Posts tagged with "windows"
npm Erroring Out on Windows 10 Fast Ring Build 14367
Just in case someone else is running into the same thing, I’m running Windows 10 Insiders Build 14367 (on the fast ring), and I’m unable to use npm. When I do a simple npm -v I get this error…
C:\code>npm -v |
My workaround is simply to type bash and get into Ubuntu where I have node and npm. There’s not really any disadvantage to this either since it operates on the same directory structure. I’m loving this Bash on Ubuntu on Windows thing.
Moving Desktop and Downloads to OneDrive
The fierce competition between online storage providers has led to where we are today. Today a consumer can store their entire life in the cloud. Okay, “their entire life” might be an exaggeration, but you know what I mean.
Do you have multiple terabytes of family photos, videos, and email archives? Yeah, me too. How would you feel if you lost them? Pretty rotten. Me too.
Maybe you already know the concepts behind basic system backups, but I’ll share some things here for context.
You can protect against a hard drive crash by backing up your valuables to a separate drive. That will dramatically reduce your chance of failure from a faulty drive, a lost laptop, an accidental format, or someone hacking into your system and deleting everything. It won’t, however, protect you from a fire, natural disaster, or perhaps a burglary. In that case, you need an offsite backup.
An offsite backup can be a little hard drive that you drop everything on and hand to a friend. And not that sketchy friend… someone you trust.
Unless your friend lives in another state, however, even this measure isn’t going to protect you from what I like to call the meteorite scenario. The meteorite in my scenario could be replaced by an earthquake, tornado, flood, or whatever else mom nature likes to bring your way wherever you live. Not that nature likes to bring meteorites my way here in Seattle. In fact, I’ve never seen a meteorite enter the atmosphere over the Emerald City, but I digress. To protect against the meteorite scenario, you need cloud backup.
Cloud backup is a bit more than just a fancy offsite backup. When you get your files to the cloud, you’re counting on a professional and commoditized backup strategy. You’re counting on the fact that your cloud provider assumes an extremely high potential value on the documents in question and creates multiple backup copies themselves to assure they don’t end up with a huge number of extremely dissatisfied customers.
It’s not without risk. It’s entire possible that any of the major cloud providers could completely goof up and lose your files. It’s a remote possibility, but the risk is there.
So in my opinion, the ultimate setup is as follows.
You keep all of your documents in your cloud storage provider of choice. I like OneDrive.
You sync some of your documents on each of your devices, but you sync all of your documents on one device with a hard drive that can handle it. You be sure that one master device - perhaps a desktop PC at home in your closet - is always on and thus syncing changes down from the cloud as you modify things from your various devices.
With that configuration, you have all of your documents locally and in the cloud. It’s all live too and doesn’t require an intermittent backup strategy.
Now more to the point.
If you’re running Windows, you have the concept of the system folders. These are the folders like Documents, Pictures, Videos, Desktop, and Downloads. They’re special folders in that they are not just a file container, but they’re also a concept. You want to store files in your Documents folder, but you may want to configure what that folder is called or where it is, and you want applications to not have to worry about where it is.
It’s similar to what happened to the paradigm of printers. A long time ago in this very galaxy, applications used to be responsible for printing. If you were an application developer, you had to create printer drivers. Now you just sort of toss your document over the wall to the operating system and say “I want to print to that one” and the common printer drivers are invoked.
It’s like that with the Documents system folder. An application might default to saving in your Documents folder regardless of where you the user have deemed that folder to live.
Perhaps you know already how to configure your Documents folder location. If not, here’s how…
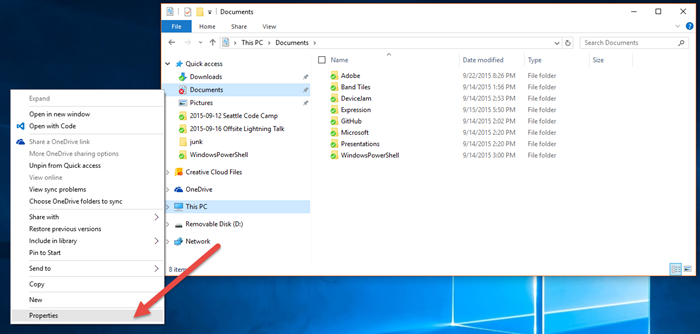
So you just right click on the Documents folder in Windows Explorer (here I’m finding it in my Quick Access list on the left) and choose Properties.
Then you go to the Location tab and change the path. To move your documents to the cloud you simply configure a path that is somewhere in your OneDrive folder (by default in c:\users{user}\OneDrive).
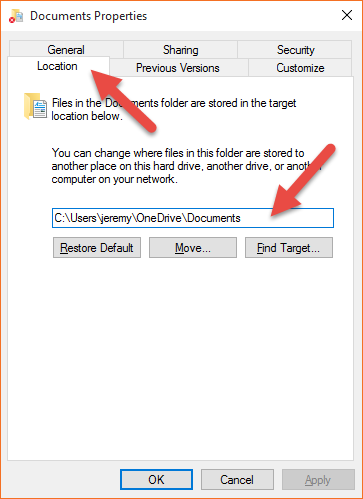
The result of this change is that now when most any application on your computer saves a document - say a letter to grandma, your tax returns, or whatever - it puts it in the Documents folder (the concept) which you have configured to be in your OneDrive. So that tax return is going to be synced to the cloud and all of your other devices.
Now even more to the point.
Many people don’t know that you can do the same thing with your all of your system folders including your Desktop and your Downloads folders.
It goes like this.
You may not yet have a folder in your OneDrive for Desktop and Downloads, so create them. Don’t put them inside your Documents folder. Just put them right on the root of your OneDrive file store. I did this on onedrive.com in my browser. Whenever I want to explicitly do something to my OneDrive files on the server I do it in the browser and essentially bypass the sync tool built into Windows.
Now, just like you did for your Documents folder, you go to Properties and then the Location tab and you change the path to your newly created folders in OneDrive. Mine are…
- c:\Users\jeremy\OneDrive\Desktop
- c:\Users\jeremy\OneDrive\Downloads
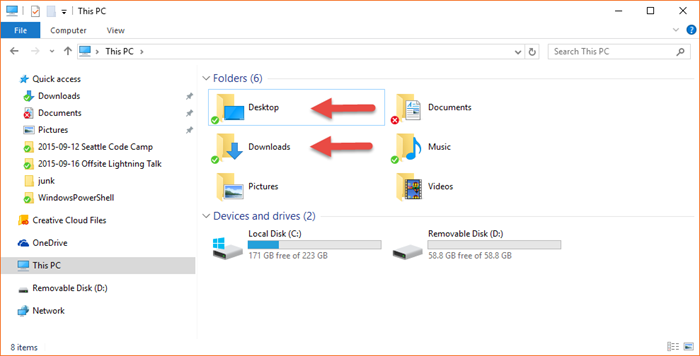
And that will do it.
Now when you download a file from internet using Microsoft Edge and it defaults to the Downloads folder and then you have to reload your machine, you don’t have to think about what’s in your Downloads folder and whether you want to back it up. It’s already done. And if you’re the type to save the really important tasks that you want to be front-of-mind to your desktop it’s the same thing. By the way, you know that guy at work with a thousand icons on his desktop? Don’t be that guy. :)
The whole goal here is to cloud enable our devices - making them as stateless as possible. You know you’re cloud enabled when a complete OS reload takes 30 minutes and you’re done.
There you go. Happy downloading.
Another app in the Store
I’m on leave but I return to work next week. I took some of my off time to write another app. It’s a quick one that is tied to a specific piece of hardware, but I have said hardware and I use this app all the time now.
It’s a webcam viewer for the Foscam FI9820. I will expand it at some point to work with more cameras and do a lot more to it, but for now I have done with I always recommend my independent developer friends do and I kept the scope very low.
The app is called CamView and I use it daily now to spy on my as he sleeps. Here’s what it looks like…
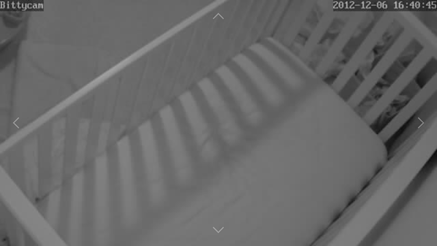
Notice the full screen view of the webcam. I like this immersive experience, because I feel like I’m actually in room looking into the crib. I wanted to create a good snap experience too since watching someone sleep is not exactly going to be captivating and one might wish to multi-task. Here’s what I ended up with for the snapped view…
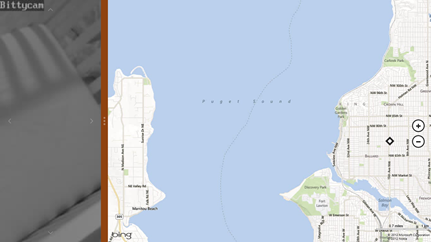
Instead of the camera’s view being restricted to a small square, it takes up the entire snap view.
Notice too the faint arrows on each edge of the screen. Those control the pan and tilt of the camera. Again, I like how direct the control is. Instead of a control panel to the side, they are right on the surface of the image.
If you happen to have this specific hardware, then you can link to CamView in the store with http://aka.ms/camviewapp.
I’m not sure what I’ll write next, but I’m ready for my next app. What are you working on and how’s it going?
Event Handlers in a Windows 8 App
One of the nicest things about JavaScript is the way it considers function. Instead of being wholly owned subsidiaries of classes, functions are as portable as any other object, and their arguments are dynamic too. This makes for some elegant event handling.
In this screencast, I’ll attempt to give you a taste of how to wire up events in a Windows 8 app using JavaScript. It’s a pretty basic scope and I don’t enumerate the many events available on the many WinJS controls. I also don’t cover the event model around gestures or manipulations, but I hope to share more about those exciting areas later.
Page Navigation in Windows 8 JavaScript Apps
I’d like to talk a bit about navigating in Metro apps using HTML/JavaScript. There are a few options for doing so, and as you probably know whenever there’s more than one way to do things, then you the developer have power but not necessarily clarity. The latter is what I hope to offer here.
First of all, the HTML/JavaScript that Metro apps are based on are identical to the HTML/JavaScript that websites are based on. It is entirely based on the standards. This is good because proprietary things are bad - generally speaking. This means that you can navigate exactly like you do in websites, but don’t. I’ll explain why not.
So you could navigate from default.html to page2.html like this…
<a href="page2.html">link to page 2</a> |
But again… you should usually do this. Doing so changes the “top level document location”. This navigation looks something like this…
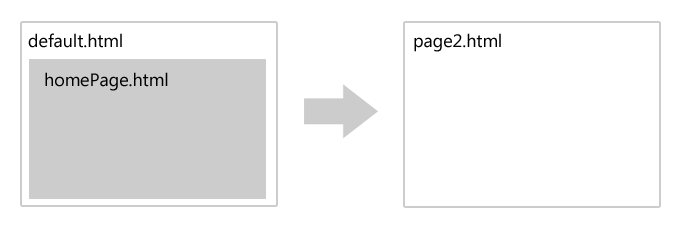
Where the user is no longer on the default.html page. For websites, it’s just fine to jump around by navigating the top level like this because you’re usually not too concerned about state, but in a full-fledged application, you usually are concerned with state and you can make your life easier by using the built-in navigation features that are provided by the VS2012 templates.
When you use the navigation functionality, a navigation looks more like this…
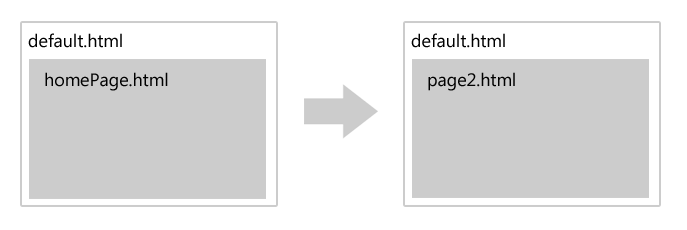
Notice that the user is still on default.html, but the contents of the second page have simply been loaded into what is called the contenthost. Now, if you loaded a bunch of script and styles on default.html and even declared some variables and set some state, you still have all of that, even though to the user it appears that you’ve navigated to a second page.
Implementing this is pretty straight-forward. Follow these steps…
Get the navigate.js script file that comes with the Navigation Application project template in VS2012. You can either start with the Navigation Application project template and notice that navigate.js is already in your js folder, or you can create a throw-away Nav project and steal that file.
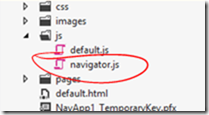
Reference the navigate.js from your default.html file…

Add a contenthost to your default.html file
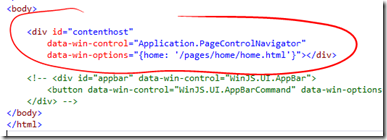
And that’s it. After this has been implemented, then you are free to do things in your JavaScript like this…
WinJS.Navigation.navigate("/pages/page2/page2.html"); |
And you have the chance to pass some parameters without having to resort to query string parameters which can be cumbersome and restricting. To do this, you can pass a second parameter to the navigate function like this…
WinJS.Navigation.navigate("/pages/page2/page2.html", myDoohicky); |
…where myDoohicky can be any JavaScript object you want.
Now, when might we actually perform this navigation? Well, in many cases it will be on some user action. For instance, let’s say the user is going to click a button and we want to navigate them to page2.html. Let’s see what that would look like…
HTML
<button id="myButton">go to page2</button> |
JavaScript
ready: function (element, options) { |
Now let’s look at a bit more pragmatic example. Let’s say we are working in a grid (WinJS.UI.ListView technically) and when the user touches one of the tiles, we want to navigate to a second page with more details about that element.
This can be wired up much like the simple button example above, but likely the elements in our grid are data bound from some list that we have. In that case, perhaps the easiest way to implement this is by adding a function to the list and then bind the click function just like any of the data elements are bound. Here’s an example of that…
HTML
<div id="headertemplate" data-win-control="WinJS.Binding.Template"> |
JavaScript
ready: function (element, options) { |
Now, there’s a lot going on in the JavaScript file there, so let me break it down for you. First of all, I pulled this example from another post I did on creating a Netflix browser app utilizing their OData feed. If you want to know what’s going on with the call and the data binding, go check that out.
I added to it though. I changed what happens in the forEach loop. The reason I did is to illustrate how to bind to a function like you bind any other data property. Look in the HTML at the div just below the one with the id of template. I’m binding the onclick attribute to the clickFunction. That clickFunction is what I created in the forEach loop of the JavaScript. Notice, though, that there’s one funny thing we need to do to it. Since we are using this in the HTML it could be exploited and so we turn on strictProcessing for our app and that requires us to set _supportedForProcessing_ on any functions that we are going to call from the HTML. So, we set that to true for our function and we’re good to go.
I hope this brings the concept home for you. If you have questions, leave a comment below and I’ll be glad to try to help.
Metro on an Alternate Monitor?!
You know those sonic noise guns that you can shoot at people and they supposedly just stop in their tracks because it’s physically disorienting? I felt like I got hit with one when I ran across this little nugget.
Want to move your Metro experience from your primary monitor to another screen - say your second (or fourth) monitor or even to the projector for a show? I’ve been told that the start menu appears on the primary monitor (without resorting to the simulator). Period. But that’s not the case! look up thank God
If you press WIN + PGUP/PGDN, you can change which monitor the start menu and all Metro apps appears on. Now that’s awesome! Until now, I was resorting to the simulator for getting my icons on my second monitor or projector to show people. News must spread. Tell everyone.