App Development
App States and Activation Kinds
Process Lifetime Management (PLM) is also known as the Application Lifecycle, but don’t confuse it with Product Lifecycle Management (also PLM) or with the general Application Lifecycle Management (ALM).
By Microsoft’s conventional definitions and in the best of my understanding, Process Lifetime Management and Application Lifecycle are one and the same, are defined (for Windows 8) here, and are defined as such…
This topic describes the lifecycle of an app, from the time it is deployed through its removal. By suspending and resuming your app appropriately, you ensure that your customer has the best possible experience with your app.
The means by which an app developer considers and targets the lifecycle of an app is well documented on the above page and in a few other blogs I found with some easy searching, so let’s consider that outside the scope of this quick study.
I’d just like to define some terms and share a little utility I made to help you understand what’s happening and when. Emphasis on the word little please.
The application’s state is one of three logical values: Running, Not Running, or Suspended. That’s easy. And the values are easy to understand when you look at this diagram…
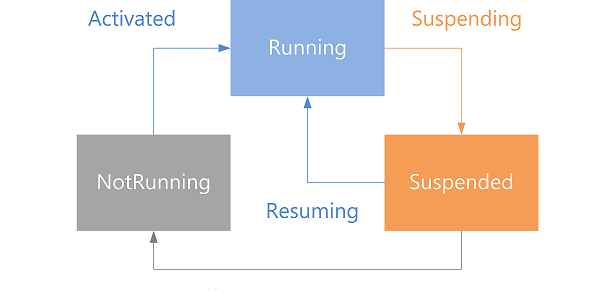
But the actual states that an app can be in are actually enumerated (in JavaScript) in the ApplicationExecutionState object as notRunning, running, suspended, terminated, and closedByUser.
When you’re writing code for your app - even in the onactivated function that lives by default in the default.js file of your project - the value of the app’s state isn’t all that helpful, since it will always be running.
But what you might be interested in is the applications state the last time the app was running - you know, before it got activated. And that’s available in the onactivated function under args.detail.previousExecutionState. You might need to know this to, for instance, determine that Windows had to terminate the app due to resource constraints.
The other value you’ll be interested in when your app gets activated is the activation kind. The activation kind is the means by which this app was launched. At first, you might wonder how an app can be launched besides you touching the app tile on the start screen. There are a myriad of ways though let me assure you. In Windows 8.1, there are 23.
In the simple case, your app was launched by the user, so the value of the args.detail.kind variable is simple launch (actually it’s the integer value of the Windows.ApplicationModel.Activation.ActivationKind enumeration), but the user may also have executed a protocol handler that is registered to your app (protocol), opened a file whose type is registered to your app (file), launched your app via Cortana (voiceCommand), or one of 19 more.
And now the little utility.
LifeCycleState is on github at github.com/codefoster/LifeCycleState.
Run it and it simply shows the previous app state and the means by which the app was launched. Something like…
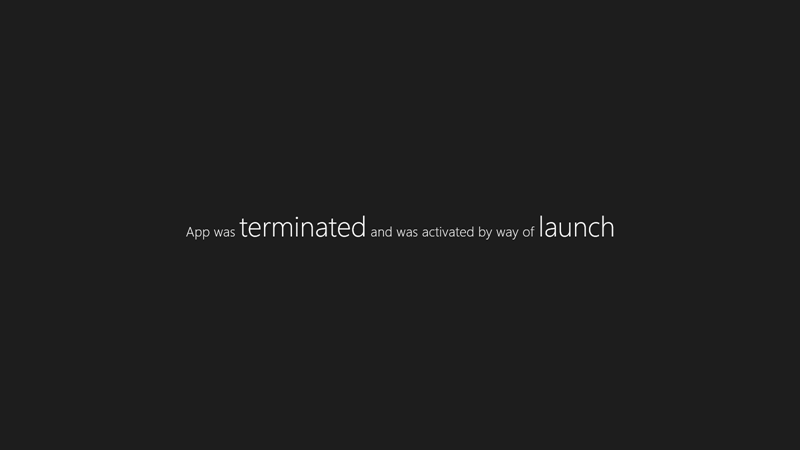
Hopefully it’s helpful for understanding the different states and activations kinds there are and when or how you trigger them. Run it through a few scenarios such as opening the app. Try switching to another and then back (activation does not occur). Try using various means of closing the app (ALT + F4, swipe from the top, swipe from the top and hold at the bottom of the screen until the tile flips, mouse click the X in the top right, etc.). Also, don’t forget about the Lifecycle Events that you can trigger using Visual Studio. Look for this button…

There you have it.
Don't Make Your App Boil the Ocean!
I you haven’t dived into the app marketplace, what are you waiting for?
If Flappy Birds can bring in so much attention and cold, hard cash, who’s to say you can’t crank an app out in a weekend and be a contender.
I’ll give you one simple tip in this blog post. One tiny tidbit of information that just might spell the difference between you getting an app out the door and not.
I’m not going to advise that you take a certain course or watch a few hours of online video or go back to school or hire a marketer or a business manager. It’s much simpler than that and cheaper too.
Make a simple app.
Reduce the scope.
If you reduce the scope of your project to something simple you will be doing yourself and likely your potential users a favor. Your app doesn’t have to boil the ocean. It doesn’t have to do everything. Some apps do everything in the world, but they’re run by big teams and developed over long periods of time. They’re not usually done in free evenings and weekends. And despite this fact, they might not make as much money as some runaway success apps.
Don’t be a perfectionist.
If your app has a glitch, someone will find it. If you’ve provided support information (which you should), then someone will let you know. You’ll fix it. Your users will feel like they’re using a dynamic app from an attentive developer and they’ll be more apt to use your stuff. Nobody is expecting your app to be perfect and polished right out of the shoot - unless you’re Facebook or Vine or something.
Follow up.
Don’t fire and forget your app. Put it out there and then babysit it. Keep an eye on the downloads, the ratings, and the reviews. If nobody is talking then track some people down and ask them explicitly to try it and give you some feedback. Tell them you’re looking to improve it. If they have only good things to say and start using, then you’ve got a good product that you can market. If they don’t find it relevent or useful then shift to something else. If they find issues then fix them.
The nice thing about these apps as a form of modern, digital expression is that your artwork is alive and within reach. Unlike an oil painting it’s not out the door and out of reach. You get to iterate. It’s less like a bullet you fire and then pray hits its target, and more like a torpedo. Launching it is only the beginning. From there you get to track it, track your target, correct the course, and hopefully, eventually watch it go BOOM!
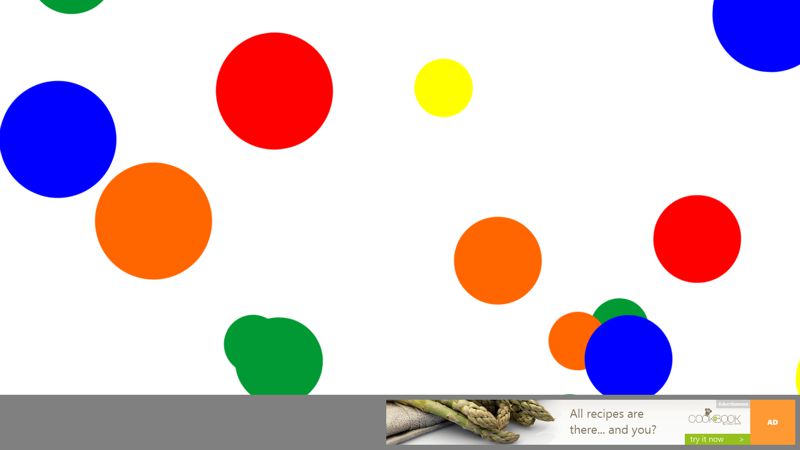
I just put an app in the Windows Store called KidSuite Pop. It’s about as simple as it gets, yet I know that there’s at least one user in the world that absolutely loves it. That’s because I made it specifically for him. My son is rather fond of spending free minutes popping virtual bubbles on the Surface while confidently calling out the colors - “RED” pop “BLUE” pop “YEDDOW!” pop
If this tyke finds it fun, I’m hoping a few other tiny fingers will open it and tiny eyes will ignore the ads while still earning me money for his college tuition.
KidSuite Pop in action…
Where to Start
There was a feature of Windows 8.1 Preview that opened the Start Screen on whichever screen you were actively using. This drove me nuts. I expected my Start Screen to be on a certain screen. The constancy is important and I also wanted it to appear on the touchscreen of my laptop, not my external touchless monitor.
In the final release of Windows 8.1, however, this is configurable.
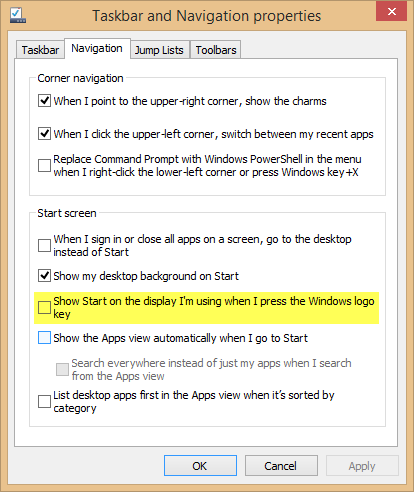
Simple right click your task bar, choose properties, go to the Navigation tab and uncheck the box for Show Start on the display I’m using when I press the Windows logo key.
Push Notifications for Specific Users
I received a question that I’d like to turn into a blog post for the benefit of the masses. I’ve gotten this question a number of times in the past.
_Is it possible to do push notifications to all users/only a specific user/only a specific set of users? _
The answer to all three questions is yes.
Push notifications are performed by Microsoft’s Windows Notification Service (WNS). It’s a server in the cloud somewhere, so obviously if it’s going to send a push notification to a user’s device, it’s going to have to have some identifying information. Specifically, it needs to know the unique device and the unique user. A device can be used by multiple users and users can use multiple devices, so the combination of the two is essential. This identification is handled by something called a _channel URI. _
Your app gets a channel URI from the Windows API. Your app says (usually right when your app starts) “Hey, Windows, can I have a new channel URI?” Windows comes back to the app with a channel URI that is good for 30 days. From that point on, you (the app developer) is responsible for storing that channel URI value and later retrieving it to communicate with that specific user/device.
So, to answer this question, we need to talk about the recommended strategy for managing these channel URIs. Fundamentally, you need to store the channel URI along with an optional association with the user (assuming you’ve authenticated the user and have an ID) and an optional association with the current device (assuming you’ve generated a device identifier). As long as you have stored this association, you’ll be able to target your user, your user’s device, or the combination thereof.
Here’s how I recommend you do it (roughly).
The first time your app starts, you generate a device ID (a GUID) and store it in local storage (not roaming!). Look for this ID on each app start and don’t regenerate it if one already exists.
Each time your app starts, request a new channel URI. They’re good for 30 days, but you don’t want to implement reuse logic when there’s no reason. Fetching a new channel URI is an easy and cheap operation.
Each time your app starts, authenticate your user.
Store the channel, user, and device IDs in Azure Mobile Services (or another service if you’re okay with not using the coolest backend service on the planet) in tables. For ultimate flexibility, create three independent tables and use foreign keys to keep the relationships. For ultimate ease where you can assume one user has one device and one channel (at a time), store them all in the users table.
You may, obviously, have other information in the users table about when they last logged in, where they live, what type of user they are, or whatever. You can filter the users table any which way you want and you then have a great list of channel URIs to do push notifications to. You can actually use Azure Mobile Services to do filter the table, loop the results, and perform the push very easily.
For a complete example on how to do this, download codeSHOW (codeshow.codeplex.com) and check out the WAMS push demo. You can see the code and run the app and see the results as well.
Happy notifying!
Loading States of the WinJS.UI.ListView
If you make Windows 8 apps using HTML and JavaScript, you are definitely going to be chums with the WinJS ListView control. It’s the fundamental list control. You use it to create item grids as are so typical to Windows 8 apps, and you use it as well for lists - more vertically item lists like you might often find in the snap view of various apps.
The ListView is a rather rich control that does a lot of layout for you and offers you a lot of rich functionality as well. It can be bound to a list of data and then can load asynchronously for performance and responsiveness and also conditionally so you can selectively choose item templates or render methods.
It’s often times important to find out what the ListView is doing so you can coordinate some of your own custom functions.
The ListView has a loading process that has various milestones or loading states - each of which fires the onloadingstatechanged event and includes the exact loading state. You can wire in to this event, figure out which loading state the ListView is currently in, and do something of your own.
As an example, let me show you something from my codeSHOW app. In case you aren’t familiar, codeSHOW is a Windows 8 app for learning how to make Windows 8 apps using HTML and JavaScript. You can download it from the Windows Store at http://aka.ms/codeshowapp or download the full source code for the app from http://codeshow.codeplex.com.
In codeSHOW, the user may choose from a large list of demos, spend a little time using the chosen demo, and then click back to return to the home page. When the user returns to the homepage, it would be convenient to recall their scroll position so they don’t have to keep finding their place each time.
Here’s how it was implemented in codeSHOW.
When the user chooses a demo, the WinJS navigation framework unloads the home page and loads the demo page. In the unload event of the home page, I added…
app.sessionState.homeScrollPosition = demosListView.scrollPosition; |
This adds the scroll position of the ListView to the sessionState. This means that even if the app crashes or the user switches away and lets it get suspended, the scroll position is going to be saved for later recall.
Now, when the user returns to the home page by pressing the back button from the demo page, the following code fires from the ready event…
demosListView.onloadingstatechanged = function () { |
This hooks up an event handler for the `onloadingstatechanged event, so that each time the loading state changes, we have an opportunity to intercept, check to see if the loading state is a certain one, and do something.
In this case, we’re checking to see if the loading state of the ListView is “viewPortLoaded”. Some experimentation told me that after the viewPortLoaded state is reached, the ListView has fleshed itself out enough that a setting of the scroll position will actually work. If you try to set the scroll position before the ListView gets to this loading state, the ListView will have no width and thus setting the scroll position will be a futile effort.
Here are all of the loading states of a ListView in order…
-
viewPortLoaded -
itemsLoading -
itemsLoaded -
complete
So if you need to do something only after the entire ListView is loaded, you would use code similar to my last listing, except check to see that the loading state is “complete”.
I hope this helps. Keep having fun with your web development in Windows 8, and if you’ve got a cool app you’re working on, send me a tweet and I’ll mention your project.
Stayin' Alive
Of course now that you’ve seen my post title, you’re going to have the Bee Gees stuck in your head for the foreseeable future. Sorry about that. I’m actually not talking about the song at all, but rather about getting your Windows 8 app to tell the system that something happening and it should not go to sleep.
You have to use good judgment here for obvious reasons. Keeping your users system alive is obviously going to peg their battery and may disappoint. Often times, however, it’s exactly the functionality the user wants. Who wants to start a video and then have the system lock 5 minutes in?
The app I’m working on that this applies to is called CamView (http://aka.ms/camviewapp). It shows a web cam, and my wife and I use it to keep an eye on our 10 months old son as he sleeps. When we bring him up on the big screen TV, we don’t want the system to lock. We want it to stay alive. So there’s our use case and the solution is simple. I’ll show the implementation in JavaScript of course, but the C# is practically identical.
First of all, I add this in my default.js page outside of the immediate function so it’s available to my entire app.
var app = WinJS.Application; |
Then on the page that shows the webcam image I do this…
app.dispRequest = new Windows.System.Display.DisplayRequest; |
This line takes advantage of the dynamic nature of JavaScript and adds the dispRequest property to the app object though it didn’t exist before. It then instantiates the dispRequest to a new instance of the DisplayRequest from the Windows namespace.
In the page’s ready method, then, I can call…
app.dispRequest.requestActive(); |
Which will tell Windows that my app is currently doing something that should block the default locking behavior and stay alive.
The “being a good citizen” part starts here. You’ve told Windows when to stay alive, but you also need to tell Windows when you’re done staying alive. You would do this anytime the user leaves the screen with video, anytime the video stops or pauses, or generally anytime you can. My webcam view page doesn’t have any kind of stop or pause, so I’m just disabling the requestActive as soon as the user navigates away from the page. I put that in the unload event for my Page object, and it goes like this…
unload: function() { |
It’s yet another simple task that helps add up to great user experience. It’s a matter of sweating the small stuff and considering every little nuance of your app that might delight the user. Now let’s hope I make my millions off of CamView so I can retire.
Another app in the Store
I’m on leave but I return to work next week. I took some of my off time to write another app. It’s a quick one that is tied to a specific piece of hardware, but I have said hardware and I use this app all the time now.
It’s a webcam viewer for the Foscam FI9820. I will expand it at some point to work with more cameras and do a lot more to it, but for now I have done with I always recommend my independent developer friends do and I kept the scope very low.
The app is called CamView and I use it daily now to spy on my as he sleeps. Here’s what it looks like…
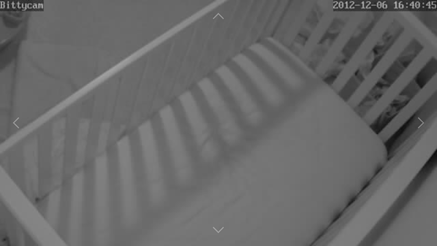
Notice the full screen view of the webcam. I like this immersive experience, because I feel like I’m actually in room looking into the crib. I wanted to create a good snap experience too since watching someone sleep is not exactly going to be captivating and one might wish to multi-task. Here’s what I ended up with for the snapped view…
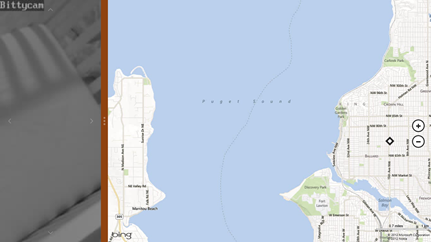
Instead of the camera’s view being restricted to a small square, it takes up the entire snap view.
Notice too the faint arrows on each edge of the screen. Those control the pan and tilt of the camera. Again, I like how direct the control is. Instead of a control panel to the side, they are right on the surface of the image.
If you happen to have this specific hardware, then you can link to CamView in the store with http://aka.ms/camviewapp.
I’m not sure what I’ll write next, but I’m ready for my next app. What are you working on and how’s it going?
Anatomy of a Push Notification
I can hardly stand not knowing how something works under the hood. More often than not, I’d rather have a working knowledge of a system than the convenience or function of the system itself. It’s why I chased degrees in Computer Electronics and Computer Engineering in the first place. I don’t know so much about all of the fancy things that engineers put into processors and primary system boards these days, but I’m relieved to have at least a fundamental understanding of a control bus, a machine clock, a MOSFET, an assembly program, and the higher level software abstractions. But I digress…
What I want to talk about right now is the anatomy of a push notification message. I was intimidated by the subject when I was first introduced to it, but I’ve climbed on top of the general concept now and feel confident enough to post on the matter.
I do have to say that I’m pretty excited about the convenience of Windows Azure Mobile Services (WAMS) abstractions over the process, but I don’t want to use it blindly without understanding what it’s doing under the hood. I’m going to start with a review of the process and players in a typical push notification. You can find this diagram and an overview of the process here.
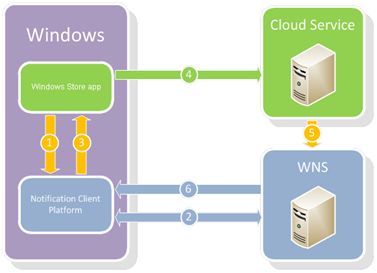
The green is you and the blue is Microsoft. You are writing an app and you are responsible for a cloud service to communicate with WNS.
In my typical attempt to make complex sound easy, I’m going to walk you through this process.
Steps 1-3. Your app asks Windows for a channel.
You ask Windows for a channel, Windows asks WNS (this happens transparent to you), and then Windows gives you a channel. This channel is just a string. Here’s a sample URI with an ellipse since it’s actually much longer.
https://bn1.notify.windows.com/?token=AgYAAABrcyAqFeh...wfOG5%2bD4TCeHU%3d
By the way, the channel that Windows gives you also includes an expiration time which may be helpful.
Step 4. Your app sends this URI to your cloud service
You can use whatever means you choose, but I would hope that you’d find a smart and secure way to do that. A potential attacker would have to get this URI and also your Package Security Identifier and Client Secret in order to start sending malicious app notifications, but still.
Step 5. Your cloud service asks WNS (Microsoft’s server) for an access token and then triggers a push
Here’s where the bulk of the “magic” happens. Your service does two HTTP calls. The first gets it an access token (which you’ll likely want to cache), and the second (and subsequent) initiates a push to your app. WNS knows where your app is because of the URI that you sent it.
Here are examples of those two raw HTTP messages…
First message
POST /accesstoken.srf HTTP/1.1 |
It’s just a simple POST to login.live.com/accesstoken.srf. The client_id is actually the Package Security Identifier (SID) that you get from your developer dashboard at http://dev.windows.com, and the client_secret is the Client Secret that you find in the same place.
The response to a successful access token request is something like…
HTTP/1.1 200 OK |
With that, your service has what it needs to submit notifications to be pushed to your app.
Second message
Your service has the access token and that’s all it needs to issue requests for WNS to push to your app.
Here’s a push message that changes the text on your tile…
POST **https://bn1.notify.windows.com/?token=AgYAAABrcyAqFeh...wfOG5%2bD4TCeHU%3d** HTTP/1.1 |
Notice a few things about this message…
- Just like the request for an access token, this is a secure post to https
- The message is sent to the channel URI
- You can find valid values for the Content-Type and X-WNS-Type headers here
- The Authorization header always has that word Bearer, a space, and then the access token received from the first call
Step 6. WNS sends the notification to your app
This step is all on WNS and Windows and you don’t have to do anything except for verify that the process worked.
And there you have it. You can find numerous services that wrap this process for you and make it easy, but now you know the guts of what’s going on under the hood. It’s not exactly something you want to try to explain to your mom, but it’s not exactly quantum physics either.
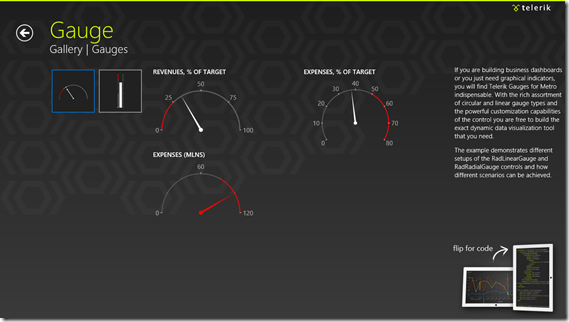
Well done, Telerik
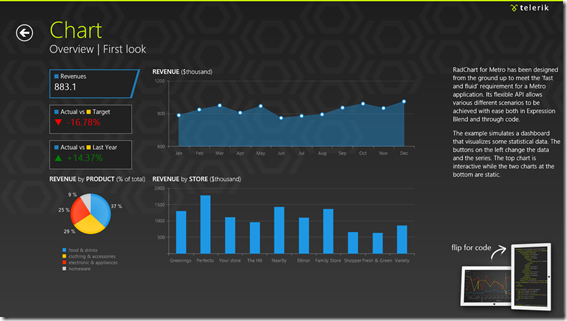
If you haven’t seen Telerik’s Windows 8 controls, you should check it out. Just go to telerik.com and install the trial and then open the demo app (there’s one for HTML/JS and one for XAML/C#) in Visual Studio and launch it.
Their presentation is awesome and the controls themselves are way cool. They’re simple and clean and have just the right amount of animation – enough to make them look alive but not so much they look brassy.
Super Simple Swipe Sections
Yesteryear we used tabs in UI. The problem with tabs and similar navigation aides is that they demand pixels to tell users about where they might go, whereas, good Windows 8 design tells users about where they are.
If you’re on a page that shows multiple entities or sections or parts or whatever, just hint to the user that there’s more off the page by giving yourself a left margin but cutting content off on the right.
I made a pretty simple way to do this for a Windows 8 app and you’re free to steal it.
Just add this to your default.css…
/*Swipers*/ |
Then add class='swiper' to the main section on your page (the one that has a role of main)…
<section aria-label="Main content" role="main" class="swiper"> |
..
You might want to give you main section the standard 120 pixel left margin like this…
.myPage section[role=main] { |
Then give it contents something like this…
<section aria-label="Main content" role="main" class="swiper"> |
Notice a few things…
- the swiper’s immediate children can be any type of element (*). I’m using divs in my example.
- the children will be 80% and have 80% snappoint intervals. This is so that the content from the next page will show up on screen and hint to the user to swipe and see more
- there is an extra at the end. This is necessary for being able to snap to the last section with a swipe gesture
- each section has a header (h2) and it will automatically have the correct 20 pixels under it
That’s it. I hope it comes in useful to you.