The Authoring Workflow in Hexo
In hexo, there’s a really nice workflow for creating a new post. There are docs on this, but who needs docs when we’ve got bloggers, right?
First, in the main project, make sure the /scaffolds/draft.md is the way you like it. Here’s mine…
--- |
Notice how the date is excluded. If you’re writing a draft post, you don’t know when you’ll publish it yet, so you likely want to leave that off. It gets populated automatically a little later. Read on.
Then make sure your /scaffolds/post.md is the way you like it. Here’s mine…
--- |
It looks just the same, but there’s a date there.
Now here’s what my workflow looks like every time I create a new blog post.
- At the command line type
hexo new draft foo - Switch to Visual Studio Code (or your markdown editor of choice)
- Edit the
foo.mdfile that should be in your/source/_draftsfolder - Back at the command line type
hexo publish foo
When you created the initial draft, it created in the _drafts folder which doesn’t get generated, so it’s not going to make it to your website yet.
When you published it, hexo moved the markdown file from _drafts over to _posts and added the current date and time.
I think that’s a slick workflow and I’m very happy with it.
Move to Hexo
I just finished migrating all of the content on codefoster.com over to my fifth blog engine!
To date, I’ve run codefoster.com on Wordpress, BlogEngine.net, Lemoon, BetterCMS, and now Hexo.
Hexo, unlike the others, is a static site generator. That means that the work of building pages out of content is done as a build step before the site gets deployed, and the deployed site is actually just a bunch of HTML files. That makes it fast, secure, and searchable. You may have heard of Jekyll - a quite popular site generator that works much the same.
When I first heard about static site generators some time ago, I was actually quite skeptical, but the idea started attracting me more and more. Then when I discovered that Hexo uses Node.js, I decided to give it a shot. I love node.
Hexo was easy to get started with. I went to hexo.io and started learning about all of its capabilities to make sure it would cover my needs, which are…
Need 1: Easy Authoring. I was never as big a fan of Windows Live Writer as so many others were. It just felt like too much behind-the-scenes magic happening. In a static site generator, you author in markdown. A markdown file is a simple text file that uses simple codes for formatting instead of HTML mark_up_ which is rather robust. For example, instead of using
<b>strong type!</b>to bold a word, you use**strong type!**. Furthermore, instead of a table looking like…<table>
<thead>
<td>H1</td>
<td>H2</td>
</thead>
<tbody>
<tr>
<td>A1</td>
<td>A2</td>
</tr>
<tr>
<td>B1</td>
<td>B2</td>
</tr>
</tbody>
</table>It looks like this…
H1 | H2
--- | ---
A1 | A2
B1 | B2
The best markdown when you write on developer topics like I do is the backtick (`). If you use single backticks inline like `let x = 10;`, you get inline text that’s formatted like code like
let var x = 10;. If you surround an entire code block with three backticks, you get an entire code block, and if you add a language code (js, csharp, html, etc.) after the opening backticks, you even get correct color syntax for that language.Need 2: Custom Web Magic. I’m a web guy, and my blog is an authoring platform on the web, so I should be able to write HTML (even though I’m authoring in markdown), sprinkle in custom CSS, and add JavaScript at will.
Markdown inherently permits inline HTML. It neither complains nor modifies it. Same with embedded<style>blocks or references tocssfiles. It also allows me to pull in JavaScript that will run client-side.Need 3: Themes and Plugins. I like web design, but I like it more when it’s done for me and I can just tweak it to my liking. There are a lot of really good themes for Hexo. I also like being able to extend the functionality of my site quickly and easily with plugins. Hexo has plugins too.
I am using the chan theme for codefoster.com right now, but of course it would be trivial to switch.
Installing themes and plugins is as simple as a familiargit clonecommand. You pull down the files from GitHub, you may need to add a little bit of configuration in your site’s_config.ymlfile, and you’re good to go.Need 3: Alias support. I think there’s a lot of value in a good, short URL. The URL for this post, for instance, is simply
codefoster.com/movetohexoas opposed to a URL that a lot of blogging platforms will default to that might be more likecodefoster.com/2016/12/14/Other/Move-to-Hexo. That’s easier to remember, easier to share, easier to type, and easier to look at.
Since, like I mentioned, I’ve changed blog platforms 4 times, I have a number of legacy URLs that are important to maintain. Some of the platforms forced the longer format. Sometimes I just didn’t know how to configure it to be shorter. Regardless, I need to redirect people. I need to redirect them from the old slug to the new.
I also need to redirect folks from short URLs in my domain to external websites. For instance, if you go to codefoster.com/codechat/codegalaxies, you’ll jump out of my domain to Channel 9 to watch an interview I did there.
Hexo allows both of these redirects with easy configuration. This functionality is available, actually, thanks to a plugin called hexo-generator-alias.Need 4: Local Authoring and Local Serving. I want to be able to work on blog posts whether I’m connected to internet or not, and I want to be able to visualize the results quickly and easily.
Hexo allows me to run theservercommand to create a local server for my files in watch mode, so I can see the changes in my browser very shortly after making them in my IDE.
All in all, I’m thrilled with my choice of platform and am looking forward to figuring out more of the capabilities.
Drop a comment in the thread below (just opened up guest commenting by the way) if you have feedback, if you have another blog engine that you use and love, or certainly if you’re using Hexo too and want to share some advice.
Happy blogging!
ADDENDUM 1 (2016-12-16)
Someone pointed out that it would be good to share how I migrated my content from my old blog to Hexo. Great idea.
If you browse to hexo.io/plugins and search for “migrate” you’ll see that there are migrators for:
- Blogger (
hexo-migrator-blogger) - GitHub Issues (
hexo-migrator-github-issue) - Joomla (
hexo-migrator-joomla) - RSS (
hexo-migrator-rss) - Wordpress (
hexo-migrator-wordpress)
I was using a little-known, ASP.NET-powered blog engine called BetterCMS that was actually quite wonderful, although I think I made it clear that I wanted something lighter. There’s obviously not a migrator for BetterCMS, but I did have an RSS feed, so I used that.
I was beyond pleased with the results. I was actually a bit shocked at how simple it was to run and how effective it was in migrating the majority of my content to markdown.
To migrate using the RSS migrator (and I assume the process with the other migrators is much the same), I simply ran at the command line from the root directory of my hexo site npm install hexo-migrator-rss and then hexo migrate rss http://codefoster.com/rss. I didn’t use the optional --alias argument, but if it works as designed it would have been a good idea, because I spent a considerable amount of time doing it manually afterward. The --alias argument is supposed to add alias: tags to the top of each post that allows existing blog URLs to be redirected to their new URL.
There was quite a bit of work to do in my markdown files after migration, but all of it was very much expected. It surrounded my code blocks with backticks, but I had to determine where I wanted inline code and where I wanted to use three backticks and a language designation to get a code block. I also discovered that the language designations are rather important since without them, the tool that formats your code either has to format it as generic code (fixed width font) or spend considerable cycles attempting to detect the language.
The Git Add Patch Command
When you’re using Git for your version control, each commit should be atomic and topical. That is, it should contain related changes and nothing but related changes.
You don’t commit something broad in scope like “changed all the necessary files to implement feature 712”. That’s what a branch is for. Instead, you commit something like “added fetch() method call to the orders page”. That’s likely just one small part of feature 712. A whole bunch of commits end up implementing the feature.
But what about when you’re working away like crazy on your code base and you end up changing a single file in two different places and these two changes relate to different commits? Most people just go ahead and roll the changes into the same commit. Not ideal.
The hard way to do this right is to delete one change, stage and commit, and then paste the change back in.
There’s an easier way though. It’s called a patch add, but I like to call it a partial add. git add -h will show you the -p argument and inform you that it allows you to “select hunks interactively”. As much as that sounds like an online dating service for women, its actually just a really easy way from the command line to stage portions of a file and not the entire file.
Let’s say we start with this file…
//foobar.js |
Now let’s say I end up editing both of the functions in that file, but these changes are unrelated to one another. I simply changed foo to foo foo and bar to bar bar. Let’s look first at using the command line to take care of business here, and then we’ll try it with Visual Studio Code.
Here’s the changed file contents…
//foobar.js |
Command Line
Type git diff…
C:\scratch\foobar [master]> git diff |
Now to actually start the staging command, we type git add foobar.js -p and get the same diff along with these interactive options…
Stage this hunk [y,n,q,a,d,/,s,e,?]? |
There are actually a few more options than what are listed there too. You can type ?<enter> to get help on what those mean, but to spare time they are…
| Command | Action |
|---|---|
| y | stage this hunk |
| n | do not stage this hunk |
| q | quit; do not stage this hunk or any of the remaining ones |
| a | stage this hunk and all later hunks in the file |
| d | do not stage this hunk or any of the later hunks in the file |
| g | select a hunk to go to |
| / | search for a hunk matching the given regex |
| j | leave this hunk undecided, see next undecided hunk |
| J | leave this hunk undecided, see next hunk |
| k | leave this hunk undecided, see previous undecided hunk |
| K | leave this hunk undecided, see previous hunk |
| s | split the current hunk into smaller hunks |
| e | manually edit the current hunk |
| ? | print help |
Which to choose? Well, the diff that we see on the screen shows both changes. That’s too much. So we want to press s to split this hunk. That gives us…
Stage this hunk [y,n,q,a,d,/,s,e,?]? s |
…where now only one of the changes remains and we have our same interactive prompt.
The change we’re looking at is entirely related and should be in a single commit (along with possibly some other files). So we press y to stage it and then q to quit and we’re finished.
Visual Studio Code
Now let’s do the same thing using Visual Studio Code. This and a few other git-enabled IDE’s are smart enough to let you do a patch add. VS Code doesn’t call it a patch add though. It calls it staging selected lines, which actually makes good sense.
Start with the same file and changes, and view the changed file in VS Code and you should see…
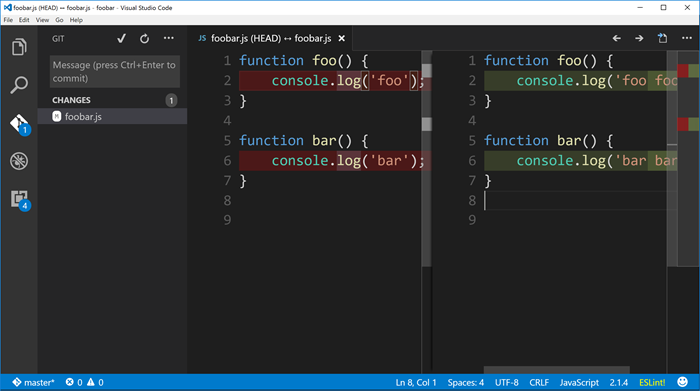
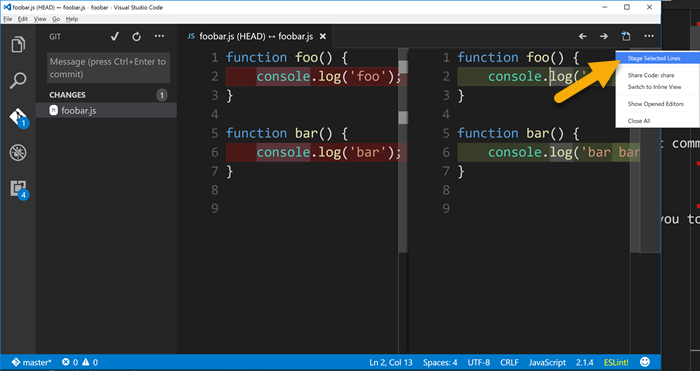
Now just put your cursor anywhere within the first change in the pane on the right and then find the little ellipse (...) on the top right corner of the window. From there choose Stage Selected Lines.
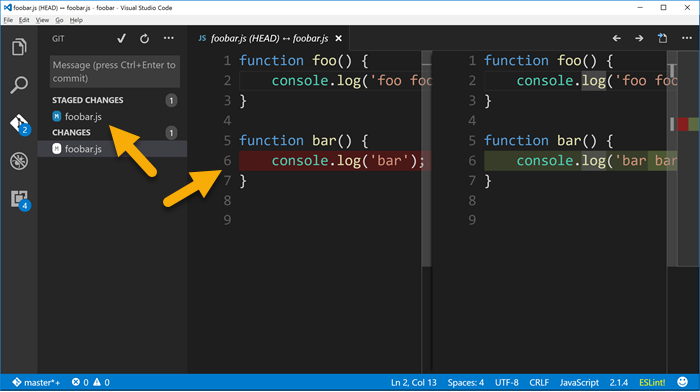
And then if you look in the Git panel, you’ll see that the foobar.js file has been staged but it also has changes that have not yet been staged.
Whether you used the command line or Visual Studio Code to stage that first change and commit, you can just go about staging and committing the rest of the file as you normally would.
The end.
Guest Commenting on codefoster.com
I just opened up guest commenting on codefoster.com.
I’m generally in favor of identity on the web and generally not a huge fan of anonymity. Pretty much every anonymous forum I’ve been to online is littered with the darkest parts of mankind. It’s a sad state really.
So consider this an experiment to see if anonymity will encourage good community on codefoster.com and if manual comment moderation is feasible and sustainable.
We’ll see. Please comment :)
The Regatta Project
My role at Microsoft is that of an evangelist, and that implies that we speak broadly to audiences about technology. Recently, however, my team is working one-on-one with organizations on exciting new Microsoft technologies - making sure they’re exactly what developers need.
One of the projects I’ve been working on recently is called Regatta championed by Baiyin Zhou (@baiyinvc) from Boston.
This entire idea is super fun. Imagine exercising on a rowing machine in a studio in a group session. Now imagine a visual on the wall depicting your rowing machine and those of the other session participants as real boats. As you heave and ho, you see your little boat moving across the screen.
There are just so many awesome scenarios that are possible at this point.
The visual of the boats alone is encouragement for you to work harder to compete against others in the class. But that’s pretty obvious isn’t it. What about the less obvious scenarios? What about being able to add in a phantom boat that represents the group’s average from yesterday’s workout? Now you’re not competing against your fellow rowers - you’re competing with them. You have to beat that phantom boat!
As soon as things in the real world - like our efforts to stay in shape - are digitized and turned into data, we get to do things like capture our progress, integrate with other fitness tracker systems, or even do data analysis to determine some deep learning from it.
This is the type of concept where digital systems really have an opportunity to affect our lives for the better. I keep saying that technology is not so interesting unless it improves our lives. For being such a technophile, I’m actually quite the skeptic, because all too often technology just gets in the way.
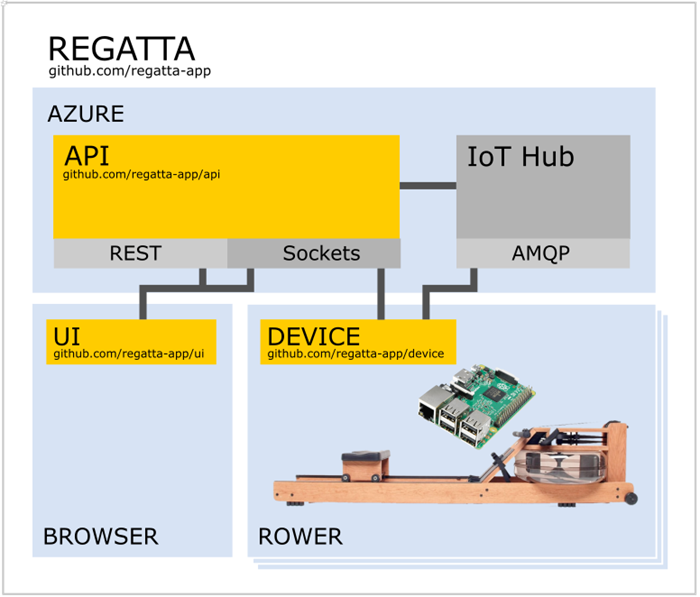
The Regatta Project envisions a future with a whole lot of rowing machines deployed with smart devices (the Raspberry Pi Zero at this point) attached to them, and assuring good communication with all of these devices is a great job for Azure IoT Hub.
Go check out the details of the [Regatta](https://microsoft.github.io/techcasestudies/iot/2016/12/10/regatta.html) project and let me know what you think with a comment below.
5 More Posts
Blogging is a chore. Writing in general is a chore. It’s not easy to formulate thoughts and put them into words. I have a ton of respect for prolific authors that generate volumes in their lifetime, because that’s a phenominal feat.
I just looked at my blog statistics and I’m woefully low for the year. I have only blogged 14 times in 2016 so far. That’s barely over once per month, whereas I should be creating a post at least every week. I started off in 2012 with 87+ posts, and have tapered down to last year (2015) at only 19. I’m ashamed.
My desire is to write though. I write for you, my reader, but I certainly write for me too. It’s a great discipline and as any technical blog author knows, the main reason we post is to remind our future selves how to do something we at one point knew. Tell me you haven’t searched online for a technical answer only to find your own post from 2 years ago!
So here’s the deal. It’s currently December 8. There are about 23 days left in the year. My goal is to post at least 5 more times. Wait, this posts counts, so 4 more times. Hoorah! That’s completely doable and will mean that I have not digressed from 2015.
Furthermore, it’s my commitment to increase 2017 significantly. I won’t put any official commitments on a number out there, but there’s not reason I can’t maintain a weekly cadence and produce >52 posts for 2017.
Here we go!
A Month of Soylent
I’ve been one month now on an (almost) exclusively Soylent diet.
Soylent is a drink engineered to be everything the human body needs for food. They don’t explicitly recommend that a person eats nothing besides Soylent, but they certainly don’t say it can’t be done, and there are plenty of folks that do it.
Soylent is billed as a “healthy, convenient, and affordable food”. In my experience, it’s quite easily all three. I’m pretty excited about this stuff.
Let me start by saying that I’m not a diet guy. I’ve made various attempts in the past to count my caloric intake, but I can’t remember the last time I imposed any kind of constraints on what I ate. In my opinion, counting calories sucks. It’s quite a chore stopping to think about what I’m eating, try to find its rough equivalent in a table somewhere, recording it, and trying to time the intake so that you end the day at the right number.
@kennyspade first introduced me to Soylent a full year ago. He brought the topic up in response to my mention of Mark Zuckerberg wearing the same attire each day to alleviate decision fatigue. Soylent is similar in its ability to eliminate the decisions we make about what we eat.
Kenny handed me a bottle of Soylent’s premixed product that they dub version 2.0 to try. I don’t remember being particular taken by the flavor or the texture, but I wasn’t turned off either.
Finally, the beginning of this September, I decided to try Soylent longer term, and I set my sites pretty high. I decided to reduce my diet to almost exclusively Soylent and water.
Soylent is available as a powder or a drink with the former being cheaper and the latter being more convenient. I opted for convenience for now.
I expected to be in for a bit of a personal battle. You see, I’m not that disciplined when it comes to eating. I’m basically just not accustomed to thinking about what I eat. I like sugar, so when candy is offered or available, I take it. If a bowl or a bag is offered, I take a few. I work hard and stay up late, so I drink coffee - perhaps 3 cups a day. And I like rich food in large portions. I was never overly excessive, but I haven’t been thrilled with my fitness either.
Well, it’s October now, so let me fill you in on my September…
Soylent is Tastier than I Thought
I started out not minding the taste, texture, and overall experience of Soylent 2.0 at all, but I ended up, somehow, absolutely loving it. Soylent tastes a bit like the milk left in your bowl after you’ve eaten Frosted Flakes, but a bit less sweet. I have a bottle every 4 hours, and after about 2 I’m really looking forward to the next one… not because I’m starving - I’m not - but because I enjoy the drink. The mouth feel is excellent too. It’s a little bit grainy in a good way, and I much prefer that to the overly thin texture I find in the other (usually milk-based) protein or meal replacement drinks I’ve tasted.
Soylent is Quite Filling
I decided to eat four 400 kcal Soylent drinks each day at 7am, 11am, 3pm, and 7pm. That’s 4 hours between meals and 1600 calories a day. The product is engineered to be 20% of the food a person needs for a day - 20% of the calories and 20% of the vitamins and nutrients - but I wanted to reduce my intake a bit and trim some fat.
After 4 hours of fasting, my stomach is ready for some substance, and whether I take my time drinking a bottle or throw it back in a hurry (in the TSA security line!) it does satisfy. I don’t feel full per say as I pitch the bottle into the recycle bin, but I don’t feel hungry either. I feel perfectly content for at least 2 hours and then start slowly getting hungry as I approach the 4 hour mark.
If I decided on a standard 2000 kcal diet, that would be 5 Soylents a day and a meal every 3 hours. That would be even easier.
Soylent is Easier than I Thought
The entire effort was much easier than I thought. I could hardly call it a battle, actually, as I initially thought it would be. The reason for this I attribute to the simplicity of my rule set…
- I will eat only Soylent and drink only water
- As a single exception to rule 1, if I get too hungry at any point, I’ll allow myself to eat broccoli. You can hardly go wrong with steamed, plain broccoli. It’s very healthy and doesn’t exactly pose a temptation.
- If I have culinary social opportunities (team dinners, family outings, etc.) I’ll go and I’ll engage, but I just won’t eat. Believe it or not, you can still enjoy a conversation across the table from someone without eating. It grinds against habit perhaps, but it works. Admitted, it does take a little bit away from a romantic dinner, but actually, that’s a bit strange isn’t it? For some reason, it’s not as fun eating with someone when you’re doing all the eating. My wife was kind and accommodating though.
In previous attempts to eat well, I had to spend extra time considering each morsel that passed in front of me.
“Should I eat that cracker?”
“Should I eat a cookie?”
“Should I eat another cookie?”
“Just one more pretzel?”
“My own carton of fries or share with my wife?”
But this time it was different. The answer was always the same - “no”.
No soda. No coffee. No cereal. No cookie. No nothing.
No chicken, no carrots, no milk. No to seconds. No to firsts! No nothing. The answer is always no.
That greatly simplifies things and leaves my mind free to really concentrate on the project at hand or on what my 4 year old is trying to say to me.
Eating Includes a Lot of Ceremony
There’s a whole lot of ceremony around food that I wasn’t aware of until I got on the outside of it all.
Several time per day we think about food - we consider our hunger, we decide to eat, we decide what, we decide when, we decide where, we transport, we stand in line or wait on a server, we acquire, we consume, we ask to be excused while we chew and try to talk to others, and finally we clean up the mess on our table and on our hands. And after hardly any time at all, we start thinking about our next meal!
I also neglected to notice just how often we come up with the idea to find coffee. Is there a machine nearby? Is there a Starbucks nearby? And then again with the relatively long process of acquisition and consumption.
Food acquisition is still a cinch compared to ancient times when our food was running around with teeth. But the reality is that times are different and there may just be room for some efficiency improvements.
Recreational Eating Rocks
I wonder if you’re thinking, “Yeah, but I like eating, and I don’t have any desire to give it up.”
I like eating too. September was a bit exceptional, but as a normal course I think it’s a good idea to use Soylent for all of the boring meals - the ones where you just need to put food in the belly - and then truly enjoy all the other meals - the recreational meals. It’s interesting too that my enjoyment of them is inversely proportional to their frequency. A weekly turkey sandwich tastes way better than a daily one.
Soylent is Convenient
There are a number of scenarios that I ran across during my experiment that accentuated the convenience of my new found food.
- Sometimes you don’t have time for breakfast. A Soylent is about as convenient as a bar.
- Same thing when you’re heads-down at work and acquiring lunch feels like a real chore.
- Reducing your diet to a very narrow menu of Soylent and water allows you to experiment with possible food allergies.
- Lunch meetings at work afford ample opportunity to show off bad habits or spill food on your lap. Starting your own lunch at 11:00 and finishing at 11:01 frees you up to focus on colleagues, partners, or the topics at hand.
- When you’re running around town running errands or having fun, stopping at a restaurant doesn’t have to be another thing on your list. Unless, that is, the rest of your family is on something other than a Soylent diet :)
Overall, it’s just nice to be in control of your own daily diet.
The Cost of Engineered Eating
Shelling out the money for a month’s worth of Soylents ($323 for 1600 kcal/day) feels like a lot. Consider, however, that this includes the convenience of the premixed option (a month of powder @1500 kcal/day is ~$180/mo), and may or may not be kinder on your budget than whatever else you were going to eat that month.
Some Other Things I Learned in Soylentember
Although weight loss was not my primary goal in this endeavor, I have lost 5 pounds over 4 weeks. That’s a healthy weight loss rate, and I always have the option to maintain my 1600 calorie diet or bump it up to 2000. Soylent is not a weight loss product - it’s just food, but it makes calorie counting much easier.
Air travel is not easy if you’re doing the liquid version of Soylent, because you can’t take liquid through security. I’m forced to check a bag and make sure that there’s not too much time between when I go through security and when I visit baggage claim on the other end, which is often more than 4 hours. If you like to get to the airport 2 hours early like me, then you are constrained to flights that are roughly 2 hours or less. This is a good reason to get some of the powder version (1.6), which is exactly what I intend to do.
The bottles are recyclable**. **I recommend giving them a quick rinse before finding your nearest recycling bin.
When I get my hands on some powder I intend to mix up a day at a time and then use some of my 2.0 bottles for mixing
I chilled my Soylent bottles in the fridge when I started, because I read that it’s better cold. It is good when it’s cold, but I later discovered that I like it at least as much when it’s room temperature. I think comes back to the texture. For some reason, when it’s cold it feels smoother in the mouth, but I like my Soylent to feel like food in my mouth. It’s more convenient leaving them at room temperature too, because you can just throw the day’s worth of food in your backpack and take off.
Soylent also offers bars that are 250 kcal and I’m told are quite delicious. I like having the option of finer control of caloric intake by adding in this smaller increment.
Going Forward
I’m not 100% certain about how I want to proceed now. Like I mentioned, I expected this to be a chore, and expected to be rather excited about getting back to normal eating when September was over. On the contrary, I quite enjoy my new freedom from food ceremony, and I’m sure I’ll continue supplementing some portion of my days kcal intake at least. I like how easy it is to come up with a daily plan of something like…
- 2 Soylent 2.0 drinks (800 kcal) + 1 bar (250 kcal) + 1 light dinner
- 3 Soylent 2.0 drinks (800 kcal) + 1 big dinner
I’m pretty sure I’ll either do one of those or perhaps just keep on with a fully Soylent diet! We’ll have to see.
OneDrive Sync Status
I don’t know how long the feature has been active, but I only recently realized that I can now see the status of all of the upload and download activity for OneDrive.
It used to be that you could hover over the OneDrive icon in the system tray and see some very basic status on OneDrive’s current effort to keep your local files in sync with your cloud storage. You saw that it was “Processing changes…” or that it had “247kB of 1.2GB uploaded”. It was slightly helpful knowing that it was actually working on something, but left a truck load of room for improvement.
Now if you hover over the OneDrive icon in the status tray, you get the upload progress as well as data transfer speeds, and if you click the icon you get something like this…
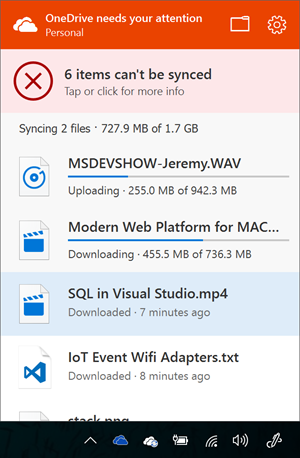
Now I can see that that MSDEVSHOW file that I recently dropped into my local folder is in fact on its way to the ether and nearing ready to share with others. Nice.
By the way, those 6 items it says I can’t sync are not a problem. I know why they can’t. It’s only because I haven’t opted to select some files for syncing yet.
I really should have provided feedback on this a long time ago, because I’ve been wanting it. Whenever you find yourself missing a feature or annoyed by some behavior in your operating system or software, make sure you find the right place to provide feedback and do it, because Microsoft (and likely other companies) really do look at what people want and steer their efforts that way.
In Windows, by the way, you can just hit Win + F and you’ll see your screen flash as Windows takes a screen shot of whatever you’re doing and then initiates a feedback request. That’s excellent.
npm Erroring Out on Windows 10 Fast Ring Build 14367
Just in case someone else is running into the same thing, I’m running Windows 10 Insiders Build 14367 (on the fast ring), and I’m unable to use npm. When I do a simple npm -v I get this error…
C:\code>npm -v |
My workaround is simply to type bash and get into Ubuntu where I have node and npm. There’s not really any disadvantage to this either since it operates on the same directory structure. I’m loving this Bash on Ubuntu on Windows thing.
Saving Your Code Settings and Snippets
I finally realized why I wasn’t investing a lot of thought or time on my Visual Studio Code snippet library. It’s transient.
I looked up where the user settings are being saved - C:\users\<me>\AppData\Roaming\Code\User.
Well, that’s a bit of a crock. It’s 2016. I want everything saved to my OneDrive folder so I can do a reload without considering the various settings files I’ll have to back up and restore. What, am I a caveman?
I searched VS Code and my registry and didn’t see an obvious (I only have about 2.5 minutes to spend on tasks like this) way to customize the path, so I did what any developer in this modern era would do. I posted a question on StackOverflow.
And in true SO form, I got an answer back very quickly. Well, it wasn’t exactly an answer, but close. DAXaholic responded that there is an extension for VS Code that may fit the bill.
It’s called Visual Studio Code Settings Sync by Shan Khan. You can install it in Visual Studio Code by going to your command palette (CTRL+P) and typing ext install code-settings-sync.
Now, I had to spend a few synapses on this strategy for saving settings. The way Shan set this up it saves your settings, snippets, launch, and keybindings to your GitHub account as gists. Creative, Shan. It’s not exactly the same as having my settings and snippets saved to my OneDrive, but I kinda like it. I do have to manually upload everything, and by manual I only mean that I have to execute the Sync: Update/Upload Settings command in Code. And then when I reload or slide over to a new work machine I have to Sync: Download Settings.
I sort of like, however, storing bits of code in my GitHub Gists repository.
One advantage is that I could easily share my settings with the world. By default, the extension creates the gist as secret. I don’t like secrets though, so I can just edit that gist on gist.github.com and hit the Make Public button.
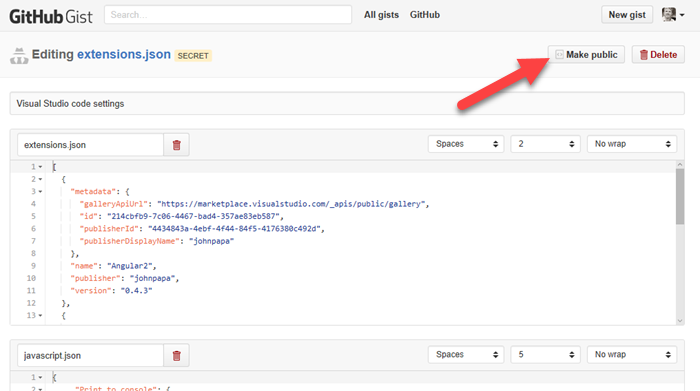
And now I can share the link with you. Very cool. And that’s a live link too so that every time I add an awesome new snippet, you can see it. Now, I just have to remember not to put any secret keys in my settings or snippets :)
Anyway. I thought this was very cool. Kudos to Shan Khan on the cool extension.
Happy coding.