Posts tagged with "azure"
The Regatta Project
My role at Microsoft is that of an evangelist, and that implies that we speak broadly to audiences about technology. Recently, however, my team is working one-on-one with organizations on exciting new Microsoft technologies - making sure they’re exactly what developers need.
One of the projects I’ve been working on recently is called Regatta championed by Baiyin Zhou (@baiyinvc) from Boston.
This entire idea is super fun. Imagine exercising on a rowing machine in a studio in a group session. Now imagine a visual on the wall depicting your rowing machine and those of the other session participants as real boats. As you heave and ho, you see your little boat moving across the screen.
There are just so many awesome scenarios that are possible at this point.
The visual of the boats alone is encouragement for you to work harder to compete against others in the class. But that’s pretty obvious isn’t it. What about the less obvious scenarios? What about being able to add in a phantom boat that represents the group’s average from yesterday’s workout? Now you’re not competing against your fellow rowers - you’re competing with them. You have to beat that phantom boat!
As soon as things in the real world - like our efforts to stay in shape - are digitized and turned into data, we get to do things like capture our progress, integrate with other fitness tracker systems, or even do data analysis to determine some deep learning from it.
This is the type of concept where digital systems really have an opportunity to affect our lives for the better. I keep saying that technology is not so interesting unless it improves our lives. For being such a technophile, I’m actually quite the skeptic, because all too often technology just gets in the way.
The Regatta Project envisions a future with a whole lot of rowing machines deployed with smart devices (the Raspberry Pi Zero at this point) attached to them, and assuring good communication with all of these devices is a great job for Azure IoT Hub.
Go check out the details of the [Regatta](https://microsoft.github.io/techcasestudies/iot/2016/12/10/regatta.html) project and let me know what you think with a comment below.

Deploying TypeScript Projects to Azure from GitHub Using Continuous Deployment
I’m working on a fun project called Waterbug. You can peek or play at github.com/codefoster/waterbug.
Waterbug is an app that collects data as you row on a WaterRower and visualizes it in an Angular 2.0 app.
It’s a fun app because it uses a lot of modern stuff. Modern stuff is usually the fun stuff, and that’s why it’s always nice to be working on a greenfield project.
So, like I mentioned, one of the components of this app uses Angular 2.0. Angular is itself written in TypeScript, and you’re strongly encouraged to write your Angular 2.0 apps using TypeScript. You don’t have to, but at least in my opinion, you’d be crazy not to.
TypeScript is awesome.
TypeScript makes everything more terse, more elegant, and easier to read, and it allows your tooling (Visual Studio Code is my editor of choice) to reason about your code and thus help you out immensely.
The important thing to remember about TypeScript and the reason I think for it’s rapid uptake is that it’s not a different language that compiles to JavaScript. It’s a superset of JavaScript. That means you don’t throw any of your existing work away. You just start sprinkling in TypeScript where it benefits you. If you’re like me though, it won’t be long before you’re addicted to using it everywhere.
When you’re working on a TypeScript project, you write in .ts files and those get transpiled from .ts files to .js files.
Herein lies our first question.
Should we check those .js files (and also the .js.map files that are created by default) into our code repository (GitHub in my case)?
The answer is no.
The .js code is derivative and does not belong in source control. Source control is for source files. The .ts files are our source files in this case.
If you start checking your .js files into source control, you’re inevitably going to end up with .ts files and their associated .js files out of sync. Hair pulling will surely ensue.
I’ve gone one step further and determined that I don’t even want to look at my .js files in my editor.
In Visual Studio Code, I can go to File | Preferences | Workspace Settings, which opens (or creates if necessary) my projects .vscode\settings.json file. Then I can sprinkle in a little magic dust and tell Code that I’m not so concerned with .js and .js.map files and I’d just rather they not show up in my File Explorer pane or in my global search results.
Here’s the magic dust…
{ |
If, however, you don’t check your .js files into GitHub, then when you configure Azure to do continuous deployment from GitHub, it’s not going to pull in any .js files and that’s what your users’ browsers really need to make the site run.
So this is where some people say “Oh, blasted! I’ll just check my .js files in and call it done”.
True that works, but it also incurs technical debt. Don’t do it. It’s not worth it. Stick to your philosophical guns and don’t make choices like this. It may cost a little more up front to figure out the right way, but you’ll be glad later.
So, where and when should the .ts files get transpiled?
The answer is that they should get transpiled in Azure and it should happen each time there’s a deployment.
Now, let’s dig in and figure out how to do this.
If you do a little research, you’ll find that when you wire Azure up to look at GitHub, it does a pull of the code every time you push to the configured branch. Then it runs a default deployment script if you haven’t specified otherwise.
To run some code for each deployment, you simply customize this deployment script. You do that by adding two files to the root of your project: .deployment and deploy.cmd. You could just create these files manually, of course, but it’s better to generate them. That way you have the latest recommended default script and it specifically made for the type of application you’re running.
To generate the default deployment script, you first need to have the Azure Xplat CLI tool installed, which is a breeze. Just do npm install -g azure-cli. If you already have it and haven’t updated it for a while, then run npm up -g azure-cli.
After you have the azure-cli tool, you need to login to your Azure subscription. This is a lot easier than it used to be.
Simply type azure login. That will generate a little code for you and then ask you to go to a website, login, and enter your code. From that point forward, you’re able to access your Azure goodies from your command line. CLI FTW!
Once you get that, just go to the root of your website project (at the command line) and then run…
azure site deploymentscript --node |
This will create the .deployment and deploy.cmd files.
Okay, now we just have to customize the deploy.cmd file a bit.
If your deployment script looks like mine, then there’s a part that looks like this…
:: 3\. Install npm packages |
That script runs npm install to install your npm dependencies. It adds the --production flag to indicate that developer dependencies should be skipped since this is not a dev box - it’s the real deal!
Just after an npm install, you’re ready for the meat of the matter. It’s time to turn all of your .ts files into .js files.
To accomplish this, I added this just after step 3…
:: 4\. Compile TypeScript |
The first line is obviously a comment.
The echo shows what’s going on in the console so you can find it in the log files and such.
The last line calls :ExecuteCmd (which is a function that comes with the default deployment script) and asks it to run TypeScript’s commandline compiler (tsc) using node and pointing it to the deployment target. The deployment target is the /site/wwwroot directory that contains your site. The command explicitly uses the tsc command that’s in the deployment target’s node_modules\typescript\bin folder. That should be there because we have typescript defined as one of the projects dependencies in the package.json. Therefore the npm install from a few lines up should have installed typescript. Another strategy would be to install typescript globally, but I opted for this method.
And that’s really all there is to it. I like to jump over to my SCM site (
If you look in the list of deployments in your Azure portal, you can actually double-click on the latest deployment and then click on View Log to see the console output that was captured when this deployment script ran…
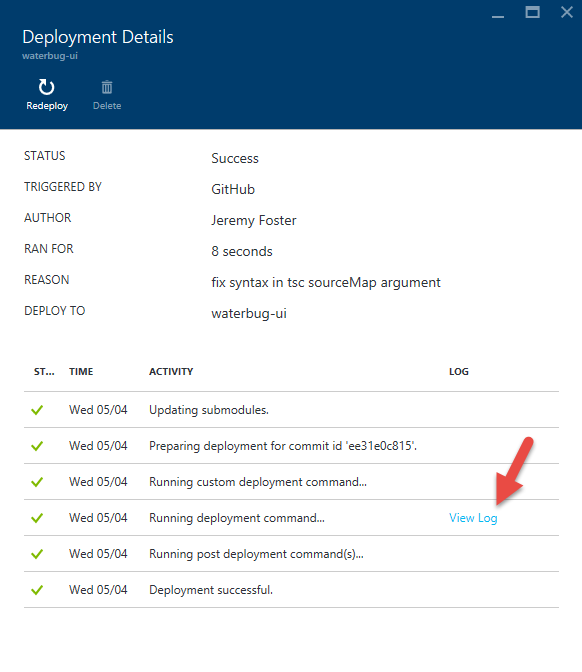
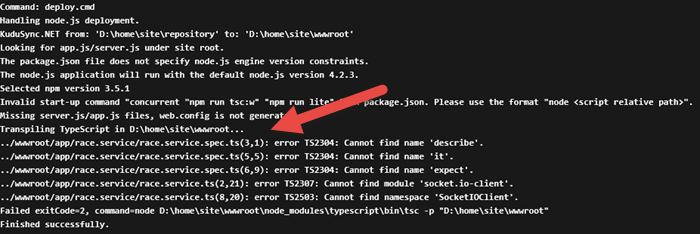
In the log, you can see our echo and that the transpilation process has occurred. Don’t worry about the errors that are thrown. Those are expected and didn’t stop the process from completing.
On the New Mongo Capabilities in DocumentDB
On March 31, 2016 it was announced at //build and also by Stephen Baron via the DocumentDB blog that DocumentDB could now be used as the cloud data store for apps that already target MongoDB.
There’s a good video all about DocumentDB that came out of the recent //build event, and if you jump to 16:20 you’ll hear John Macintyre describe this new offering in good detail.
In this post, I’d like to break down what this means and why I think this is cool beans.
First of all, if you’re itching to get started, just check out how to join the preview program in the aforementioned blog post.
What does this mean in my own words? Keep in mind that my words tend not to contain a lot of technical speak. I have to keep things well organized in my mind if I’m to avoid insanity - an aspect of my personality that I’m hoping works to your when I record my thoughts in video or in this case in HTML.
I’ll start with what this is not. This is not a driver or an adapter. It’s not a package that you install that translates everything you do against Mongo into underlying calls to DocumentDB’s API.
That would be pretty cool, and I’m not certain that it didn’t already exist, but this is not that. The team decided on an approach that was lower level, more performant, and more compatible. They decided to essentially build MongoDB wire-level protocol compatibility into DocumentDB.
This is more performant because it doesn’t rely on any sort of adapter. It’s more compatible because it doesn’t care what tools, libraries, or techniques you use to talk to MongoDB today. Whatever strategy you use will inevitably result in MongoDB protocol compatible messages on the wire, and that’s going to work with DocumentDB.
I’d also like to attempt to position this against the open-source MongoDB code base that currently exists.
Is this Microsoft’s attempt to compete with Mongo? No way.
If anything, this is a recognition of the power and popularity of MongoDB.
DocumentDB’s support of this protocol doesn’t, in fact, do away with the need for MongoDB. DocumentDB is only a cloud service. You can’t install DocumentDB in a mobile app and run it offline. You can do that with MongoDB.
On the contrary, you use DocumentDB and this protocol when you already know MongoDB, but you want the many benefits of hosting your database in the cloud as a managed service - the primary advantages being scale and elasticity.
Take a look at this great article about the similarities and differences between MongoDB and DocumentDB.
This announcement appears to me to capture the strengths of these platforms without being forced to accept the shortcomings of either.
Configuring a Custom Domain Using Namecheap and Azure Web Apps
Namecheap.com is a domain registrar that treats me very well. Domain registration and DNS records is a strange world that I don’t understand very deeply, so I appreciate a registrar that makes things clear and keeps it fairly simple.
If you’ve created a website in Azure and you’re not opting to use Azure’s recently announced domain registration service, but have instead registered your domain using Namecheap, then this post is for you. Actually, this post is for me since I always forget a step or two and need this as a reference. But you can use it too.
Step 1. Register your domain with Namecheap. I don’t have any trouble with this step and I’m going to assume you won’t either. If you do need help, look for support on namecheap.com. For the purposes of this article, I’m going to assume the domain is tweetmonkey.io since that’s one that I recently created.
Step 2. Create your web app on Azure. Again, this is sort of out of scope for this article, but it’s not hard.
Step 3. Point your Namecheap domain to Azure. This is where we tell Namecheap to point to Azure. It’s not hard, but it’s just not always easy to remember.
Log in to your Azure web app using portal.azure.com, go to Settings, then Custom Domains and SSL, then Bring External Domains, then copy the IP address. We’ll need that soon.
Now log in to namecheap.com, go to manage your domains, and choose the domain you want to forward.
Click All Host Records on the left
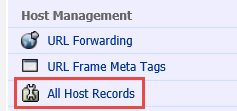
There are two host records that should already exist. One has a prefix of @ and one has a prefix of www.
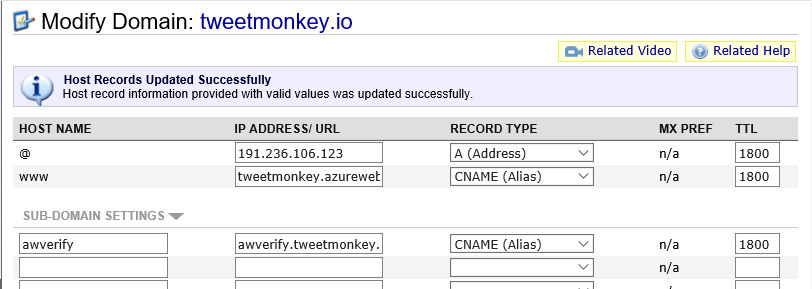
- For the @ record, paste the IP address into the IP Address/URL field. Make sure the record type is still A (Address). Change the TTL to 1800.
- For the www record, enter your given Azure address such as tweetmonkey.azurewebsites.net. That’s always prefix you chose for your Azure web app and then .azurewebsites.net. Make sure it’s a CNAME (Alias) record type and enter 1800 for the TTL.
- Under subdomain settings, add awverify into the first field, awverify.tweetmonkey.azurewebsites.net into the second, and drop down and choose CNAME (alias) for third. Again enter 1800 in the TTL field.
Here’s what it should look like…
Step 4. Check your DNS propogation. Now Namecheap has been forwarded, but you likely can’t continue yet, and that’s because it can take up to 30 minutes for this change to propagate across the internet. I like to go to http://www.dnsunlimited.com/propagation_check every 30 seconds or so (actually, I’m more patient than that) and doing a CNAME search for www.tweetmonkey.io and awverify.tweetmonkey.io. As soon as you see a response value of tweetmonkey.azurewebsites.net or awverify.tweetmonkey.azurewebsites.net respectively, I know the propagation is done and I’m ready for the next step.
Step 5. Add your domain to Azure. Now that the entire internet knows about your change, you’re ready to configure it in Azure. Go back to that same Azure portal location that you did in step 3a and under domain names add your root domain and your www prefix - tweetmonkey.io and www.tweetmonkey.io. Azure will check your CNAME records to be sure you are authorized to use this domain (we wouldn’t want people able to redirect domains willy nilly!), and since you checked the propagation of your CNAME records in step 4, it should pass. Save your changes.
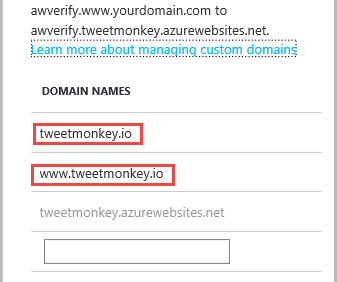
Step 6. Test, drop the mic, and exit stage right. After step 5, you should immediately be able to open your browser of choice and hit either your root or your www. site. Hope it works for you.
Keep in mind that you may choose to get all sorts of fancy with your domain prefixes. You may choose to have your root domain (tweetmonkey.io in this case) go to the same place as your www prefix and then point your api prefix to a separate Azure web app that you made with Web API and then perhaps you could create an admin prefix that takes users to a different web app still. In any case, I think you qualify as an official webmaster now!
Code speed to you!
What's New in Azure
Sometimes it’s the most obvious things that are the easiest for me to miss. I can see being in a usability study with the folks that designed the new Azure portal and giving feedback like, “you know, this is great and all, but it would be really nice to get some visibility into what sort of functionality is getting added to this portal as it’s added”. I can see the designers ripping off their white lab coats in frustration, with clenched teeth and fists, muttering “it’s right… there… and it’s huge!”
Here it is…
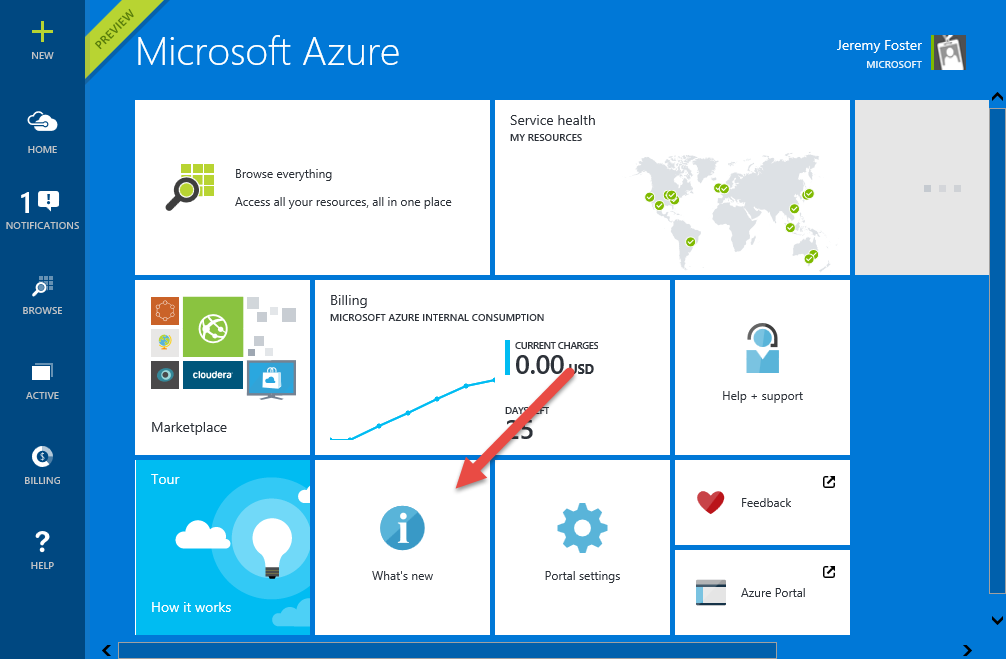
Click on that, and you’re going to get a blog essentially that enumerates all of the additions to this new version of the Azure portal as they happen. It’s good visibility into this ever changing portal.
For instance,recently - on May 13 - we got the ability to create connectors in the logic apps designer. That’s helpful. Thanks, Azure team.