Other
Learning Blockchain
I’ve been reading and studying a bit about blockchain recently and am extremely intrigued.
And now, I’ll attempt to explain what blockchain is in brief. Not because you might need to know, but because I usually try to explain something when I’m trying to understand it myself.
Blockchain is a structure and algorithm for storing and accessing data such that data records (transactions or blocks) are hashed and strung together link a linked list data structure. The linking achieved by each block in the chain including as a part of its definition (and thus as a part of its hash) the hash of the previous block in the chain.
So I guess it’s like carrying a little piece (granted a uniquely identifying piece) of history - the hash - along in every transaction.
It’s not unwieldy because each block on has to worry about one extra hash - a tiny piece of data actually.
The benefit, though, is that if a bad guy goes back and modifies one of the records in an attempt to give himself an advantage of some kind in the data, he invalidates every subsequent block.
Because this chain of data is entirely valid or entirely invalid, it is easy for a big group of people to share the entire thing (or even just the last record since it is known to be valid) and all agree on every single change to it.
I watched a TED Talk on the subject and hearing Don Tapscott provide some potential applications of a blockchain really helped to solidify my understanding.
One of his examples was these companies like Uber and Airbnb, which are supposedly highly decentralized and peer-to-peer. They’re not really though, because you still end up with a single company in the middle acting not only as the app developer and facilitator, but more importantly acting as the central source not only all business logic, but also all data and all trust.
In my current understanding, were blockchain to be implemented today in peer-to-peer businesses like these, it would not spell the end of a company like Airbnb. Rather it would mean that their role would be reduced to that of a service provider and not a trust bank. Each stay would be a transaction between a traveler and a host as it is today, but the exchange of dollars and (arguably as important) the exchange of reputation would be direct transactions between two parties.
In addition to a basic blockchain where static values are the content of each block, you have Etherium. This Canadian organization has devised a construct that apparently instead of building up a sort of database of blocks, it builds up a virtual computer. Their website describes it well calling it a decentralized platform that runs smart contracts: applications that run exactly as programmed without any possibility of downtime, censorship, fraud, or third party interference. As I understand it currently, it’s as if each block is not just static data, but rather logic. It can be used to creates rules such as “the 3rd day of each month I transfer $30 to party B”. Check out this reddit post for some well worded explanations on Etherium.
If you have an Azure account, you can already play with Etherium and some other blockchain providers. That’s exactly what I’m doing :)
Comment below if you’re playing with this and want to help me and others come to understand it better.
OneDrive Sync Status
I don’t know how long the feature has been active, but I only recently realized that I can now see the status of all of the upload and download activity for OneDrive.
It used to be that you could hover over the OneDrive icon in the system tray and see some very basic status on OneDrive’s current effort to keep your local files in sync with your cloud storage. You saw that it was “Processing changes…” or that it had “247kB of 1.2GB uploaded”. It was slightly helpful knowing that it was actually working on something, but left a truck load of room for improvement.
Now if you hover over the OneDrive icon in the status tray, you get the upload progress as well as data transfer speeds, and if you click the icon you get something like this…
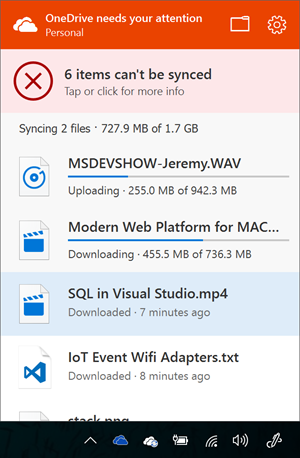
Now I can see that that MSDEVSHOW file that I recently dropped into my local folder is in fact on its way to the ether and nearing ready to share with others. Nice.
By the way, those 6 items it says I can’t sync are not a problem. I know why they can’t. It’s only because I haven’t opted to select some files for syncing yet.
I really should have provided feedback on this a long time ago, because I’ve been wanting it. Whenever you find yourself missing a feature or annoyed by some behavior in your operating system or software, make sure you find the right place to provide feedback and do it, because Microsoft (and likely other companies) really do look at what people want and steer their efforts that way.
In Windows, by the way, you can just hit Win + F and you’ll see your screen flash as Windows takes a screen shot of whatever you’re doing and then initiates a feedback request. That’s excellent.
Make Git Wait for Code
There’s a decent chance that you, like me, ended up with Visual Studio Code incorrectly configured as Git’s core editor. I’m talking about Windows here.
Take a look at your .gitconfig file and see what you have configured. You will likely find that in c:\users<username>.
Under the [core] section, look for the editor key. What do you have for a value?
If your Visual Studio Code path ends with code.cmd, then it’s not correct. It should end with code.exe. And it should have a -w flag. The -w flag tells the launching context to block until the process is terminated. That means that if you run a Git command from the command line that launches Code as a text editor, the command line should be blocked until you’re done editing that file and shut down Code.
Let’s say, for instance, that you have committed some files and then realize that you forgot one. You could commit it as a new commit, but it makes more sense to tack the change on to the last commit (assuming you haven’t pushed your commit up to a shared repo yet!).
To do this, you simply run git commit --amend at the command line. This amends your staged files to the last commit. It also launches your default text editor so you can determine if you want to keep the same commit message you elected previously or overwrite it.
This should open your text editor, wait for you to make and save your changes and then shut down your editor before releasing control of the command line and continuing on.
You can simply edit your .gitconfig file to add this configuration, but it’s easier to run this…
git config --global core.editor "'C:\Program Files (x86)\Microsoft VS Code\code.exe' -w"
…from your command line.
Hope this helps you like it did me. Credit goes to F Boucheros on this Stackoverflow post.
Extensible Code
Visual Studio Code has extensions!
The bells ring, the confetti flies, the fans go wild!
The two things we all wanted from Code was…
- to see it go open source
- to get extensions.
If you were following the user voice page for Code like I was, you’d have seen way more votes for extensions than for any other feature. The size of the vote count made it look like not having extensions was a total deal breaker and for many folks I talked to… it was.
Well, now it’s here!
It’s here in full force. Not only are extensions available, but there are already a whole lotta cool extensions available in the online gallery. There were about 60 a couple days before launch - a metric that jumped over 20 points by the time Sean McBreen was showing off (here and here) the announcement at the Connect() conference. And there are obviously a lot more now just a few weeks later.
Getting extensions is like getting three wishes from a genie in a bottle and for your first wish requesting unlimited wishes. Code is a great tool, but with extensions, you can make it do most anything you want.
Some of the great things about Code extensions are…
they’re easy to write. To run and test an extensions, Code launches an instance of itself. It’s a bit like Inception that way. Then you can just play with your extension as it currently is and be sure it’s behaving as you designed.
they run in a different process. When you start up Code, it’s okay if you have 38,329,420 installed, because they’re not loading synchronously in the same process as your main editor. Granted 38M+ extensions is going to bog something down and I think you’ll have a hard time finding that many unique extensions in the marketplace any time soon, but my point is that you don’t have to worry about the performance impact of installing your favorite few.
they can be written in either raw JavaScript or in TypeScript, and generating them is quick and easy using Yeoman (which by the way is awesome!).
publishing them is just about the easiest thing in the whole world. It’s literally one command - nay, one short command…
vcse publish
My Favorite Extensions So Far
I haven’t found the time to install every extension (who has that kind of time?!), but here are three of my favorites so far…
MDTools
Markdown (.md) files are really handy. If you’re not familiar with markdown files, just think of them as a cross between text files and HTML files. Text files are nice because they are very readable. Markdown files are readable still but they give us the ability to easily bring in rich content like hyperlinks, images, and formatting. One of the great additions to markdown is the ability to indicate spans or blocks of code and even in some cases to specify the code language and get great formatting.
So it’s no surprise that markdown files have become the standard for creating documentation and meta text for code repositories. Developers work with markdown a lot and it’s exciting to have a bit of help.
The MDTools extension allows you to do a lot of those little things to a selected block of text. You can convert to upper case, lower case, or title case, you can HTML encode or decode, and you can even convert to ASCII art - an extremely fun use case! To activate these tools, install the extension, restart the editor, select some text, and then use the ALT + T keyboard shortcut.
There’s a lot more the MDTools extension can do to, so check it out.
Quick Snippet
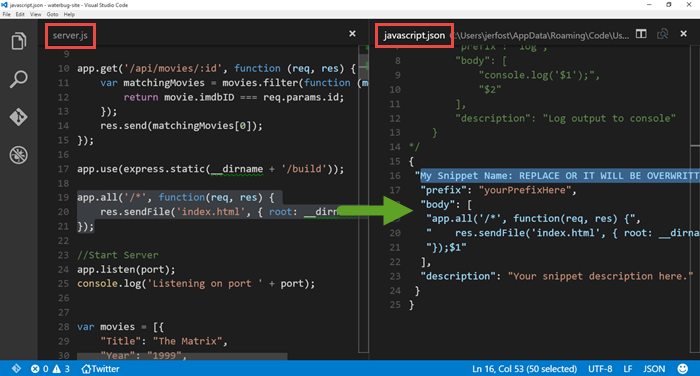
Quick Snippet is a great idea for an extension by my colleague Sara Itani (@mousetraps). See my interview of Sara on episode 048 of my podcast CodeChat. It allows a developer to highlight a block of text they’ve written and quickly and easily create a snippet out of it. In my experience, it takes a little bit of discipline to create snippets today to save time tomorrow. This extension excites me because it removes some of the friction and makes snippet creation fast. Now I can save time on saving time!
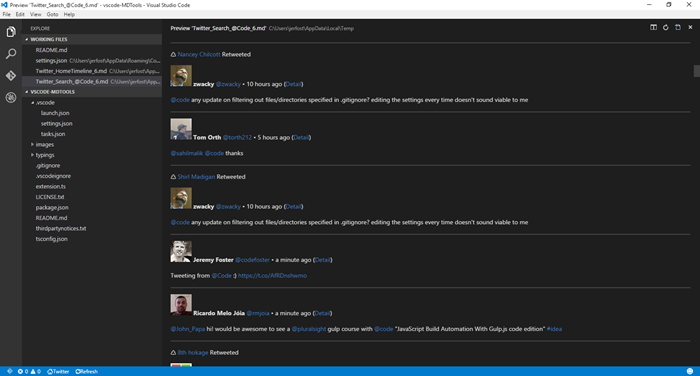
This one’s just cute and fun and shows off the power and versatility of extensions in Code. The Twitter extension let’s you read and even write

Create Your Own
Now here’s the real winning tip. You don’t have to just check every week to see if someone has created your new doodad yet. You can just build it yourself!
If you’re wondering if it’s hard, it’s not. If I can make an extension, you can.
Watch this. I’m going to build the hello world extension from start to finish in just over a minute. Granted I sped it up a little and skimmed over the long running npm install bits, but still. You can see that it’s an easy process. Note: this assumes you have Node.js and Visual Studio Code installed already.
If that went just a little bit too fast for you, you can get the complete tutorial by going to code.visualstudio.com/docs/extensions/example-hello-world, and for a bunch more information about getting started creating Code extensions, go to code.visualstudio.com/docs/extensions/overview.
My team has put together a bunch of different videos and blog posts to sum up the announcements from Connect(). You can see the rest of them by visiting Jerry Nixon‘s post Inside the Code: What’s New with Visual Studio.
VS Code Goes Open
Visual Studio Code is now open source.
Me: What do you think of Visual Studio Code?
Some Dude: It’s awesome. I just wish it were open source.
Me: You need to fork it? Tweak it?
Some Dude: No.
Me: Okay.
I get it. I like open source stuff too.
Realistically, there are few products I have time to fork and fewer still that I have need to fork.
But even when I have no need to fork a project and no intention to submit a pull request any time soon, still I want it to be open source. Why? Because… freedom.
I like closed source products too, actually. Closed source products can be sold. Selling products earns a company money. Companies with money can create big research and development departments that can tinker with stuff and make new, cool stuff. And ultimately, I like new cool stuff.
The best scenario for me, a consumer, though, is when a big company with a big research and development department can afford to make something cool and free and open, because they make money on other products.
Some products (think Adobe Photoshop) are obviously a massive mess of proprietary code that feel right to belong to their parent company. They need the first-party control.
Others, like Code feel more like they belong to the community. That’s how I feel anyway.
**And now I can. Visual Studio Code is officially OSS! **
In case you missed it, Microsoft announced at Connect() 2015 that Code was graduating from preview to beta status and that it would be open sourced.
To see Code’s code comfortably settled into its new home, just head over to github.com/microsoft/vscode. From there, you can clone it, fork it, submit an issue, submit a PR… or look at what the team is working on and who else is involved. You know… you can do all of the GitHub stuff with it.
So there it is. It’s not only free as in “free beer” now, but also as in “free speech”.
The actual announcement is buried in the keynote, so the best way to get the skinny on this announcement, the details, and the implications is to watch the Visual Studio Code session hosted on Connect() Day 2 by @chrisrisner. The panel shows off Code in serious depth. It’s a must-see session if you’re into this stuff.
One of the more exciting things they showed off is actually the second gigantic announcement regarding Code… the addition of extensions to the product, but that’s a big topic for another day and another blog post.
What exactly does the open sourcing of Code mean for you? As I mentioned, you may or may not be interested in ever even viewing the source code for Code. The real gold in this announcement is the fact that Code now belongs to the community. It’s ours. It’s something that we’re all working on together. That’s no trivial matter. Microsoft may have kicked it off and may be a huge contributor to it here forward, but so are you and I.
So whether you’re going to modify the code base, study the code base, or just take advantage of the warm feeling that open source software gives us, you know now that the best light-weight code editor for Windows, Linux, and Mac, is ready for you.
Let’s have a quick look at the code for Code using Code. The official repo is at http://github.com/Microsoft/vscode. So start by cloning that into your local projects folder. My local projects folder is c:\code, so I do this…

Then, you launch that project in Code using…

You’ve got it now. So I just added “codefoster” to a readme.md file to simulate a change and then hit CTRL + SHIFT + G to switch to the Git source control section of VS Code, and here’s what I see…
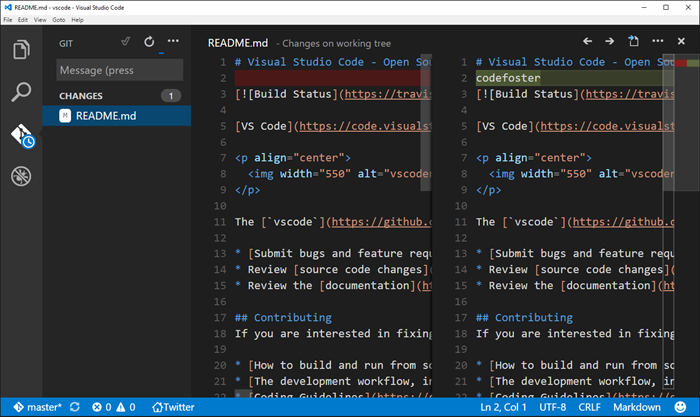
Notice that the changed file is listed on the left and when highlighted the lines that were changed are compared in split panes on the right. Checking this change in would simply involve typing the commit message (above the file list) and then hitting the checkmark.
This interface abstracts away some of the git concepts that tend to intimidate newcomers - things like pushing, pulling, and fetching - with a simpler concept of synchronizing which is accomplished via the circle arrow icon.
It’s important to note that I wouldn’t be able to check this change in here because I don’t have direct access to the VS Code repo. Neither do you most likely. The git workflow for submitting changes to a repo that you don’t have direct access to is called a pull request. I’ll leave the expansion of this topic to other articles online, but in short it’s done by forking the repo, cloning your fork, changing your files, committing and pushing to your fork, and then using github.com to submit a pull request. This is you saying to the original repo owner, “Hey, I made some changes that I think benefit this project. They are in my online repository which I forked from yours. I hereby request you _pull _these changes into the main repository.
It’s quite an easy process for the repo owner and I don’t think a repo owner on earth is opposed to people doing work for them by submitting PR’s. :)
Again, getting involved simply means interacting and collaborating on GitHub. Here’s how…
- Check out the list of issues (there are already over 200 of them as I type this) on microsoft/vscode repo.
- Chime in on the issues by submitting comments.
- Create your own issue. See how.
- Clone the code base using your favorite git tooling or using
git clone https://github.com/microsoft/vscode.giton your command line. That will allow you togit pullanytime you need to get the latest. Having the code means you can browse it whenever you’re wondering how something works. See how. - Fork the code using GitHub if you want to create a copy of the code base in your own GitHub repo. Then you can modify that code base and submit it via a pull request whenever you’re certain you’ve added some value to the project. See how.
And you can chatter about Code as well on Twitter using @Code. As to how they got such an awesome handle on Twitter I have no idea.
Also check out my mini-series I’m calling Tidbits of Code and Node on the Raw Tech blog on Channel 9 where I’ve been talking a lot about Code (and Node) and plan to do even more now that the dial for its awesome factor was turned up a couple of notches.
Happy coding in Code!
Hail Bridge Mode
My wife and I have acquired a coach RV, parked it on our property, remodeled the interior, and done most of the work of listing it on Airbnb.
I was looking to allow guests that stay in the space to use wireless internet for free, but I am not interested in giving them credentials to just jump onto my network.
The solution, I knew, was a bridge - essentially a device with two wireless NICs and the ability to communicate between them for you. I hadn’t hooked up a bridge before, and I expected it was going to be hard. I expect most things to be hard and am seldom disappointed. Actually, that’s not entirely true. I do expect most things to be hard, but I’m still quite often disappointed.
I talked with my colleague @KennySpade about it and I liked his answer - “I think this little device I have in my hand will do the trick. I’ll send it to you. It was only $12.”
The device Kenny was referring to is a TP-LINK WR702N Nano Router.

I was wrong in believing that a device like this would contain a single wireless NIC and would thus be capable of speaking to a single wireless device. In fact, when configured for “bridge mode” the device is able to be configured such that it communicates with my home network, but then itself broadcasts a second network with a new SSID and credentials.
The three primary reasons I wanted to go this route (rim shot) are…
- It feels right for the RV to have its own wireless network. I can’t explain it. It just feels right.
- It provides the security of keeping guests on a separate physical network.
- It allows me at some point in the future to travel around with this rig all the time allowing all of its occupants to a) communicate with each other on a network and b) get internet access when we stop somewhere when I simply tell the TP-LINK what the SSID is. We stop at a coffee shop, I point the TP-LINK to the coffee shop’s wifi, and voila all of the inhabitants of the RV instantly have internet access.
I’m quite tickled with this solution.
Windows Phone Emulator on Windows 10 TP Build 9926
After upgrading to Windows 10 Technical Preview Build 9926, I found myself unable to run the Windows Phone Emulator either from the Developer Power Tools or by executing a phone app from Visual Studio 2013.
I found a forum post online that showed how to resolve it. Here it is.
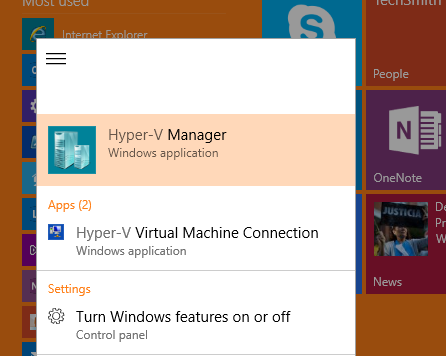
Open the Hyper-V Manager
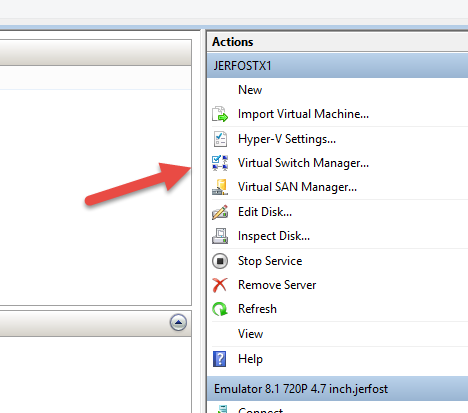
Now click on Virtual Switch Manager on the right under Actions…
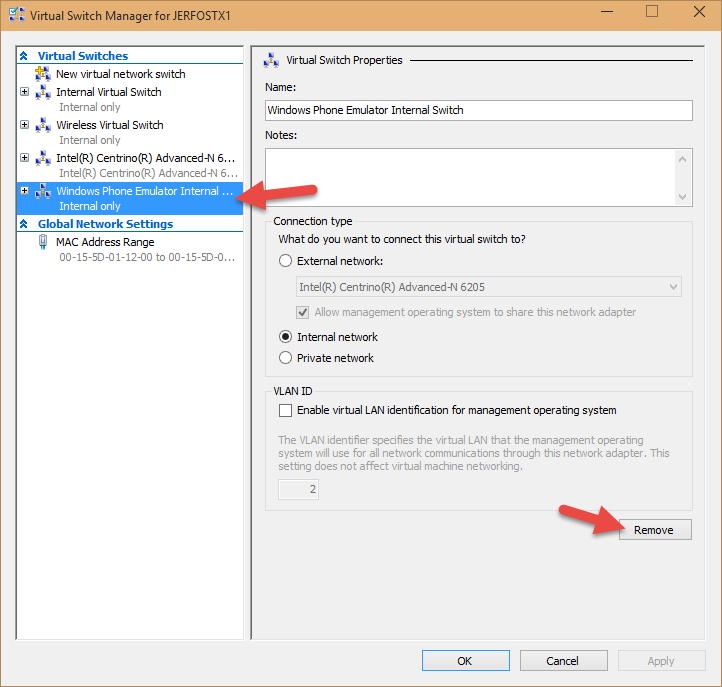
And then choose the Windows Phone Emulator Internal Switch from the list of switches and hit Remove. Don’t worry, a new one will be automatically created for you the next time you try to connect to the emulator in Visual Studio.
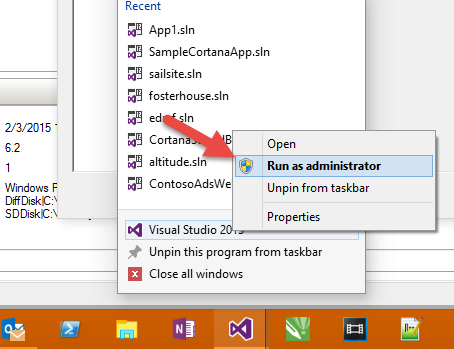
Now launch Visual Studio as an administrator…
And try again to execute a Windows Phone project. The emulator took quite a while for me to open up, but it eventually did and worked great.
Hope this helps someone.
This Week on Channel 9
This week I recorded This Week on Channel 9 with my good friend and colleague Steve Seow (@SteveSeow). Steve knows startups, and this week I invited him to join me as we present some pretty cool content about Docker, the VS Unity Tools, Node, home automation, the Intel Edison, and lots of other goodies. Have a look.
Project GoChute
This is a live post, so be sure to check out the addendums at the bottom.
I haven’t entirely given up on my GoChute idea, but it has slid down the priority list somewhat. I’d better explain.
Let me tell you what my GoChute idea was/is and where I’m at on it.
The GoChute is an attachment for a GoPro camera that allows a person to use their GoPro for a mega, aerial selfie. Sure, you could shell out a few hundred or maybe thousands of dollars for a drone, but the GoChute will get you the coveted bird’s eye view on the cheap. It would work by allowing you to throw or launch the complete unit high into the air. It would detect the apogee of travel, deploy a parachute, and then drift gently back down to earth while taking your video.
I’m a big fan of the GoPro cameras. I have a GoPro HERO3+ Black edition and I have used it for everything from checking a spinning boat propeller to playing at the water park with my family to recording CodeChat episodes.
The rugged and waterproof case for the GoPro is certainly one of its big values, but the biggest arguably is the wide array of mounts available. You can spend a few bucks and get your GoPro on your head, on your chest, on you bumper, on your windshield, on your harness, on your roll bar, on your sailboat rail, or just about anywhere else.
I decided to take advantage of this with the GoChute.
The GoChute idea is fun because it’s a good combination of hardware and software. Here’s the basic hardware…

This package was designed in SketchUp. I found a GoPro adapter in the 3D warehouse that attaches to the camera housing itself, and then proceeded to redesign the entire box.
You can see the hinged lid on the top and holes on the side for securing parachute lines. Here’s the other side…

On this side, you can see the parachute deployment latch and a couple of holes for status LED’s to poke through.
Here’s an exploded view of the latch…

The latch itself is on a small hinged joint. A servo motor mount allows me to mount the motor that is going to pull the latch when it’s time for the parachute to deploy. I’m counting on the lid being under pressure (likely by use of a spring) in order to keep the lid closed securely and to eject the parachute well once the latch is tripped.
This entire package would be 3D printed in 3 parts - the box, the small latch, and the lid.
Inside the package would reside a smart device for reading sensors and figuring out how to behave (when to deploy the chute mainly). The plan is for that smart device to be an Intel Edison, because of its small form factor and because I have one on hand, but a variety of devices could be used.
According to the original plan, the device would require little more than an accelerometer and a battery for power.
Before I printed the package, I decided to get the electronic circuit prototyped and prooved out. And upon doing, I ran into a snag - a snag that has not quite killed, but certainly postponed the project. I must confess, the snag is entirely due to the amount of time between me and my high school physics courses.
The first thing to do in setting up the circuit was to wire up an accelerometer. Here’s the ADXL335 that I ended up using…

In case you’re interested in this stuff and don’t already know, there are basically two kinds of accerometers you can use for a project - analog and digital. The ADXL335 is analog. Analog accelerometers are easier to use and sometimes offer more resolution. With an analog accelerometer, after you’ve accomplished the simple task of providing it 3.3V power and ground, you wire three pints (for each of the three axes in our 3D world) to your smart device and each has a voltage value that represents the amount of acceleration (g-force) acting on that axis at any given moment in time. So reading an analog accelerometer is a simple matter of calling a function like .analogRead() or its equivalent on each of the three inputs.
When you have an accelerometer installed into a device securely and permanently, then it’s orientation may have some meaning. If you put it in a car, then you may care, for instance, about the fact that X is the forward/backward axis, Y is the side to side axis, and Z is up and down. In this project, however, who knows what the orientation of the device is going to be in the air. It will likely be spinning all around. Especially considering the fact that the plan involves launching this from a vertical slingshot.
So the values of acceleration on the individual axes matter not. What matters is the overall acceleration on the unit. It didn’t take much web research to remind myself of the formula…

So, let me go ahead and list some simple code for determining this. This is JavaScript. If you’re interested in writing JavaScript on a device, then head on over to my Setting up an Intel Edison post and see how I got here.
var cylon = require('cylon'); |
Cylon is a JavaScript library that makes working with devices much easier. It happens to have a bridge for the Edison, so it’s all very easy to work with.
In the above code, I’m calling my Edison eddie and I’m polling the analog pins every 20th of a second and applying the aformentioned formula to determine the magnitude.
Then, I took my Edison, accelerometer, and a USB battery pack for power and rubber-banded it all together and threw it in the air and then caught it. Do you want to see the results? I certainly did. I have to say, I was surprised. Will you be?
Here’s the overall acceleration (the magnitude of all axes)…

There was a value on the pins when I let the unit rest, and I subtracted that from all subsequent values.
I spend considerable time studying this chart with my wife (who is much smarter than me) and I have to admit there are still some parts that are a bit baffling. Here’s what (I think) I do know now…
- The ramp up before the flat line (from about 105 to 109) is my throw. That’s me adding acceleration to the unit.
- The flat line from 109 to about 122 is the span after leaving my hand and before catching it.
- The spike to a value of 800 at 123 or so is the moment the unit landed back in my hand and there’s a small rebound (bounce) at about 125.
Here’s what I’m certain I still don’t know about that chart…
- Why did the acceleration drop around 37 when (I believe) I picked the unit up from the table?
- Why did the acceleration drop between 97 and 106 just before I tossed the started my throw?
- Why is the steady value from 1 to 37 the same value as from 109 to 122 when the unit was in the air and being affected by gravity?
I may be reading the chart all wrong, and would certainly welcome your comments below.
In attempting to understand, I tweeked my code to create a delta between the last magnitude reading and the current one - a delta. The chart for the acceleration delta is perhaps a bit easier to understand…

But the biggest discovery I got out of reading these charts was that…
I’m not going to be able to detect the apogee using an accelerometer.
My error was in thinking that the acceleration force on the unit would diminish as it ascended, zero out at its apogee, and start increasing again as it descended. Perhaps I was making a noobie mistake and thinking of the unit’s velocity. The fact (as I understand it now) is that straight line from 109 to 122 means there’s nothing at all that changes at the peak of the unit’s travel, and thus no way for me to launch my parachute with this data alone.
I researched how model rockets determine the same thing, and sure enough I discovered that they tend to use altimeters or human spotters with calculators (that’s a different kind of geeky).
I did have one idea as to how to make this work. I could do a little bit of math and add up the amount of energy that was put into throwing the unit. Because the resistence to that energy (gravity) is constant, I should be able to do a decent job of calculating how long this thing is going to be in the air, cut that in half and launch the parachute based on timing. I’m not exactly excited about doing the testing that that method requires, and that’s why this project is sliding.
Thanks for reading!
Addendum (2014-12-04)
Actually, the project is back on :) I’ll explain.
I love the process I had to go through to discover that an accelerometer would not work. I don’t mind not knowing things. I mind not learning things!
I attended a meetup of the KingMakers in Redmond the other day and had a good conversation with someone with some hobby rocket experience. He said that it’s very common to use barometric altimeters to measure altitude and that the resolution is very good - something like 1 foot! Wow. I would not have guessed. I quickly considered an altimeter, but dismissed it almost as quick thinking that the resolution would be too poor. After learning this, though, it didn’t take me long to find the MPL3115A2 from Adafruit.

This bad boy is capable of .3m accuracy and even comes with a thermometer for temperature readings.
So with new information in my quiver, I’m back in the game. Look for more here on the GoChute project as progress unfolds.
Things a Web Developer Should Have Memorized
Web development involves the use of a lot of technologies and languages implemented according to a lot of standards. It’s not exactly the most cohesive stack and I would attribute that to its long and democratic evolution as well as its very broad acceptance and implementation.
At the end of the day, though, it leaves us web developers with a lot of information to wrap our heads around. It helps me to keep a bit of a reference sheet on the parts that I look up often, and even be sure that some of it is firmly committed to memory - my own L2 cache, if you will, to avoid even a glance at the reference sheet.
Here are some of the things on my reference sheet in case you find them helpful too. I’m thinking this will be a good canon of things a beginning web developer should learn as well.
URI Scheme
We take URI’s for granted, but we usually just take the simple form for granted and might see derivatives as proprietary hacks. In fact, the primary spec for URI’s is pretty robust and a lot of the derivatives you might run across are entirely valid. I helps to spend a second considering the full form and having a glance at a few examples so you’ll know how to recognize a valid URI.
<scheme name> : <hierarchical part> [ ? <query> ] [ # <fragment> ] |
The complete example that is given on Wikipedia is helpful here…
foo://username:password@example.com:8042/over/there/index.dtb?type=animal&name=narwhal#nose |
In this example, we’ve got a scheme name of foo. By the way, I’ve also heard this called the protocol. The one you see all the time is http.
We have a username and password of username:password. I use this commonly for passing credentials in to an FTP connection. Keep in mind there is no protection at all of this password. It’s passed in clear text and you should pretty much count these public credentials if you’re going to use it.
The domain, then, is example.com followed by a semi-colon (:) and the port number (8042), the full path (/over/there/index.dtb), an optional question mark symbol and query string (?type=animal&name=narwhal), and an optional pound symbol and fragment identifier (#nose).
There’s a lot more good information about URI schemes (and a few other topics :) in this Wikipedia article.
HTTP Request Methods
The HTTP request methods, which many like to call verbs, are a set of directives we get to pick from when we’re making a request to a web server. The directive tells the server something about the nature of our request, our agreement on the format and content of the request, and our expectation of the response. The list of verbs in rough order by popularity would be a good thing to commit to memory if you haven’t already. They are GET, POST, PUT, DELETE, PATCH, HEAD, TRACE, OPTIONS, and CONNECT. They are by convention capitalized and that makes it funny when you choose to shout them in the middle of an otherwise normal sentence.
If you can only memorize two of these, make them GET and POST which I would guess comprise about 98.5% of the HTTP requests currently flying around the internet.
GET. A request. A question. An attempt to convince the server to give me a representation of a given resource. If I ask for http://mydomain.com/mydocument.html via GET, I’m asking for the contents of the document itself to be sent to me.
POST. A request, but not so much a question. A POST is a way to submit new data to an existing resource (a collection for example). It’s very commonly used to receive form data.
If you want to play around with creating web requests and hurling them toward unsuspecting servers, I recommend downloading and installing Fiddler by Telerik. Fiddler makes it very easy to compose requests, analyze the results, replay requests, and tons more.
HTTP Status Codes
Memorizing the status codes is quite important. You never know when you’re going to be paired programming and get a 204 response back from a web service. In that moment, it’s going to be you against your partner and no matter how fast you’re able to get this Wikipedia article, it’s going to be much too late for your reputation. For the record, had a 204 been returned to me before I wrote this article, I would not have known it and would have been appropriately ashamed.
So make up some flash cards, hand them to your spouse and say “quiz me”. Use the full list from Wikipedia, but for the sake of completeness, a few of the important ones are listed below.
It’s certainly a bare minimum that you memorize the categories of status codes, which are…
| Code | Meaning |
|---|---|
| 1XX | Informational |
| 2XX | Success (yay!) |
| 3XX | Redirection |
| 4XX | Client Error (it’s your fault) |
| 5XX | Server Error (it’s their fault) |
If you get a 600 code, there’s really something wrong.
And here are a few of the codes that codefoster deems common or important…
| Code | Meaning |
|---|---|
| 100 | Continue |
| 200 | OK |
| 301 | Moved Permanently |
| 401 | Unauthorized |
| 403 | Forbidden |
| 404 | Not Found |
| 418 | I’m a little teapot (no joke… look it up) |
HTTP Header Fields
HTTP header fields are all of the things you get to sprinkle into your web request to be more specific about what you’re attempting to do with that request. And then they’re also sprinkled into the response back from the server. Most client SDKs that wrap HTTP calls provide the headers as a collection. This is basically so you can avoid writing regular expressions, and avoiding writing regular expressions is sort of the whole point of being a software developer I think.
There’s obviously way to many possible header fields to memorize, but I’ve found myself going back and looking up some of these a dozen times, which is far less efficient than just take a little time to commit the common ones to memory. You can get the complete (if that’s possible) list of fields on the Wikipedia article, but here’s what I recommend for learning the HTTP header fields that will be the most valuable for you. Use an HTTP sniffer like the one I mentioned already - Fiddler - and watch the requests and responses that are sent and received for some common traffic such as when you’re simply browsing the web or when you’re calling web services. Then make a list of all of the request headers and response headers you see go by and look them up on that Wikipedia article I mentioned and understand and memorize each.
HTML Header Information
There’s plenty to memorize within the context of the web platform languages - HTML, CSS, and JavaScript, but I won’t enumerate all of those here. I will, however list some HTML header information that I think is sort of cross-concern and would be helpful to have in your head.
Put all of the various HTML DOCTYPE formats out of your mind and simply memorize the one simple one that HTML5 gives us - that is…
<! DOCTYPE html> |
It’s by no means a complicated line, but for some reason I found it hard to memorize. I guess it’s due to how infrequently I actually have to write it and the strange syntax - <! prefix, no closing tag or self-closing tag, upper case DOCTYPE and lower case html.
You can look at the meta tags that are still popular such as keywords and description, but honestly I don’t think there are many more. The use of meta tags is declining I believe, and even the use of keywords and description - despite their purpose for improving SEO (search engine optimization) - supposedly has little to no effect.
Well, I hope this is helpful to have this information in one spot. Now, do what it takes to make sure that one spot is in your brain instead on this blog post.