Node.js
Beautiful Cascading Node Config
FYI, this is a repost. I lost this post’s source markdown and just recreated it for posterity.
I just learned something, which instantly makes it a good day.
I’ve been on the lookout for a really good pattern in Node.js projects to allow a user to…
Define configuration variables in a JSON config file (not flat environment variables!)
Allow them to override the configuration variables with command line arguments
Make the command line arguments work like any good, modern CLI with double dash full names (i.e.
--foo bar) or single dash aliases (i.e.-f bar)Let the dev know if their code isn’t working because a certain configuration variable hasn’t been set
Here’s what I have now.
let config = require('./arguments.json'); |
So, the arguments.json file that we bring in is a place we can define arguments permanently so they don’t have to be included on the command line.
Then we pull in a dependency on the command-line-args package. I was delighted to discover that this package works exactly like I expected it too. For each argument, we can give it a long name (i.e. argumentA) and a short name (i.e. a). Finally, I added the required property myself, which I’ll show you in a second.
Next, I coerce these two sources of configuration values using a spread operator. I talked a lot more about spread operators in my Level Up Your JavaScript Game! - Other ES6 Language Features post. The order of these two spread objects is such that it will take the values in my file first, but then override them with command line arguments if they exist.
Finally, I added another little trick that wasn’t built in to the command-line-args package (although I think it should be). I added the ability to make certain arguments required, and if not to throw an error so the user knows exactly why things don’t work.
That’s all!
NPM Link
My buddy Jason Young (@ytechie) asked a question the other day that reminded me of a Node trick I learned sometime ago and remember getting pretty excited about.
First, let’s define the problem.
If you are working on a Node project and you want to include an npm package as a dependency, you just install it, require it, and then do a fist pump.
If, however, you are in one of the following scenarios…
You find a great package on npm, but it’s not exactly what you want, so you fork it on GitHub and then modify it locally.
You are working on a new awesome sauce npm package, but it’s not done yet. But you want to include it in a node project to test it while you work on it.
…then you’re in a pickle.
The pickle is that if in your consuming app, you’ve done a npm install my-awesome-package then that’s the version from the public registry.
The question is, how do you use a local version.
There are (at least) two ways to do it.
The first is to check your project (the dependency npm package that you’ve forked or you’re working on) in to GitHub and then install it in your consuming project using npm install owner/repo where owner is your GitHub account. BTW, you might want to npm remove my-awesome-package first to get rid of the one installed from the public registry.
This is a decent strategy and totally appropriate at times. I think it’s appropriate where I’ve forked a package and then want to tell my friend to try my fork even though I’m not ready to publish it to npm yet.
I don’t want to expound on that strategy right now though. I want to talk about npm’s link command (documentation).
The concept is this. 1) You hard link the dependency npm package into your global npm package store, and 2) you hard link that into your consuming project.
It sounds hard, but it’s dead simple. Here’s how…
- At your command line, browse to your dependency package’s directory.
- Run
npm link - Browse to your consuming project’s directory.
- Uninstall the existing package if necessary using
npm remove my-awesome-package - Finally, run
npm link my-awesome-package
You’ll notice that the link isn’t instant and that will cause you to suspect that it’s doing more than just creating a hard link for you, and you’re right. It’s doing a full package install (and a build if necessary) of the project.
The cool part is that since the project directory is hard linked, you can open my-awesome-package in a new IDE instance and work away on it and when you run the consuming project, you’ll always have the latest changes.
And that’s that. I use this trick all the time now that I know it. Before I knew it, you’d see version counts like 1.0.87 in my published packages because I would roll the version and republish after every change. Oh, the futility!
The inverse is just as easy. When the latest my-awesome-package has been published to npm and you’re ready to use it, just visit your consuming package and run npm unlink my-awesome-package and then npm install my-awesome-package. Then go to your dependency package and simply run npm unlink. Done.
The Simplest Node Website
I’ll start with the code…
require('express')().get('/',function(req,res){ |
There it is. The simplest Node.js webserver/website. Three lines of code.
I know I’ve got it a bit mungled together. I’m not recommending this code. Just having fun.
Notice that I’m hanging a () directly off of the require('express'). The require statement returns a function. This is one of the most popular of the Node module patterns. Since it returns a function, hanging parenthesis off of it executes the function.
The execution of the function returns an express app, and the app supports chaining like jQuery or LINQ, so you do a .get() and then a .listen() and those are both methods of an express app.
The .get() creates the root route ('/') and then allows you to provide a function to handle that route. The function does a simple hello world.
The .listen() starts up the engine.
After creating a JavaScript file called app.js with this content in it, just type node app, and you should get zero feedback. But then hit http://localhost:3000 in your browser of choice and you’ll get the reassuring “hello world”.
By the way, if you’re using ES2015, that gets even shorter…
require('express')().get('/',(req,res)=>res.send('hi')).listen(3000);
Taking Twitter by Stream
I found a number of examples of how to hook in to Twitter’s Streaming API using JavaScript (via Node.js) and every example I found was too hard. Not really hard, but too hard.
I find so much value in simple examples. It’s the whole reason I created codeShow.
Listen, bloggers. Most of the time, folks aren’t interested in your entire awesome solution. I know it’s awesome, but you have to consider the time it’s going to take for people to get their heads around a) what it is you’re trying to do (your domain), and b) all of the other stuff you’re doing that they don’t care about.
So, in the interest of keeping it simple, let’s take a look at a simple Node.js app for hooking in to the excellent streaming API by Twitter. Let’s take a look at it in 15 lines of code.
First, a note as to why you’d want to do this. Of course, you could do the atrocious - that is, hit twitter.com and scrape some results. Yuck. Or you could do the classic - that is, use the standard Twitter API and start asking it every 5 seconds if they have anything you’re interested in yet. But why do the atrocious or the classic when you could do the fantabulous? The fantabulous is hooking into the streaming API and then letting your app just sit there waiting for Twitter to call you saying “Hey, we found something you’re interested in.”
Here it is… in its entirety…
var twitter = require('twitter'); |
The above code has a simple dependency on a rather popular Node.js module called twitter. I’m obviously assuming you are familiar with installing Node.js modules here, but that’s pretty easy to pick up.
The magic about the above code is that a) it does what it’s supposed to and b) it doesn’t do anything else.
The documentation for the twitter module is pretty sparse, but you don’t need to know much about it. You really need the documentation for the Twitter Streaming API. That will teach you what a filter type stream is, how to add a search term as a track, and how to handle the data that is returned.
That’s all for now.
(and yes, those keys are obfuscated :)
Open Existing Node.js Project in Visual Studio
Working on a coding project inside of Visual Studio is hugely helpful. VS does so many things to support the developer, that I myself (and millions of others) define it as indispensable. Whether I’m writing C# or JavaScript, I still want to do it in Visual Studio.
I have a lot of Node.js code on my box and occasionally I’ll get into a situation when I have an existing Node.js project (one that I didn’t create initially using Visual Studio), and I want to open it in VS.
When you create a new Node.js project in Visual Studio, it gives you the basic files - app.js, package.json, and README.md - and then it gives you a .njsproj file. That’s the file that lights VS up with all of the additional help that’s specific to Node.js. That’s the file we essentially need to create in an existing project, but how? It’s not exactly a new project, but according to Visual Studio’s definition, it’s not an existing project either.
I’ll show you how. But first, you have to have Visual Studio (I’m running the free Visual Studio Community 2013 with Update 4) and the Node.js Tools for Visual Studio.
First, open Visual Studio and choose File | New Project…
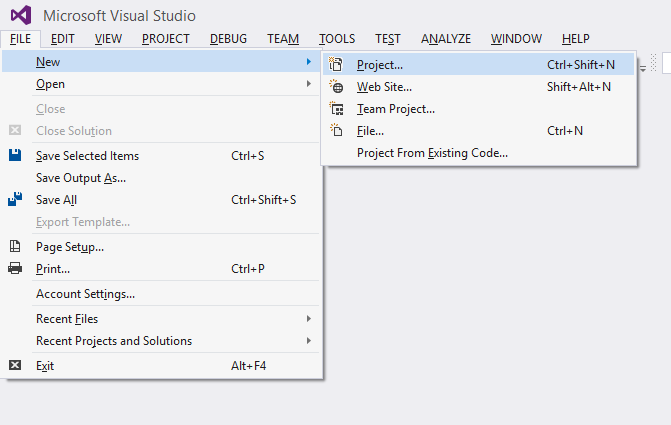
Under the Templates section you should be able to expand a JavaScript section and then choose Node.js.
On the right, you will see a big list of project templates, and notice the second one (it’s the second on my list at least) - From Existing Node.js code. That’s the one. Hit it.
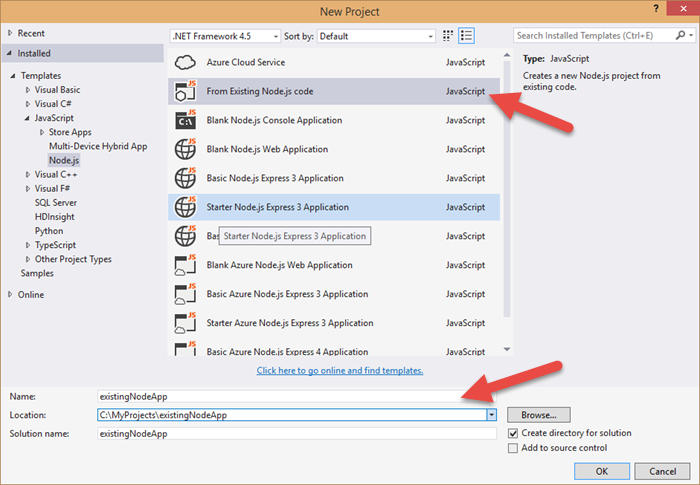
The values in the 3 boxes on the lower end of the box - Name, Location, and Solution Name - by the way, are used to populate default values on subsequent screens, but you’ll have a chance to change them. I recommend you put the name of your project in the Name field and the path to it in the Location.
Then hit OK.
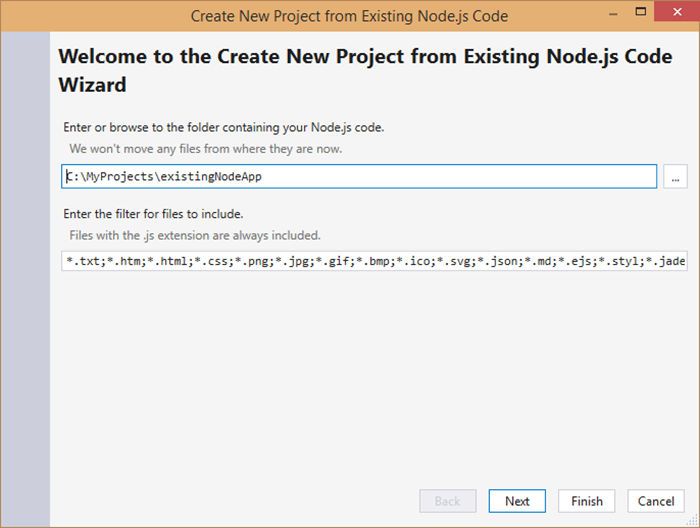
The first wizard screen prompts you for the location of your existing Node.js project. If you populated the Location field on the New Project screen, then this will already be set. The rest of this screen is self-explanatory.
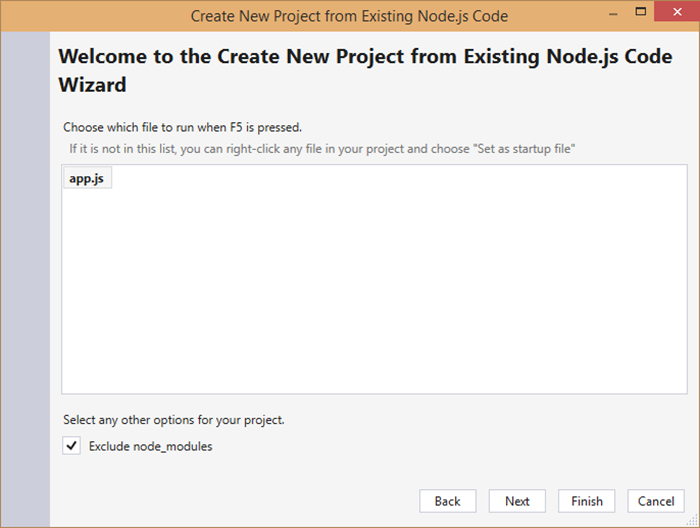
The wizard next guesses what is the entry point. If it’s not right then point it to the right one.
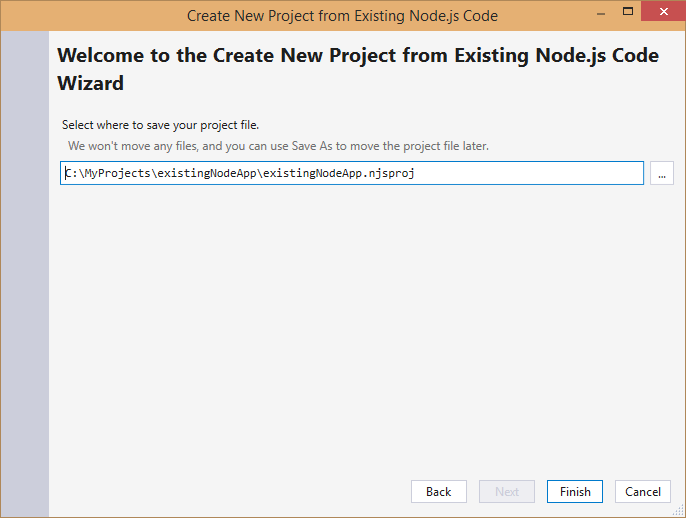
Finally, you need to indicate the name of the .njsproj file, and again it’s going to pull a default from the New Project screen if you filled that out.

And there you have it. You’ve essentially gotten a .njsproj file created where it should be. If you created this new project from the File menu like I did in my example, then your new Node.js project is inside of an unsaved solution file, so when you close Visual Studio or the solution, it’s going to prompt you to save it. The other approach - if you already had a solution - would be to open it, right click the solution file, and then choose New Project from the context menu.
Have fun with Node.js!