Posts tagged with "typescript"
Beautiful Cascading Node Config
FYI, this is a repost. I lost this post’s source markdown and just recreated it for posterity.
I just learned something, which instantly makes it a good day.
I’ve been on the lookout for a really good pattern in Node.js projects to allow a user to…
Define configuration variables in a JSON config file (not flat environment variables!)
Allow them to override the configuration variables with command line arguments
Make the command line arguments work like any good, modern CLI with double dash full names (i.e.
--foo bar) or single dash aliases (i.e.-f bar)Let the dev know if their code isn’t working because a certain configuration variable hasn’t been set
Here’s what I have now.
let config = require('./arguments.json'); |
So, the arguments.json file that we bring in is a place we can define arguments permanently so they don’t have to be included on the command line.
Then we pull in a dependency on the command-line-args package. I was delighted to discover that this package works exactly like I expected it too. For each argument, we can give it a long name (i.e. argumentA) and a short name (i.e. a). Finally, I added the required property myself, which I’ll show you in a second.
Next, I coerce these two sources of configuration values using a spread operator. I talked a lot more about spread operators in my Level Up Your JavaScript Game! - Other ES6 Language Features post. The order of these two spread objects is such that it will take the values in my file first, but then override them with command line arguments if they exist.
Finally, I added another little trick that wasn’t built in to the command-line-args package (although I think it should be). I added the ability to make certain arguments required, and if not to throw an error so the user knows exactly why things don’t work.
That’s all!
TypeScript for Documentation
TypeScript is wonderful for a variety of reasons and there’s one I want to hightlight right now.
TypeScript allows a developer or team to sprinkle types in to their codebase. These types make it much easier for your IDE to tell you you’re doing something you don’t intend to do in your logic. That’s excellent.
But the types also document your codebase well.
Here’s a function without types…
function sum(n1, n2) { |
And then with types…
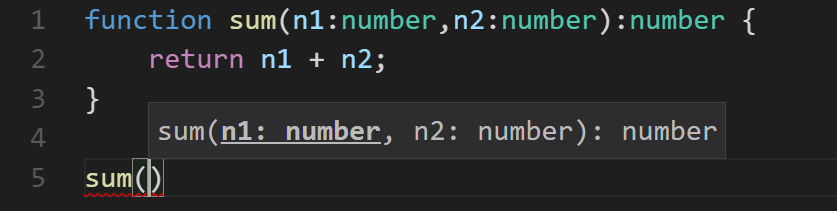
function sum(n1: number,n2: number): number { |
And the obvious advantage is that at a glance, I as a human can see what kinds of variables this function is expecting and what it’s going to give me back.
Additionally, my IDE can inspect these types and give me some information about the expected parameter types without even make the journey to the source code to look…
I can take that a step further and add some comments to the source and get even better descriptions.
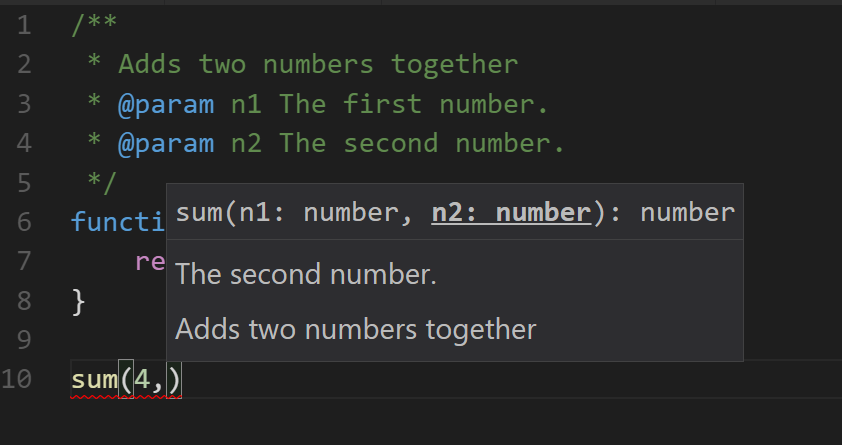
And now I can be more awesome.
Deploying TypeScript Projects to Azure from GitHub Using Continuous Deployment
I’m working on a fun project called Waterbug. You can peek or play at github.com/codefoster/waterbug.
Waterbug is an app that collects data as you row on a WaterRower and visualizes it in an Angular 2.0 app.
It’s a fun app because it uses a lot of modern stuff. Modern stuff is usually the fun stuff, and that’s why it’s always nice to be working on a greenfield project.
So, like I mentioned, one of the components of this app uses Angular 2.0. Angular is itself written in TypeScript, and you’re strongly encouraged to write your Angular 2.0 apps using TypeScript. You don’t have to, but at least in my opinion, you’d be crazy not to.
TypeScript is awesome.
TypeScript makes everything more terse, more elegant, and easier to read, and it allows your tooling (Visual Studio Code is my editor of choice) to reason about your code and thus help you out immensely.
The important thing to remember about TypeScript and the reason I think for it’s rapid uptake is that it’s not a different language that compiles to JavaScript. It’s a superset of JavaScript. That means you don’t throw any of your existing work away. You just start sprinkling in TypeScript where it benefits you. If you’re like me though, it won’t be long before you’re addicted to using it everywhere.
When you’re working on a TypeScript project, you write in .ts files and those get transpiled from .ts files to .js files.
Herein lies our first question.
Should we check those .js files (and also the .js.map files that are created by default) into our code repository (GitHub in my case)?
The answer is no.
The .js code is derivative and does not belong in source control. Source control is for source files. The .ts files are our source files in this case.
If you start checking your .js files into source control, you’re inevitably going to end up with .ts files and their associated .js files out of sync. Hair pulling will surely ensue.
I’ve gone one step further and determined that I don’t even want to look at my .js files in my editor.
In Visual Studio Code, I can go to File | Preferences | Workspace Settings, which opens (or creates if necessary) my projects .vscode\settings.json file. Then I can sprinkle in a little magic dust and tell Code that I’m not so concerned with .js and .js.map files and I’d just rather they not show up in my File Explorer pane or in my global search results.
Here’s the magic dust…
{ |
If, however, you don’t check your .js files into GitHub, then when you configure Azure to do continuous deployment from GitHub, it’s not going to pull in any .js files and that’s what your users’ browsers really need to make the site run.
So this is where some people say “Oh, blasted! I’ll just check my .js files in and call it done”.
True that works, but it also incurs technical debt. Don’t do it. It’s not worth it. Stick to your philosophical guns and don’t make choices like this. It may cost a little more up front to figure out the right way, but you’ll be glad later.
So, where and when should the .ts files get transpiled?
The answer is that they should get transpiled in Azure and it should happen each time there’s a deployment.
Now, let’s dig in and figure out how to do this.
If you do a little research, you’ll find that when you wire Azure up to look at GitHub, it does a pull of the code every time you push to the configured branch. Then it runs a default deployment script if you haven’t specified otherwise.
To run some code for each deployment, you simply customize this deployment script. You do that by adding two files to the root of your project: .deployment and deploy.cmd. You could just create these files manually, of course, but it’s better to generate them. That way you have the latest recommended default script and it specifically made for the type of application you’re running.
To generate the default deployment script, you first need to have the Azure Xplat CLI tool installed, which is a breeze. Just do npm install -g azure-cli. If you already have it and haven’t updated it for a while, then run npm up -g azure-cli.
After you have the azure-cli tool, you need to login to your Azure subscription. This is a lot easier than it used to be.
Simply type azure login. That will generate a little code for you and then ask you to go to a website, login, and enter your code. From that point forward, you’re able to access your Azure goodies from your command line. CLI FTW!
Once you get that, just go to the root of your website project (at the command line) and then run…
azure site deploymentscript --node |
This will create the .deployment and deploy.cmd files.
Okay, now we just have to customize the deploy.cmd file a bit.
If your deployment script looks like mine, then there’s a part that looks like this…
:: 3\. Install npm packages |
That script runs npm install to install your npm dependencies. It adds the --production flag to indicate that developer dependencies should be skipped since this is not a dev box - it’s the real deal!
Just after an npm install, you’re ready for the meat of the matter. It’s time to turn all of your .ts files into .js files.
To accomplish this, I added this just after step 3…
:: 4\. Compile TypeScript |
The first line is obviously a comment.
The echo shows what’s going on in the console so you can find it in the log files and such.
The last line calls :ExecuteCmd (which is a function that comes with the default deployment script) and asks it to run TypeScript’s commandline compiler (tsc) using node and pointing it to the deployment target. The deployment target is the /site/wwwroot directory that contains your site. The command explicitly uses the tsc command that’s in the deployment target’s node_modules\typescript\bin folder. That should be there because we have typescript defined as one of the projects dependencies in the package.json. Therefore the npm install from a few lines up should have installed typescript. Another strategy would be to install typescript globally, but I opted for this method.
And that’s really all there is to it. I like to jump over to my SCM site (
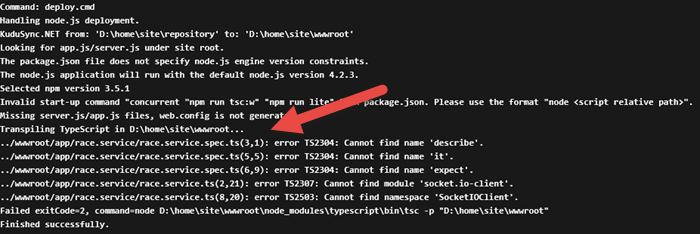
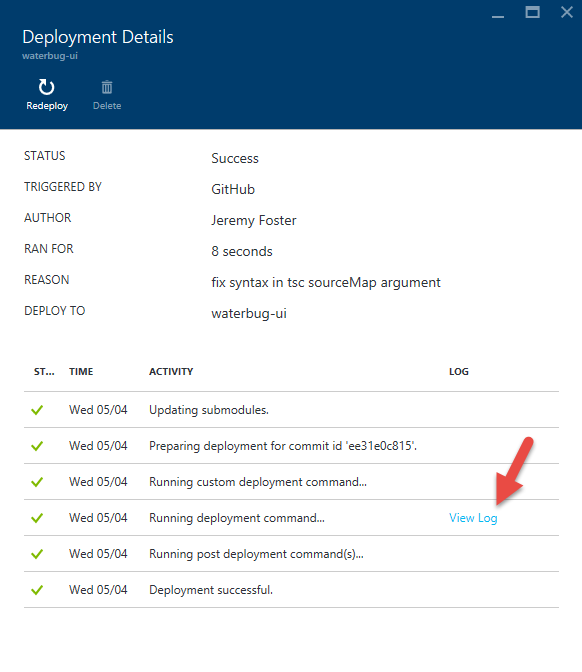
If you look in the list of deployments in your Azure portal, you can actually double-click on the latest deployment and then click on View Log to see the console output that was captured when this deployment script ran…
In the log, you can see our echo and that the transpilation process has occurred. Don’t worry about the errors that are thrown. Those are expected and didn’t stop the process from completing.