Posts tagged with "git"
You Already Have That Linux Command in Windows
I do a lot of work with Windows as well as with Linux, and I have a little trick that I’ve shared 100 times and finally decided to drop into a blog post for posterity.
So often, I’m working with groups of Windows developers trying to access Linux VM’s in Azure or Raspberry Pi’s running Raspbian and I ask them to ssh into the server.
Note:
sshis not just a tool, it’s a verb, and I concur with @shanselman who has declared that it’s correct pronunciation is much like the sound made by a downhill skier - a sort of “shoosh”. Now you know, so pass it on.
Unfortunately, many of those Windows developers commence to open PuTTY - a graphical tool for doing serial or terminal communication. If you’re opening a graphical tool for doing CLI work, there’s an inbalance in the force. You should be far more intimate with your systems terminal or command line tool and that tool should allow you to ssh.
So how do you ssh from Windows? There are a number of ways, but if you have Git for Windows installed, you probably already can if you just do one simple thing.
Git for Windows installs by default into C:\Program Files\Git. If you look in that folder, you’ll find \usr\bin. And if you look in there, you’ll find a whole ton of Linux commands, and one of those commands is ssh.
If I remember correctly, these commands are actually the Cygwin Win32 ports of most of Linux’s commands.
So to start using all of those commands, all you have to do is add C:\Program Files\Git\usr\bin to your system path.
Method 1: edit the system environment variables
Go to Start and type “environment” and then choose to “Edit the system environment variables”. Then hit the Environment Variables button, find the Path variable in either your User or System Variables, and edit it to include C:\Program Files\Git\usr\bin. Now restart any terminals and type ssh to test.
Method 2: add the path in your PowerShell profile
The method I actually use to get these commands into my path is a bit different. I add a command to my PowerShell profile. The advantage is that my profile is already sync’ed to my OneDrive account so it persists across reinstalls of Windows. So I don’t have to remember to edit my path after I reload my computer.
To do this, go to your terminal of choice and use your editor of choice to edit your $profile. I would type code $profile to use Visual Studio Code to edit it.
Then add this line somewhere in there…
$env:Path += ";C:\Program Files\Git\usr\bin" |
Again, test this by restarting your terminal and simply calling ssh. Now try scp and touch and ls. Yay! But ls already worked for you you say? That’s because PowerShell has a bunch of built in aliases, and ls is an alias for dir. So the functionality is similar, but not exactly the same.
There are a bunch of these aliases, in fact. You can see the full list here. I recommend adding the following lines to your PowerShell profile to remove these aliases and unlock the real (well, almost real) Linux commands…
If(Test-Path alias:curl) { Remove-Item -Path alias:curl } #remove alias that shadows use of real curl |
Enjoy!
The Git Add Patch Command
When you’re using Git for your version control, each commit should be atomic and topical. That is, it should contain related changes and nothing but related changes.
You don’t commit something broad in scope like “changed all the necessary files to implement feature 712”. That’s what a branch is for. Instead, you commit something like “added fetch() method call to the orders page”. That’s likely just one small part of feature 712. A whole bunch of commits end up implementing the feature.
But what about when you’re working away like crazy on your code base and you end up changing a single file in two different places and these two changes relate to different commits? Most people just go ahead and roll the changes into the same commit. Not ideal.
The hard way to do this right is to delete one change, stage and commit, and then paste the change back in.
There’s an easier way though. It’s called a patch add, but I like to call it a partial add. git add -h will show you the -p argument and inform you that it allows you to “select hunks interactively”. As much as that sounds like an online dating service for women, its actually just a really easy way from the command line to stage portions of a file and not the entire file.
Let’s say we start with this file…
//foobar.js |
Now let’s say I end up editing both of the functions in that file, but these changes are unrelated to one another. I simply changed foo to foo foo and bar to bar bar. Let’s look first at using the command line to take care of business here, and then we’ll try it with Visual Studio Code.
Here’s the changed file contents…
//foobar.js |
Command Line
Type git diff…
C:\scratch\foobar [master]> git diff |
Now to actually start the staging command, we type git add foobar.js -p and get the same diff along with these interactive options…
Stage this hunk [y,n,q,a,d,/,s,e,?]? |
There are actually a few more options than what are listed there too. You can type ?<enter> to get help on what those mean, but to spare time they are…
| Command | Action |
|---|---|
| y | stage this hunk |
| n | do not stage this hunk |
| q | quit; do not stage this hunk or any of the remaining ones |
| a | stage this hunk and all later hunks in the file |
| d | do not stage this hunk or any of the later hunks in the file |
| g | select a hunk to go to |
| / | search for a hunk matching the given regex |
| j | leave this hunk undecided, see next undecided hunk |
| J | leave this hunk undecided, see next hunk |
| k | leave this hunk undecided, see previous undecided hunk |
| K | leave this hunk undecided, see previous hunk |
| s | split the current hunk into smaller hunks |
| e | manually edit the current hunk |
| ? | print help |
Which to choose? Well, the diff that we see on the screen shows both changes. That’s too much. So we want to press s to split this hunk. That gives us…
Stage this hunk [y,n,q,a,d,/,s,e,?]? s |
…where now only one of the changes remains and we have our same interactive prompt.
The change we’re looking at is entirely related and should be in a single commit (along with possibly some other files). So we press y to stage it and then q to quit and we’re finished.
Visual Studio Code
Now let’s do the same thing using Visual Studio Code. This and a few other git-enabled IDE’s are smart enough to let you do a patch add. VS Code doesn’t call it a patch add though. It calls it staging selected lines, which actually makes good sense.
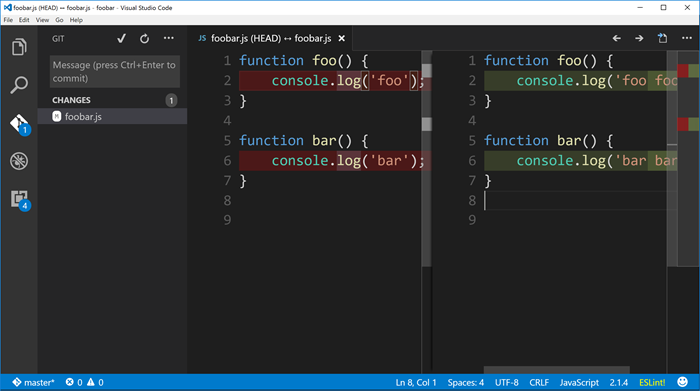
Start with the same file and changes, and view the changed file in VS Code and you should see…

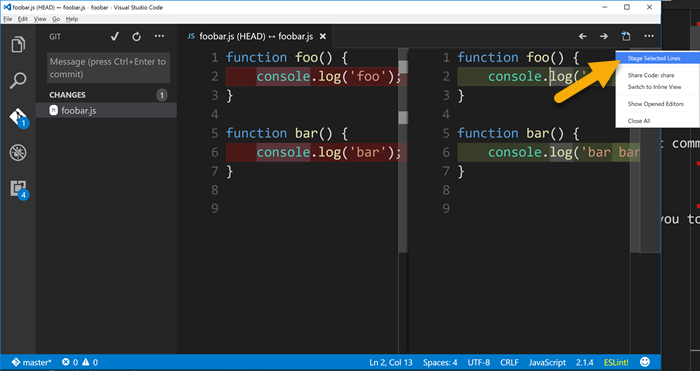
Now just put your cursor anywhere within the first change in the pane on the right and then find the little ellipse (...) on the top right corner of the window. From there choose Stage Selected Lines.

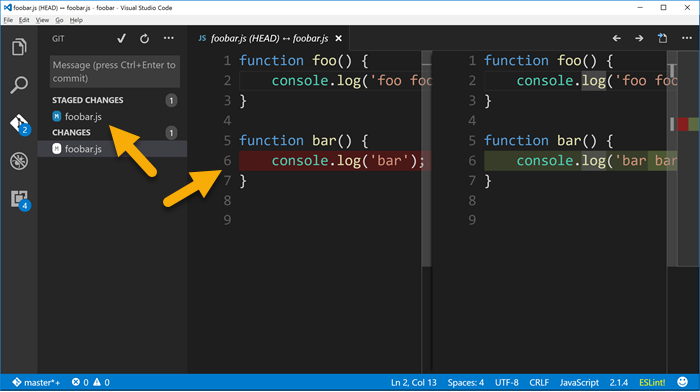
And then if you look in the Git panel, you’ll see that the foobar.js file has been staged but it also has changes that have not yet been staged.

Whether you used the command line or Visual Studio Code to stage that first change and commit, you can just go about staging and committing the rest of the file as you normally would.
The end.
Make Git Wait for Code
There’s a decent chance that you, like me, ended up with Visual Studio Code incorrectly configured as Git’s core editor. I’m talking about Windows here.
Take a look at your .gitconfig file and see what you have configured. You will likely find that in c:\users&lt;username>.
Under the [core] section, look for the editor key. What do you have for a value?
If your Visual Studio Code path ends with code.cmd, then it’s not correct. It should end with code.exe. And it should have a -w flag. The -w flag tells the launching context to block until the process is terminated. That means that if you run a Git command from the command line that launches Code as a text editor, the command line should be blocked until you’re done editing that file and shut down Code.
Let’s say, for instance, that you have committed some files and then realize that you forgot one. You could commit it as a new commit, but it makes more sense to tack the change on to the last commit (assuming you haven’t pushed your commit up to a shared repo yet!).
To do this, you simply run git commit --amend at the command line. This amends your staged files to the last commit. It also launches your default text editor so you can determine if you want to keep the same commit message you elected previously or overwrite it.
This should open your text editor, wait for you to make and save your changes and then shut down your editor before releasing control of the command line and continuing on.
You can simply edit your .gitconfig file to add this configuration, but it’s easier to run this…
git config --global core.editor "'C:\Program Files (x86)\Microsoft VS Code\code.exe' -w"
…from your command line.
Hope this helps you like it did me. Credit goes to F Boucheros on this Stackoverflow post.