
App Development
Event Handlers in a Windows 8 App
One of the nicest things about JavaScript is the way it considers function. Instead of being wholly owned subsidiaries of classes, functions are as portable as any other object, and their arguments are dynamic too. This makes for some elegant event handling.
In this screencast, I’ll attempt to give you a taste of how to wire up events in a Windows 8 app using JavaScript. It’s a pretty basic scope and I don’t enumerate the many events available on the many WinJS controls. I also don’t cover the event model around gestures or manipulations, but I hope to share more about those exciting areas later.
Storage in a Windows 8 App
Apps generate data. Some of them generate a ton of data and others just a few little bits and pieces. Allow me to enumerate your options for storing stuff when you’re working on an app for Windows 8. There are subtle differences between the way storage is done in an HTML/JS app versus a .NET or a C++, but for most of the techniques you’re just accessing the WinRT library so the steps are practically identical.
Before we enumerate the types of storage, let’s talk about the types of data that typically get generated in an app. I’ll break them up into application state, user settings, application data, and user data.
Application State
Application state (or session state) is the data that pertains to what the user is doing in their use of an app. If the user has browsed to the registration page and starting typing their name and address in, then that data is session state. If the user has to drop their tablet (figuratively of course), switch apps, or something else and doesn’t get back to it for some time, then the kind thing (only humane option?) to do is remember their state and restore it when they return.
User Settings
A user has preferences. Your user might want the music in their game turned off. They might want to choose a theme color. They might want to turn on automatic social sharing. These are preferences. They usually take up hardly any space, but it’s they’re really important to your user. The best thing to do is store them in the cloud instead of just on a device so the user feels like they are remembered wherever they go.
Application Data
Application data is the data generated by your app that may have everything in the world to do with your user, but your user is going to assume that the app is holding that data for him and doesn’t want to manage it himself outside of the app. If you installed a task list app, you’d expect it to hold tasks for you, right? That’s app data. The line can be blurry between app data and user data, so read on.
User Data
User data is data generated by the app, but belongs more to the user than the app. The user expects to be able to send the data to a friend, open it in a different program, or back it up to the cloud. User data is everything you find in the libraries – the documents library, the music library, etc.
Implementation
So, let’s talk about how to implement these.
**Application state **can be stored in WinJS.Application.sessionState. That’s an object that WinJS and Windows handle for you and plays well with the lifecycle of your app. Saving to the sessionState object couldn’t be easier. Just issue a command like…
WinJS.Application.sessionState = { |
You could do this anytime during the use of your app or you could wait until the app.oncheckpoint event (look on your default.js page for that) and just do it when your app is on it’s way out of the spotlight.
Keep in mind that this is for session data only. Windows assumes that if your user explicitly ends the app, they are ending their session and sessionState is not stored. You also can’t count on it after an application crash, so make sure it’s only transient data that wouldn’t ruin the users day to lose.
**User settings **are again very important. You have many options for storing them, but only two that I recommend. The first is localSettings and the second is roamingSettings. Only use localSettings if you have good reason not to roam the setting to the cloud. If you use roamingSettings and the user doesn’t have a Microsoft account, it will still store locally. Both of these are accessed from Windows.Storage.ApplicationData.current. You can store a new setting value like this…
localSettings.values["gameMusic"] = "off"; |
**Application data **can work much like the user settings technically, but it serves a different purpose. Imagine the task list app I mentioned before. The tasks themselves must obviously be stored and you - the developer - have quite a variety of options. You have to ask yourself a few questions like:
- Does the user need to share the app data with select others?
- Does the user need access to the data on multiple devices?
- Does the data feed any other apps either on the same or another platform?
It’s very possible that just storing data local to the device is plenty. In that case, the localFolder from Windows.Storage.ApplicationData.current. This spot is dedicated to storing data for your app and your app only. No other apps have access to it actually.
If you have a very small amount of application data (less than 100k) then you can use the roamingFolder from the same Windows.Storage.ApplicationData.current. This data will, just like the roamingSettings, be synced to the user’s online profile and back down to any other devices they might log in to.
You have a variety of other options for storing data such as a local database, online database, online user drive, and more, but I’ll save those for another day and another post.
Finally, we’ll talk about user data. Unlike application data, users will expect to have ownership of their user data. When a user creates a spreadsheet, this is not data that just exists inside of Excel. The user expects to have that spreadsheet in their documents and be able to work with it (share it, rename it, organize it, …) outside of Excel.
If your app is one that will work with user data, then you need to pick a file format and create the association. This is done in the package.appxmanifest where you’ll also need to add a capability to access the users documents. It’s quite a easy thing to use the open and save file dialogs from your app and the user will love having full access not only to his documents, but also all apps he has installed that implement the FilePicker contract.
That’s quite enough on storage for now. Perhaps some of the following locations from within the Windows Dev Center will be helpful to you…
WinJS.Application.sessionState object
Manage app lifecycle and state
Optimizing your app’s lifecycle
Have fun.
Referring to Package Files
When you’re working with a Windows 8 project in VS2012, you have some number of project files in your Solution Explorer. You have HTML files, CSS files, JavaScript files, images, and perhaps some XML or JSON or TXT files - something like that.
If, in the course of executing logic in your app, you need to access these files, there are a number of ways and you should know when you might use what and why… that’s as opposed to being incapacitated or stabbing in the dark.
Option 1 - relative or ms-appx reference
Your first option is to refer to the file using a relative or an ms-appx reference.
You’re working with a web app here, so remember that if you’re sourcing an image on an HTML page, you can include a relative link like myimage.png to refer to an image of that name in the same location as that HTML file.
Remember that ms-appx is a scheme analogous to the http in http://, but instead of referring to the _hyper text transfer protocol _(the transfer protocol of the Interweb) it refers to the current package. If you’re making a breakfast cereal inventory app (don’t ask me how I came up with that as an example, but I think it’d sell!) then ms-appx:// is the scheme to use to access your app’s assets and _ms-appx:///cereals.xml _would refer to the cereals.xml file. This doesn’t give you a benefit over a relative link, though.
And wait… hold the phone. Why did we use three slashes? That’s simple. It’s because we want to refer the current package self as opposed to any referenced packages within the current package. Actually, ms-appx:///cereals.xml is equivalent to ms-appx://{packageid}/cereals.xml where {packageid} is the package identifier from the manifest file.
Option 2 - WinJS.xhr()
The first option is likely your best choice if you’re referencing declaratively from within an HTML file. Your second option and the one you’ll likely use when you’re working imperatively within JavaScript is to hit the local asset using xhr. The WinJS.xhr method takes a URL and returns gives you its word (a promise) that it will return with a response and will call your then/done when it’s back.
The response from your xhr call might be some JSON data, some XML, an HTML document, or just some random text. Anyway, you get to decide what happens with it.
Option 3 - installedLocation
The third option is one most recent one that I discovered and I like it.
If you look at the _Windows.ApplicationModel.Package _class, you’ll see that you can access the current package using the current method. If you look at the current package, you’ll see that you have an installedLocation property. And if you look at that installedLocation, you’ll see that you have a getFileAsync method.
The getFileAsync method returns (via a promise) a StorageFolder, and that folder contains all of the files in your project. Tada!
One good example of a use of this method is the online documentation for the setHtmlFormat method that hangs off of DataPackage.
Conclusion
As always, it’s possible there are even more ways to skin the cat than I’ve enumerated. These are the three I know. I hope it’s helpful.
Happy reflecting!
Snap to Your Tiles
Let’s say you have a bunch of tiles in your Windows 8 app.

And the user grabs this list with their finger and pans some distance to the right. There’s a chance the list will end up landing in a position like this…

Notice that the tiles at left are cutoff. The list has panned some arbitrary distance and stopped where fate stopped it. I know it’s all scientific, but it’s fun to say that fate landed it here.
But what if you don’t want to put your app in fate’s fickle hands and would rather stop every time at a tile’s edge. That flick from my last example, then, should find you here…
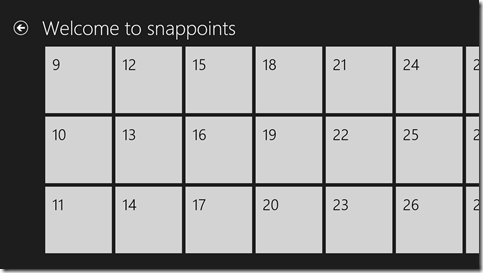
…with the edge of tiles 9, 10, and 11 neatly lined up on your left margin.
Is that possible? Of course it is.
Is it easy? Yep. That too.
Once again, the custom CSS properties in Windows 8 come to the rescue. I’m going to talk about a couple of properties in the -ms-scroll* area. If you want a good list of the available properties, just type -ms-scroll in a CSS sheet and let IntelliSense be your guide.
We would implement this using snap points. Snap points are an IE concept. I don’t know if they’ve been suggested to the W3C for consideration in the CSS standard (I couldn’t find anything that indicated they have), but they should be because they’re super helpful.
If you have a container whose content exceeds the boundaries of the container, then scrolling is necessary to view all content, right? And when a user flicks with his finger, the contents scroll within the container and upon letting up his finger, the user watches his content scroll for a bit longer with some apparent inertia, right? Well, a snap point is a location in that content where it makes sense for that content to stop scrolling. You can define snap points in one of two ways: mandatory or proximity.
Defining a container to use mandatory snap points means that it will always stop at the nearest snap point. It will never stop somewhere in between. Defining it to use proximity snap points, however, means that if it ends up close enough to a snap point then it will find its way there, but if it’s not close enough then it will be fine with coming to rest between points.
Here’s the CSS you should add to achieve the above…
.snappoints #list .win-viewport { |
Let me break that down for you.
.snappoints is the name of my page, which in Windows 8 navigation apps automatically gets a class with your page’s name. So .snappoints essentially namespaces this CSS to this page.
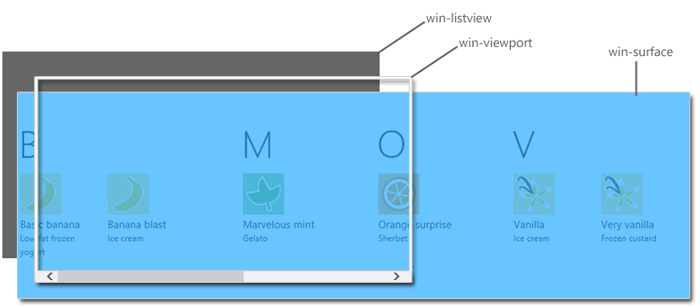
#list is the ListView control on my HTML. I manually gave it the ID of list. BTW, I recently discovered that if you know you’re only going to have a single list on your page, it might be easier to forgo the naming of it and instead just refer to it with [data-win-control=WinJS.UI.ListView]. Nice, eh?
.win-viewport is the viewport of my ListView. If you work with the ListView much, and haven’t seen it already, you should definitely check out Styling the ListView and its itemsfrom the Dev Center. In that article, it breaks down the components of the ListView so you can have a shot at knowing how to style it. Here’s how it visually defines the win-viewport…
The first part of the property (mandatory) indicates that we are using mandatory snap points, so as I said before, we are assured of coming to rest on a snap point and never in between.
The second part of the property (snapInterval(0px,200px);) indicates that I want to start the content at the very beginning (0px) and I want a snap point every 200px. I have to know that my tiles are 200px wide to make this work. CSS is not actually recognizing a tile’s edge, just points every 200px.
I was a little bummed that I couldn’t find a way to indicate manually (with CSS properties on HTML elements I guess) where I want snap points to be and then just have the container recognize them, but this way works pretty well too.
That’s it. Happy snapping!
Implementing the Settings Contract
I presented at a developer camp in Redmond recently on the subject of implementing Windows 8 contracts. You can find the video on Channel 9. Unfortunately, I didn’t have enough time to cover the implementation of the Settings contract, so I want to cover that now in the attached screencast.
The Settings contract is an important one, since almost every app known to mankind has some user preferences or options to store. In previous Windows development, the convention was to put options like this into the Tools | Options menu item, but there are plenty of examples of apps that chose to find another place for it.
In Windows 8, the sanctioned place to put your user’s settings is in the Settings pane. This is the pane the user gets when he does one of the following…
- swipes from the right to access the Charms and then chooses the Settings charm
- presses Win + I
The Settings place should hold things like…
- account management (login/logout)
- preferences
- app version information
- help
- and so on
The pane is divided into settings that you (the developer) have control over and those that you do not. Everything below the horizontal line is system level and unavailable for change. Above the line, the Permissions entry is owned by Windows, but you are responsible for any more. Your settings entries might be: Settings, Help, About, Permissions, or they might be Account Control, Sound Settings, Video Settings, Permissions.
I hope the included screencast helps you ramp up quickly on how to do this in HTML/JS. If you have any questions, leave a comment. Thanks. [screencast removed]
But WHY do we pan horizontally?
You may have heard or read or noticed, that in Windows 8, things move side to side. What’s with that? We’ve been scrolling vertically on the web since the stone age (and by stone age I’m referring to the early 90’s). And while we’re on the subject, what’s the difference between panning and scrolling anyway?! Hold your britches… you’re about to find out.
First the second question and then second the first.
What’s the difference between panning and scrolling?
Usually, when terms are being defined, the author looks up definitions from reputable sources like Merriam Webster or Wikipedia (Noah turns over). But I’m going to avoid the bias and just shoot from the hip with the bullets on hand. That’s cowboy for I’m going to define them myself.
**scrolling **= moving the contents of a smaller, fixed viewport so that some subsequent content is made visible while some other content falls out of view
Not bad. Here’s panning.
**panning **= horizontally moving the contents of a one’s view so that some subsequent content is made visible while some other content falls out of view
Hopefully, you can see the differences there. First, panning is horizontal. When you’re watching a movie and the scene slides to one side or the other it’s because the cameraman has panned the camera. If the scene moved up or down, the cameraman would have been tilting the camera.
It would technically be more accurate to describe a lateral movement of content on the screen as a strafe, which moves the camera to the side instead of rotating it, but I don’t know… maybe strafebars just doesn’t roll off the tongue well enough.
So, scrolling involves a viewport that doesn’t necessarily coincide with “one’s view”. In other words, panning occurs when all (or perhaps mostly all) of your view is moving, and again always in a horizontal direction.
And this is exactly what tends to happen in a Windows 8 app. Modern views and especially modern Windows 8 views tend to contain more focused content. Instead of a myriad of fragments of information representing what a user might do, Windows 8 tries to immerse the user in the one thing they are doing at that moment. So instead of having many small islands of information to scroll, users are free to pan the entire view.
Now on to the why horizontal question. Why does most everything in a Windows 8 application pan horizontally?
There are a number of reasons. And they’re all really good.
First, more devices have landscape oriented screens than portrait. That means that the horizontal axis is the long one and it’s much more elegant to pan content along the long axis, because more data fits on the long axis than fits on the short one.
Second, more of the languages in the world are read horizontally (left to right or right to left) than are read vertically, so the eye is accustomed to the general content flow being horizontal.
Third, the human hand and arm system is more comfortable swiping side to side then up and down. Try making an exaggeratedly large vertical motion with your hand and then try the same horizontally. I think you’ll agree.
Finally, horizontal panning is unique and differentiating. Which is fitting seeing as this is one of the most unique and differentiating operating systems I’ve ever seen released.
Horizontal Panning
If you drop a ListView into your HTML page and fill it with data that fills up your page and overflows, what happens to the overflow? The answer is that it gets cut off by the right side of the screen and thus hints to the user to swipe to scroll the rest of the content into view. Easy.
But what if you aren’t using a ListView, or what if you have some content that you want to show next to your ListView and you want them to both pan together when the user swipes?
Well, I’m going to tell you.
The answer in short is… overflow-x: scroll.
And the answer in long follows.
Try this simple HTML.
<section aria-label="Main content" role="main"> |
The section should already be defined in you app if you started with a project template, so you should only need to define the div. Where I’ve put ellipses (…) you should add a bunch of text so that this div contains more text than a single screen should hold.
Now add some CSS to make this act the way you want. This should do it…
.mypage section[role=main] .sidescroll { |
(Note that this style rule starts with .mypage. If you are using the navigation template, then that is necessary to scope the style rule to this page only and keep it from affecting other pages. If you didn’t start with the navigation template or if the style rule isn’t working for you, then try simply removing that.)
The magic (well, it’s just science actually) line there is overflow-x: scroll. If we just used overflow: scroll then the div would try to allow scrolling on both axes. We only want horizontal scrolling though, so overflow-x is the property of choice.
Sometimes you want one element to stay fixed while the rest of the page pans. In that case, you would just drop the element outside of and before this scrolling div. Easy peasy.
That’s it. Happy panning!
How the WinJS.UI.ViewBox Actually Works
I just learned something about the WinJS.UI.ViewBox and wanted to share.
I have known for some time what the ViewBox does, but I recently learned how it does it.
First, let me reiterate what the ViewBox does. I compared its functionality to the FlexBox in my When to Use ViewBoxes and FlexBoxes post. The ViewBox itself snaps to the size of the container it is in and resizes its child (without changing its aspect ratio) to fit.
How does it actually do that? It’s pretty cool. It does it with a CSS transform. If you create a ViewBox and then look at the DOM Explorer, you’ll see something like this…
<body> |
Notice a few things about this generated code. First, notice the inline style attribute on the second div. It’s not on the ViewBox itself, but rather on its first (and only) child. The values indicate that the div should be translated 171px from the left. The ViewBox has calculated the shape of my screen (1366 x 768 in this case) and the shape of that only child div (1024 x 768), and determined that it needs to scoot over to the right 171 pixels in order to center it within the screen.
Now I snap my app and then check out the DOM Explorer again and here’s what I have…
<body> |
So there you have it. In order to arrange the child div in the center of the snap view, it’s going to need to translate (move) it down 264 pixels and shrink it to 31% (0.3125) of its original size.
I could have continued not knowing the how of this, but I’ll sleep better tonight knowing it.
How to do Semantic Zoom in an HTML/JS App
Semantic Zoom is super easy, but even the easy things can use some conceptual explanation and examples to clarify them. Rest assured that once you see it, you’ll go “Ah! That won’t be a problem then.”
If you use XAML/C# to make your Metro apps, then you should check out Jerry Nixon’s post on semantic zoom.
So, I’m going to be talking about Semantic Zoom. You know what that is right? It’s different from optical zoom. It’s a Windows 8 differentiator and it’s really helpful. It’s a way of zooming out of some information and making it easier to orient and easier to consume. Optical zoom just scales everything. Semantic zoom shows a different logical version of the same list.
Any given list in a Windows 8 screen may be 3 or 4 or 5 screens worth of horizontal information, right? Well, it’s not hard to pan that far, but it’s not always easy to really see what your scope is when it’s on 4 screens. When a user semantically zooms out, he is hoping to get oriented with your data. He is hoping to rise up so he can understand and/or so he can dive back in at just the right place.
I’m going to provide an example here. My example is a list of attractions in Kauai. Each has a category property - things like Flora, Scenery, Waterfall, etc. I will use these categories to group my list, but with the grouping and all of the content I want to show, the list is about 4 screens wide…

This might be a good scope of data for this view in my app, but at the same time it might be too much to expect a user to be able to consume in a glance. So, we implement semantic zoom. When the user pinch zooms, we want to show them something like this…
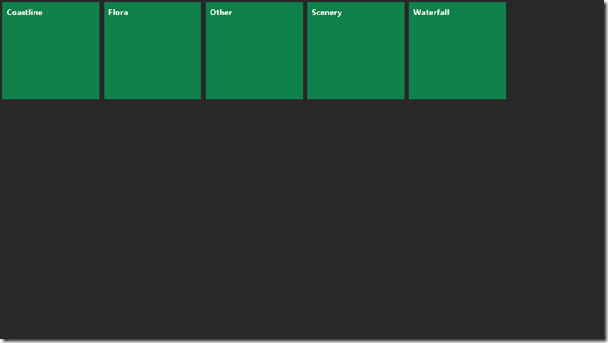
This is not very stylish, I know, but it serves to make the point. We want to indicate in much less horizontal space (and hopefully on a single screen) what our data contains. In this case, we’re showing the categories. We could get quite creative with what we show here. The concept is to logically expand our scope to orient the user.
Now when the user chooses the Waterfall tile, he’ll be semantically zoomed back in and will be taken directly to the waterfall section. The user can also zoom back in using a stretch zoom gesture (two fingers on the screen and then moved further apart).
Let’s move on to how to implement this. It’s by no means rocket science. Unless of course you’re building an app for… er… rocket science.
Start off with a blank Metro application. First thing you’re going to need is the data.
In your default.js file, add an onready function like this…
app.onready = function (args) { |
And then inside of it add your data like this…
var attractions = [ |
And then you need to turn that simple JavaScript array into a Binding List so you can bind to it. Like this…
var attractionsList = new WinJS.Binding.List(attractions); |
And then you group that list like this…
var attractionsListGrouped = attractionsList.createGrouped( |
And there’s that.
Now, let’s visit your HTML file (default.html).
You’ll need your actual ListView…
<div id="zoomedinlist" data-win-control="WinJS.UI.ListView"></div> |
And you’ll also need a template and a header template…
<div id="headertemplate" data-win-control="WinJS.Binding.Template"> |
And then you need to bind the ListView to your data, so go back to your default.js file and after the var attractionsListGrouped statement, add this…
var zin = q("#zoomedinlist").winControl; |
Now you should have a working list, and all we have to do is add the semantically zoomed out version and the semantic zoom control itself.
So, on the default.html page, add the semantic zoom control and the zoomedoutlist to the list you already have like this…
<div data-win-control="WinJS.UI.SemanticZoom"> |
(note that last code should be pasted over the existing zoomedinlist since we already had that there)
Then, that zoomedoutlist needs some data binding, so we go back to the default.js and add this…
var zout = q("#zoomedoutlist").winControl; |
OKAY STOP. Let me explain what’s going on here. Quite simply, we’re just adding two different ListView controls with their own data bindings (that happen to be based on the same data, and then we are wrapping both of those up with the WinJS.UI.SemanticZoom control.
Keep in mind, that there are no constraints necessarily on what can comprise those two lists. You, the developer, are responsible for making sure that your semantic zoom control makes good sense for the user.
Now, please notice that the data source for the zoomed in list is a grouped list of attractions, while the data source for the zoomed out list is a list of groups. Thanks why we get the categories for our zoomed out tiles.
I added a couple of classes in the templates that I had you paste into your HTML, so if you add the following style rules to your default.css file, then that should make everything look sensible…
.item-image { |
And that should do it. Leave a comment if this was helpful. Actually, leave a comment if it wasn’t helpful too. :)
Happy zooming.
All Windows 8 Quickstarts
If you’re looking for training material for Windows 8, you’ll find quite a lot online. It can be overwhelming finding stuff online though. I consider it part of my job to help you locate things, so here’s a tip. Just do a search in the Windows 8 Dev Center (http://dev.windows.com) for the word ‘quickstart’; and you’ll find a lot of walk-through articles that are really helpful in figuring out how things work. Here’s a link to that search directly: http://social.msdn.microsoft.com/search/en-US/windows/apps?query=quickstart&Refinement=180