How to do Semantic Zoom in an HTML/JS App
Semantic Zoom is super easy, but even the easy things can use some conceptual explanation and examples to clarify them. Rest assured that once you see it, you’ll go “Ah! That won’t be a problem then.”
If you use XAML/C# to make your Metro apps, then you should check out Jerry Nixon’s post on semantic zoom.
So, I’m going to be talking about Semantic Zoom. You know what that is right? It’s different from optical zoom. It’s a Windows 8 differentiator and it’s really helpful. It’s a way of zooming out of some information and making it easier to orient and easier to consume. Optical zoom just scales everything. Semantic zoom shows a different logical version of the same list.
Any given list in a Windows 8 screen may be 3 or 4 or 5 screens worth of horizontal information, right? Well, it’s not hard to pan that far, but it’s not always easy to really see what your scope is when it’s on 4 screens. When a user semantically zooms out, he is hoping to get oriented with your data. He is hoping to rise up so he can understand and/or so he can dive back in at just the right place.
I’m going to provide an example here. My example is a list of attractions in Kauai. Each has a category property - things like Flora, Scenery, Waterfall, etc. I will use these categories to group my list, but with the grouping and all of the content I want to show, the list is about 4 screens wide…

This might be a good scope of data for this view in my app, but at the same time it might be too much to expect a user to be able to consume in a glance. So, we implement semantic zoom. When the user pinch zooms, we want to show them something like this…
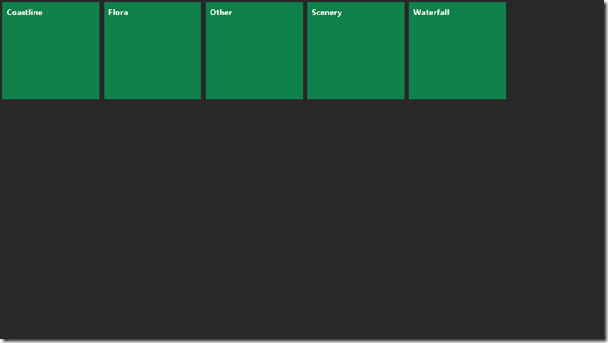
This is not very stylish, I know, but it serves to make the point. We want to indicate in much less horizontal space (and hopefully on a single screen) what our data contains. In this case, we’re showing the categories. We could get quite creative with what we show here. The concept is to logically expand our scope to orient the user.
Now when the user chooses the Waterfall tile, he’ll be semantically zoomed back in and will be taken directly to the waterfall section. The user can also zoom back in using a stretch zoom gesture (two fingers on the screen and then moved further apart).
Let’s move on to how to implement this. It’s by no means rocket science. Unless of course you’re building an app for… er… rocket science.
Start off with a blank Metro application. First thing you’re going to need is the data.
In your default.js file, add an onready function like this…
app.onready = function (args) {

};
And then inside of it add your data like this…
var attractions = [
    { name: "Fern Grotto", category: "Flora", location: "East", imageUrl: "http://www.kauai.com/photos/kauai/point/98/super/fern_grotto-kauai-attraction.JPG", description: "Only accessible by boat or Kayak, the fern Grotto is located about two miles up Kauai's Wailua River, the only navigable river in the State of Hawaii." },
    { name: "Hanalei Valley Lookout", category: "Scenery", location: "North", imageUrl: "http://www.kauai.com/photos/kauai/point/51/super/hanalei-valley-lookout-kauai-attractions-3.jpg", description: "The Hanalei Valley is an enchanted site charmed with the likes of countless waterfalls, rainbows, fields of taro and hidden treasures waiting to be explored." },
    { name: "Hanapepe Swinging Bridge", category: "Other", location: "West", imageUrl: "http://www.kauai.com/photos/kauai/point/93/super/843726541306971801.jpg", description: "Located in old town Hananpepe a Historical sight made up of an eclectic group of galleries and shops. Home to Friday night Art walk." },
    { name: "Kalalau Lookout", category: "Scenery", location: "West", imageUrl: "http://www.kauai.com/photos/kauai/point/94/super/3075381091306977440.jpg", description: "The Kalalau lookout stands at 4,00 feet above sea level and gives you a peek at a valley that as late as the 1920's still was the home to residents who farmed crops there. The only way into the valley is by foot along the Kalalau Trail or by boat." },
    { name: "Kauai Coastal Path", category: "Coastline", location: "East", imageUrl: "http://www.kauai.com/photos/kauai/point/100/super/kauai-coastal-path-kauai-attractions.JPG", description: "Kauai Coastal Path is a scenic and and safe place to walk, run or bike while taking in the beautiful scenery of Kauai's East Side." },
    { name: "Keahua Arboretum", category: "Flora", location: "East", imageUrl: "http://www.kauai.com/photos/kauai/point/95/super/keahua-arboretum-kauai-attractions-5.JPG", description: "The Keahua Arboretum is planted with native and introduced plants by the University of Hawaii and is used as an outdoor classroom to students and visitors. Cool off in the cold mountain spring water and enjoy lunch at one of the picnic sites." },
    { name: "Kilauea Lighthouse National Wildlife Preserve", category: "Coastline", location: "North", imageUrl: "http://www.kauai.com/photos/kauai/point/49/super/kilauea_lighthouse_national_wildlife_preserve-kauai-attraction.JPG", description: "Kilauea Point National Wildlife Refuge started in 1985 by the U.S. Fish and Wildlife Service is marked by its towering lighthouse. The ocean cliffs and tall grassy slopes of a dormant volcano provide a protective breeding ground for many Hawaiian seabirds" },
    { name: "Koloa Landing", category: "Coastline", location: "South", imageUrl: "http://www.kauai.com/photos/kauai/point/99/super/koloa-landing-kauai-attractions-2.jpg", description: "Once one of the largest deep water whaling ports in Hawaii, Koloa Landing is now a popular location for shore dives." },
    { name: "Lawai International Center", category: "Other", location: "South", imageUrl: "http://www.kauai.com/photos/kauai/point/110/super/lawai-international-center-kauai-attractions.JPG", description: "Lawai International Center and the 88 Shrines are located on the ancient site of Heiau where Hawaiians once came for healing." },
    { name: "Menehune Fishpond", category: "Other", location: "East", imageUrl: "http://www.kauai.com/photos/kauai/point/48/super/menehune-fishpond-kauai-attractions.JPG", description: "Menehune Fish Pond is located just above the Nawiliwili Harbor. The Menuhune Fish Pond, Alekoko got it's name from the legend that a small race of people known as menehune built these ponds 1,000 years ago overnight." },
    { name: "Napali Coast", category: "Coastline", location: "North", imageUrl: "http://www.kauai.com/photos/kauai/point/82/super/napali-coast-kauai-attractions.jpg", description: "The Napali is a fifteen mile stretch of coastline starting on the north shore at Kee beach and ending on the west side at Polihale beach. This rugged coast will leave you breathless as you gaze upon the he razor sharp cliffs that rise sharply from sea to " },
    { name: "Opaekaa Falls", category: "Waterfall", location: "East", imageUrl: "http://www.kauai.com/photos/kauai/point/88/super/opaekaa_falls-kauai-attraction.JPG", description: "Opaekaa Falls can be seen from the scenic lookout along Kuamoo Road in the Wailua Homesteads. " },
    { name: "Spouting Horn", category: "Coastline", location: "South", imageUrl: "http://www.kauai.com/photos/kauai/point/86/super/spouting-horn-kauai-attractions-1.JPG", description: "Spouting Horn Beach Park is a delightful lookout where you can watch a blowhole spout a plume of sea water into the air." },
    { name: "Tree Tunnel", category: "Flora", location: "South", imageUrl: "http://www.kauai.com/photos/kauai/point/91/super/tree-tunnel-kauai-attractions.JPG", description: "The beautiful canopy of eucalyptus trees line Maliuhi Road, the gateway to Kauai's sunny side and the towns of Koloa, and Poipu." },
    { name: "Wailua Falls", category: "Waterfall", location: "East", imageUrl: "http://www.kauai.com/photos/kauai/point/50/super/wailua_falls-kauai-attraction.JPG", description: "This 140 foot waterfall appears on many postcards, print and media collections and was used as the opening scene for the 1970's Television series Fantasy Island." },
    { name: "Waimea Canyon", category: "Other", location: "West", imageUrl: "http://www.kauai.com/photos/kauai/point/83/super/waimea-canyon-kauai-attractions-2.JPG", description: "Waimea Canyon State Park is the largest canyon in the Pacific and will undoubtedly capture your gaze, with its 10 mile long stretch at a mile wide and measuring more than 3,500 feet deep." },
    { name: "Wet and Dry Caves", category: "Other", location: "North", imageUrl: "http://www.kauai.com/photos/kauai/point/111/super/wet-and-dry-caves-kauai-attractions.jpg", description: "Waikanaloa & Waikapalae Wet Caves are located off the the main road in the Haena State Park and are easy to get to. The Waikanaloa Cave is not for swimming. The Waikapale cave is located a a little further up the road and involves a quick hike to the swim" },
];
And then you need to turn that simple JavaScript array into a Binding List so you can bind to it. Like this…
var attractionsList = new WinJS.Binding.List(attractions);And then you group that list like this…
var attractionsListGrouped = attractionsList.createGrouped(
    function (i) { return i.category; }, //group key
    function (i) { return { category: i.category }; }  //group
);
And there’s that.
Now, let’s visit your HTML file (default.html).
You’ll need your actual ListView…
<div id="zoomedinlist" data-win-control="WinJS.UI.ListView"></div>And you’ll also need a template and a header template…
<div id="headertemplate" data-win-control="WinJS.Binding.Template">
    <div data-win-bind="innerText:category"></div>
</div>
<div id="zoomedintemplate" data-win-control="WinJS.Binding.Template">
    <div>
        <img class="item-image" data-win-bind="src:imageUrl" />
        <div data-win-bind="innerText:name"></div>
    </div>
</div>
And then you need to bind the ListView to your data, so go back to your default.js file and after the var attractionsListGrouped statement, add this…
var zin = q("#zoomedinlist").winControl;
zin.itemDataSource = attractionsListGrouped.dataSource;
zin.groupDataSource = attractionsListGrouped.groups.dataSource;
zin.itemTemplate = q("#zoomedintemplate");
zin.groupHeaderTemplate = q("#headertemplate");
Now you should have a working list, and all we have to do is add the semantically zoomed out version and the semantic zoom control itself.
So, on the default.html page, add the semantic zoom control and the zoomedoutlist to the list you already have like this…
<div data-win-control="WinJS.UI.SemanticZoom">
    <div id="zoomedinlist" data-win-control="WinJS.UI.ListView"></div>
    <div id="zoomedoutlist" data-win-control="WinJS.UI.ListView"></div>
</div>
(note that last code should be pasted over the existing zoomedinlist since we already had that there)
Then, that zoomedoutlist needs some data binding, so we go back to the default.js and add this…
var zout = q("#zoomedoutlist").winControl;
zout.itemDataSource = attractionsListGrouped.groups.dataSource;
zout.itemTemplate = q("#zoomedouttemplate");
OKAY STOP. Let me explain what’s going on here. Quite simply, we’re just adding two different ListView controls with their own data bindings (that happen to be based on the same data, and then we are wrapping both of those up with the WinJS.UI.SemanticZoom control.
Keep in mind, that there are no constraints necessarily on what can comprise those two lists. You, the developer, are responsible for making sure that your semantic zoom control makes good sense for the user.
Now, please notice that the data source for the zoomed in list is a grouped list of attractions, while the data source for the zoomed out list is a list of groups. Thanks why we get the categories for our zoomed out tiles.
I added a couple of classes in the templates that I had you paste into your HTML, so if you add the following style rules to your default.css file, then that should make everything look sensible…
.item-image {
    width: 280px;
    height: 210px;
}

.sz-category {
    width: 200px;
    height: 200px;
    background-color: green;
    color: white;
    font-weight:bold;
    font-size: large;
    padding: 10px;
}
And that should do it. Leave a comment if this was helpful. Actually, leave a comment if it wasn’t helpful too. :)
Happy zooming.