
Snap to Your Tiles
Let’s say you have a bunch of tiles in your Windows 8 app.

And the user grabs this list with their finger and pans some distance to the right. There’s a chance the list will end up landing in a position like this…

Notice that the tiles at left are cutoff. The list has panned some arbitrary distance and stopped where fate stopped it. I know it’s all scientific, but it’s fun to say that fate landed it here.
But what if you don’t want to put your app in fate’s fickle hands and would rather stop every time at a tile’s edge. That flick from my last example, then, should find you here…
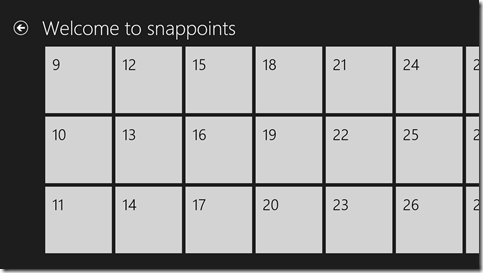
…with the edge of tiles 9, 10, and 11 neatly lined up on your left margin.
Is that possible? Of course it is.
Is it easy? Yep. That too.
Once again, the custom CSS properties in Windows 8 come to the rescue. I’m going to talk about a couple of properties in the -ms-scroll* area. If you want a good list of the available properties, just type -ms-scroll in a CSS sheet and let IntelliSense be your guide.
We would implement this using snap points. Snap points are an IE concept. I don’t know if they’ve been suggested to the W3C for consideration in the CSS standard (I couldn’t find anything that indicated they have), but they should be because they’re super helpful.
If you have a container whose content exceeds the boundaries of the container, then scrolling is necessary to view all content, right? And when a user flicks with his finger, the contents scroll within the container and upon letting up his finger, the user watches his content scroll for a bit longer with some apparent inertia, right? Well, a snap point is a location in that content where it makes sense for that content to stop scrolling. You can define snap points in one of two ways: mandatory or proximity.
Defining a container to use mandatory snap points means that it will always stop at the nearest snap point. It will never stop somewhere in between. Defining it to use proximity snap points, however, means that if it ends up close enough to a snap point then it will find its way there, but if it’s not close enough then it will be fine with coming to rest between points.
Here’s the CSS you should add to achieve the above…
.snappoints #list .win-viewport { |
Let me break that down for you.
.snappoints is the name of my page, which in Windows 8 navigation apps automatically gets a class with your page’s name. So .snappoints essentially namespaces this CSS to this page.
#list is the ListView control on my HTML. I manually gave it the ID of list. BTW, I recently discovered that if you know you’re only going to have a single list on your page, it might be easier to forgo the naming of it and instead just refer to it with [data-win-control=WinJS.UI.ListView]. Nice, eh?
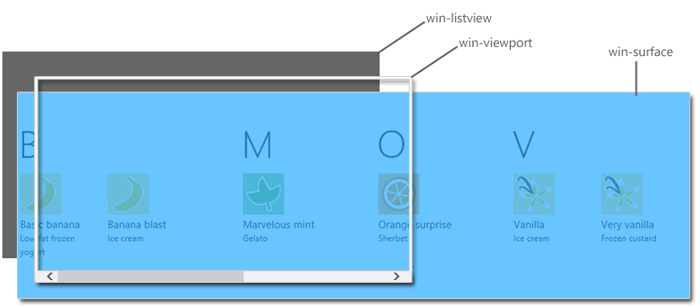
.win-viewport is the viewport of my ListView. If you work with the ListView much, and haven’t seen it already, you should definitely check out Styling the ListView and its itemsfrom the Dev Center. In that article, it breaks down the components of the ListView so you can have a shot at knowing how to style it. Here’s how it visually defines the win-viewport…
The first part of the property (mandatory) indicates that we are using mandatory snap points, so as I said before, we are assured of coming to rest on a snap point and never in between.
The second part of the property (snapInterval(0px,200px);) indicates that I want to start the content at the very beginning (0px) and I want a snap point every 200px. I have to know that my tiles are 200px wide to make this work. CSS is not actually recognizing a tile’s edge, just points every 200px.
I was a little bummed that I couldn’t find a way to indicate manually (with CSS properties on HTML elements I guess) where I want snap points to be and then just have the container recognize them, but this way works pretty well too.
That’s it. Happy snapping!
Implementing the Settings Contract
I presented at a developer camp in Redmond recently on the subject of implementing Windows 8 contracts. You can find the video on Channel 9. Unfortunately, I didn’t have enough time to cover the implementation of the Settings contract, so I want to cover that now in the attached screencast.
The Settings contract is an important one, since almost every app known to mankind has some user preferences or options to store. In previous Windows development, the convention was to put options like this into the Tools | Options menu item, but there are plenty of examples of apps that chose to find another place for it.
In Windows 8, the sanctioned place to put your user’s settings is in the Settings pane. This is the pane the user gets when he does one of the following…
- swipes from the right to access the Charms and then chooses the Settings charm
- presses Win + I
The Settings place should hold things like…
- account management (login/logout)
- preferences
- app version information
- help
- and so on
The pane is divided into settings that you (the developer) have control over and those that you do not. Everything below the horizontal line is system level and unavailable for change. Above the line, the Permissions entry is owned by Windows, but you are responsible for any more. Your settings entries might be: Settings, Help, About, Permissions, or they might be Account Control, Sound Settings, Video Settings, Permissions.
I hope the included screencast helps you ramp up quickly on how to do this in HTML/JS. If you have any questions, leave a comment. Thanks. [screencast removed]
msMatchMedia - programmatic access to media queries
If you throw down with a media query like this…
@media screen and (-ms-view-state: fullscreen-portrait) { |
…then you’re going to get purple text in all of your paragraphs, right?
Well, what if you wanted to check to see if you were in fullscreen-portrait from your code so you could do something fancy. Of course, you get some help from Windows with that. If you’re using the navigation project template then you can implement an updateLayout method when you define a page and one of the parameters you’ll receive is viewState.
But you might not be in the updateLayout method and you might want to check some other media query property such as whether the screen is at least 600px wide.
That’s where you may benefit from accessing media queries programmatically.
To execute the media query above from could you can do this…
if (msMatchMedia("(-ms-view-state: fullscreen-portrait)").matches) { |
This msMatchMedia method hangs off of the window object.
I know that there are usually properties in the DOM API that will allow you to discover these things about your environment, but if media queries are your thing and you can solve the issue that way, then there you go.
CSS Tip: nth-child and nth-of-type Pseudoclasses
Let’s say we have the following HTML…
<ul class="list"> |
That’s not difficult. It’s a ul (unordered list) which is by default rendered with bullets, although you’ve got full control over how exactly you want it to render. In this case, we have 6 items. Simple. And here’s how it should render in an empty Windows 8 app (with the default dark theme)…
Now what if we wanted every item to be yellow? Go ahead and think about how you’d do it before you look at my answer.
Here it is…
.list li { |
That’s easy enough. Now what if we wanted to give every other item a dark blue background? Well, there are at least four ways I can think of to do that. I’ll include all four.
The following two are equivalent and will highlight every other line starting with the first…
.list li:nth-child(2n-1) { |
The first rule contains a formula and the second simply contains the word odd. This nth-child is called a pseudo-class because we didn’t have to manually decorate every other li tag with a class in order to select them. Instead, we use a pseudo-class. Much easier.
The nth-child pseudo-class uses a formula that is always of the form: an+b. Essentially, CSS is going to plug a set of positive integers starting with 0 into the n in that equation. The result will be a set of integers. CSS will omit the negative and zero values and use the resulting positive integers to determine which items should be matches.
Our 2n-1 formula then would evaluate to an integer set that looked like [-1,1,3,5,7,9,…]. CSS would then ignore the -1 and apply this style to the 1st, 3rd, and 5th elements. Because highlighting every other row is likely a very common case, CSS defines the odd keyword to simplify matters.
The following two are also equivalent and will highlight every other line starting with the second…
.list li:nth-child(2n) { |
Again, the first is an equation and the second is a keyword. The set of positive integers [0,1,2,3,4,5,…] would get evaluated in that equation to [0,2,4,6,8,10,…]. The 0 would be ignored, and the 2nd, 4th, and 6th list items would have the style applied. Here’s the result…
Here are some other, more advanced uses of the nth-child pseudo-class…
| Formula | Result |
|---|---|
3n |
Every 3rd element |
10n |
Every 10th element |
-n+7 |
The first 7 elements |
n |
All elements (pointless) |
n+4 |
All elements starting with the 4th |
2n+3 |
Every other element starting with the 3rd |
And if you want to see some more, go to Useful :nth-child Recipes on [CSS Tricks](http://css-tricks.com.
So there you have it. That’s nth-child. Pretty handy, eh?
Now let’s look at nth-of-type and see how it differs from nth-child. Consider the following HTML now…
<div class="list"> |
Now we have a div that has mixed child types. It has some p elements and some child div elements.
When we attempt to apply the same blue style to the second div using our nth-child syntax…
.list div:nth-child(2) { |
We don’t get the desired effect. Nothing will be highlighted. See, the nth-child pseudo-class is indicating that our target element has to be the 2nd child, but it’s not. It’s the second div, but it’s not the second child. To specify that we’re looking for the second div, we use nth-of-type like this…
.list div:nth-of-type(2) { |
And that brings us to the end of the post. If you have any questions or comments, please feel free to leave them below.
But WHY do we pan horizontally?
You may have heard or read or noticed, that in Windows 8, things move side to side. What’s with that? We’ve been scrolling vertically on the web since the stone age (and by stone age I’m referring to the early 90’s). And while we’re on the subject, what’s the difference between panning and scrolling anyway?! Hold your britches… you’re about to find out.
First the second question and then second the first.
What’s the difference between panning and scrolling?
Usually, when terms are being defined, the author looks up definitions from reputable sources like Merriam Webster or Wikipedia (Noah turns over). But I’m going to avoid the bias and just shoot from the hip with the bullets on hand. That’s cowboy for I’m going to define them myself.
**scrolling **= moving the contents of a smaller, fixed viewport so that some subsequent content is made visible while some other content falls out of view
Not bad. Here’s panning.
**panning **= horizontally moving the contents of a one’s view so that some subsequent content is made visible while some other content falls out of view
Hopefully, you can see the differences there. First, panning is horizontal. When you’re watching a movie and the scene slides to one side or the other it’s because the cameraman has panned the camera. If the scene moved up or down, the cameraman would have been tilting the camera.
It would technically be more accurate to describe a lateral movement of content on the screen as a strafe, which moves the camera to the side instead of rotating it, but I don’t know… maybe strafebars just doesn’t roll off the tongue well enough.
So, scrolling involves a viewport that doesn’t necessarily coincide with “one’s view”. In other words, panning occurs when all (or perhaps mostly all) of your view is moving, and again always in a horizontal direction.
And this is exactly what tends to happen in a Windows 8 app. Modern views and especially modern Windows 8 views tend to contain more focused content. Instead of a myriad of fragments of information representing what a user might do, Windows 8 tries to immerse the user in the one thing they are doing at that moment. So instead of having many small islands of information to scroll, users are free to pan the entire view.
Now on to the why horizontal question. Why does most everything in a Windows 8 application pan horizontally?
There are a number of reasons. And they’re all really good.
First, more devices have landscape oriented screens than portrait. That means that the horizontal axis is the long one and it’s much more elegant to pan content along the long axis, because more data fits on the long axis than fits on the short one.
Second, more of the languages in the world are read horizontally (left to right or right to left) than are read vertically, so the eye is accustomed to the general content flow being horizontal.
Third, the human hand and arm system is more comfortable swiping side to side then up and down. Try making an exaggeratedly large vertical motion with your hand and then try the same horizontally. I think you’ll agree.
Finally, horizontal panning is unique and differentiating. Which is fitting seeing as this is one of the most unique and differentiating operating systems I’ve ever seen released.
Horizontal Panning
If you drop a ListView into your HTML page and fill it with data that fills up your page and overflows, what happens to the overflow? The answer is that it gets cut off by the right side of the screen and thus hints to the user to swipe to scroll the rest of the content into view. Easy.
But what if you aren’t using a ListView, or what if you have some content that you want to show next to your ListView and you want them to both pan together when the user swipes?
Well, I’m going to tell you.
The answer in short is… overflow-x: scroll.
And the answer in long follows.
Try this simple HTML.
<section aria-label="Main content" role="main"> |
The section should already be defined in you app if you started with a project template, so you should only need to define the div. Where I’ve put ellipses (…) you should add a bunch of text so that this div contains more text than a single screen should hold.
Now add some CSS to make this act the way you want. This should do it…
.mypage section[role=main] .sidescroll { |
(Note that this style rule starts with .mypage. If you are using the navigation template, then that is necessary to scope the style rule to this page only and keep it from affecting other pages. If you didn’t start with the navigation template or if the style rule isn’t working for you, then try simply removing that.)
The magic (well, it’s just science actually) line there is overflow-x: scroll. If we just used overflow: scroll then the div would try to allow scrolling on both axes. We only want horizontal scrolling though, so overflow-x is the property of choice.
Sometimes you want one element to stay fixed while the rest of the page pans. In that case, you would just drop the element outside of and before this scrolling div. Easy peasy.
That’s it. Happy panning!
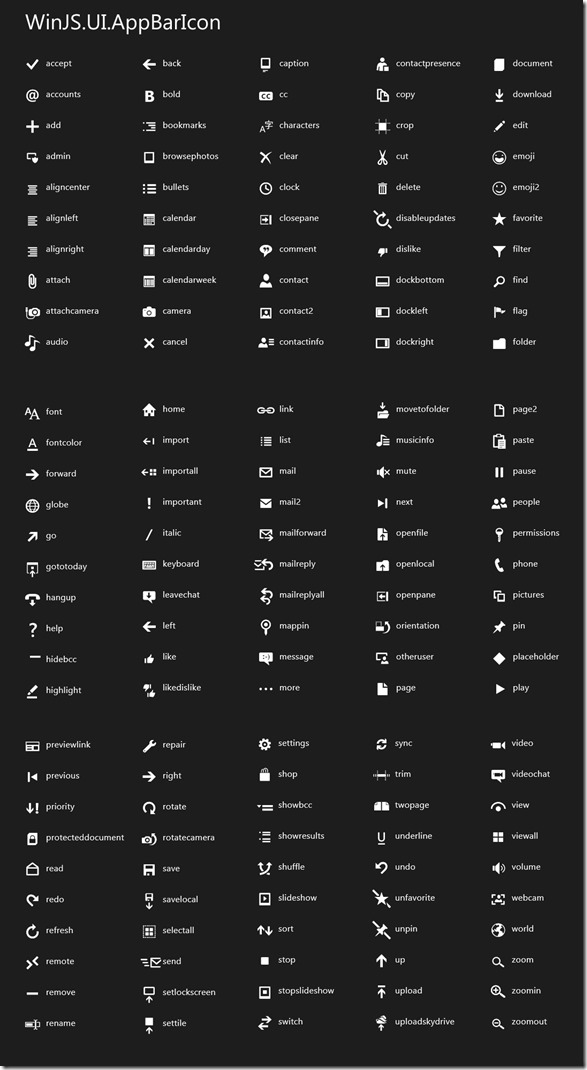
Windows 8 App Bar Icons (from Segoe UI)
UPDATE: since writing this I’ve found this MSDN article that I think has more information than my post. Hope that’s helpful.
This is a reference post. Come back when you, like me, forget which icons are available to use on your application bar in your Windows 8 app.
If you define your app bar imperatively (in JavaScript), then you would simply pass the name of the icon from this graphic in as the icon option like so…
new WinJS.UI.AppBarCommand({..., icon:'bookmarks', ...}) |
Here’s the chart for those with young eyes :)
Getting Windows Device Info
I have plenty of experience in the C# space with accessing Windows API, but I’m still finding it rather novel and delightful to do the same thing in JavaScript. The fact that I can do something like…
Windows.Devices.Enumeration.DeviceInformation |
…is just slick. That’s all. There’s no interop’ing, no dll loading, no service calls. WinRT just delivers it to my front door and doesn’t even make me sign.
Recently, I went looking for how to enumerate the devices currently recognized by the system and found it to be quite nice and thought I’d share.
I started by creating a ListView and an item template in the HTML and imperatively binding that to a WinJS.Binding.List in my JavaScript file. In the interest of being DRY, I won’t walk through that process, but you can see the concept here.
With a ListView and a WinJS.Binding.List in place and with the two hooked together, we’re ready to just fetch our device information and push it into the List. I’ll just lay out all the JS code at once and then explain. Perhaps it will be self-explanatory.
Windows.Devices.Enumeration.DeviceInformation.findAllAsync().done(function (devices) { |
If you follow me much, you likely know that my code tends to be rather dense. I like using the horizontal space that God (and Visual Studio) gave me instead of wearing out my enter key and your scroll wheel. So there are a few things going on in this relatively short snippet.
First, I’m calling into Windows.Devices.Enumeration.DeviceInformation and calling findAllAsync(). That will asynchronously return all of the devices found on the system.
.done() is how we proceed with the results of an asynchronous call in case you haven’t seen that before, and we have a chance to capture the async payload (in this case a bunch of devices) by specifying a devices paramter.
Next, I’m calling a few array functions.
The filter function takes a lambda function and in this case I’m only concerned with devices that have a name and are enabled.
The distinct function is my own. If you want the code for that one, leave me a comment. It reduces the array to only those with unique entries, and it gives you an opportunity to specify what you mean by “unique$rdquo;. In this case, I’m saying that two devices are distinct if their name values are distinct.
Then I do a fancy forEach on the array. Notice how all of these array functions themselves return arrays making it convenient to chain functions together. The forEach function simply calls the provided function on each of the items in the list. No more (or far fewer at least) awkward for iterations. Yay!
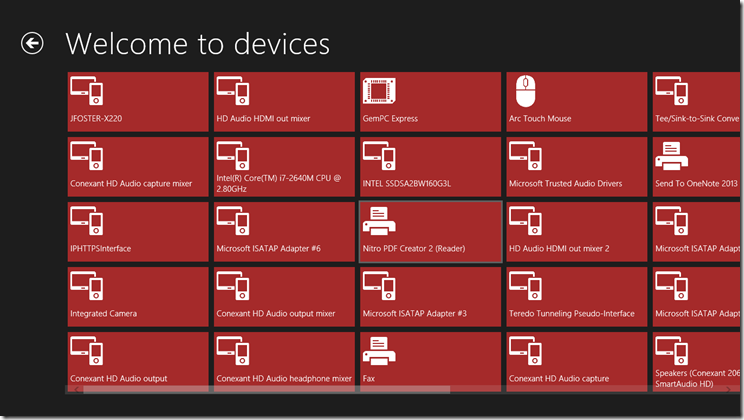
In this forEach function, I’m doing another async call - this time to retrieve the Windows 8-style, super fancy glyph graphic to represent the device (hint: you can also call getThumbnailAsync() to get a boring, old-style, full color, supposedly realistic icon for each device.
When the call returns, I create an anonymous object shaped like the data that my template is expecting and push it into my WinJS.Binding.List. Just like that.
A little bit of CSS work later we have something that looks like this…
If you have any questions, just leave a comment and I’ll approve and respond as soon as I can.
Happy device enumerating!
Learn Windows 8 Development in Your Underwear
If you’re interested in learning how to write apps for Windows 8 but don’t want to leave your desk to do it, then I have just the thing for you. They’re called HOLOs. That’s a Hands-On Lab Online. It goes like this.
First, you register and then when the event comes around, you log in and are hooked up with a Live Meeting to a presenter and a bunch of other attendees and also with a Hyper-V session to a Windows 8 virtual machine with all of the course work ready to go. You listen to the presenter for a while, and then you run through the labs with the instructor right there and ready to help when you raise your virtual hand.
There are sessions on a myriad of Windows 8 related subjects including…
- Creating a Windows 8 App
- Orientation, Snapping, and Semantic Zoom
- Searching and Sharing
- The Windows Store
- Application Bars and Media Capture
- Settings and Preferences
And each of those subjects has separate, dedicated online sessions for C# and JavaScript.
Go register now to save your spot. I created a short URL to a search of all of the HOLOs being offered – http://aka.ms/holo.
I’m going to be presenting a number of the JavaScript courses, so I’ll see you online!
Windows 8 2-day Camp - Content
Thanks to all of the attendees of our Windows 8 2-day Camp and Hackathon last week!
It was an exhausting but excited couple of days and some attendees left with Samsung Series 7 slates, an XBox console, a bunch of XBox games, and more.
The Windows 8 content from day 1 will be available soon on Channel 9. Until then, I promised that I would upload the content from my session and the content from Bart De Smet’s session on Reactive Extensions.
My Content - Windows 8 Contracts
My session was an introduction to integrating the Windows 8 experience into your app by implementing the Windows 8 contracts. We looked at Search, Share, Settings, the FilePicker, and PlayTo. The code is extremely simple and intended to get you in the door. Let me know if you have any questions…
CFContractDemos.zip (40.04 kb)
Bart De Smet’s Content – Reactive Extensions
Bart De Smet was a guest presenter on day 2 on the topic of Reactive Extensions. He presented mostly JavaScript examples, but the content below includes all of the .NET examples as well. If you’re not familiar with Reactive Extensions, I think you should get acquainted, and Bart’s slides are very well made and helpful in coming to an understanding.