
ReSharper 7 is Released
I got a note in my inbox a few days ago saying that ReSharper 7 had been released. I was pretty surprised since I assumed they still had a ton of kinks to work out, but I’ve got it installed and am flying through some Windows 8 development and haven’t run into any glitches so far.
I’m kind of always excited about ReSharper, but here are a few reasons why version 7 is keeping my fire lit.
It supports VS 2012 and Windows 8 apps. It works with any of the last few versions of Visual Studio even when they’re installed side by side. It’s impressive that VS 2012 is not even released yet and R# is all over it. Not only does it work in VS 2012, but it support Asynchronous Solution Loading so it starts up faster, it uses the Preview tab, and it supports both the light and dark themes.
It gives you a hierarchical view of your CSS. Sweet. Look at this…
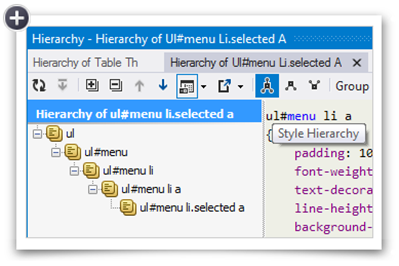
…and I noticed that it shows a little glyph next to CSS rules that are overriding the a rule elsewhere. That’s helpful.
Version 7 allows you to remove unused references from your entire solution at once.
Also, it adds a ton of support for JavaScript. It extends VS’s native IntelliSense for JavaScript. The ability for anyone to make IntelliSense for such an insanely dynamic language is beyond me for sure. It even added support for Jasmine unit testing.
There’s quite a bit more that it offers that I haven’t shared here, so check it out. This is one tool you should just throw down on, because it’s worth it. Another tool you should throw down on is CorelDRAW, but that’s another topic for another blog post.
Finally, I like their little catch phrase – More color to Visual Studio. If you’re familiar with the story around the color in Visual Studio between the developer preview and the release preview then you’ll have to laugh. And the “7” is made of little colored tiles. Groovy.
A JavaScript Library for Everything
Windows 8 is one of those environments that’s just fun and expressive to develop in. So is JavaScript. The convergence of the two is just rockin’.
One of the great things about JavaScript is the enormous amount of code that other people have already written and put up on the web for your consumption. Do you want to wrap local storage (store.js), detect faces (liuliu), implement lightweight pubsub (minpubsub), or load JavaScript asynchronously (include.js)? You can do it by simply including a library in your Windows 8 project.
To find a library, you can always Bing (did you know that Bing results are preferred to Google 2:1 in blind taste tests?) for the functionality you need or you can try something here…
- microjs.com
- Hanselman’s post
- List of JavaScript libraries (Wikipedia)
BlockMover Sample from Jake and Sam
Thanks to everyone that showed up to last Friday’s session on JavaScript game development in Windows 8. I really appreciated the information and demonstration that Jake and Sam presented. I hope it was as helpful for you too.
I said I’d post the sample code that they used, and here it is. You will need to go to impactjs.com and purchase the library if you’d like to use this, but if you’re actually making games then it’s a small cost to consider.
Enjoy!
Random Tile Colors
This tip is quite short and simple, but worth a post I think. If you want to colorize some tiles like the start screen does, here’s one simple way to do it.
var demos = [ |
This is some code from a project I have that showcases some simple code demos, so I have an array of each of these objects. Then I create a quick array of some of the color codes used on the start screen. Finally, I simply do a forEach on the demos array adding a new tileColor property to each which is a randomly selected color from the color array.
This ability to just throw another property onto an object without mucking with the class and affecting all of the other instances, is in my opinion one of the nicest things about a dynamic language like JavaScript, and I take advantage of it quite a lot.
Now to actually use this color for the tiles, it’s a simple matter of adding it to the databinding statement like this…
<div id="itemTemplate" data-win-control="WinJS.Binding.Template"> |
Notice the style.backgroundColor:tileColor term. That’s all it takes.
How the WinJS.UI.ViewBox Actually Works
I just learned something about the WinJS.UI.ViewBox and wanted to share.
I have known for some time what the ViewBox does, but I recently learned how it does it.
First, let me reiterate what the ViewBox does. I compared its functionality to the FlexBox in my When to Use ViewBoxes and FlexBoxes post. The ViewBox itself snaps to the size of the container it is in and resizes its child (without changing its aspect ratio) to fit.
How does it actually do that? It’s pretty cool. It does it with a CSS transform. If you create a ViewBox and then look at the DOM Explorer, you’ll see something like this…
<body> |
Notice a few things about this generated code. First, notice the inline style attribute on the second div. It’s not on the ViewBox itself, but rather on its first (and only) child. The values indicate that the div should be translated 171px from the left. The ViewBox has calculated the shape of my screen (1366 x 768 in this case) and the shape of that only child div (1024 x 768), and determined that it needs to scoot over to the right 171 pixels in order to center it within the screen.
Now I snap my app and then check out the DOM Explorer again and here’s what I have…
<body> |
So there you have it. In order to arrange the child div in the center of the snap view, it’s going to need to translate (move) it down 264 pixels and shrink it to 31% (0.3125) of its original size.
I could have continued not knowing the how of this, but I’ll sleep better tonight knowing it.
Windows 8 App Design Sheet
Attached is a worksheet that might help you when you’re brainstorming the design of your Windows 8 app.
It encourages the 3-tier navigation structure that’s common with these apps. The grid units are 1 unit (20 pixels). There are rules for the top and left margins (5 units and 6 units respectively) as well as for an app bar (88 pixels). The Windows 8 version includes a guide for snapped view (320 pixels), whereas the Windows 8.1 version has minimum width guides at 320 and 500 pixels.
If I modify it, I will replace the attachment here so that you can always come back to this post to download more sheets. It helps to have a few of these printed out and stashed in your computer bag.
Hope it helps.
Windows 8: Windows 8 App Design Sheet.pdf
Windows 8.1: Windows 8.1 App Design Sheet.pdf
Metro Design by Blink Interactive
Last Friday my user group (“The Ocho”) met and heard a special presentation on Metro Design thanks to Blink Interactive.
Valentina and Christina are UW students and interns at Blink and gave us a ton of information about user centric design and then the history and concepts behind Metro design.
I promised that I’d post their slide deck for those that want to take a look, so here it is.
If you were there with us, thanks for joining. If you weren’t, then look up our next meeting at http://www.meetup.com/theocho. Maybe we’ll see you there.
How to Make Your Grid Pan Automatically
I got a question at an event a few weeks ago that sounded at first like it was going to implicate a rather complicated answer. In the end, it turned out to be not so bad.
The question was…
On the start screen when the user moves his mouse to the edge, the tiles pan automatically. How do I make the grid in my app work just like that?
And the answer - or rather an answer is here…
var timer = null; |
Let me unpack that for you.
When the user’s mouse is within the grid (that’s the .groupeditemslist), then check the event argument that our event function received and see what the location of the user’s mouse is on the screen (that’s screenX).
If it is withing 50 pixels of the right side of the page (that’s the document.body.scrollWidth) then set timer to a new interval that runs a simple function every 1 millisecond. The body of the function that runs is listView.scrollPosition += 30, which you have likely guessed scrolls (pans) to the right by 30 pixels. And the opposite should obviously happen if the user moves his mouse close to the left edge.
I wrote this rather quickly and have not tested it thoroughly. It appears to work well and does not have any significant performance impact (even though the interval is a single millisecond). That said - I would highly encourage you to tweak the numbers and see what works best for you. If you come up with a better combination, please leave a comment below.
I hope every is having as much fun with this Windows 8 development as I am!
Happy panning.
Using Promises
If you’re developing Windows 8 apps using JavaScript, then you’re likely familiar with the WinJS.Promise object. You can hardly get by without using one, because a lot of the API in WinJS and WinRT is asynchronous and for JavaScript apps they return a Promise.
I’m going to share with you what I have learned about promises so far in increasing order of sophistication.
Consuming a Promise
Everybody and their uncle is going to use this one. If you need to make a call to WinJS.xhr() for instance, you’re going to get a WinJS.Promise in return. They’re quite easy to deal with actually and you may already know this.
When you get a promise from a method, you simply hang a .then or a .done method off of it and provide a function that you want to run when the asynchronous method is complete.
WinJS.xhr({url:"http://someuri.com/service"}) |
The call to .xhr comes back really quickly and you and your code go about your day even though the service hasn’t responded yet. Then when the service finally does come back to you, everything inside the done method runs. The promise that .xhr returns contains a payload as well. That’s why we’re able to declare our done function with function(xhr) and then access whatever it is the service returned.
So this is super handy for keeping our UI fast and fluid. But let’s move past merely consuming promises and get a bit more advanced.
Passing a Promise
You’ve seen how to consume a promise so that you can avoid a blocking call to a relatively long running or potentially long running method call. Sometimes you want to write a method yourself that calls an asynchronous method and you want to give your method caller the ability to call it asynchronously.
In this case, all you have to do is return the promise given to you by the asynchronous method you’re calling. So, for example, let’s wrap the example call to .xhr above with our own method call…
function myMethodAsync() { |
There we go. Now I can call myMethodAsync (and by the way, adding Async to the method name is a convention to indicate that it is an asynchronous method) like this…
myMethodAsync() |
And notice that I can still specify the xhr parameter for my done function and access the payload.
That’s how we pass along a promise from one asynchronous method to another. Sometimes, however, you need to start from scratch and create your own promise.
Creating a Promise
If I want to create my own method and allow callers to call it asynchronously then I need to return to them a promise. That’s simply the pattern in JavaScript.
Creating a promise is pretty easy, but you need to understand the concept because sometimes things can start to feel messy and it’s really helpful to understand what’s going on (not that I do entirely yet).
In Windows 8 JavaScript development we have the WinJS.Promise. You create it like this…
new WinJS.Promise(function(c,e,p) { |
The c, e, and p are parameters that are themselves functions. Within the function body, then, I can actually call c() when I want to complete the promise, call e() when I want to report an errant case, or call p() when I want to report progress.
Study this method I wrote that makes sure a file exists and if it doesn’t then it creates it…
function assureFileAsync() { |
There are a few things going on here, so let’s dissect.
First, I did use the Async suffix to indicate to the caller that this is going to be an asynchronous method. I create and return a new WinJS.Promise and the bulk of the logic here exists in the function declaration for that promise.
If a file called applicationData.json exists (fileExists is another function I wrote), then we don’t need to do anything and this promise should be considered complete, so we simply call c(). If we wanted our promise to carry a payload (like the xhr method does), then we could put that here by calling c(myResult). In this case, however, we don’t need that.
If the file does not exist, then we want to create it. Notice that this creation is itself an asynchronous call and in the .then there’s even another one. Finally, after we have made certain the file exists and contains my starterData, then we call the c() to indicate that this promise is complete.
There’s plenty more insinuated by this, but I’m going to leave it there for now in the interest of simplicity.
Saving a Promise
Now this trick I just figured out recently and it’s very handy.
Let’s say that in one part of my code I want to do something (call it Action A) that may take some time, and then in another place I want to do something else (call it Action B) but Action B should not occur until Action A has successfully completed.
I could let Action B call Action A asynchronously because then I could hang the .then or .done on that call. Sometimes, though, I don’t want Action B to be the initiator.
Let’s look at a more concrete example. This is the case where I ended up discovering this pattern.
When my application loads I want to load all of the data from file. When you user lands on the home page, I want to show the loaded data. Obviously I can’t show the user the data until it’s loaded, but I want to initiate the data load in the app’s activated event not in the home page.
So here’s what we do. We initiate the data load from the app’s activated event and save the resulting promise somewhere where it will be accessible to the home page. I just added it dynamically onto the WinJS.Application object (not sure if that’s recommended or not, but it works great :) Then from the home page, we simply access that object and hang a .done on it. Easy.
Here’s the data load call from my app activated event…
WinJS.Application.dataLoadedPromise = Data.initializeAsync(); |
…and here’s where I want to start work on my home page data, but only after the data is loaded…
var hubItemsList = new WinJS.Binding.List(); |
Now getHubItemsAsync (itself another asynchronous call, but that’s coincidental) will only get called once the dataLoadedPromise is complete.
Conclusion
There’s much more to promises that I didn’t include here - for brevity in part, but also because I haven’t discovered it yet, but keep an eye on this blog. As I turn over new leaves, I’ll post it here - I promise.
One Sweet Stack
Following is a mongo post. A huge post. A massive amount of information. The general recommendation is that blog posts should be short, but rules are made to be broken. You can’t tame me. I’m like a wild stallion. So here is a huge blog post.
Last Saturday at the Seattle Code Camp I delivered a presentation I called One Sweet Stack which showed how to start with a SQL Azure database (though it would work with any relational database really), connect to it using Entity Framework, and extend it as OData with WCF Data Services.
I chose this stack because…
- I come from corporations that have existing database solutions. These aren’t modern, green-field databases of the myriad of flavors. These are classic, tried-and-true, and very much relational. I’m as excited as the next guy all of the modern ways to persist data, but don’t think for a minute that the relational database story is obsolete. Far from it.
- I love using Entity Framework. I get a little jolt of excitement when I instantiate a DbContext or call SaveChanges(). Geeky? Of course.
- I think that WCF DS is oft overlooked and recently especially in light of WebAPI (which is also a great product). I’m a fan of designing a database, mapping it through an ORM, and providing an elegant API (whether it’s internal or external) with so little code that I can write it from scratch in a 1 hr session (including explanations).
- Windows 8 thrills me even more than EF.
I’m hoping to convey virtually all of the content from the presentation here, so it will be a heavy post. Consider it a reference post and come back to it if/when you need it.
The source code for this project is attached. You can find it at the bottom of this post.
First, the database…
So, as I said, I started with a SQL Azure database.
You connect to a SQL Azure database using a regular connection string just like any other database, so it will be a no-brainer for you to read this and apply it to a SQL Server on premises or even a MySQL or an Oracle database.
My database is a simple schema. It’s just a table of a few attractions that one will find on the island of Kauai, Hawaii and one related table of categories those attractions fall into (i.e. waterfall, scenery, flora, etc.). Here’s a diagram…
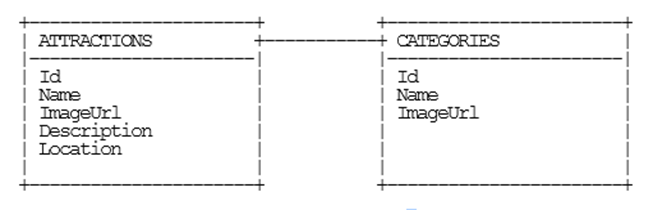
(my diagram by the way was done using asciiflow.com… very geeky indeed)
In the attached zip file, you’ll find KauaiAttractionsAzureScript.sql that you can use to create this database on your own Azure (or local if you’d rather) instance. Just create the database first and then run the script in the context of your new database. If you want to run through this whole exercise connecting to your own database, however, I would highly recommend it. It would be good practice.
Next, setting up the solution…
Follow these mundane steps to get over the snoozer that is creating projects, adding references, and importing packages…
- Create a new solution in VS2012
- Add a new Windows Class Library using C# (call it SweetStack.Entities)
- Add a new WCF Service Application using C# (SweetStack.Service)
- Add a new Cloud project using C# (SweetStack.Cloud)
- Add a new Unit Test Project using C# (SweetStack.Tests)
- Add a new Navigation App for JavaScript Windows Metro style (SweetStack.Metro)
- Add a reference to SweetStack.Entities to the .Service and the .Tests projects
- Add the .Service project as a web role to the .Cloud project
- In the .Cloud project right click Roles
- Add | Web Role Project in Solution…
- Choose the .Service project
- Add the latest version of Entity Framework (currently 5.0.0-rc) to the .Entities, .Services, and .Tests projects
- Add the latest version of Microsoft.Data.Services (currently 5.0.1) to the .Services project
Next, creating the .Entities project…
We have our database already in place, and now we want to create an Entity Framework context that will allow us to access our database using code.
Instead of creating an EF model (.edmx file), we are going to reverse engineer the database to POCO classes. Why? Because it’s rad. That’s why. First thing you need to do is install the Entity Framework Power Tools Beta 2 (from Tools | Extensions and Updates in VS2012).
Once that is done, you can right click on your .Entities project and choose Entity Framework | Reverse Engineer Code First. Then enter your connection string information. Remember to check the “Remember my password” box so that it will save your credentials into your connection string for later.
So the tooling should have created a bunch of .cs files in your .Entities project. You not only get POCO classes for each of your database tables, you also get one for the context. That’s the one that derives from DbContext. You also get a folder with a map file for each entity.
All of this is beautiful and I’ll tell you why. You now have a direct 1:1 relationship between your code and your database, but you also have the complete freedom to modify the mappings so that the two don’t necessarily match. If your data architect, for instance, called the database table “first_name” and you’d rather that be called FirstName in your code, then just change that property but keep the mapping to “first_name”. You can even ignore certain properties or add new ones that don’t have a mapping. Furthermore, classes that DO have database mappings can be mixed with other classes that do NOT have mappings. It’s all up to you.
Next, let’s test it…
It’s hard to see a Windows class library work without writing a test for it. In the .Tests project write a simple test that looks something like this…
[] |
Before you can run the test, copy the <connectionstrings> element from the app.config, create a new app.config in the .Tests project (right click Add New Item…), and then paste the
That test should pass if you haven’t mucked anything up already.
Next, time to create the .Service…
This one just FEELS like it’s going to take a while. Low and behold, however, I bet I could do it in less than 37.5 seconds (not that I’ve timed myself). Do this…
- Delete (from the .Service project) the IService1.cs and Service1.cs files that you got for free (even though you didn’t ask for them :)
- Right click the .Service project and add a new item… add a WCF Data Service called Entities.svc
- Once your file is created, check out the class name and see how it derives from DataService
but the T is undefined. Fill that in with SweetStack.Entities.Models.KauaiAttractionsContext - Now uncomment the line in the InitializeService method that says SetEntitySetAccessRule and in the quotes just specify an asterisk (“*”). You can change the EntitySetRights.AllRead to .All if you like, but we won’t be writing any data in this tutorial anyway, so it doesn’t matter so much.
- Copy the
element from the app.config of the .Entities project into the web.config of your .Service project - Put your hands down… you’re done!
Set your .Service project to the startup project and run it. You should get a browser that looks like this…

Note: if you get a list of files instead, just click on the
Entities.svcfirst.
Next, we let’s see what we’ve got…
What you’re looking at there is a GEN-YOU-WINE OData feed. That’s exciting. OData rocks. Not only do you get all of your entities extended through OData, but you get type information about them and you get their relationships with each other. Also, you can ask an OData feed for XML or for JSON and it will say “Yes, sir/ma’am.”
Fire up Fiddler and hit that service root URL appending each of the following and see what you get for responses (also add “Accept: application/json;odata=verbose” to the headers in Fiddler to request JSON). Issue the following commands against your service and behold the results…
<table border="0" cellpadding="2" cellspacing="0" style="width: 825px;"> |
If that doesn’t turn your crank then you should check your Geek card… it might be expired.
Next, we go Metro…
We’re ready to consume our data. We’re going to be working here with an HTML/JS Metro application which makes it reasonable brainless to consume JSON. Here we go…
I had you create your Metro app from the navigation template, so you should have a pages folder (assuming your using Visual Studio 2012 as opposed to Visual Studio 11). In there you have home.html, home.css, and home.js. Those three files are all we’re going to concern ourselves with for now.
In the .html file, you need to create a ListView and define an item template and a header template (because we want our items to appear in groups). Here’s what that would look like…
<div id="itemtemplate" data-win-control="WinJS.Binding.Template"> |
Then in the .css file add the following so that our images are the right size and our ListView is tall enough to show two rows…
.homepage section[role=main] { |
Finally, in the .js file we need to add just a little bit of code. I’ll just drop it all on you and then explain each section. Put this inside the page’s ready method…
var attractionsListGrouped = new WinJS.Binding.List().createGrouped( |
The first part (var attractionsListGrouped...) creates a new WinJS.Binding.List that groups the items by their .Category.Name. This necessitates that we bring our Attraction entities down with that $expand property included to get the related Category, but that’s easy so we worry not.
The next part imperatively sets the item and header templates and the data sources of both the items and the groups. This can be done before our list has even been populated with any items. In fact, we need to do it that way because the call we make to get the items is asynchronous and we need that list that we’re binding to to exist before we even get back from that call.
The last part is the xhr call. You can see the syntax. The xhr expects an object within which we’re specifying the url and a custom header. The function we pass in to the subsequent .then is going to run after we get back from the xhr call. At that point, we can look at the response, parse it as JSON, and then for each item, push it into our list. This list is a WinJS.Binding.List which means that it is essentially observable and will tell the UI when updates have been made so it can change accordingly. So when our items are fetched and filled in, the user will see them pop into the ListView in his view.
Tangent about application/JSON;odata=verbose…
Remember how we added application/JSON;odata=verbose to our headers for the xhr call? Why would we do that? It’s because we’re using the prerelease version of WCF DS, and the existing OData JSON syntax has been dubbed “verbose” to make room for some awesome new methods for expressing rich, typed, interrelated OData while keeping the payload light, light, light. More on that at a later time.
Conclusion
Attached you’ll find the complete source code. Hope it helps you learn Windows 8 development and I hope you get your first app done soon and are rewarded with huge royalty checks :)
And that does it for this walk through. It was a marathon post, so if you’re read this far email me your mailing address and I’ll send you a gift in the mail. I’m betting I won’t be troubled to send too many gifts :) (offer expires the end of June 2012)