
Children of the Nations
I’ve worked with Children of the Nations (COTNI) in the past and they are a very cool organization.
At one point, my wife and I and some friends volunteered for their Meal Marathon – an extremely grassroots effort to get food to hungry kids. The program wasn’t a hundred layers of abstraction away from the actual goal – feeding hungry kids. Instead it was a simple matter of putting food in bags, putting bags in boxes, putting boxes in a shipping container, and shipping the container to Sierra Leone and the Dominican Republic. So simple… so helpful.
Right now and until June 12, COTNI needs donations of the following items…
- School backpacks
- School SmilePacks
- Hygiene SmilePacks
- Solar-powered flashlghts
- Soccer cleats (any size)
- Baseball cleats (any size)
- Soccer balls
- Soccer ball pumps
- Baseballs
- Baseball gloves
If you live anywhere near Silverdale, WA and would like to help get these items to the kids that need them, please go to https://cotni.org/get-involved/locally/donate-resources and get more information.
UW Seattle Student Appathon
If you’re a student at UW, then I’ve got a cool opportunity to throw your way.
Come to the Microsoft Appathon @ UW, learning to build apps, eat free food, win cool prizes, and get $100 per app on top of it all!
We’ll be giving away a Surface and some Xbox hardware, and who know… we may even have a good time too.
Instead of just a single event, we’re also going to hold two mini-events to give you an opportunity to get your system set up and ready for developing Windows 8 apps. Below are the event dates and registration links. I’ll see you there!
Mini-event - Tuesday, May 7: http://aka.ms/uwmini1
Mini-event - Friday, May 10: http://aka.ms/uwmini2
Main event - Saturday, May 11: http://aka.ms/uwappathon
App Art
One of my favorite steps in the app development lifecycle is the creation of the artwork. I’m not stellar at creating original artwork, but I definitely recognize when things look just right, and sometimes I stumble upon it. I must also have a little bit of marketing in me, because it’s my constant effort to brand things.
The artwork and branding is important, because an app developer must live in a constant state of capturing the user amid so much noise. An app needs to say “here’s precisely what I do and how it adds value to your life”. It takes a lot of design thought and effort to cut through the noise and reach your audience.
Good messages to communicate are: clean, simple, creative, elegant, and fluid.
I’d like to walk you through my process of creating artwork for an app called Everyview. Everyview is webcam viewer that attempts to implement well the design principles of Windows 8. It’s intended to feel like a breath of fresh air. There are plenty of apps for viewing web cams and it’s nothing that can’t be done in the browser too, but it’s seldom a consolidated and elegant experience. As of this writing, Everyview is not yet published to the Windows Store, but by the time you read it, it may be. Try searching for Everyview.
My artwork for Everyview started with the creation of a symbol. The symbol had to represent every image that could possibly come through the eye of a camera and so I simply chose to represent the eye of a camera. I didn’t want to make the app subject to aging by choosing a specific camera though, and I didn’t want to specify a still camera or a video camera. So I created a camera lens. The icon doesn’t determine absolutely that you’re looking down the barrel of a DSLR, an amateur video camera, a high-end video camera, or any other specific model. It’s an agnostic character of a camera.
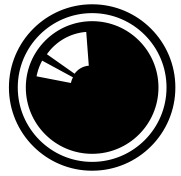
Looking into the eye of a camera invokes a bit of a “live” feeling, as if you’re on the air. I chose not to embellish the icon with a lot of gradients and or other attempts to make it look more realistic. As long as it says “camera” to the user, that’s enough. I did, however, ad a lens glare that identifies it without doubt as a camera lens.
Let me show you how I created this image.
I used CorelDRAW because… well, because I always use CorelDRAW. Use your graphics package of choice, but don’t restrict yourself to a bitmap editor. Creating images in a vector-based graphics package has serious benefits and will make exporting to the various required app graphic sizes a breeze. Creating images in a bitmap package will inevitable find you needing a size larger than what you designed for. I recorded a primer on using CorelDRAW and you can access it at http://aka.ms/coreldrawprimer.
Before I show you how I created that image, let me show you how I set up CorelDRAW for creating images for Windows 8. Choosing File | New in CorelDRAW by default will start you out with a document the size of a piece of paper. CorelDRAW is very good at creating artwork for print, but we’re concerned here more with pixels than we are with inches, so let’s change the defaults and save it for future use.
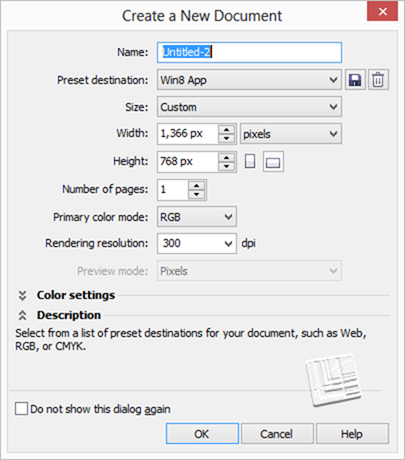
I created a preset called Win8 App that uses the base Windows resolution of 1366 x 768 pixels. I also chose a color mode of RGB since the results are to be rendered to a screen rather than a printer. When you’re working with documents of a designated pixel width/height, the resolution I mostly irrelevant.
If you’d like a nice place to start, try downloading the template I created at /w8tiletemplate.
Now, with a new document, we can go about creating our camera lens graphic.
Creating the lens graphic
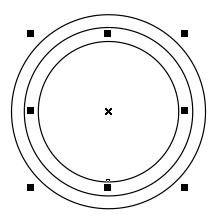
Create a series of concentric circles like so. You do this by creating the largest and then resizing it with the CTRL key held to resize about the object’s center and hitting the right mouse button when you have your next circle to create a copy.
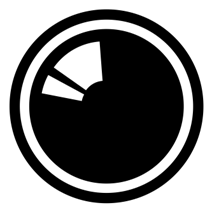
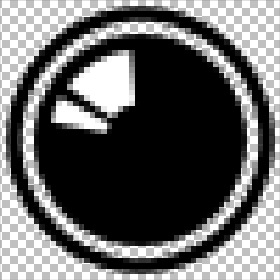
Use the second largest to trim the largest by clicking first the second largest and then holding shift and clicking the largest. Then hit the trim button  on the toolbar. Then delete the second largest circle. Setting the fill color of all objects to black and removing the outline color should leave you with something like this…
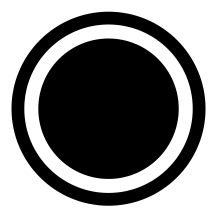
That’s nice and simple and we have only to create the lens glare, which is only slightly harder than what we’ve done so far.
Make another couple of circles inside the smallest. I like to give them a red outline (right click on red from the color palette) while I’m working so they’re easily discerned.
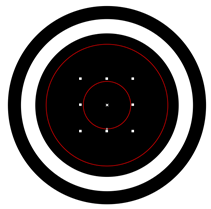
When you draw an ellipse (in this case a circular ellipse) in CorelDRAW, you have an ellipse, which is different from a custom curve. Ellipses have the property that you can grab their little vertex using the shape tool and drag to reduce the ellipse to an arc. Use the shape tool (F10) to do just that and work your way to something like this…
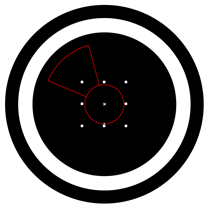
And then use some trimming and intersecting to end up with this…
Designing the tiles
Now it’s time to design yourself some tiles. At a minimum, you’ll need a standard app tile (150 x 150), a small logo (30 x 30), a store logo (50 x 50), and a splash screen (620 x 300). Additionally, you can design a wide logo (310 x 150) and some additional promotional images in case the Store finds your app worthy of being featured. It’s recommended that the wide logo only be used if you’re going to implement a live tile.
Let’s start with the main app tile. Here’s what I came up with for that…

Obviously, the tile incorporates the symbol we just created, but I also add a stylized app title below that. I chose a fairly bold font, condensed it, used different colors for the words and even shoved them together and created a little notch. Little design choices like this are somewhat arbitrary, but will end up becoming your brand and how people recognize your app. Finally, I added a soft gradient behind the entire title. You have to be careful with gradients in modern apps, but a shallow, gray gradient here seems to add a sort of dreamy, modern, cloud feel to the app.
Next, I’ll elaborate a bit on the standard logo design when creating the wide logo and the splash screen which I tend to make rather similar. Here’s what I came up with.

Now with more horizontal space than vertical, we stretch the brand elements out left to right and I like to add a little subtitle that describes without a doubt what the purpose of the app is - it’s a webcam viewer. Like the notched v in view, I notch the E with the camera lens and keep all of the graphics tight and bold.
The last step is the creation of the store and small logos.
The Store logo
The store logo is used for your apps dedicated detail page in the Windows Store. It’s common practice to just shrink the app tile down from 150 pixels to 50 and call it good, but that’s unfortunate because it’s rare that the app’s main tile will look so good at this size. Take a look at the Bing app’s Store logo captured from its page in the Store…
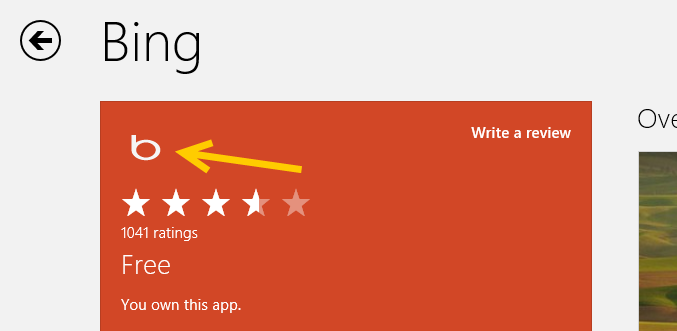
You want this image to be even simpler than the main app tile, to use most of the 50 x 50 pixel space, and to have a transparent background.
For my Everyview app, I stuck to the basic, original symbol. In CorelDRAW if you want to render something out a certain size even if the elements inside don’t quite fill up that size, you just create a bounding rectangle the size you want and then give it no fill and no outline. I have rendered this bounding box orange below for visibility only. To export this image, you simple set the bounding box’s outline color to none (invisible), select the entire group (bounding box and symbol together), and then export (CTRL + E) it.

Here’s how that would be rendered, however.
Notice a few things about this:
- The image has been rendered to pixels custom made for the export size chosen (it could be rendered absolutely huge and would still look great)
- The bounding box is not visible, yet it is responsible for the overall size and shape of the exported image
- The background is transparent (designated by the checkerboard pattern) but the lens glare is always white
- The transparency is 24-bit which means it has various levels of transparency around the edges to make it blend perfectly with the background
- There is a little bit of space around each edge of the symbol
- The symbol is large enough to capture all the quality we can in this restricted space
The small logo
The small logo is used to represent your app when the user semantically zooms out of their start screen. Try it and see.
You can use the exact same techniques to create the small logo as you did for the Store logo. The small logo (30 x 30 pixels) is even smaller than the store logo (50 x 50 pixels) so it becomes that much more important to be intentional about simplifying your image.
That’s as far as I’ll take this for now. Of course, you would continue your design effort into the app itself so that the entire effort is unified and consistent.
I’d like to point out one of the advantages to Microsoft design principles that ends up being highlighted by the content of this article. No part of the splash screen or the tiles or even the app itself are contributed to by Windows. The entire space falls under the responsibility of whoever wears the design hat in your organization (even if you are your organization and you wear all the hats!). The app tiles as well as the app’s main design surface because a truly empty canvas and 100% of the pixels are there to deliver your brand, deliver your functionality, and delight your user.
Have fun with this. It’s fun stuff for sure.
Push Notifications for Specific Users
I received a question that I’d like to turn into a blog post for the benefit of the masses. I’ve gotten this question a number of times in the past.
_Is it possible to do push notifications to all users/only a specific user/only a specific set of users? _
The answer to all three questions is yes.
Push notifications are performed by Microsoft’s Windows Notification Service (WNS). It’s a server in the cloud somewhere, so obviously if it’s going to send a push notification to a user’s device, it’s going to have to have some identifying information. Specifically, it needs to know the unique device and the unique user. A device can be used by multiple users and users can use multiple devices, so the combination of the two is essential. This identification is handled by something called a _channel URI. _
Your app gets a channel URI from the Windows API. Your app says (usually right when your app starts) “Hey, Windows, can I have a new channel URI?” Windows comes back to the app with a channel URI that is good for 30 days. From that point on, you (the app developer) is responsible for storing that channel URI value and later retrieving it to communicate with that specific user/device.
So, to answer this question, we need to talk about the recommended strategy for managing these channel URIs. Fundamentally, you need to store the channel URI along with an optional association with the user (assuming you’ve authenticated the user and have an ID) and an optional association with the current device (assuming you’ve generated a device identifier). As long as you have stored this association, you’ll be able to target your user, your user’s device, or the combination thereof.
Here’s how I recommend you do it (roughly).
The first time your app starts, you generate a device ID (a GUID) and store it in local storage (not roaming!). Look for this ID on each app start and don’t regenerate it if one already exists.
Each time your app starts, request a new channel URI. They’re good for 30 days, but you don’t want to implement reuse logic when there’s no reason. Fetching a new channel URI is an easy and cheap operation.
Each time your app starts, authenticate your user.
Store the channel, user, and device IDs in Azure Mobile Services (or another service if you’re okay with not using the coolest backend service on the planet) in tables. For ultimate flexibility, create three independent tables and use foreign keys to keep the relationships. For ultimate ease where you can assume one user has one device and one channel (at a time), store them all in the users table.
You may, obviously, have other information in the users table about when they last logged in, where they live, what type of user they are, or whatever. You can filter the users table any which way you want and you then have a great list of channel URIs to do push notifications to. You can actually use Azure Mobile Services to do filter the table, loop the results, and perform the push very easily.
For a complete example on how to do this, download codeSHOW (codeshow.codeplex.com) and check out the WAMS push demo. You can see the code and run the app and see the results as well.
Happy notifying!
Ready to start developing for Windows 8?
First of all, if you need any help getting your system configured to start developing Windows 8, just go to usdpe.ohours.org and set up an office hours appointment with a Microsoft Developer Evangelist near you. They’ll walk you through the whole process.
Windows 8 development is not only a blast, but it can be very lucrative as well. I encourage you to dive in and work hard at learning. If you need any help along the way we’ll be glad to help. Here’s how to get started…
Get a Windows Store developer account
To put an app in the Windows Store (and start making money!!), you need to get a Windows Store developer account. The account costs money on an annual basis, but if you qualify for one of the programs I’m about to mention, you could get it for free.
If you’re a student, you can get a Windows Store developer account for free by joining the DreamSpark program! Just go to http://www.dreamspark.com and sign up. If you need any help getting signed up for DreamSpark, email my colleague Sam Stokes at sam.stokes at microsoft.com from your school email account. He’s an expert at that stuff.
If you are a new business with a BizSpark account or if you have an MSDN subscription, you too can get your Windows Store developer account for free. For BizSpark questions, email my colleague steve.seow at microsoft.com and he’ll get you squared away.
If you don’t qualify for any of these programs, then you’ll need to pay for your developer account. They are $49 for private parties or $99 for companies. You can go here to get started.
For more in-depth information about the developer account visit Registering for a Windows Store developer account in the Dev Center.
Get Windows 8
To develop a Windows 8 app, you need to get Windows 8 and install it. Actually, if you are using some of the game engines, you could start developing before you get Windows 8, but eventually you’ll need it for testing and submitting your finished product to the Windows Store so you can start making the big bucks.
You can buy Windows 8 online or in any computer store. If you qualify for one of the programs I mentioned (DreamSpark, BizSpark, or MSDN) then you can get a free license. If you want to try Windows 8 out for a while, you can always download a 90-day evaluation copy.
If you have a PC, you can install Windows 8 natively (recommended), you can boot to a VHD drive, or you can install it in a virtual machine. Install it natively if you can or boot to a VHD drive as a second choice. If you run it in a virtual machine, you might not get the same performance.
If you have a Mac, you can install Windows 8 using BootCamp (recommended) or virtually using Parallels (also good). There are other virtualization options, but these two are recommended. Note that Apple says that BootCamp doesn’t support Windows 8, but I’ve seen it work, so I think you’ll be okay.
Get the developer tools
Besides Windows 8, you also need to install the tools. At a minimum, you’ll need the free Visual Studio Express 2012 for Windows 8. There is a professional version of Visual Studio 2012 too that costs money but offers more features. The free version is enough to build an entire app, though. If you want to use a game engine for making a game for Windows 8, let me recommend Scirra Construct2. Contruct2 is an excellent tool and can really get you from 0-60 [link removed] in no time flat!
There are a few other SDKs (for maps or advertisements or whatever) that you can download from the Windows Dev Center.
Get a graphics program
Finally, whether you’re creating a business app or a video game, you’re going to need to generate some graphics. You can use the graphics package of your choice, but if you don’t have any experience with graphics yet, I recommend CorelDRAW. CorelDRAW is a vector-based graphics package, which makes it much easier to create new illustrations and app graphics. CorelDRAW costs money, so if you are looking for a free solution, then InkScape will get the job done too.
Are you stuck?! Don’t forget you can set up office hours with a Microsoft Developer Evangelist for one-on-one help by visiting usdpe.ohours.org.
More
Beyond getting your machine all set up, you can try these links to get you entrenched in Windows 8 development…
Figure out which language stack to use to develop an app - XAML/C# or HTML/JavaScript
Azure Websites
It’s been a long time coming, but I’m finally all transferred over to Azure Websites for codefoster.com. It feels good. It feels like the future. The management portal is excellent and I have all of my cloud stuff in one place now (and it’s not in HP’s cloud thing).
Code for CSS for Windows 8 App Development
Hello. I wrote a little book (my first actually) called CSS for Windows 8 App Development published by Apress. It’s available at aka.ms/cssbook. All of the code listings from the book are available in a Windows 8 app that I have created, and you can download all of the source code for this app at cssbookcode.codeplex.com. The code is not polished yet as the book is still in alpha, but it should build and run and you’re welcome to take a look as early as you like. Thanks for reading my book. I wish you lots of fun and success in developing apps for Windows 8.
Loading States of the WinJS.UI.ListView
If you make Windows 8 apps using HTML and JavaScript, you are definitely going to be chums with the WinJS ListView control. It’s the fundamental list control. You use it to create item grids as are so typical to Windows 8 apps, and you use it as well for lists - more vertically item lists like you might often find in the snap view of various apps.
The ListView is a rather rich control that does a lot of layout for you and offers you a lot of rich functionality as well. It can be bound to a list of data and then can load asynchronously for performance and responsiveness and also conditionally so you can selectively choose item templates or render methods.
It’s often times important to find out what the ListView is doing so you can coordinate some of your own custom functions.
The ListView has a loading process that has various milestones or loading states - each of which fires the onloadingstatechanged event and includes the exact loading state. You can wire in to this event, figure out which loading state the ListView is currently in, and do something of your own.
As an example, let me show you something from my codeSHOW app. In case you aren’t familiar, codeSHOW is a Windows 8 app for learning how to make Windows 8 apps using HTML and JavaScript. You can download it from the Windows Store at http://aka.ms/codeshowapp or download the full source code for the app from http://codeshow.codeplex.com.
In codeSHOW, the user may choose from a large list of demos, spend a little time using the chosen demo, and then click back to return to the home page. When the user returns to the homepage, it would be convenient to recall their scroll position so they don’t have to keep finding their place each time.
Here’s how it was implemented in codeSHOW.
When the user chooses a demo, the WinJS navigation framework unloads the home page and loads the demo page. In the unload event of the home page, I added…
app.sessionState.homeScrollPosition = demosListView.scrollPosition; |
This adds the scroll position of the ListView to the sessionState. This means that even if the app crashes or the user switches away and lets it get suspended, the scroll position is going to be saved for later recall.
Now, when the user returns to the home page by pressing the back button from the demo page, the following code fires from the ready event…
demosListView.onloadingstatechanged = function () { |
This hooks up an event handler for the `onloadingstatechanged event, so that each time the loading state changes, we have an opportunity to intercept, check to see if the loading state is a certain one, and do something.
In this case, we’re checking to see if the loading state of the ListView is “viewPortLoaded”. Some experimentation told me that after the viewPortLoaded state is reached, the ListView has fleshed itself out enough that a setting of the scroll position will actually work. If you try to set the scroll position before the ListView gets to this loading state, the ListView will have no width and thus setting the scroll position will be a futile effort.
Here are all of the loading states of a ListView in order…
viewPortLoadeditemsLoadingitemsLoadedcomplete
So if you need to do something only after the entire ListView is loaded, you would use code similar to my last listing, except check to see that the loading state is “complete”.
I hope this helps. Keep having fun with your web development in Windows 8, and if you’ve got a cool app you’re working on, send me a tweet and I’ll mention your project.