Posts tagged with "winjs"
Easy Caching in WinJS Apps
I set out the other day to help a developer add some cache functionality for his app.
The app is 1Vigor and there’s a version for swimmers, one for runners, and another for learning how to generate peak performance in whatever sport or fitness activity you’re doing (not quite ready for the Store). The 1Vigor apps pull content from the 1vigor.com website and provide some great articles for athletes. The authors of the articles are first rate and the amount of content available is impressive too.
The swimming and running apps are already in the store, but if you download them, you’ll discover that you’ll be required to maintain an internet connection while you fetch your next article to read, since no cache functionality exists. So if you’re on a submarine without wifi, you’re going to be out of luck. I’m not completely sure, but I don’t think that wifi availability on submarines is quite caught up with commercial airlines.
My first thought was that I was going to have to take a very manual approach to caching. I was prepared to enumerate each article and save a copy in local storage or something like that. As it turned out, it was a much easier task.
Here’s the only code required to accomplish the task at hand…
var results = WebData.articles.map(function (a) { |
And here’s what that does. It starts with the WebData.articles - an array containing objects with the metadata about the articles and including a URL (contentUrl) linking to the HTML of the article from 1vigor.com.
It maps that array to a WinJS.xhr call. If you’re not familiar with the .map() function, listen up. The .map() function works for all arrays (because it exists in the prototype for the Array object). When you map an array, you are changing all of its elements to something else.
Let’s say you have an array (A) of numbers and you want to create a new array (B) where all of the numbers from A are doubled. You could do that with…
var B = A.map(function(i) { return i*2; }); |
So, back to the first block of code… the value of the results variable is going to be an array of Promise objects.
You can wait for all of the promises in an array to complete by using WinJS.Promise.join(myArrayOfPromises).
So the articlesCached variable which I hang on the WebData object is going to be a promise that completes when all of the individual calls to the article content are complete.
Now, you might be wondering at this point what I do with the results of those HTTP requests. The answer is that I do nothing with them. I don’t need to. GET requests over HTTP are cached by default, so the next time the user launches an article and the system attempts to access its content using the .contentUrl, it essentially says “Hey, I’ve done this before. I’ll just use the results of that last network call instead of doing another one.”
And that’s all it took.
Not bad, eh?
Thirty Nine Fourteen
That’s how many lines of CSS code make up the ui-light.css file that you get with WinJS.
What exactly are these nearly 4,000 lines of code doing for you? A lot of good stuff actually. And not only that, but there’s a lot that can be learned from spending some time looking at this file with a microscope. The techniques used in it are pretty advanced as far as CSS goes, and there are some classes, pseudo-classes, and pseudo-elements that you’ve likely not been introduced to yet.
All-in-all, the style sheet defines the look and feel of a Windows 8 app, all of its typography, all of the standard HTML controls, and all of the controls provided for you by WinJS such as ListView, slider, and many more.
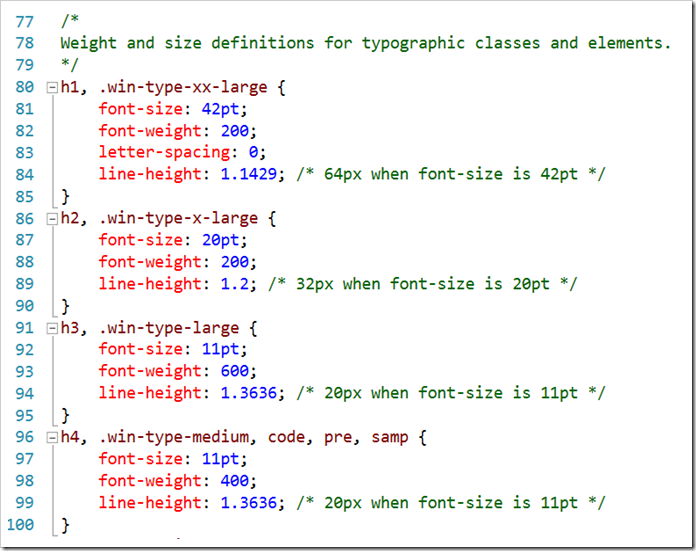
Here are a few of the highlights I want to call out…
- **header styles. **The font size and weight of the standard headers h1 through h6 are defined using the Windows 8 type ramp – 42pt, 20pt, 11pt, and 9pt. Also, along with each header is an accompanying class so that the font ramp can be applied to text elements without making them headers. For h1 there is win-type-xx-large, for h2 win-type-x-large, for h3 win-type-large, for h4 win-type-medium, for h5 win-type-small, and for h6 there’s win-type-xx-small.
- win-type-ellipsis is defined with the text-overflow: ellipsis property (and a couple of others) to allow text continuation
- HTML controls such as button, progress, input, select, and textarea are defaulted with minimum widths and heights so they work well in a touch environment.
- win-backbutton is defined as a class you can add to a button element to make it render like the round back button you see all over the place in Windows 8. The various states of the button such as hover or disabled are defined as well.
- snapped media query. When the user snaps an app, there’s a lot less space for everything, so the size of the entire type ramp is reduced as is the size of the win-backbutton, the size of the appbar and appbar buttons, and the padding and margins in various places.
- high contrast mode is supported throughout Windows 8 to improve visibility for people that need it. There is a media query expression for –ms-high-contrast that is captured in various media queries and defined to create more vivid contrasts and easier reading.
I’m impressed with the CSS file and all of the time and consideration it must have taken to not only get all of these definitions written, but also to get them in the right order and to take into account things like the CSS specificity. There’s very little in the file that feels remotely “hacky”. Still, I’m glad I wasn’t tasked with authoring it!
Page Navigation in Windows 8 JavaScript Apps
I’d like to talk a bit about navigating in Metro apps using HTML/JavaScript. There are a few options for doing so, and as you probably know whenever there’s more than one way to do things, then you the developer have power but not necessarily clarity. The latter is what I hope to offer here.
First of all, the HTML/JavaScript that Metro apps are based on are identical to the HTML/JavaScript that websites are based on. It is entirely based on the standards. This is good because proprietary things are bad - generally speaking. This means that you can navigate exactly like you do in websites, but don’t. I’ll explain why not.
So you could navigate from default.html to page2.html like this…
<a href="page2.html">link to page 2</a> |
But again… you should usually do this. Doing so changes the “top level document location”. This navigation looks something like this…
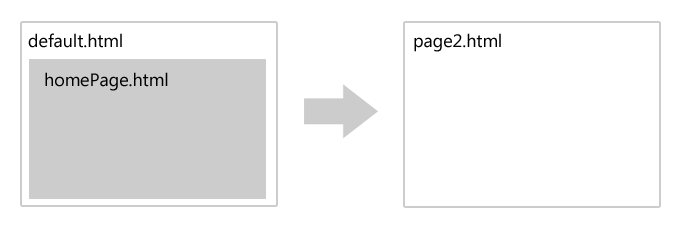
Where the user is no longer on the default.html page. For websites, it’s just fine to jump around by navigating the top level like this because you’re usually not too concerned about state, but in a full-fledged application, you usually are concerned with state and you can make your life easier by using the built-in navigation features that are provided by the VS2012 templates.
When you use the navigation functionality, a navigation looks more like this…
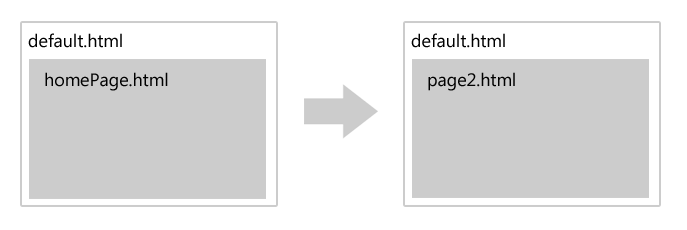
Notice that the user is still on default.html, but the contents of the second page have simply been loaded into what is called the contenthost. Now, if you loaded a bunch of script and styles on default.html and even declared some variables and set some state, you still have all of that, even though to the user it appears that you’ve navigated to a second page.
Implementing this is pretty straight-forward. Follow these steps…
Get the navigate.js script file that comes with the Navigation Application project template in VS2012. You can either start with the Navigation Application project template and notice that navigate.js is already in your js folder, or you can create a throw-away Nav project and steal that file.
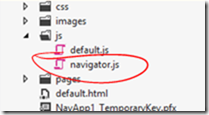
Reference the navigate.js from your default.html file…

Add a contenthost to your default.html file
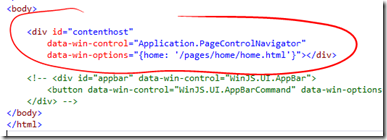
And that’s it. After this has been implemented, then you are free to do things in your JavaScript like this…
WinJS.Navigation.navigate("/pages/page2/page2.html"); |
And you have the chance to pass some parameters without having to resort to query string parameters which can be cumbersome and restricting. To do this, you can pass a second parameter to the navigate function like this…
WinJS.Navigation.navigate("/pages/page2/page2.html", myDoohicky); |
…where myDoohicky can be any JavaScript object you want.
Now, when might we actually perform this navigation? Well, in many cases it will be on some user action. For instance, let’s say the user is going to click a button and we want to navigate them to page2.html. Let’s see what that would look like…
HTML
<button id="myButton">go to page2</button> |
JavaScript
ready: function (element, options) { |
Now let’s look at a bit more pragmatic example. Let’s say we are working in a grid (WinJS.UI.ListView technically) and when the user touches one of the tiles, we want to navigate to a second page with more details about that element.
This can be wired up much like the simple button example above, but likely the elements in our grid are data bound from some list that we have. In that case, perhaps the easiest way to implement this is by adding a function to the list and then bind the click function just like any of the data elements are bound. Here’s an example of that…
HTML
<div id="headertemplate" data-win-control="WinJS.Binding.Template"> |
JavaScript
ready: function (element, options) { |
Now, there’s a lot going on in the JavaScript file there, so let me break it down for you. First of all, I pulled this example from another post I did on creating a Netflix browser app utilizing their OData feed. If you want to know what’s going on with the call and the data binding, go check that out.
I added to it though. I changed what happens in the forEach loop. The reason I did is to illustrate how to bind to a function like you bind any other data property. Look in the HTML at the div just below the one with the id of template. I’m binding the onclick attribute to the clickFunction. That clickFunction is what I created in the forEach loop of the JavaScript. Notice, though, that there’s one funny thing we need to do to it. Since we are using this in the HTML it could be exploited and so we turn on strictProcessing for our app and that requires us to set _supportedForProcessing_ on any functions that we are going to call from the HTML. So, we set that to true for our function and we’re good to go.
I hope this brings the concept home for you. If you have questions, leave a comment below and I’ll be glad to try to help.
When to Use ViewBoxes and FlexBoxes
HTML and CSS is great, but there’s at least one thing that has driven web designers mad for ages - layout. We used to use tables and it worked. We knew their weaknesses, but they worked. Then we were told that tables are for tabular data and div elements are for layout, but divs are wretched creatures. To set divs next to each other one had to float them, but then when finished floating had to be explicitly turned off - argh. Also, divs had no notion of filling vertical space or of controlling the vertical placement of anything within it.
So a myriad of web designers resorted to absolute positioning, browser hacks, jQuery UI positioning, or some other means just to get things to go where they ought.
Enter Windows 8.
Windows 8 allows us to design our Metro style apps using HTML and CSS. In doing so, however, it the CSS standards and Microsoft have given us some facilities to finally place things where we want them.
It’s not obvious how everything works though so let me give you a boost. If you start with a Fixed Layout Application (for the record, I think it should be called the Flexible Layout Application) project template you get the right stuff automatically, but here’s an explanation so you have the concept as well.
We’re dealing with two entities here: the WinJS.UI.ViewBox control and the -ms-flexbox css property value (for the display property).
WinJS.UI.ViewBox
The purpose of the ViewBox is stated in the documentation. It says that it “Scales a single child element to fill the available space without resizing it. This control reacts to changes in the size of the container as well as changes in size of the child element. For example, a media query may result in a change in aspect ratio.”
The first thing I had a hard time wrapping my head around was the overlap between a ViewBox and a FlexBox. Then I discovered that there really isn’t any. The ViewBox control is quite simple. It scales the content that it contains but maintains it’s aspect ratio.
It works like this…

Note that it does not work like this…

In other words, as it says in the documentation, it scales the contents, but it keeps their proportions.
And that’s really the end of it. The ViewBox serves this one purpose.
Flexbox
Now it’s time to talk about the flexbox. This is not a WinJS control, but rather an implementation of a CSS3 property. It’s not quite a standard property yet because all of the browsers are still implementing it with vendor specific properties and values, but it’s close. For Windows 8, we specify a display property with a value of -ms-flexbox to indicate flexbox layout.
The purpose and scope of the flexbox is a bit bigger than the ViewBox. Here’s what the W3C spec for the CSS Flexible Box Layout Module says “In the flexbox layout model, the children of a flexbox can be laid out in any direction, and can “flex” their sizes, either growing to fill unused space or shrinking to avoid overflowing the parent. Both horizontal and vertical alignment of the children can be easily manipulated. Nesting of these boxes (horizontal inside vertical, or vertical inside horizontal) can be used to build layouts in two dimensions.”
So, like the ViewBox, we still have the concept of the container’s content changing in size to fit the container, but this has more to do with a collection of child items.
Additionally, the flexbox offers a lot of properties to specify how it’s children are laid out. A quick glance in Blend at the CSS properties on a div in the Flexbox category will enumerate them for you…
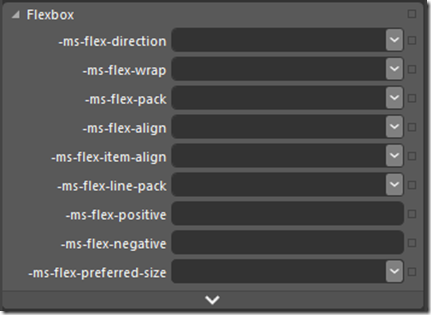
Notice first the -ms vendor specific prefix as I mentioned.
To give a thorough description of the possibilities with these properties, I’d be duplicating what’s already done quite nicely on the flexbox page on w3.org, so just go there and read the nitty, gritty detail.
Differences
The ViewBox is a WinJS control, whereas the flexbox is a CSS property.
The ViewBox always acts on a single child item, but the flexbox can act on multiple child items.
The ViewBox itself changes size to fit it’s container as a core feature. The flexbox can be told to scale to 100% either in width or height, but it doesn’t have to.
The ViewBox does not extend control over the alignment and scale modes of it’s contents, but always does the same thing - scales the child item without changing it’s proportion.
All Together Now
Now that you know how different these controls are, consider them together. If you put a flexbox div inside of a ViewBox, you get a really effective layout tool. Try this for your HTML…
<body> |
With this as the CSS…
.flexy { |
What you have now is a flexbox that fills its area well. Look at these simulator screenshots so you can see what this would look like…
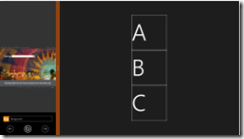
[more images missing]
XAML is unarguably the most powerful layout engine I’ve ever seen, but I really don’t feel like there’s too much in HTML/CSS that we’re missing now with additions like this. It’s rather empowering.
Happy layouts!