
Tweet Monkey!
This is a very, very simple maker project. It’s clean. It’s easy. It’s quick. I’m hoping the process and architecture inspire you to make something of your own, and I hope the world of possibilities in this space start opening up for you as they are for me (as evidenced by my fantastically long project idea list).
Let’s get started!
Here’s the Big Idea
We’re going to use a microprocessor with wifi to monitor Twitter’s streaming API for tweets with a certain hash tag and then when one lands, we’ll activate a dancing, squawking, symbol clanging monkey for 2 seconds. Two seconds should be enough to see him go through his entertaining gyrations. Each subsequent tweet will again set our monkey into motion and hilarity will ensue.
Perhaps you’ve seen projects done with low-level boards like the Arduino, one of Particle‘s boards, or the tiny ESP8266. I’m a fan of those boards, but for this project, we’re calling into Twitter’s streaming API. On the surface, that seems like a simple thing, but under the hood there’s a lot that needs to happen. Regardless of what sort of client you’re using to connect to the popular Twitter service, you have to authenticate. That means that you have to use Oauth. And that means that you have to do a bunch of work in your HTTP headers. But I don’t want to do that work. I want this to be easy. Node.js makes it easy, so we’re going to use a board that supports Node.js.
For this project, we’re going to use an Intel Edison running Node.js. Node.js runs JavaScript, which is a high-level scripting language that, despite its origins in front-end development, feels very much at home on the server, in apps, or on devices. The syntax of JavaScript is nice and all, but the real value of running Node.js for this project is the fact that we can use a Node module that has already been written to handle all of the Twitter complexity. We’ll end up with a very short code block that does just what we want.
You can use whatever you like for editing the text files, but I’ll be using the free Visual Studio Code.
My original Tweet Monkey product used the Edison on an Arduino breakout board with a USB battery pack and a big relay. The entire solution was pretty huge.
I’ve modified the steps below to make it more accessible. I include the complete list of materials you’ll need to purchase, and it’s cheaper than if you were to purchase the Arduino dev board and the Seeed Grove Kit that included the relay. Furthermore, because the Edison is no longer required to live on the Arduino breakout board, it takes advantage of one of Edison’s biggest features - it’s small size.
Here’s what the entire project is going to look like from a hardware standpoint, just so you know…

Here’s what you’ll need
| **Item** | **Price** | **Link** |
| Monkey | $12 | [Amazon](http://www.amazon.com/dp/B0000V4H4O/ref=sr_ph_1?m=A2NL9UUKFTRQH&ie=UTF8&qid=1438886567&sr=sr-1&keywords=magic+monkey) |
| Intel Edison | $50 | [Sparkfun](https://www.sparkfun.com/products/13024) |
| Edison battery module | $25 | [Sparkfun](https://www.sparkfun.com/products/13037) |
| Edison GPIO module | $15 | [Sparkfun](https://www.sparkfun.com/products/13038) |
| MOSFET | $0.88 | [Digikey](http://www.digikey.com/product-detail/en/STP16NF06/497-2766-5-ND/603791) |
| 1/4W Resistor Kit | $15 | [Digikey](http://www.digikey.com/product-detail/en/RS225/RS225-ND/7110) |
| Drill and 1/6" drill bit | ||
| 2' 22-gauge wire | ||
| Short M-F jumper wires | $3 | [Digikey](http://www.digikey.com/product-detail/en/MIKROE-512/1471-1231-ND/4495595) |
| 20-pin Pin Header Strips | $6 | [Digikey](http://www.digikey.com/product-detail/en/M20-9992046/952-1902-ND/3727869) |
| Micro-USB cable and power source | ||
| 2 AA batteries |
Step 1. Buy the monkey
I found mine at a local novelty shop here in Seattle called Archie McPhee, but it’s the same as this one on Amazon.
Step 2. Mod the monkey
This monkey comes out of the box ready to entertain children with a simple on/off switch on his butt. Well, we’re not children, and that’s not going to work for us. We’re using our monkey for serious business - serious monkey business.
So the first thing we need to do is inspect our monkey’s downstairs and see how this on/off contraption works.
Here’s what I see…
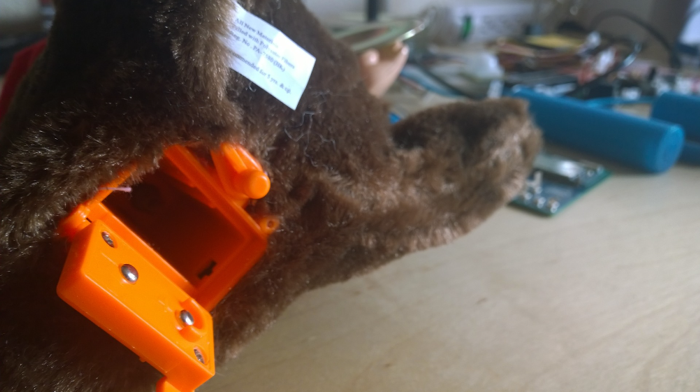
Every project is different. Here’s what I’m looking for.
We’re dealing with a complete circuit here. There are two AA (1.5V) batteries and they’re hooked up in serial, so that means that this monkey runs on 3V and some unknown amount of current will be drawn.
You don’t often know how much current any given load is going to require. You could put meters in the circuit and measure, but the better thing to do is to simply leave a circuit as is with it’s own power source and everything. The other option would be to attempt to merge the circuits of our load (the monkey) and our microprocessor, but that’s where you have to be careful. Microprocessors tend to cost real dollars. Ironically, the Edison I’m going to introduce soon - an amazing work of engineering art - is only 3x the price of this silly mechanical monkey! The inner workings of computers are child’s play compared to the inner workings of our global economy. But I digress. My point was that you don’t want to toast your Edison. So we want to control the monkey by simply doing the equivalent of turning the switch on an off.
What we discover in this monkey’s butt is that the switch on the outside of the trapdoor is simply connecting or disconnecting the ends of the batteries and completing or breaking the circuit. So let’s do the same. Let’s simply tap into the two contacts with some wires, run them out, and use software to virtually touch the ends of the wire together.
We need to run wires outside all clean like, so let’s drill some very small holes through the trap door and run wires through. Then we’ll set up a soldering station and solder the wires directly to the contacts.
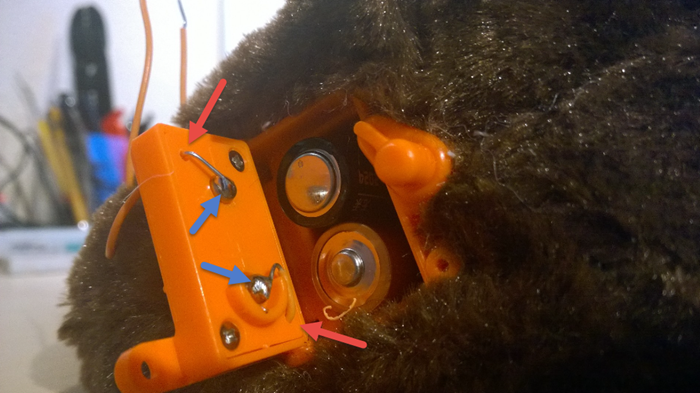
Now we can close the door and we’ve got two wires that when touched together complete the circuit and set the monkey in motion. Conveniently, we have not disabled our on/off switch, so if we wish to use it to turn the monkey on, we can still do that.
And just like that, we’re done with surgery. Your monkey should recover nicely.
Step 3. Add a component to complete the circuit
The question now is how to programmatically connect these two wires to complete the circuit. There are a number of options, and I’ll enumerate them.
Option 1. We could hook the positive wire to a pin on our microprocessor and the negative wire to the ground of our circuit. There are some considerations with this approach, and in our case here, there are some real problems. Different devices have different voltage levels for their logic. We’re going to be using an Edison with the Arduino dev board installed. The logic on the Arduino board are 5V, and that’s actually because the dev board is level shifting them up for us, because the logic levels on the Edison itself are only 1.8V. So as long as we’re using the dev board, if we attempted to hook our logic directly up to the monkey’s circuit, we’d be combining the power source of our microprocessor with our monkey’s own AA power source. That’s not a good idea.
Option 2. A mechanical relay is a nifty device that has 2 circuits. On one circuit, it let’s you give it a logical 0V or 5V level. If you give it 0V, then the second circuit will be open. If you give it 5V, then it will mechanically connect (as in, internally touch two pins together with metal) the other circuit so that electricity will flow. You will actually hear a click when a relay is activated. It is not, obviously, a power source. It simply let’s you decide whether to open or close a circuit so that whatever power source it has will or will not flow. This is the option we’re going to use for this project simply because I have one readily available.
Option 3. A solid state relay works exactly like a mechanical relay except: a) it tends to handle smaller amperage values on the secondary circuit, and b) it is perfectly silent. I have some of these on order, but they’re not in yet. A solid state relay is usually created with an optoisolator that uses a small light source (an LED) and a small light pickup (a phototransistor) internally. This decouples the circuits and allows the whole thing to operate silently.
As I mentioned, I have a mechanical relay on hand, so I’ll use that. It’s capable of handling 10A which is far more than we’ll need it for, but it will work. By the way, I believe this relay takes 5V to trigger, so we wouldn’t be able to use it with the Edison alone. We must have the Arduino dev board. The wires coming out of the monkey’s hind end are attached to the relay board in the green connector with flat screws on top. Here’s the relay…
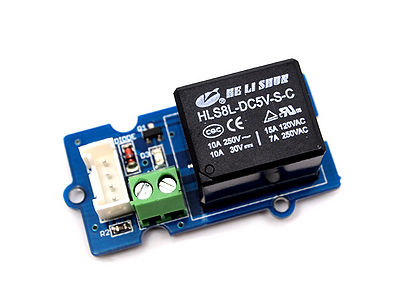
I got this relay from a Grove Seeed Kit (intentionally misspelled). The nice thing about this kit is that it makes all of the components easy to hook up. The white 4-pin connector you see on the component fits a bundle of wires that also comes with the kit and again into an Arduino-compatible shield, which you’ll see next.
Step 4. Adding the microprocessor
Next, I plugged my relay into my base shield. The base shield is on my Arduino dev board, and the Edison is mounted to the same. The Edison needs power, and that’s easily provided with a simple USB battery pack.
At this point, we have all of our hardware hooked up and are ready to implement some logic.
Step 5. Writing the software
We’re going to be writing JavaScript in a Node.js project on this Intel Edison to get this monkey grooving. If you are pulling an Edison out of the box and need help setting it up, have a look at codefoster.com/edison-setup. For the rest of this article, you’ll need your device to be all configured and on the same wifi network as your host PC (the one you’re using Visual Studio on) and you’ll need to know the IP address and the login password.
If you haven’t already, go to visualstudio.com and download and install Visual Studio Community 2015. Then go to http://nodejstools.codeplex.com and download and install the Node.js Tools for Visual Studio.
Now clone https://github.com/codefoster/tweetmonkey.git and open the tweetmonkey.njsproj file in Visual Studio. Let me point out a few things about this project.
- There’s a config.js file that you need to fill in with your particulars.
- Go to apps.twitter.com and create a new app to get the Twitter API keys and secrets.
- There’s a gulpfile.js that has a deployment project. The IP address and password you enter into the config.js will determine where this project gets deployed.
- There’s a
{ track: '#cfmonkey' }in the app.js that you need to change the value of. This is what the search is going to look for. This is not looking for tweets from a user actually, but rather looking for tweets with certain text in the body. I will try to update the GitHub repo with comments for how to search for tweets to a certain user. - The code in the app.js is hooking into Twitter’s “streaming API”. This means that you don’t have to poll the service every second to see if any relevant tweets have landed yet. Rather, Twitter will look for them and when one does land, it will call the your code’s function. That’s a thing of beauty!
Step 6. Running the app
Ideally, I’d have another gulp task for executing the Node.js project on the device, but I haven’t quite figured that out yet, so I just SSH to the device and run it.
I’ll assume you’re all set up for using SSH since you’ve supposedly gone through my /edison-setup article already.
To SSH, use…
ssh root@192.168.1.13 (or whatever your IP address happens to be)
Once on the device, cd to the project directory (it should be in the default location depicted by the ~ in the prompt - this is likely /home/root) and then use…
node app.js
Step 7. Testing it
Testing it is easy. Just send a tweet with the chosen text and watch your monkey dance!
Something more compact perhaps?
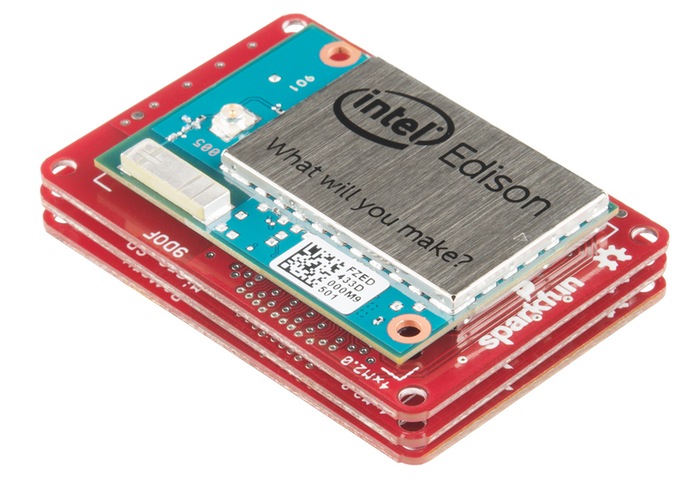
The final solution is by no means compact. You have a big, green board hanging out of monkey’s bum by wires and a USB batter pack to boot. So how might we make this solution more compact? I’ll tell you. Take a look at the Edison on its Arduino dev board. Most of that is dev board, right? The Edison itself is very small. So if we could get rid of the dev board, that would be a huge step. Of course, then we need to power the thing and a way to access the logical pin that controls the relay. So, we could simply head back to SparkFun.com and order a couple of Edison modules. These things are great in my opinion. For this solution, we could use the Edison itself, a GPIO breakout module, and a battery module. Then we’d have to replace our relay with something smaller - no problem since the relay I used was way overkill. Then we’d probably want to find a creative way to conceal the whole thing. We could give our monkey a backpack, for instance. In some cases, you can power your Edison from the same source as your project, but in this case, the monkey is carrying 3V and our Edison needs 3.7V at a minimum, so I wouldn’t feel good about that.
Conclusion
So there you have it - a simple, end-to-end tweet monkey! Just what everyone needs.
I hope you had fun with the monkey specifically, but more importantly, I hope you’re just a little bit more comfortable hooking into an existing electronic circuit and using logic from a program you wrote to manipulate it. When you get the concepts behind the procedures, you really start to see the possibilities, and that is the heart of the maker movement.
I recorded a session about Tweet Monkey’s older brother - Command Monkey as a CodeChat episode with my colleague Jason Short (@infinitecodex). Here you go…