Storage in a Windows 8 App
Apps generate data. Some of them generate a ton of data and others just a few little bits and pieces. Allow me to enumerate your options for storing stuff when you’re working on an app for Windows 8. There are subtle differences between the way storage is done in an HTML/JS app versus a .NET or a C++, but for most of the techniques you’re just accessing the WinRT library so the steps are practically identical.
Before we enumerate the types of storage, let’s talk about the types of data that typically get generated in an app. I’ll break them up into application state, user settings, application data, and user data.
Application State
Application state (or session state) is the data that pertains to what the user is doing in their use of an app. If the user has browsed to the registration page and starting typing their name and address in, then that data is session state. If the user has to drop their tablet (figuratively of course), switch apps, or something else and doesn’t get back to it for some time, then the kind thing (only humane option?) to do is remember their state and restore it when they return.
User Settings
A user has preferences. Your user might want the music in their game turned off. They might want to choose a theme color. They might want to turn on automatic social sharing. These are preferences. They usually take up hardly any space, but it’s they’re really important to your user. The best thing to do is store them in the cloud instead of just on a device so the user feels like they are remembered wherever they go.
Application Data
Application data is the data generated by your app that may have everything in the world to do with your user, but your user is going to assume that the app is holding that data for him and doesn’t want to manage it himself outside of the app. If you installed a task list app, you’d expect it to hold tasks for you, right? That’s app data. The line can be blurry between app data and user data, so read on.
User Data
User data is data generated by the app, but belongs more to the user than the app. The user expects to be able to send the data to a friend, open it in a different program, or back it up to the cloud. User data is everything you find in the libraries – the documents library, the music library, etc.
Implementation
So, let’s talk about how to implement these.
**Application state **can be stored in WinJS.Application.sessionState. That’s an object that WinJS and Windows handle for you and plays well with the lifecycle of your app. Saving to the sessionState object couldn’t be easier. Just issue a command like…
WinJS.Application.sessionState = { |
You could do this anytime during the use of your app or you could wait until the app.oncheckpoint event (look on your default.js page for that) and just do it when your app is on it’s way out of the spotlight.
Keep in mind that this is for session data only. Windows assumes that if your user explicitly ends the app, they are ending their session and sessionState is not stored. You also can’t count on it after an application crash, so make sure it’s only transient data that wouldn’t ruin the users day to lose.
**User settings **are again very important. You have many options for storing them, but only two that I recommend. The first is localSettings and the second is roamingSettings. Only use localSettings if you have good reason not to roam the setting to the cloud. If you use roamingSettings and the user doesn’t have a Microsoft account, it will still store locally. Both of these are accessed from Windows.Storage.ApplicationData.current. You can store a new setting value like this…
localSettings.values["gameMusic"] = "off"; |
**Application data **can work much like the user settings technically, but it serves a different purpose. Imagine the task list app I mentioned before. The tasks themselves must obviously be stored and you - the developer - have quite a variety of options. You have to ask yourself a few questions like:
- Does the user need to share the app data with select others?
- Does the user need access to the data on multiple devices?
- Does the data feed any other apps either on the same or another platform?
It’s very possible that just storing data local to the device is plenty. In that case, the localFolder from Windows.Storage.ApplicationData.current. This spot is dedicated to storing data for your app and your app only. No other apps have access to it actually.
If you have a very small amount of application data (less than 100k) then you can use the roamingFolder from the same Windows.Storage.ApplicationData.current. This data will, just like the roamingSettings, be synced to the user’s online profile and back down to any other devices they might log in to.
You have a variety of other options for storing data such as a local database, online database, online user drive, and more, but I’ll save those for another day and another post.
Finally, we’ll talk about user data. Unlike application data, users will expect to have ownership of their user data. When a user creates a spreadsheet, this is not data that just exists inside of Excel. The user expects to have that spreadsheet in their documents and be able to work with it (share it, rename it, organize it, …) outside of Excel.
If your app is one that will work with user data, then you need to pick a file format and create the association. This is done in the package.appxmanifest where you’ll also need to add a capability to access the users documents. It’s quite a easy thing to use the open and save file dialogs from your app and the user will love having full access not only to his documents, but also all apps he has installed that implement the FilePicker contract.
That’s quite enough on storage for now. Perhaps some of the following locations from within the Windows Dev Center will be helpful to you…
WinJS.Application.sessionState object
Manage app lifecycle and state
Optimizing your app’s lifecycle
Have fun.
Using WinJS.xhr to Fetch This and That
You know the story. A call to a website used to be little more than a single request with its single response. But times have changed. The web is all grown up and any given visit to a website is often accompanied by multiple requests for more atomic bits of data.
The popular thing to do now, in fact, is to implement websites using a single page architecture where the user does one primary request and response to get the core document, and then the rest of his or her time spent in the app consists only of these tiny requests/response cycles that bring just what’s necessary.
This is how Windows 8 apps using HTML/JS work - they are single page apps. And to play in this sandbox, you need to get good at using WinJS.xhr(). WinJS.xhr() is not a fancy function. It doesn’t do a lot more than any of the other libraries do when they wrap the XmlHttpRequest. It makes for good, simple, elegant though and I like that.
Watch this screencast of the xhr() function in action and enjoy.
Query Your DOM
Your HTML describes the structure and sequence of your document. It’s the starting point for your UI. But it’s just the starting point. Things change. Items get added, removed, or moved. Styles change. Dialogs appear and disappear, and the user touches things and drags them around. All (or at least most) of this interaction happens in JavaScript where you can instruct your document in the language of code to react to your user and do what you command.
Before you can move something, remove something, or add to something, though, you’ll need to select it. That’s what I’m going to talk about here. I’m going to talk about selecting one or more elements from your document object model (DOM) from JavaScript so you can work with them. This is called querying the DOM.
It used to be rather difficult to query the DOM. When I was a kid I not only had to walk uphill to school both ways, but I also had to use rudimentary and often proprietary JavaScript functions for getting access to in my HTML. The popular getElementById() was helpful but it only ever got one thing at a time. Usually, I resorted to looping through document.all() and asking questions about each and every element on the page to see if it was in my reticle for the change I had in mind.
Today, things are different. When I first met jQuery and started selecting from the DOM using the CSS selector syntax I already knew, it was love at first $. When I started Windows 8 development using HTML/JS I remember thinking “okay… but only if I get to take jQuery in with me”. But since I’ve hardly used it. The reason is that ECMAScript 5 introduced querySelector() and querySelectorAll(). These yumful functions take CSS queries just like the jQuery selector syntax and return (respectively) a single DOM element or a list of nodes.
Besides these selection methods, WinJS also added a couple of functions (that just wrap querySelector and querySelectorAll BTW). They are id() and query() and they’re in the WinJS.Utilities namespace.
I talk all about of these selection methods in a previous post called Selecting Elements in a Windows 8 HTML App.
I liked using querySelector and querySelectorAll because they were the closest to the metal being right in the JavaScript language, but there was one thing I didn’t like about them. querySelector returns a DOM element… that’s fine. querySelectorAll returns a node list, though and I usually want to work with an array so I can use all of the ECMAScript 5 array functions. So I wrote a wrapper that I simply call q() which stands for query. It’s short and has a little bit of abstract functionality that I like, and I wrote a post about it too. It’s called Query Selector Helper for Metro Apps. But I have since upgraded the helper function to allow the caller to force the result of the call to be an array. That way, even if it is only a single result that is returned, it will return it as an array of one, so the caller doesn’t have to have switching logic.
I keep the latest version of this function in my ocho.js library which is part of my codeSHOW project on CodePlex. So to get the latest version of the helper, simply go to http://codeshow.codeplex.com, go to the Source Code tab, choose Browse, and then browse to /codeSHOW/js/ocho.js.
Enjoy!
Dyyno's Journey - Developing an App for Windows 8
I hosted an episode of DevRadio the other day and now it’s live on Channel9. It’s an interview with Vamshi Sriperumbudur and Dr. Sid Annapureddy from a Silicon Valley based company called Dyyno [link removed] that is doing some exciting work on the Windows 8 platform. Dyyno helps more than 30 content creators or aggregators distribute their content on smart devices, and their app Flix Universe brings this content to Windows 8.
Here’s the full interview on DevRadio. Enjoy.
Jump Start Your Brain
My colleague Michael Palermo and I are scheduled to present two Jump Start video series on Channel 9. The first will cover basic HTML, CSS, and JavaScript development, and the second will cover those web technologies as they apply to creating Windows 8 apps.
You can get a lot more information about this content and register to attend by going to http://aka.ms/Win8Dev-JS.
Data Presentation
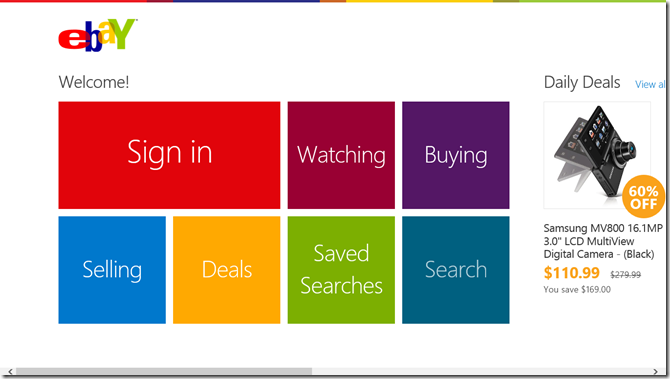
Sometimes it’s hard to know what control to use when you’re thinking about bringing your data feed into your Windows 8 app. You know you want to bring them in as tiles of some form or another. Maybe you want to do classic square tiles like eBay.
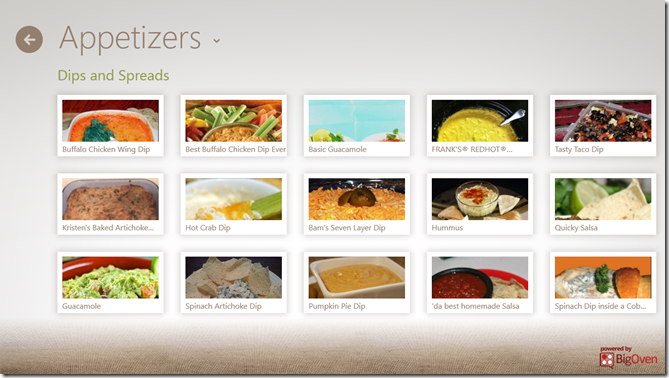
Hopefully, though, you want to add a little bit of flare and personality to yours. You could do something like the Cookbook app. Their primary data point is obviously a recipe and it looks to me like the designers of this app have put them in little Polaroids with shadows and everything.
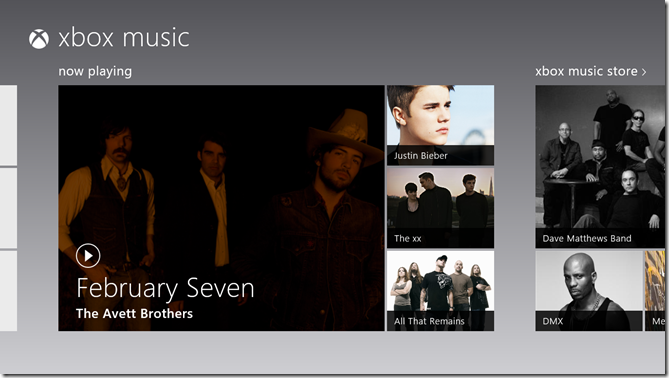
You could copy the music app that utilizes hero images – larger than average images that communicate a sense of feature or significance.
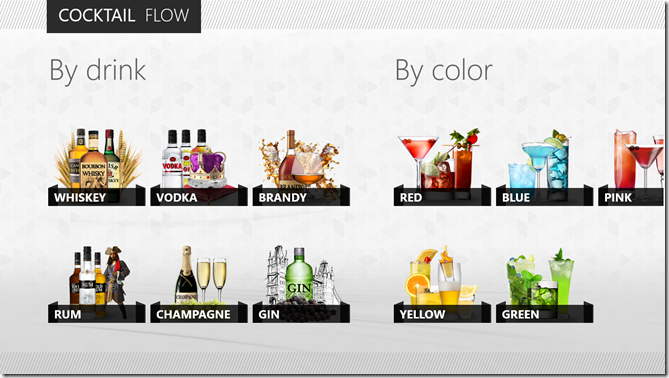
You could even get trés chic and model Cocktail Flow with their novel, beautiful tiles. They hardly look like tiles, but they still convey that essential Windows 8 design.
Inevitably, you’re going to have to make a choice about what control underlies this presentation of data, and eventually you’re going to have to implement it.
In this post, I’d like to do a little bit of a study into what control to choose when and why. As usual, I’ll be coming from an HTML/JS perspective, so if you’re wondering what your options are in XAML, Bing is your friend.
The first thing I want to point out is that not all lists of data are created equal. If you’re working on a section of your hub, you’re working with a very finite set of data. On the other hand, if your user has chosen to see something like your list of all recipes, then the list could have 10’s or 100’s of items in it. The two scenarios are candidates for vastly different solutions.
For the former, the hub section, I would employ a grid like what you see in the Music app screenshot above. You know that you have exactly four cells for images (for albums in this case) and you can determine which four albums you want to show and of them which deserves the ginormous featured cell on the left. The advantage to using a grid is that you have ultimate control over its layout. You don’t have to stick to symmetric lists of square. You can get funky with the layout and you can change it up too. You can create one layout for features a single item and another for featuring three. It’s all up to you (with the permission of your designer friend of course). The downside to using a grid is that you don’t get to bind it to an enumerable list of data. That’s not much of a problem, however, because again you’re only working with a handful or so of items. Also, grids don’t have any of the UX yum built in. They don’t automatically handle selection for instance, so if you want to allow the user to swipe select multiple entities in your grid, you’re going to have to figure out how to do that.
For the latter, the recipe list like you see in the Cookbook app screenshot above, I would employ a ListView. A ListView does have the UX yum built in. It automatically handles invocation, selection, and a lot more. It flows, it pans, it groups, and it wraps. It’s really great at what it’s made for.
In other scenarios, if you’re okay with giving up the yum that a ListView provides, you might want to opt for a FlexBox. Flexboxes give you better control than a ListView over how it’s members are laid out, and nothing complicated gets rendered out for each member of the flexbox. If you just inject a bunch of divs into your flexbox then that’s all it will contain.
To avoid a merely conceptual post on a developers’ blog, allow me to create a quick, custom grid and then populate it with some content.
First, the design. Let me whip out my digitizer pen and draw up a quick grid layout using CorelDRAW (woot!)…
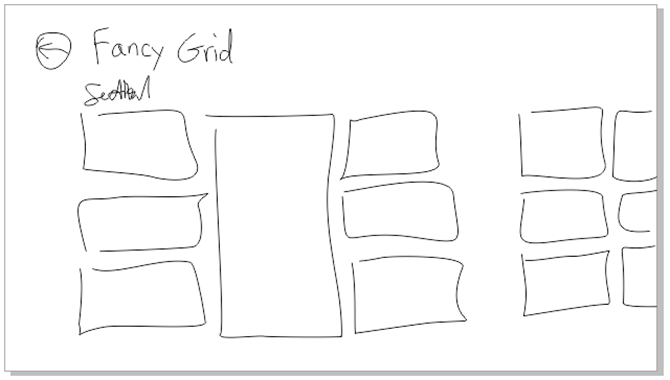
That’s the concept. Now for the implementation. I’m only going to layout the seven items in the first section.
First the HTML…
|
The only thing in that HTML that isn’t boilerplate is the div called grid and the seven div’s inside. There’s one for each of the tiles in our layout. And now on to the CSS which is not a terribly lot longer…
.fancygrid section[role=main] > * { |
Great. No JavaScript. As it should be. This is just a matter of layout, so it’s a collaborative effort between HTML (our structure) and CSS (our layout and style). The HTML in this case is dead simple. It’s just a div with seven div’s inside. Our CSS is like that kid in your chemistry lab in high school that did all the work for your whole lab group while you played Nintendo. Slacker.
So let me explain. The first style rule that refers to the main section is just something I do make sure everything in that main section takes on the 120px left margin that characterizes Windows 8 apps. The next rule applies to the grid. You may know by now, but the .fancygrid that preceeds #grid is just there to namespace this rule to this page. The next rule applies to all seven of the child div’s of the #grid div. The child combinator (the >) in this case is likely important. If you end up putting content inside of these cells and that content contains any div elements at all, this rule would apply to them if you used a space (the descendent combinator) instead of that greater than sign. So for all seven cells we want to draw a white border and give 5px of space. Why 5px? Because the Windows 8 design principles call for 10px between items and so that would be 5px around each item. Then I’m using the :nth-of-type() pseudo-class to refer to each div according to its position and add the correct -ms-grid properties to put it where it belongs. Notice how the 4th div has a span of 3.
And here’s the result…
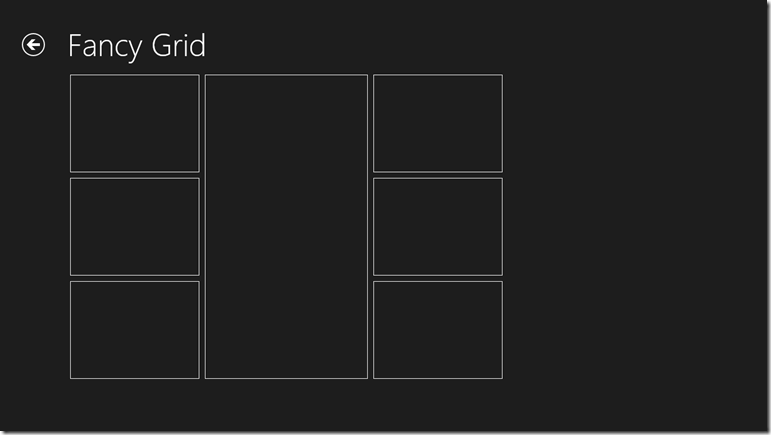
Now, if you’re like me, you see this done once and it looks fine and dandy, but your mind races to imagine the value of something like this in a library primed for reuse. It would be super easy to dynamically add div’s and a couple of CSS properties each according to the template selection chosen by the developer. I believe I’ll get started on that now. Or perhaps soon. By all means, please beat me to it.
Hope this has been helpful. Now get to work!
Referring to Package Files
When you’re working with a Windows 8 project in VS2012, you have some number of project files in your Solution Explorer. You have HTML files, CSS files, JavaScript files, images, and perhaps some XML or JSON or TXT files - something like that.
If, in the course of executing logic in your app, you need to access these files, there are a number of ways and you should know when you might use what and why… that’s as opposed to being incapacitated or stabbing in the dark.
Option 1 - relative or ms-appx reference
Your first option is to refer to the file using a relative or an ms-appx reference.
You’re working with a web app here, so remember that if you’re sourcing an image on an HTML page, you can include a relative link like myimage.png to refer to an image of that name in the same location as that HTML file.
Remember that ms-appx is a scheme analogous to the http in http://, but instead of referring to the _hyper text transfer protocol _(the transfer protocol of the Interweb) it refers to the current package. If you’re making a breakfast cereal inventory app (don’t ask me how I came up with that as an example, but I think it’d sell!) then ms-appx:// is the scheme to use to access your app’s assets and _ms-appx:///cereals.xml _would refer to the cereals.xml file. This doesn’t give you a benefit over a relative link, though.
And wait… hold the phone. Why did we use three slashes? That’s simple. It’s because we want to refer the current package self as opposed to any referenced packages within the current package. Actually, ms-appx:///cereals.xml is equivalent to ms-appx://{packageid}/cereals.xml where {packageid} is the package identifier from the manifest file.
Option 2 - WinJS.xhr()
The first option is likely your best choice if you’re referencing declaratively from within an HTML file. Your second option and the one you’ll likely use when you’re working imperatively within JavaScript is to hit the local asset using xhr. The WinJS.xhr method takes a URL and returns gives you its word (a promise) that it will return with a response and will call your then/done when it’s back.
The response from your xhr call might be some JSON data, some XML, an HTML document, or just some random text. Anyway, you get to decide what happens with it.
Option 3 - installedLocation
The third option is one most recent one that I discovered and I like it.
If you look at the _Windows.ApplicationModel.Package _class, you’ll see that you can access the current package using the current method. If you look at the current package, you’ll see that you have an installedLocation property. And if you look at that installedLocation, you’ll see that you have a getFileAsync method.
The getFileAsync method returns (via a promise) a StorageFolder, and that folder contains all of the files in your project. Tada!
One good example of a use of this method is the online documentation for the setHtmlFormat method that hangs off of DataPackage.
Conclusion
As always, it’s possible there are even more ways to skin the cat than I’ve enumerated. These are the three I know. I hope it’s helpful.
Happy reflecting!
Seattle Give Camp just around the corner
In less than two months, a number of charities will gather in the Commons on the Microsoft campus with a lot of project requirements to share. Those projects will be matched up with developers from the area that are willing to give a weekend to help out a good cause. Many hours will be spent furiously designing and coding away, and at the end of the weekend the fruits will be shared.
I haven’t been to a Give Camp before, but I’ve heard that it’s pretty remarkable what can get accomplished in a weekend and how helpful it is to the charities. Many of these groups are on very tight budgets and don’t normally have IT help or don’t have nearly enough.
If you’re going to be around the weekend of October 19-21, I encourage you to go to http://seattlegivecamp.org and sign up as a volunteer designer or developer. Even if you don’t have technical skills, you can volunteer to cover other needs. You can put your skills to a really good use and probably end up having a good time to boot.
I hope I’ll see you there.
Snap to Your Tiles
Let’s say you have a bunch of tiles in your Windows 8 app.
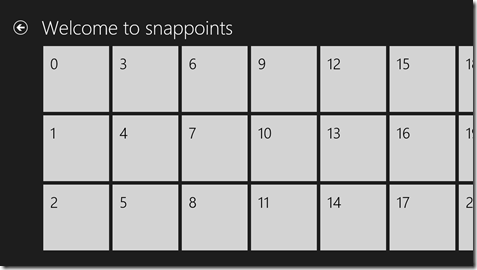
And the user grabs this list with their finger and pans some distance to the right. There’s a chance the list will end up landing in a position like this…
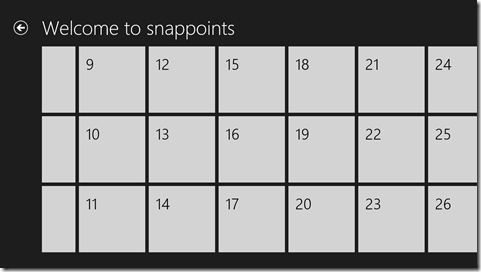
Notice that the tiles at left are cutoff. The list has panned some arbitrary distance and stopped where fate stopped it. I know it’s all scientific, but it’s fun to say that fate landed it here.
But what if you don’t want to put your app in fate’s fickle hands and would rather stop every time at a tile’s edge. That flick from my last example, then, should find you here…
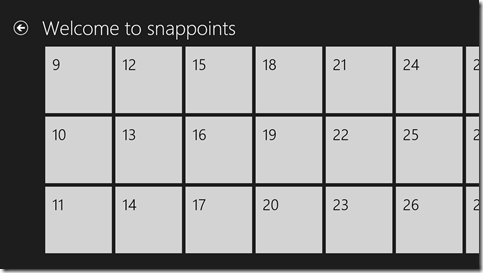
…with the edge of tiles 9, 10, and 11 neatly lined up on your left margin.
Is that possible? Of course it is.
Is it easy? Yep. That too.
Once again, the custom CSS properties in Windows 8 come to the rescue. I’m going to talk about a couple of properties in the -ms-scroll* area. If you want a good list of the available properties, just type -ms-scroll in a CSS sheet and let IntelliSense be your guide.
We would implement this using snap points. Snap points are an IE concept. I don’t know if they’ve been suggested to the W3C for consideration in the CSS standard (I couldn’t find anything that indicated they have), but they should be because they’re super helpful.
If you have a container whose content exceeds the boundaries of the container, then scrolling is necessary to view all content, right? And when a user flicks with his finger, the contents scroll within the container and upon letting up his finger, the user watches his content scroll for a bit longer with some apparent inertia, right? Well, a snap point is a location in that content where it makes sense for that content to stop scrolling. You can define snap points in one of two ways: mandatory or proximity.
Defining a container to use mandatory snap points means that it will always stop at the nearest snap point. It will never stop somewhere in between. Defining it to use proximity snap points, however, means that if it ends up close enough to a snap point then it will find its way there, but if it’s not close enough then it will be fine with coming to rest between points.
Here’s the CSS you should add to achieve the above…
.snappoints #list .win-viewport { |
Let me break that down for you.
.snappoints is the name of my page, which in Windows 8 navigation apps automatically gets a class with your page’s name. So .snappoints essentially namespaces this CSS to this page.
#list is the ListView control on my HTML. I manually gave it the ID of list. BTW, I recently discovered that if you know you’re only going to have a single list on your page, it might be easier to forgo the naming of it and instead just refer to it with [data-win-control=WinJS.UI.ListView]. Nice, eh?
.win-viewport is the viewport of my ListView. If you work with the ListView much, and haven’t seen it already, you should definitely check out Styling the ListView and its itemsfrom the Dev Center. In that article, it breaks down the components of the ListView so you can have a shot at knowing how to style it. Here’s how it visually defines the win-viewport…
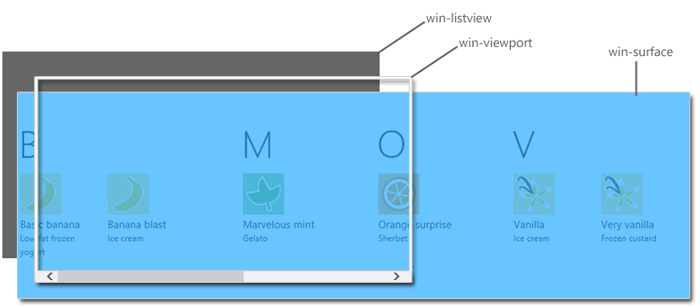
The first part of the property (mandatory) indicates that we are using mandatory snap points, so as I said before, we are assured of coming to rest on a snap point and never in between.
The second part of the property (snapInterval(0px,200px);) indicates that I want to start the content at the very beginning (0px) and I want a snap point every 200px. I have to know that my tiles are 200px wide to make this work. CSS is not actually recognizing a tile’s edge, just points every 200px.
I was a little bummed that I couldn’t find a way to indicate manually (with CSS properties on HTML elements I guess) where I want snap points to be and then just have the container recognize them, but this way works pretty well too.
That’s it. Happy snapping!
Implementing the Settings Contract
I presented at a developer camp in Redmond recently on the subject of implementing Windows 8 contracts. You can find the video on Channel 9. Unfortunately, I didn’t have enough time to cover the implementation of the Settings contract, so I want to cover that now in the attached screencast.
The Settings contract is an important one, since almost every app known to mankind has some user preferences or options to store. In previous Windows development, the convention was to put options like this into the Tools | Options menu item, but there are plenty of examples of apps that chose to find another place for it.
In Windows 8, the sanctioned place to put your user’s settings is in the Settings pane. This is the pane the user gets when he does one of the following…
- swipes from the right to access the Charms and then chooses the Settings charm
- presses Win + I
The Settings place should hold things like…
- account management (login/logout)
- preferences
- app version information
- help
- and so on
The pane is divided into settings that you (the developer) have control over and those that you do not. Everything below the horizontal line is system level and unavailable for change. Above the line, the Permissions entry is owned by Windows, but you are responsible for any more. Your settings entries might be: Settings, Help, About, Permissions, or they might be Account Control, Sound Settings, Video Settings, Permissions.
I hope the included screencast helps you ramp up quickly on how to do this in HTML/JS. If you have any questions, leave a comment. Thanks. [screencast removed]