
Beautiful Cascading Node Config
FYI, this is a repost. I lost this post’s source markdown and just recreated it for posterity.
I just learned something, which instantly makes it a good day.
I’ve been on the lookout for a really good pattern in Node.js projects to allow a user to…
Define configuration variables in a JSON config file (not flat environment variables!)
Allow them to override the configuration variables with command line arguments
Make the command line arguments work like any good, modern CLI with double dash full names (i.e.
--foo bar) or single dash aliases (i.e.-f bar)Let the dev know if their code isn’t working because a certain configuration variable hasn’t been set
Here’s what I have now.
let config = require('./arguments.json'); |
So, the arguments.json file that we bring in is a place we can define arguments permanently so they don’t have to be included on the command line.
Then we pull in a dependency on the command-line-args package. I was delighted to discover that this package works exactly like I expected it too. For each argument, we can give it a long name (i.e. argumentA) and a short name (i.e. a). Finally, I added the required property myself, which I’ll show you in a second.
Next, I coerce these two sources of configuration values using a spread operator. I talked a lot more about spread operators in my Level Up Your JavaScript Game! - Other ES6 Language Features post. The order of these two spread objects is such that it will take the values in my file first, but then override them with command line arguments if they exist.
Finally, I added another little trick that wasn’t built in to the command-line-args package (although I think it should be). I added the ability to make certain arguments required, and if not to throw an error so the user knows exactly why things don’t work.
That’s all!
TypeScript for Documentation
TypeScript is wonderful for a variety of reasons and there’s one I want to hightlight right now.
TypeScript allows a developer or team to sprinkle types in to their codebase. These types make it much easier for your IDE to tell you you’re doing something you don’t intend to do in your logic. That’s excellent.
But the types also document your codebase well.
Here’s a function without types…
function sum(n1, n2) { |
And then with types…
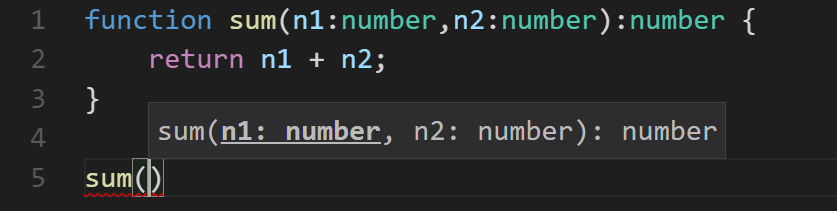
function sum(n1: number,n2: number): number { |
And the obvious advantage is that at a glance, I as a human can see what kinds of variables this function is expecting and what it’s going to give me back.
Additionally, my IDE can inspect these types and give me some information about the expected parameter types without even make the journey to the source code to look…
I can take that a step further and add some comments to the source and get even better descriptions.
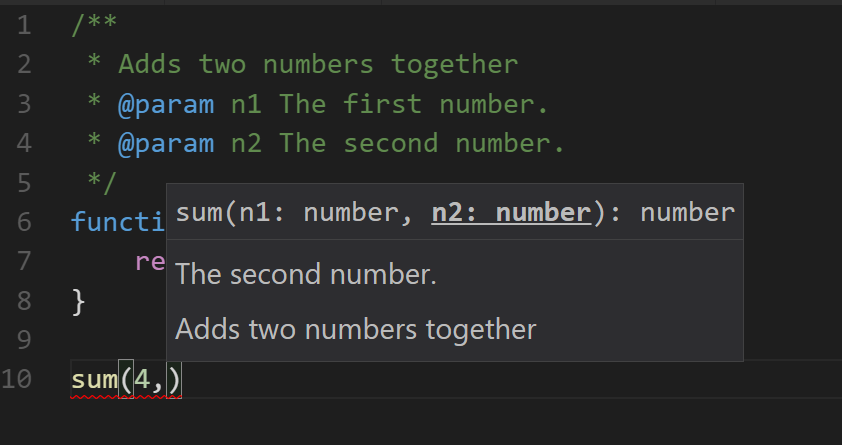
And now I can be more awesome.
A Simple Brain
I’m not (yet) an expert in machine learning, but like so many I recognize that it’s an incredibly integral part of our future.
Right now, most data insights are the result of some significant effort - a lot of data, a lot of training, and perhaps a significant amount of time spent by data scientists.
I anticipate that insights are going to come not only out of these large projects, but out of the small workflows as well. For example, your average web developer may tend to create some marketing information and some web forms online, but in the future, they’ll also apply some machine learning.
I have been dabbling with Brain.js lately, and I wonder if something like this might be a good compliment to some of the massive capability available in very high scale machine learning solutions. Brain.js is just JavaScript, and sometimes that’s all you need - something that will run in small quantity in the browser!
So I copied some code from the Brain.js website and regurgitated it here for your benefit. I also put it into my repo simple-brain.
Here’s the code…
const brain = require('brain.js'); |
I’m learning a lot about ML right now and it’s fun to have a new space to learn and explore. It’s fun too that ML has a bit of a presence in the JavaScript world even though the Python leaning is strong. I found this excellent article by Jonathan who’s as crazy as I am to consider JS for ML at this time.
Zoom in Windows
I do a lot of presentations. The only thing I like more than writing code is talking about writing code.
I’ve always had a little angst about zooming my screen though because…
The built-in Windows Magnifier seemed to get in my way
The excellent and popular Zoom It tool requires an extra install and I never seem to have it running when my presentation starts.
I recently discovered, though, a couple of options that make theh built-in Windows Magnifier work way better for me.
First, I looked up the keyboard shortcuts and beyond the basics of WIN + = for zooming in and WIN + - for zooming out, you can use WIN + ESC to exit the zoom altogether. Prior to discovering that, I thought it was necessary to zoom all the way back out. I also found that CTRL + ALT + Mouse Wheel works to zoom in and out with your mouse.
Now, my biggest aggravation with the Magnifier was how the UI rendered every time I performed a zoom. There’s a Magnifier settings to “Collapse to magnifying glass icon”. That’s better than the full window, but it’s still fairly obtrusive. So here’s the trick.
Start Magnifier so the icon appears on the Task Bar.
Now right click on the Magnifier icon, right click on the Magnifier entry in the context menu, and hit Properties.
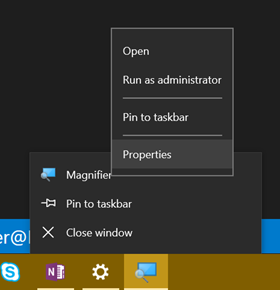
Now set Run to Minimized

That’s it. Now when you hit WIN + = to zoom in, the screen zooms in to the mouse cursor and doesn’t render any obtrusive UI.
It’s the simple things that light me up!
Quick note. A colleague just read and tried this and it didn’t seem to work for him. I tried it again and the behavior is not exactly like I indicated in this post. I spent some time trying to figure out exactly what’s up, and I figured out that if the magnifier is not running, then it will still create the UI. If you check the box I mentioned to earlier - Collapse to magnifying glass icon - the UI is smaller, but it’s still there. The application is not active, but if it happens to show up where your cursor is, then it’s still obstructive. So, I am going to submit this feedback to the Windows team to see if I can be an advocate of change. It does help if you move the Magnifier’s window to a remote area of the screen, and you can also just minimize it, but both of those take a little effort. Anyway, we’ll get this figured out :)
Okay, folks. I submitted this feedback via Windows Feedback and it was promoted to bug 16580796 within the hour. Impressed. Fingers crossed this is fixed in the next Windows update.
Level Up Your JavaScript Game! - Other ES6 Language Features
See Level Up Your JavaScript Game! for related content.
Sometimes it takes a while to learn new language features, because many are semantic improvements that aren’t absolutely necessary to get work done. Learning new features right away though is a great way to get ahead. Putting off learning new features leaves you lagging the crowd and constantly feeling like you’re catching up. I’ve noticed that junior developers often know more modern language features than senior developers.
There are quite a few language features that were introduced in ES5 and ES6, and you’d be well off to learn them all! Certainly, though, look into at least the ones I’m going to talk about here. I recommend you learn…
…to effectively use the object and array spread operators.
From MDN: “Spread syntax allows an iterable such as an array expression or string to be expanded in places where zero or more arguments (for function calls) or elements (for array literals) are expected, or an object expression to be expanded in places where zero or more key-value pairs (for object literals) are expected.”
The spread operator is an ellipsis (
...), but don’t confuse it with the pre-existing rest operator (also an ellipsis). The rest operator is used in the argument list of a function definition. The spread operator on the other hand is used… well, I’ll show you.
Think of the spread operator’s function as breaking the elements of an array (or the properties of an object) out into a comma delimited list. So [1,2,3] becomes 1,2,3. The array spread operator is most helpful for either passing elements to a function call as arguments or constructing a new array. The object spread operator is most helpful for constructing or merging objects properties.
If you have an array of values, you can pass them to a function call as separate arguments like this…
myFunction(...[1,2,3]); |
If you have two objects - A and B - and you want C to be a superset of the properties on A and B you do this…
let C = {...A, ...B}; |
Therefore…
{...{"name":"Sally"},...{"age":10}} |
…to get into the habit of using destructuring where appropriate.
Destructuring looks like magic when you first see it. It’s not just a gimmick, though. It’s quite useful.
Destructuring allows you to assign variables (on the left hand side of the assignment operator (=)) using an object or array pattern. The assignment will use the pattern you provide to extract values out of an object or array and put them where you want them.
let {name,age} = {name:"Sally",age:10}; |
That’s a lot better than the alternative…
let person = {name:"Sally",age:10}; |
It works with nested properties too…
let {name,address.zip:zip} = {name:"Sally",age:10,address:{city:"Seattle",zip:12345}}; |
It works with arrays too…
let [first,,third] = ["apple","orange","banana","kiwi"] |
Destructuring is handy when you’ve fetched an object or array and need to use a subset of it’s properties or elements. If your webservice call returns a huge object, destructuring will help you pull out just the parts you actually care about.
Destructuring is also handy when creating mixins - objects that you wish to sprinkle functionality into by adding certain properties or functions.
Destructuring is also handy when you’re manipulating array elements.
…to use template literals in most of your string compositions.
I recommend you get in the habit of defining string literals with the backtick (`) operator. These strings are called template literals and they do some great things for us.
First, they allow us to line wrap our string literal without using any extra operators. So as opposed to the existing method…
let pet = "{" + |
…we can use…
let pet = `{ |
Elegant!
…to understand the nuances of lambda (=>) functions (aka fat-arrow functions).
And it looks like I’ve saved one of the best for last, because lambdas have so dramatically increased code concision. Not to overstate it, but lambda functions delight me.
I was introduced to lambda functions in C#. I distinctly remember one day in particular asking a fellow developer to explain what they are and when you would use one. I distinctly remember not getting it. Man, I’ve written a lot of lambda functions since then!
The main offering of the lambda is, in my opinion, the concision. Concise code is readible code, grokkable code, maintainable code.
They don’t replace standard functions or class methods, but they mostly replace anonymous functions in case you’re familiar with those. I very rarely use anonymous functions anymore. They’re great for those functions you end up passing around in JavaScript, because… well, JavaScript. You use them in scenarios like passing a callback to an asynchronous function.
Allow me to demonstrate how much more concise a lambda function is.
Here’s a call to that readFile function we were using in an earlier post. This code uses a pattern where functions are explicitly defined before being passed as callbacks. This is the most verbose pattern.
fs.readFile('myfile.txt', readFileCallback); |
Now let’s convert that function an anonymous function to save some lines of code. This is recommended unless of course you’re paid by the line of code.
fs.readFile('myfile.txt', function(contents) { |
Notice that the function name went away. I for one strongly dislike the first pattern. When a callback function is only used once, I feel like it belongs inline with the function call. If of course, you’re reusing a function for a callback then that’s a different story.
Now let’s go big! Or small, rather. Let’s turn our anonymous function into a lambda.
fs.readFile('myfile.txt', txt => { |
I love it! Notice, we were able to do away with the function keyword altogether and we specified it’s argument list (in this case only a single argument) on its own. Notice too that I called that argument txt. I could have, of course, kept the name contents, but I tend to use short (often only a single letter) arguments in lambda functions to amplify the brevity. Lambda functions are very rarely complex, so this works out well.
The loss of the function name and keyword saved some characters, but lambda functions get even shorter. If a lambda contains only a single expression, the curly braces can be dropped. The expression in this case becomes the return value of the lambda.
To illustrate, let me use a new example - this one from my post on arrays in this series…
let numbers = [1,2,3,4,5,6]; |
In this example, n => n <= 3 is a complete lambda function. I know, concise right?! This example illustrates the value of the single letter arguments and also introduces you to the expression syntax. The body of the lambda is n <= 3. That’s an expression. It’s not a statement such as…
let n = 3; |
And it’s not a block of statements such as…
{ |
…and like I said, when the body of your lambda is a simple express, you can drop the curly braces and the expression becomes your return value.
So in the example, the .filter() function wants a function which evaluates to true or false. Our expression n <= 3 does just that, and returns the result.
There are two caveats that I’ll draw out.
First, if you have 1 argument in your lambda function, you do not need parenthesis around the argument list. In our previous example, n => n <= 3 is a good example of that. If you have 0 arguments or more than 1 argument, however, you do. These are all valid…
() => console.log('go!') //0 arguments |
If you use TypeScript, you may notice that the presence of a type on a single argument lambda function requires you to wrap it with parenthesis as well, such as
(x:number) => x * x.
The second caveat is when your lambda returns an expression, but that expression is an object literal wrapped in curly braces ({}). In this case, the compiler confuses your intention to return an object with an intention to create a statement block.
This, then, is not valid…
let generatePerson = (first,last) => {name:`${first} ${last}`} |
To direct the compiler just do what you always did in complex mathematical statements in high school - add some more parenthesis! We could correct this as so…
let generatePerson = (first,last) => ({name:`${first} ${last}`}) |
And there’s one more thing about lambdas that you should know. Lambdas have a feature to remediate a common problem in JavaScript anonymous functions - the dreaded this assignment.
Anonymous functions (and named functions) in JavaScript are Objects, and as such they have a this operator that references them. Lambda functions do not. If you use this in a lambda function, chances are the sun will keep shining and the object you intended to reference will be referenced. No more _this = this or that = this or whatever else you used to use everywhere.
That’ll do it for arrays, and in fact that’ll do it for this series. If you jumped here from a search, headback to Level Up Your JavaScript Game! to see the rest of the content.
Thanks for reading and happy hacking!
Level Up Your JavaScript Game! - ES6 Modules
This post is not yet finished
See Level Up Your JavaScript Game! for related content.
Unfortunately, the whole concept of modules in JavaScript has undergone a ton of evolution and competing standards, and for a while it seems like no two JavaScript environments used modules the same way. Spending a little time figuring out exactly what’s happening goes a long way toward demystifying things.
To level up in JavaScript modules, I recommend you learn…
…to transition from Node.js’s CommonJS modules to ES6 modules.
Node has not yet fully adopted ES6 modules, but it’s coming soon. We developers can today though using a transpiler, and I recommend it. We may as well get into tomorrow’s habits today. Instead of…
const myLib = require('myLib'); |
…use…
import { myLib } from 'myLib'; |
The former strategy - CommonJS - is a well-established habit for most of us, but it’s not inherantly as capable as the latter - ES6 modules. I’m going to assume you’ve used the CommonJS pattern plenty and skip explaining its nuances, and talk only about the newer, better, faster, stronger ES6 modules.
To play with some the concepts on this page, install TypeScript.
npm i -g typescript |
…to define an ES6 module and export all or part of it.
CommonJS modules are defined largely by putting some JavaScript in a separate file and then requiring it. ES6 modules are too. The differences come in how a module describes what it exports - that is what it makes available to anyone who decides to depend on it.
In ES6 modules, you put export on anything you want to export. Period. That’s easy :)
//mymodule.ts |
In the above example, only y would be available to whoever takes a dependency on mymodule.
You can put export on variable declarations (like the let above), classes, functions, interfaces (in TypeScript), and more. Read on to see how these various exports get imported.
…to import an entire module.
To import everything a given module has to offer - all of the exports…
import * as mymodule from './mymodule'; |
The * indicates that we want everything and the as mymodule aliases (or namespaces) everything as mymodule. After this import, we would be free to use mymodule.y in our calling code.
…to import parts of a module.
Let’s say our module looked like this…
//mymodule.ts |
If we decide in our calling code that we need x and we need the sum function, then we can use…
import { x, sum } from './mymodule' |
Notice that we don’t need to prefix the x and sum functions. They’re in our namespace.
…to alias modules on import.
Sometimes, you want to change the name of something you import - for instance, to avoid a naming conflict…
import { x, sum as add } from './mymodule' |
That’ll do it for ES6 module imports. Now head back to Level Up Your JavaScript Game! or move on to my final topic on ES6 features.
Level Up Your JavaScript Game! - Regular Expressions
See Level Up Your JavaScript Game! for related content.
I’m sorry, but there’s no way around it. You have to master regular expressions.
Regular expressions (regex for short) have a reputation of being very difficult, but if you happen to be an entry-level developer, I really don’t want you to be intimidated by them. They’re actually not so difficult. They only look difficult once you’ve created one. In a sense, they’re an easy way to at least look like a ninja.
JavaScript’s implementation of regular expressions was tough for me at first because there are a few different ways to go about it. Spend some time writing and calling a couple of patterns though, and you’ll quickly master it.
To level up in JavaScript regular expressions, I recommend you learn…
…to write your regular expression.
That’s right, first you have to learn how to write a good regex pattern. I’m not going to go into detail, but if you want some help you’re a quick web search away. I highly recommend regexr.com. It’s good not only for learning the patterns, but testing them too.
In learning patterns, you should learn about capture groups too. Defining capture groups is simple - you just put parenthesis around certain parts of your pattern. Those parts of the pattern will then be available in your matchs as independent values.
Let’s say you wanted to pull the area code out of a phone number pattern. You could use a pattern like (\d{3})-\d{3}-\d{4}. That’s obviously a very simplistic pattern that would only match US-style, 10-digit phone numbers with dashes between the groups, but notice the parenthesis around the first group. That means that that part - the area code - is going to be made available as a value for you after you execute the regex.
…to quickly tell if a pattern is detected in some text.
If you don’t need the actual matchs of the regex execution, but just want to see if there’s a match, you use <pattern>.test(<text>). For example…
/\d{3}-\d{3}-\d{4}/.test('555-123-4567') //true |
In JavaScript, you put regular expressions between slashes (
/) just like you put strings between quotes.
…would return true.
…to use .exec() for single pattern matches with capture groups.
If you need not only to know that the pattern matched, but also to get values from the match such as the match itself and all of the capture group values, then you use .exec()…
let match = /(\d{3})-\d{3}-\d{4}/.exec('555-123-4567'); |
…and because I added parenthesis around the first number group there, that value should be returned as part of the match. The match itself is always the first match ([0]), and each subsequent capture group in the order you defined them from left to right follow ([1], [2], …, [n]).
…to use .match() to find multiple matches in a string.
The .match() function is on String.prototype, so it’s available on any string. Besides flipping the calling pattern from .exec() (.exec() uses <pattern>.exec(<text>) while .match() uses <text>.match(<pattern>)), this function has a couple of other peculiarities.
First, it does not capture from your capture groups, so if that’s what you’re looking to do, then use .exec().
Second, it is capable of capturing multiple matches returned as an array. So if you do something like…
"14 - 8 = 6".match(/\d+/g) //[14,8,6] |
The g stands for global and is a regex option that tells it to look in the entire string. Look at all of the other options that are valid there too. They can be helpful.
If you need to capture multiple matches (like you get with .match()), but you also want the capture groups (like you get with .exec()), then you need to call .exec() in a loop like this…
let text = "The quick brown fox jumps over the lazy dog."; |
Note that I included an i and a g option on the regex (/the/). The i makes the search case insensitive and the g directs it to find every match in the text. Notice that match[0] equals the full match each iteration and match[1] is the contents of the capture group I defined (the first letter of the word “the” for whatever reason).
That’ll do it for regular expressions. Now head back to Level Up Your JavaScript Game! or move on to the next topic on ES6 module imports.
Level Up Your JavaScript Game! - Arrays
See Level Up Your JavaScript Game! for related content.
Working with JavaScript arrays is practically an everyday task.
Arrays are simply collections of things, and we often find need to perform some function to each of their items or perhaps to subsets of their items.
Years ago, ES5 introduced a bunch of new array functions that you should be or become familiar with. The three I’ll highlight are filter, map, and reduce.
To level up in JavaScript arrays, I recommend you learn…
…to use the .filter() function to reduce an array down to a subset.
This is not a difficult topic, but it’s an important one. If you have a set of numbers [1,2,3,4,5,6] and you’d like to limit it to numbers less than or equal to 3, you would do…
let numbers = [1,2,3,4,5,6]; |
Take note of what the fact that .filter() hangs off of an array. It is in fact a function on Array.prototype and is thus available from every array. So [].filter is valid.
.filter() asks for a function with a single argument that represents a single item in the array. The .filter() function is going to execute the function you give it on each and every item in the array. If your function returns true, then it’s going to include that item in the resulting set. Otherwise it won’t. In the end, you’ll have a subset of the array you called .filter() on.
This brings up something I see a lot in folks that have been programming a while.
Imagine this common pattern…
let people = [ |
What’s wrong with that code? Well, it works, so there’s nothing functionally wrong with it. It’s too verbose though. If we use some array functions, we could drastically increase the readibility and maintainability. Let’s try…
people.forEach(p => { |
Here, we replaced the for loop with a forEach array function that we hang right on our array. This allows us to refer, inside our loop, to simply p instead of people[i]. I love this. I find for loops difficult and unnatural to write.
Some argue against using single-letter variables like
pand would prefer to call that something likeperson. Do what makes you happy and works well with your team, but I like single-letter variables inside of fat-arrow functions where concision is king.
Lets do another round…
people |
Here, we pulled the if statement out of our loop and added it as a .filter() function before our .forEach() function in a chain of array functions. This effectively separates the logic we use for filtering with the logic we which to take effect on our subset of people - a very good idea.
I might even take the separation of .filter() a step further and do…
people |
To me, that’s more clear.
…to use the .map() function to transform elements in an array.
Think of arrays, for a second, like you do database tables. An array entry is analogous to a database table’s row, and an array property is analogous to a database table’s column.
In this analogy, the .filter() function reduces the rows, and the .map() function which I’d like to talk about now reduces (potentially) the columns - more generally, it transforms the element.
That transformation is entirely up to you and it can be severe. You might do something simple like pull a person’s name property out because it’s the only one you’re concerned with. You might just as well do something more complex like transform each person to a web service call and the resulting promise. Let’s try that with our previous code…
let orderPromises = people |
Notice that now, each of the females under 40 is fetched from a webservice. The fetch() function returns a promise, so each array item is transformed from a person object to a promise. After the run, orderPromises is an array of promises. By the way, you could then execute code after all orders have been retrieved, using…
let ordersByPerson = await Promise.all(orderPromises); |
…to use reduce to turn an array into some scalar value.
If you really want to be a JavaScript ninja, don’t miss the .reduce() array function and it’s zillion practical uses!
As opposed to .map() which acts on each element in an array and results in a new array, .reduce() acts on each element in an array and results in a scalar object by accumulating a result with each step.
For example, if you have an array of orders and you want to calculate sales tax on each order based on total and location, you would use .map() to turn arrayOfOrders into arrayOfOrdersWithSalesTax (start with an array and end with an array).
let arrayOfOrdersWithSalesTax = arrayOfOrders |
The
.map()function in the preceding example uses an object spread operator (…) to tack another property onto each order item. You can read more about the spread operator in my Level Up Your JavaScript Game! - ES6 Features post.
If, however, you wanted to calculate the total sales tax for all orders, you would use .reduce() to turn arrayOfOrders into totalSalesTax (start with an array and end with a scalar).
let totalSalesTax = arrayOfOrdersWithSalesTax |
It’s not immediately apparent how that reduce function works, so let me walk you through it.
The .reduce() function asks for a function with 2 arguments - an accumulator which I’m calling a and a current which I’m calling o because I know that my current item on each loop is actually an order. This makes it clear to me in my function that o means order. Finally, the reduce function itself takes a second argument - the initial state. In my sample, I’m using 0. Before we’ve added up any sales tax, our total sales tax should be 0, right?
The function you pass in to .reduce() then executes for each item in the array and by our definition, it calculates the sales tax and adds (or accumulates) the result to the a object. When the .reduce() function has completed its course, it returns the value of a, and my code saves that in a new local variable calle3d totalSalesTax.
Pretty cool, eh?
Let me be clear that I said that .reduce() turns an array into a scalar, but that scalar can most anything you want including a new array.
That’ll do it for arrays. Now head back to Level Up Your JavaScript Game! or move on to the next topic on regular expressions.
Level Up Your JavaScript Game! - Asynchrony
See Level Up Your JavaScript Game! for related content.
Most any JavaScript application you touch now uses asynchrony, so it’s a critical concept although it’s not a simple one.
I usually start any discussion on asynchrony by clarifying the difference between asynchrony and concurrency. Concurrency is branching tasks out to separate threads. That’s not what we’re talking about here. We’re talking here about asynchrony which is using a single thread more efficiently by basically using the gaps where we were otherwise frozen waiting for a long process.
One of the tough things about asynchrony in JavaScript is all the options that have emerged over time. Options are a double-edged sword. It’s both good and bad to have 20 different ways to accomplish a task.
To level up in JavaScript asynchrony, I recommend you learn…
…to call a function that returns a promise.
This is the most basic thing to understand about promises. How to call a function that returns one and determine what happens when the promise resolves.
To review, calling a regular (synchronous) function goes…
let x = f(); |
And the problem is that if f takes a while, then the thread is blocked and you don’t get to be more efficient and do work in the meantime.
The solution is returning from f with a “place holder” - called a Promise - immediately and then “resolving” it when the work is done (or “rejecting” it if there’s an exception). Here’s what that looks like…
let x = f().then(() => { |
One more thing. When a promise is resolved, it can contain a payload, and in your .then() function you can simply define an argument list in your handler function to get that payload…
let x = f().then(payload => { |
Luckily, a lot of functions already return promises. If you want to read a file using the fs module in Node, for instance, you call fs.readFile() and what you get back is a promise. Again, it’s the simplest case for asynchrony, and here’s what that would look like…
const fs = require('fs'); |
…to write a function that passes on a promise.
If the simplest case for asynchrony is calling functions that return promises, then the next step is defining your own function which passes a promise on. Recall the example I used where we wanted to use fs.readFile. Well, what if we wanted to refactor our code and put that function call into our own function.
It’s important to realize that it’s rarely sensible to create a sychronous function which itself calls an asychronous function. If your function needs to do something internally that is asynchronous, then you very likely want to make your function itself asynchronous. How? By passing on a promise.
Let’s write that function for reading a file…
getFileText('myfile.txt').then(file => { |
Easy, eh? If fs.readFile returns a promise, then we can return that promise to our caller. By definition, if our function returns a promise, then it’s an asynchronous function.
…to write a function that creates and returns a promise.
But what if you want to create an asynchronous function that itself doesn’t necessarily call a function that returns a promise? That’s where we need to create a new promise from scratch.
As an example, let’s look at how we would use setTimeout to wait for 5 seconds and then return a promise. The setTimeout function in JavaScript (both in the browser and in Node) is indeed asynchronous, but it does not return a promise. Instead it takes a callback. This is an extremely common pattern in JavaScript. If you have a function that needs to call another function that wants a callback, then you need to either keep with the callback pattern (no thank you) or essentially transform that callback pattern into a promise pattern. Let’s go…
waitFive().then(() => { |
See how the first statement in the waitFive function is a return. That lets you know that function is going to come back with an answer immediately. Within the new Promise() call we pass in a handler - a function that takes 2 arguments: resolve and reject. In the body of our handler, resolve and reject are not static variables - they’re functions, and we call them when we’re done, either because things went well or they didn’t. It’s just super neat that we’re able to call them from inside of a callback. This is possible due to the near magic of JavaScript closure.
…to chain promises and catch exceptions.
You should be sure you understand how promise chaining is done. Chaining is a huge advantage to the promise pattern and it’s great for orchestrating global timing concerns in your application - i.e. first I want this to happen and then this and then this.
Here’s what a chain looks like…
f() |
…where each of those handlers that we’re passing to the .then() functions can have payloads.
There’s some wizardry that the .then() function will do for us as well. It will coerce the return value of each handler function so that it returns a promise every time! Watch this…
f() |
Pay close attention to what’s happening here. The first .then() is returning a string, but we’re able to hang another .then() off of it. Why? Because .then() coerced "foo" into a promise with a payload of "foo". This is the special sauce that allows us to chain.
There’s a shortcoming with promises here by the way. Let me set it up…
f() |
The unfortunate remedy to this problem is…
let v1; |
That’s a bit hacky, but it’s a problem that’s solved very elegantly by async/await coming up.
…to save a promise so you can check with it at any point and see if it’s been resolved.
This is great for coordinating timing in a complex application.
This is a little trick that I use quite a bit, though I don’t think it’s very common. It’s quite cool though and I don’t see any drawbacks.
let ready = f(); |
What I’m doing is saving the result of my function call to a variable and then calling .then() on it any time I want throughout my codebase.
You might wonder why this is necessary. Wouldn’t the first call be the only one that needs to “wait” for the promise? Actually, no. If you’re creating code that must not run until f() is done, then you need to wait for it. It’s very likely that subsequent references to the promise happen when the promise is already resolved, but that’s fine - your handler code will simply run immediately. This just assures that that thing (f() in this case) has been done first.
…to write an asynchronous function using async instead of creating a promise and calling it using await instead of .then().
The async/await pattern is one that some clever folks at Microsoft came up with some years ago in C#. It was and is so great, that it’s made its way into other languages like JavaScript. It’s a standard feature in the most recent versions of Node.js, so it’s ready for you out of the box.
In JavaScript, async and await still use promises. They just make it feel good.
For defining the asynchronous function, instead of…
function f() { |
…you do…
async function f() { |
And the angels rejoice! That’s way more understandable code.
Likewise, on the calling side, instead of…
f().then(result => { |
…you do…
let result = await f(); |
Yay! How great is that.
It seems odd at first, but the statements that come after the line with await do not execute until after f() comes back with its answer. I like to mentally envision those statements as being inside of a callback or a .then() so I understand what’s happening.
As I eluded to before, this solves that nasty little problem we had with the promise calling pattern…
let value1 = await f1(); |
Notice that I was a bit more verbose in that I defined f2. I didn’t have to, but the code is far more readable and more importantly, value1 is available not only inside of f2, but also between the function calls and after both.
Very cool.
…to understand the difference between each of the following lines of code.
let x = f; |
The differences may not be obvious at first.
The first line makes x to be the asynchonous function that f is. After the first line executes, you would be able to call x().
The second executes f() and sets y equal to the resulting promise. After the second line executes, you would be able to use y.then() or await y to do something after f() resolves.
The third executes f() and sets z equal to the payload of the promise returned by f().
Let me finally add one random tidbit, and that is that you should understand that the async operator can be added to a fat arrow function just as well as a normal function. So you may write something like…
setTimeout(async () => { |
You can’t use await except inside of a function marked with async.
If you find yourself trying to call await but you’re not in an async function, you could do something like this…
(async () => { |
That simply declares and invokes a function that’s marked as async. It’s a bit odd, but it works a treat.
That’ll do it for asynchrony. Now head back to Level Up Your JavaScript Game! or move on to the next topic on arrays.
Level Up Your JavaScript Game!
A fellow developer recently expressed a sentiment I’ve heard and felt many times myself.
“There are a lot of JavaScript concepts I know, but I don’t think I could code them live in front of you right now.”
It’s one thing to understand the concept of a Promise or destructuring in JavaScript, but it’s quite another to be able to pull the code out of your shiver without a web search or a copy/paste.
There are so many concepts like this for me as a developer. They’re my gaps - the pieces I know are missing. I know they won’t take long to fill, but it’s just a matter of finding and making the time. My strategy is to…
Record them
As I become aware of these gaps, I write them on my task list. I may not get to them right away, and that’s fine. When I have a spare hour though, I turn to these items in my task list and then off I go, learning something new.Write into permanent memory storage
Computers can save things permanently with a single write. For me, it takes 4 or 5 writes. For example, a long time ago, I wanted to learn how to write a super basic web server in Node.js - from memory. So I looked it up and found something like this…var html = require('http');
html.createServer((req,res) => {
res.end('hi')
}).listen(3000)I found it, tried to memorize it, tried to write it from memory, failed, looked it up, and tried again as many times as it took until I could. Now I have it. I can whip it up in a hurry if I’m trying to show basic Node concepts to someone.
In counseling my friend on what JavaScript concepts would be beneficial to practice, I decided to compose this rollup blog post called Level Up Your JavaScript Game! to share more broadly.
There are 5 things I recommend you not only grok generally, but know deeply and can whip up on request…