
Level Up Your JavaScript Game! - Regular Expressions
See Level Up Your JavaScript Game! for related content.
I’m sorry, but there’s no way around it. You have to master regular expressions.
Regular expressions (regex for short) have a reputation of being very difficult, but if you happen to be an entry-level developer, I really don’t want you to be intimidated by them. They’re actually not so difficult. They only look difficult once you’ve created one. In a sense, they’re an easy way to at least look like a ninja.
JavaScript’s implementation of regular expressions was tough for me at first because there are a few different ways to go about it. Spend some time writing and calling a couple of patterns though, and you’ll quickly master it.
To level up in JavaScript regular expressions, I recommend you learn…
…to write your regular expression.
That’s right, first you have to learn how to write a good regex pattern. I’m not going to go into detail, but if you want some help you’re a quick web search away. I highly recommend regexr.com. It’s good not only for learning the patterns, but testing them too.
In learning patterns, you should learn about capture groups too. Defining capture groups is simple - you just put parenthesis around certain parts of your pattern. Those parts of the pattern will then be available in your matchs as independent values.
Let’s say you wanted to pull the area code out of a phone number pattern. You could use a pattern like (\d{3})-\d{3}-\d{4}. That’s obviously a very simplistic pattern that would only match US-style, 10-digit phone numbers with dashes between the groups, but notice the parenthesis around the first group. That means that that part - the area code - is going to be made available as a value for you after you execute the regex.
…to quickly tell if a pattern is detected in some text.
If you don’t need the actual matchs of the regex execution, but just want to see if there’s a match, you use <pattern>.test(<text>). For example…
/\d{3}-\d{3}-\d{4}/.test('555-123-4567') //true |
In JavaScript, you put regular expressions between slashes (
/) just like you put strings between quotes.
…would return true.
…to use .exec() for single pattern matches with capture groups.
If you need not only to know that the pattern matched, but also to get values from the match such as the match itself and all of the capture group values, then you use .exec()…
let match = /(\d{3})-\d{3}-\d{4}/.exec('555-123-4567'); |
…and because I added parenthesis around the first number group there, that value should be returned as part of the match. The match itself is always the first match ([0]), and each subsequent capture group in the order you defined them from left to right follow ([1], [2], …, [n]).
…to use .match() to find multiple matches in a string.
The .match() function is on String.prototype, so it’s available on any string. Besides flipping the calling pattern from .exec() (.exec() uses <pattern>.exec(<text>) while .match() uses <text>.match(<pattern>)), this function has a couple of other peculiarities.
First, it does not capture from your capture groups, so if that’s what you’re looking to do, then use .exec().
Second, it is capable of capturing multiple matches returned as an array. So if you do something like…
"14 - 8 = 6".match(/\d+/g) //[14,8,6] |
The g stands for global and is a regex option that tells it to look in the entire string. Look at all of the other options that are valid there too. They can be helpful.
If you need to capture multiple matches (like you get with .match()), but you also want the capture groups (like you get with .exec()), then you need to call .exec() in a loop like this…
let text = "The quick brown fox jumps over the lazy dog."; |
Note that I included an i and a g option on the regex (/the/). The i makes the search case insensitive and the g directs it to find every match in the text. Notice that match[0] equals the full match each iteration and match[1] is the contents of the capture group I defined (the first letter of the word “the” for whatever reason).
That’ll do it for regular expressions. Now head back to Level Up Your JavaScript Game! or move on to the next topic on ES6 module imports.
Level Up Your JavaScript Game! - Arrays
See Level Up Your JavaScript Game! for related content.
Working with JavaScript arrays is practically an everyday task.
Arrays are simply collections of things, and we often find need to perform some function to each of their items or perhaps to subsets of their items.
Years ago, ES5 introduced a bunch of new array functions that you should be or become familiar with. The three I’ll highlight are filter, map, and reduce.
To level up in JavaScript arrays, I recommend you learn…
…to use the .filter() function to reduce an array down to a subset.
This is not a difficult topic, but it’s an important one. If you have a set of numbers [1,2,3,4,5,6] and you’d like to limit it to numbers less than or equal to 3, you would do…
let numbers = [1,2,3,4,5,6]; |
Take note of what the fact that .filter() hangs off of an array. It is in fact a function on Array.prototype and is thus available from every array. So [].filter is valid.
.filter() asks for a function with a single argument that represents a single item in the array. The .filter() function is going to execute the function you give it on each and every item in the array. If your function returns true, then it’s going to include that item in the resulting set. Otherwise it won’t. In the end, you’ll have a subset of the array you called .filter() on.
This brings up something I see a lot in folks that have been programming a while.
Imagine this common pattern…
let people = [ |
What’s wrong with that code? Well, it works, so there’s nothing functionally wrong with it. It’s too verbose though. If we use some array functions, we could drastically increase the readibility and maintainability. Let’s try…
people.forEach(p => { |
Here, we replaced the for loop with a forEach array function that we hang right on our array. This allows us to refer, inside our loop, to simply p instead of people[i]. I love this. I find for loops difficult and unnatural to write.
Some argue against using single-letter variables like
pand would prefer to call that something likeperson. Do what makes you happy and works well with your team, but I like single-letter variables inside of fat-arrow functions where concision is king.
Lets do another round…
people |
Here, we pulled the if statement out of our loop and added it as a .filter() function before our .forEach() function in a chain of array functions. This effectively separates the logic we use for filtering with the logic we which to take effect on our subset of people - a very good idea.
I might even take the separation of .filter() a step further and do…
people |
To me, that’s more clear.
…to use the .map() function to transform elements in an array.
Think of arrays, for a second, like you do database tables. An array entry is analogous to a database table’s row, and an array property is analogous to a database table’s column.
In this analogy, the .filter() function reduces the rows, and the .map() function which I’d like to talk about now reduces (potentially) the columns - more generally, it transforms the element.
That transformation is entirely up to you and it can be severe. You might do something simple like pull a person’s name property out because it’s the only one you’re concerned with. You might just as well do something more complex like transform each person to a web service call and the resulting promise. Let’s try that with our previous code…
let orderPromises = people |
Notice that now, each of the females under 40 is fetched from a webservice. The fetch() function returns a promise, so each array item is transformed from a person object to a promise. After the run, orderPromises is an array of promises. By the way, you could then execute code after all orders have been retrieved, using…
let ordersByPerson = await Promise.all(orderPromises); |
…to use reduce to turn an array into some scalar value.
If you really want to be a JavaScript ninja, don’t miss the .reduce() array function and it’s zillion practical uses!
As opposed to .map() which acts on each element in an array and results in a new array, .reduce() acts on each element in an array and results in a scalar object by accumulating a result with each step.
For example, if you have an array of orders and you want to calculate sales tax on each order based on total and location, you would use .map() to turn arrayOfOrders into arrayOfOrdersWithSalesTax (start with an array and end with an array).
let arrayOfOrdersWithSalesTax = arrayOfOrders |
The
.map()function in the preceding example uses an object spread operator (…) to tack another property onto each order item. You can read more about the spread operator in my Level Up Your JavaScript Game! - ES6 Features post.
If, however, you wanted to calculate the total sales tax for all orders, you would use .reduce() to turn arrayOfOrders into totalSalesTax (start with an array and end with a scalar).
let totalSalesTax = arrayOfOrdersWithSalesTax |
It’s not immediately apparent how that reduce function works, so let me walk you through it.
The .reduce() function asks for a function with 2 arguments - an accumulator which I’m calling a and a current which I’m calling o because I know that my current item on each loop is actually an order. This makes it clear to me in my function that o means order. Finally, the reduce function itself takes a second argument - the initial state. In my sample, I’m using 0. Before we’ve added up any sales tax, our total sales tax should be 0, right?
The function you pass in to .reduce() then executes for each item in the array and by our definition, it calculates the sales tax and adds (or accumulates) the result to the a object. When the .reduce() function has completed its course, it returns the value of a, and my code saves that in a new local variable calle3d totalSalesTax.
Pretty cool, eh?
Let me be clear that I said that .reduce() turns an array into a scalar, but that scalar can most anything you want including a new array.
That’ll do it for arrays. Now head back to Level Up Your JavaScript Game! or move on to the next topic on regular expressions.
Level Up Your JavaScript Game! - Asynchrony
See Level Up Your JavaScript Game! for related content.
Most any JavaScript application you touch now uses asynchrony, so it’s a critical concept although it’s not a simple one.
I usually start any discussion on asynchrony by clarifying the difference between asynchrony and concurrency. Concurrency is branching tasks out to separate threads. That’s not what we’re talking about here. We’re talking here about asynchrony which is using a single thread more efficiently by basically using the gaps where we were otherwise frozen waiting for a long process.
One of the tough things about asynchrony in JavaScript is all the options that have emerged over time. Options are a double-edged sword. It’s both good and bad to have 20 different ways to accomplish a task.
To level up in JavaScript asynchrony, I recommend you learn…
…to call a function that returns a promise.
This is the most basic thing to understand about promises. How to call a function that returns one and determine what happens when the promise resolves.
To review, calling a regular (synchronous) function goes…
let x = f(); |
And the problem is that if f takes a while, then the thread is blocked and you don’t get to be more efficient and do work in the meantime.
The solution is returning from f with a “place holder” - called a Promise - immediately and then “resolving” it when the work is done (or “rejecting” it if there’s an exception). Here’s what that looks like…
let x = f().then(() => { |
One more thing. When a promise is resolved, it can contain a payload, and in your .then() function you can simply define an argument list in your handler function to get that payload…
let x = f().then(payload => { |
Luckily, a lot of functions already return promises. If you want to read a file using the fs module in Node, for instance, you call fs.readFile() and what you get back is a promise. Again, it’s the simplest case for asynchrony, and here’s what that would look like…
const fs = require('fs'); |
…to write a function that passes on a promise.
If the simplest case for asynchrony is calling functions that return promises, then the next step is defining your own function which passes a promise on. Recall the example I used where we wanted to use fs.readFile. Well, what if we wanted to refactor our code and put that function call into our own function.
It’s important to realize that it’s rarely sensible to create a sychronous function which itself calls an asychronous function. If your function needs to do something internally that is asynchronous, then you very likely want to make your function itself asynchronous. How? By passing on a promise.
Let’s write that function for reading a file…
getFileText('myfile.txt').then(file => { |
Easy, eh? If fs.readFile returns a promise, then we can return that promise to our caller. By definition, if our function returns a promise, then it’s an asynchronous function.
…to write a function that creates and returns a promise.
But what if you want to create an asynchronous function that itself doesn’t necessarily call a function that returns a promise? That’s where we need to create a new promise from scratch.
As an example, let’s look at how we would use setTimeout to wait for 5 seconds and then return a promise. The setTimeout function in JavaScript (both in the browser and in Node) is indeed asynchronous, but it does not return a promise. Instead it takes a callback. This is an extremely common pattern in JavaScript. If you have a function that needs to call another function that wants a callback, then you need to either keep with the callback pattern (no thank you) or essentially transform that callback pattern into a promise pattern. Let’s go…
waitFive().then(() => { |
See how the first statement in the waitFive function is a return. That lets you know that function is going to come back with an answer immediately. Within the new Promise() call we pass in a handler - a function that takes 2 arguments: resolve and reject. In the body of our handler, resolve and reject are not static variables - they’re functions, and we call them when we’re done, either because things went well or they didn’t. It’s just super neat that we’re able to call them from inside of a callback. This is possible due to the near magic of JavaScript closure.
…to chain promises and catch exceptions.
You should be sure you understand how promise chaining is done. Chaining is a huge advantage to the promise pattern and it’s great for orchestrating global timing concerns in your application - i.e. first I want this to happen and then this and then this.
Here’s what a chain looks like…
f() |
…where each of those handlers that we’re passing to the .then() functions can have payloads.
There’s some wizardry that the .then() function will do for us as well. It will coerce the return value of each handler function so that it returns a promise every time! Watch this…
f() |
Pay close attention to what’s happening here. The first .then() is returning a string, but we’re able to hang another .then() off of it. Why? Because .then() coerced "foo" into a promise with a payload of "foo". This is the special sauce that allows us to chain.
There’s a shortcoming with promises here by the way. Let me set it up…
f() |
The unfortunate remedy to this problem is…
let v1; |
That’s a bit hacky, but it’s a problem that’s solved very elegantly by async/await coming up.
…to save a promise so you can check with it at any point and see if it’s been resolved.
This is great for coordinating timing in a complex application.
This is a little trick that I use quite a bit, though I don’t think it’s very common. It’s quite cool though and I don’t see any drawbacks.
let ready = f(); |
What I’m doing is saving the result of my function call to a variable and then calling .then() on it any time I want throughout my codebase.
You might wonder why this is necessary. Wouldn’t the first call be the only one that needs to “wait” for the promise? Actually, no. If you’re creating code that must not run until f() is done, then you need to wait for it. It’s very likely that subsequent references to the promise happen when the promise is already resolved, but that’s fine - your handler code will simply run immediately. This just assures that that thing (f() in this case) has been done first.
…to write an asynchronous function using async instead of creating a promise and calling it using await instead of .then().
The async/await pattern is one that some clever folks at Microsoft came up with some years ago in C#. It was and is so great, that it’s made its way into other languages like JavaScript. It’s a standard feature in the most recent versions of Node.js, so it’s ready for you out of the box.
In JavaScript, async and await still use promises. They just make it feel good.
For defining the asynchronous function, instead of…
function f() { |
…you do…
async function f() { |
And the angels rejoice! That’s way more understandable code.
Likewise, on the calling side, instead of…
f().then(result => { |
…you do…
let result = await f(); |
Yay! How great is that.
It seems odd at first, but the statements that come after the line with await do not execute until after f() comes back with its answer. I like to mentally envision those statements as being inside of a callback or a .then() so I understand what’s happening.
As I eluded to before, this solves that nasty little problem we had with the promise calling pattern…
let value1 = await f1(); |
Notice that I was a bit more verbose in that I defined f2. I didn’t have to, but the code is far more readable and more importantly, value1 is available not only inside of f2, but also between the function calls and after both.
Very cool.
…to understand the difference between each of the following lines of code.
let x = f; |
The differences may not be obvious at first.
The first line makes x to be the asynchonous function that f is. After the first line executes, you would be able to call x().
The second executes f() and sets y equal to the resulting promise. After the second line executes, you would be able to use y.then() or await y to do something after f() resolves.
The third executes f() and sets z equal to the payload of the promise returned by f().
Let me finally add one random tidbit, and that is that you should understand that the async operator can be added to a fat arrow function just as well as a normal function. So you may write something like…
setTimeout(async () => { |
You can’t use await except inside of a function marked with async.
If you find yourself trying to call await but you’re not in an async function, you could do something like this…
(async () => { |
That simply declares and invokes a function that’s marked as async. It’s a bit odd, but it works a treat.
That’ll do it for asynchrony. Now head back to Level Up Your JavaScript Game! or move on to the next topic on arrays.
Level Up Your JavaScript Game!
A fellow developer recently expressed a sentiment I’ve heard and felt many times myself.
“There are a lot of JavaScript concepts I know, but I don’t think I could code them live in front of you right now.”
It’s one thing to understand the concept of a Promise or destructuring in JavaScript, but it’s quite another to be able to pull the code out of your shiver without a web search or a copy/paste.
There are so many concepts like this for me as a developer. They’re my gaps - the pieces I know are missing. I know they won’t take long to fill, but it’s just a matter of finding and making the time. My strategy is to…
Record them
As I become aware of these gaps, I write them on my task list. I may not get to them right away, and that’s fine. When I have a spare hour though, I turn to these items in my task list and then off I go, learning something new.Write into permanent memory storage
Computers can save things permanently with a single write. For me, it takes 4 or 5 writes. For example, a long time ago, I wanted to learn how to write a super basic web server in Node.js - from memory. So I looked it up and found something like this…var html = require('http');
html.createServer((req,res) => {
res.end('hi')
}).listen(3000)I found it, tried to memorize it, tried to write it from memory, failed, looked it up, and tried again as many times as it took until I could. Now I have it. I can whip it up in a hurry if I’m trying to show basic Node concepts to someone.
In counseling my friend on what JavaScript concepts would be beneficial to practice, I decided to compose this rollup blog post called Level Up Your JavaScript Game! to share more broadly.
There are 5 things I recommend you not only grok generally, but know deeply and can whip up on request…
You Already Have That Linux Command in Windows
I do a lot of work with Windows as well as with Linux, and I have a little trick that I’ve shared 100 times and finally decided to drop into a blog post for posterity.
So often, I’m working with groups of Windows developers trying to access Linux VM’s in Azure or Raspberry Pi’s running Raspbian and I ask them to ssh into the server.
Note:
sshis not just a tool, it’s a verb, and I concur with @shanselman who has declared that it’s correct pronunciation is much like the sound made by a downhill skier - a sort of “shoosh”. Now you know, so pass it on.
Unfortunately, many of those Windows developers commence to open PuTTY - a graphical tool for doing serial or terminal communication. If you’re opening a graphical tool for doing CLI work, there’s an inbalance in the force. You should be far more intimate with your systems terminal or command line tool and that tool should allow you to ssh.
So how do you ssh from Windows? There are a number of ways, but if you have Git for Windows installed, you probably already can if you just do one simple thing.
Git for Windows installs by default into C:\Program Files\Git. If you look in that folder, you’ll find \usr\bin. And if you look in there, you’ll find a whole ton of Linux commands, and one of those commands is ssh.
If I remember correctly, these commands are actually the Cygwin Win32 ports of most of Linux’s commands.
So to start using all of those commands, all you have to do is add C:\Program Files\Git\usr\bin to your system path.
Method 1: edit the system environment variables
Go to Start and type “environment” and then choose to “Edit the system environment variables”. Then hit the Environment Variables button, find the Path variable in either your User or System Variables, and edit it to include C:\Program Files\Git\usr\bin. Now restart any terminals and type ssh to test.
Method 2: add the path in your PowerShell profile
The method I actually use to get these commands into my path is a bit different. I add a command to my PowerShell profile. The advantage is that my profile is already sync’ed to my OneDrive account so it persists across reinstalls of Windows. So I don’t have to remember to edit my path after I reload my computer.
To do this, go to your terminal of choice and use your editor of choice to edit your $profile. I would type code $profile to use Visual Studio Code to edit it.
Then add this line somewhere in there…
$env:Path += ";C:\Program Files\Git\usr\bin" |
Again, test this by restarting your terminal and simply calling ssh. Now try scp and touch and ls. Yay! But ls already worked for you you say? That’s because PowerShell has a bunch of built in aliases, and ls is an alias for dir. So the functionality is similar, but not exactly the same.
There are a bunch of these aliases, in fact. You can see the full list here. I recommend adding the following lines to your PowerShell profile to remove these aliases and unlock the real (well, almost real) Linux commands…
If(Test-Path alias:curl) { Remove-Item -Path alias:curl } #remove alias that shadows use of real curl |
Enjoy!
The World's Quickest API
Sometimes you just need a quick API. Am I right?
I was working on a project recently and needed just that. I needed an API, and I didn’t want to spend a lot of time on it.
One of my strategies for doing this in days of old was to write up some code-first C# entities, reverse engineer the code to create an Entity Framework model, and serve it using OData. It was great and all that stuff is still around… still supported… still getting improved and released, so you could go that way, but that’s not how I made my last “instant API”.
My last one was even easier.
I found a node package called json-server that takes a JSON file and turns it into an API. Done. Period. End of story. A few minutes composing a JSON file if you don’t have one already and then a few lines of code to turn it into an API.
I also often use a node package called localtunnel that opens a local port up to the internet. Now I spend a few minutes writing a JSON file and 20 seconds opening a port and I have myself an API that I can share with the world.
For example. Let’s say I want to write an app for dog walkers.
Here’s some dog data…
{ |
Now let’s turn that into an API stat! I’m going to be thorough with my instructions in case you are new to things like this.
I’ll assume you have Node.js installed.
Create yourself a new folder, navigate to it, and run npm init -y. That creates you a package.json file. Then run touch index.js to create a file to start writing code in.
Now install json-server by running npm i json-server
The
iis short forinstall. As of npm version 5, the--saveargument is not necessary to add this new dependency to thepackage.jsonfile. That happens by default.
Finally, launch that project in your IDE of choice. Mine is VS Code, so I would launch this new project by running code .
Edit the index.js file and add the following code…
const jsonServer = require('json-server') |
Let me describe what’s going on in those few lines of code.
The first line brings in our json-server package.
The second line creates a new server much like you would do if you were using Express.
Lines 3 and 4 inject some middleware, and the rest spins up the server on port 1337.
Note that line 4 points to data.json. This is where your data goes. You can make this simpler by simply specifying a JavaScript object there like this…
server.use(jsonServer.router({dogs: {name"Rover"}})) |
But I discovered that if you use this method, then the data is simply kept in memory and changes are not persisted to a file. If you specify a JSON file, then that file is actually updated with changes and persisted for subsequent runs of the process.
So that’s pretty much all there is to it. You run that using node . and you get a note that the API is running on 1337. Then you can use CURL or Postman or simply your browser to start requesting data with REST calls.
Use http://localhost:1337/dogs to get a list of all dogs.
Use http://localhost:1337/dogs/1 to fetch just the first dog.
Or to create a new dog, use CURL with something like curl localhost:1337/dogs -X POST -d '{ "id":4, "name":"Bob", ...}
Now you have a new API running on localhost, but what if you want to tell the world about it. Or what if you are working on a project with a few developer friends and you want them to have access. You could push your project to the cloud and then point them there, but even easier is to just point them to your machine using a tunneler like ngrok or Local Tunnel. I usually use the latter just because it’s free and easy.
To install Local Tunnel, run npm i -g localtunnel.
To open up port 1337 to the world use lt -p 1337 -s dogsapi and then point your developer friend that’s working on the UI to fetch dogs using http://dogsapi.localtunnel.me/dogs.
Be kind though. You set your API up in about 4 minutes and your UI dev probably hasn’t gotten XCode running yet. :)
NPM Link
My buddy Jason Young (@ytechie) asked a question the other day that reminded me of a Node trick I learned sometime ago and remember getting pretty excited about.
First, let’s define the problem.
If you are working on a Node project and you want to include an npm package as a dependency, you just install it, require it, and then do a fist pump.
If, however, you are in one of the following scenarios…
You find a great package on npm, but it’s not exactly what you want, so you fork it on GitHub and then modify it locally.
You are working on a new awesome sauce npm package, but it’s not done yet. But you want to include it in a node project to test it while you work on it.
…then you’re in a pickle.
The pickle is that if in your consuming app, you’ve done a npm install my-awesome-package then that’s the version from the public registry.
The question is, how do you use a local version.
There are (at least) two ways to do it.
The first is to check your project (the dependency npm package that you’ve forked or you’re working on) in to GitHub and then install it in your consuming project using npm install owner/repo where owner is your GitHub account. BTW, you might want to npm remove my-awesome-package first to get rid of the one installed from the public registry.
This is a decent strategy and totally appropriate at times. I think it’s appropriate where I’ve forked a package and then want to tell my friend to try my fork even though I’m not ready to publish it to npm yet.
I don’t want to expound on that strategy right now though. I want to talk about npm’s link command (documentation).
The concept is this. 1) You hard link the dependency npm package into your global npm package store, and 2) you hard link that into your consuming project.
It sounds hard, but it’s dead simple. Here’s how…
- At your command line, browse to your dependency package’s directory.
- Run
npm link - Browse to your consuming project’s directory.
- Uninstall the existing package if necessary using
npm remove my-awesome-package - Finally, run
npm link my-awesome-package
You’ll notice that the link isn’t instant and that will cause you to suspect that it’s doing more than just creating a hard link for you, and you’re right. It’s doing a full package install (and a build if necessary) of the project.
The cool part is that since the project directory is hard linked, you can open my-awesome-package in a new IDE instance and work away on it and when you run the consuming project, you’ll always have the latest changes.
And that’s that. I use this trick all the time now that I know it. Before I knew it, you’d see version counts like 1.0.87 in my published packages because I would roll the version and republish after every change. Oh, the futility!
The inverse is just as easy. When the latest my-awesome-package has been published to npm and you’re ready to use it, just visit your consuming package and run npm unlink my-awesome-package and then npm install my-awesome-package. Then go to your dependency package and simply run npm unlink. Done.
Growth Mindset
If you’re tuned in to technical topics, then you’ve likely heard my CEO Satya Nadella use the phrase Growth Mindset a few times.
I’ve been thinking about this phrase recently and realized that the first time I hear a phrase like this, my brain attempts to formulate a definition or understanding of it and then I have a tendency to stick to that definition every subsequent time I hear it even if it’s not entirely accurate or entirely what the speaker intended.
I wonder them, what does “growth mindset” actually mean or what does Satya intend it to mean when he uses it to describe Microsoft?
After some pondering and reading, I’ve concluded that it means (to me at least) that a person…
- is always ready to learn something new
- assumes that their understanding of any topic can can use some refinement regardless of how well-formulated it is already
- defines their success as having learned something new as opposed to having shown off what they already know
- constantly measures results against efforts as is ready to adjust efforts to maximize results
Hopefully that’s not too esoteric.
Gartner recently published an article on the topic where they used Microsoft as a positive example. In their article, they show this chart…
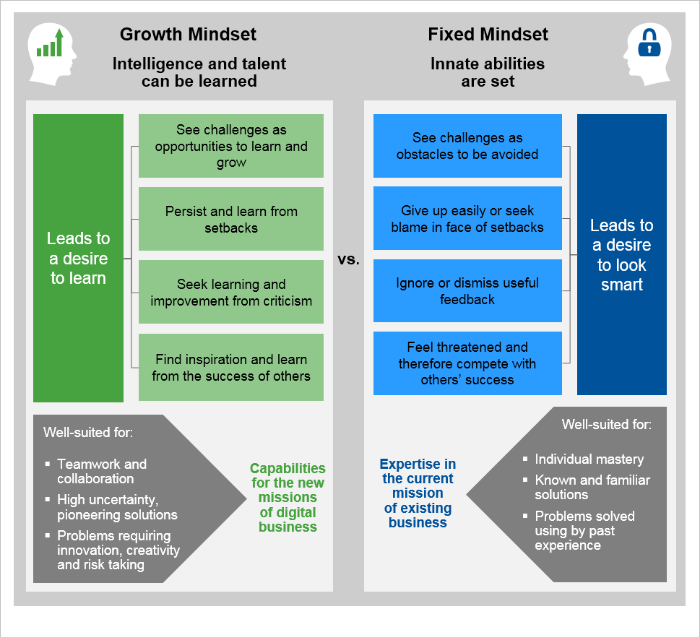
This graphic appears to indicate (and I would agree) that the defining characteristic of someone with a growth mindset is a desire to learn over a desire to look smart.
Most people would claim to value learning, but that’s the easy part. the hard part is that doing so often necessitates sacrificing looking smart… and that’s not so easy.
I have an example from my own life.
I used to work for Gateway Computers. It was a long time ago in 1998 when Gateway was just about the most likely choice for a home computer. I worked in a call center in Colorado Springs, CO.
At one point, I worked 4 12-hour days (Thursday through Sunday) per week and I remember being intellectually exhausted after about 8 hours of visualizing and solving users’ computer woes.
Side Story: At one point in my tenure at Gateway, I joined a group formed to experiment with what was called (if I remember right) Customer Chat Support (CCS). CCS was a strategy to increase our call center’s ability to handle support calls by having a moderator classify calls and send them to various rooms with up to 5 others and a single Gateway technician. Sometimes I was the moderator, but usually I was the tech and it was my job to solve 5 problems at once!
At another point in time, I was on the Executive Response Committee (ERC) and I responded to folks who had been courageous enough to write directly to Ted Waitt - the then CEO of the company. I talked to people with all kinds of troubles.
Behind the headsets in a tech support call center live together, as you might imagine, a lot of geeks. When the geeks were on break, we would chat and I quickly realized that there were two types: those who were attempting to establish that they were very knowledgeable, and those who were learning.
I didn’t realize it at the time, but I was learning about growth mindset and deciding that I would attempt personally to eschew the status of “one who knows,” and attempt instead to ask questions, discover, learn, and grow. There’s so little the guru status actually provides you anyway that is not an illusion.
John Wooden said, “Be more concerned with your character than your reputation, because your character is what you really are, while your reputation is merely what others think you are.” Similarly, Dwight L. Moody said “If I take care of my character, my reputation will take care of itself.”
Like someone who’s seeking to advance his character and giving up his reputation, one who genuinely seeks growth of knowledge will end up further along.
I’ve heard it said that - “Humility is not a lowly view of yourself. It’s a right view of yourself.”
We need to be ready to admit when we are knowledgeable about something, but just as ready to admit when we are not. It turns out that just being honest (something we hope we learned in kindergarten) about what we know or what we are capable of is the best tack.
I hope that’s encouraging and if necessary I hope it’s challenging too.
Highlighting the Beauty of Rx
Some time ago, myself and a small team of guys dedicated one evening a week to working on an app.
After the formulation of a ton of good ideas and some real progress on the project, we came to the unfortunate realization that we just didn’t have the after-hours bandwidth the project required.
I still wish I did though, because it’s a good idea, and the idea is often the hardest part of any project.
I don’t want to dive into the details of the project, but I do want to share the pattern we were pursuing - the observable pattern.
The first time I saw Reactive Extensions (Rx) I had a jaw drop experience. Its elegance was apparent despite its implementation being a bit complex. It’s one kind of complex at first and continues to be another kind of complex the more you use it. Since then I’ve been looking for excuses to use this pattern and this library and have found a few, and our app was one of them.
The app I’m alluding to is a game, and it handles a bunch of game data that happens to represent real life players with a mobile device and a GPS, but it could just as well represent 2D or 3D sprites or something besides a game at all.
Without the low-level context, I need you to understand what was going on in the app and that shouldn’t be too difficult.
Imagine every possible event that might occur in a game - everything. A player might move - even a small distance. A player might join… or quit… or shoot… or whatever. These are considered GameEvents.
Now imagine all of these events in one giant stream. That’s right one flat structure. Sort of like a Redux store or a transaction log.
Now imagine all of these events funneling through a single observable inside the game service (the service all players are sending their game events to).
And that should give you enough context to understand what I’ll share next - an observable-based engine for processing game rules.
Now before I embark, know that one of the biggest advantages here is that this general pattern gives us the flexibility to define whatever sorts of rules we want. So one set of rules would implement one game, and another set of rules would implement something altogether different.
Let’s say we want to write a rule that is only interested in when a player has physically moved (as it turns out, that’s one of the most interesting events in the game). In the Rx world, that would look something like…
var playerMoves$ = game.Events |
Note that I’m writing C# code here because that’s what we started with, but this should look pretty similar to some other popular languages you might be using.
What that code says is that I want to declare a new observable (playerMoves$) that is a filtered set of the entire set of game events - only the ones of type PlayerLocation.
Since the player location changes are such an important event, it’s good to set that one up to feed the others. Now let’s get on to another…
//any player collides with any other player |
This rule depends on the playerMoves$ we declared and set in the previous block and extends it.
This one projects each player that just moved into a new anonymous object that includes any other players that are very close to him (in this game proximity determines a “collision”).
Then we chain the .Where function on there to say that we’re only interested in occurrences where there was a collision (that’s the .Any part).
If you don’t understand that code, spend some time with it. Print it and take it to dinner with you. Put it on your nightstand. This is the sort of code block that looks bizarre first and elegant eventually.
Okay, now I’m only going to take you one step further, and I’m going to do so because although I’ve been calling these “rules,” you haven’t seen a real rule yet.
These were conveniences. These were the application of a couple of Rx operators that essentially gave us some alternate views into that massive stream of game events.
The playerMoves$ gave us a subset and the playerCollisions$ gave us another subset. To create a real rule, we need to take some action. Watch this…
playerCollisions$ |
So this block starts with that convenience observable - playerCollisions$.
Then it projects it to an anonymous object that includes the player(s) that are in collision. In that filter, the colliding players are filtered to only the players that are a) on the other team and b) in the other player’s area (zone). This rule actually comes from Capture the Flag in case you didn’t recognize it and occurs when a player gets tag running in another player’s territory.
And then what may be considered the interesting part if I weren’t such a geek and found all this stuff to be interesting :)
The .Subscribe method. This method determines what happens when this sort of collision occurs. In the case of Capture the Flag, the player is to be sent to jail - the other player’s jail that is. Thus…
c.PlayerLocation.Player.NavigationTarget = |
That is… set the player’s (the one that got tagged) navigation target (where the app tells the player to go) to the other teams waypoint labelled “Jail”.
And that’s as far as I’ll go.
Remember, the purpose here is to help you understand why you might choose to use the observable program in your application and to show you how terse and elegant it can make your code.
Happy hacking!
Edge Device Discovery - an Unfinished Project
The Team
| Team Member | Project |
|---|---|
| Masha Reutovski | Project Manager |
| Bret Stateham | BLE Communicator |
| Gandhali Samant | BLE Scanner |
| Kristin Ottofy | Sync Engine |
| Joe Raio | API |
| Jeremy Foster | UI |
A diverse group of technical engineers and one project manager from Microsoft’s Commercial Software Engineers (CSE) group. This project was an initiative that Bret Stateham submitted for Sync Week hacks.
Project Overview
This IoT Edge Device Discovery project is built on the Azure IoT Edge service. First, we’ll discuss Edge and then this project’s added value.
Azure IoT Edge
IoT Edge is a service that comes as part of Azure’s IoT offering. It is intended to run on field gateway devices (“edge” devices) and facilitate the aggregation of data from other devices in an on-site IoT solution - devices that may not have the ability to communicate directly with the cloud or for whatever other reason should send their data through a gateway.
Azure’s IoT Edge service is undergoing a big transformation from version 1 to version 2. Version 1 is already in the wild. Version 2 offers some dramatic benefits such as containerized modules that can be run on the edge or in the cloud, but this version is still in private preview and undergoing breaking changes.
In this project, we opted to focus on IoT Edge v1. We are fairly confident that any value added would not be difficult to port to version 2 in case the opportunity arises. We also recognize that IoT Edge v2 may include some functionality that partially or perhaps even entirely overlaps with this project.
IoT Edge v1 offers multiple development paths, including native development in C++, NuGet packages to boot strap .NET development, Maven packages to get started with Java, or npm packages for Node.js developers. We chose to go with the Node.js development path in based on initial research around the noble npm package for access Bluetooth Low Energy (BLE) devices in Node.js.
IoT Edge v1 can be run on a variety of devices and operating systems. For this project, we opted to use the Raspbery Pi 3 running Raspbian Jessie as the gateway device because it was known to be compatible with IoT Edge v1 and had an integrated Bluetooth hardware stack that was known to be compatible with the noble npm package.
Finally, BLE is a popular standard and there are countless devices that could be discovered and communicated with. For this project, we focused on the TI Sensor Tag CC2541 and CC2650 as our reference devices. These sensors have a number of sensors we could leverage and provided a good model for other BLE devices.
IoT Edge Device Discovery
In IoT Edge as it exists today, if a solution administrator needs to pull a new device in to the network to start recording and sending data to the cloud, the process is a bit difficult. The devices that might be added could be speaking various protocols, but for this project we focused on BLE devices.
The current process for bringing new BLE devices into a solution to start getting new data looks something like this…
- new BLE device is brought into the proximity of the solution
- admin manually retrieves the device’s MAC address and characteristics array
- admin adds the MAC address and characteristics to the IoT Edge configuration file
- admin restarts the edge service
This solution would provide a means for these devices to be discovered automatically and simply approved by solution administrators. The process would look more like this…
- new BLE device enters the premises
- Edge service sees the device (including its MAC address and entire characteristics array) and submits it to a cloud service for storage and approval (Edge does not yet begin receiving communication from the device or acting on its reported data)
- admin is notified and directed to a web portal to approve the device and configure the system’s behavior for using the device’s data
- admin either clicks approve or deny for the device
- upon approval, the Edge service begins acting upon data reported from the new device
This system would obviously be extended to support other network protocols besides BLE.
Architecture
In its current state, the solution consists of the following components…
BLE Scanner: the BLE Scanner module is specific to the BLE protocol and would be duplicated for other network protocols. The scanner is just another Edge module and constantly scans for BLE devices in the proximity of the gateway’s BLE radio. Upon seeing a device, the scanner reports the device and its characteristics array (the data points the device is capable of communicating) to the Sync Engine (also an Edge module) using the IoT Edge Message Broker. The Sync Engine is not concerned with whether devices have been discovered and reported in the past or whether they’ve already been approved or denied. It simply reports what it discovers.
Sync Engine: the Sync Engine is also an Edge module and contains the majority of the business logic for this project. It receives information from the BLE Scanner module about what devices have been discovered nearby, their MAC address, and their characteristics array, and it keeps information about these devices synchronized with the data service in the cloud (via the API). It likely receives duplicate devices from the device scanners, but maintains last known state both locally and in the cloud.
BLE Communicator: The BLE Communicator is specific to the BLE protocol and would be duplicated for other network protocols. The communicator is also an Edge module and is responsible for communicating with the entire array of approved BLE devices. This is in contrast to IoT Edge’s default, native BLE module that is delivered with the product, which is only capable of speaking with a single BLE device. The BLE Communicator module maintains configuration on disk as well as in memory and relies on the Sync Engine module to update its configuration and let it know which devices (and which characteristics) it should be communicating with.
API: the Sync Engine runs serverlessly as an Azure Function. It provides endpoints for the Sync Engine and UI. The API allows the Sync Engine module to submit newly discovered devices (and their characteristic arrays) or update existing ones. The API then provides this information to the UI. The API is designed as a REST-compliant interface and thus relies on HTTP GET, POST, PUT, and DELETE operations against entity endpoints - the primary endpoint being the list of devices which may be more clearly understood as device approvals.
UI: the UI is the only interaction point for solution administrators and allows the admin to determine which discovered devices should be considered by the Edge service, which of those devices’ characteristics should be read, which should be written, and on what schedule (i.e. once, periodically, etc.). The UI obviously relies on the API to ultimately take effect in the Edge service.
Components
The Scanner
Principal Developer: Gandhali Samant
Overview
The role BLE Scanner module, as mentioned above, is to discover BLE devices in range of the IoT Edge v1 gateway device. The module was written using Node.js and leverages the noble (https://github.com/sandeepmistry/noble) npm package. Noble supports both Windows and Linux and is the most popular node.js package for BLE communication. This module is intended to constantly scan for new BLE devices and their characteristics. When a new device is discovered the module generates a new message containing the devices MAC address and GATT characteristics and publishes the message to the IoT Edge v1 Message Broker for consumption by other modules.
Challenges
IoT Edge v1 implementation doesn’t support the use of native Node.js modules. The noble npm package is a native npm package (meaning it has to be compiled for the platform) and we were unable to create an IoT Edge module that tried to load the noble package. The solution was to use the proxy, or remote, module patter as discussed here: https://github.com/Azure/iot-edge/blob/master/samples/proxy_sample/README.md . However, that presented it’s own challenge as discovered in #2.
The Node.js implementation of the out of process proxy module is buried in a subfolder of the IoT Edge v1 GitHub repository and can’t be referenced directly from Node.js We attempted to extract that folder only and create a locally linked npm package to depend on, but ultimately ended up having to move that code into our own repo (https://github.com/bretstateham/azipg) so we could create a dependency on it from our IoT Edge v1 module.
The noble BLE implementation was great in that it was able to discover BLE devices, but it turns out there were hundreds of BLE devices available. We added a MAC address filter to discover and report only on BLE devices with MAC Addresses that started with “54:6c:0e”, the prefix used by Texas Instruments CC2650 Sensor Tags to limit the number of devices we published.
Successes
Once the challenges above were overcome, the module was able to successfully scan and discover the two TI CC2650 Sensor tag devices we had on hand. Once discovered, the details of a BLE device were collected, placed in a JSON payload, and published via the IoT Edge v1 Message Broker.
Future Development
The module will currently continue to publish the MAC address of a BLE device even if it has been previously discovered and approved or rejected. It would ideal for it to be able to use a local data store to identify only new BLE devices that need to be reported.
The Sync Engine
Principal Developer: Kristin Ottofy
Overview
The Sync Engine IoT Edge module awaits to receive a message from the Scanner module that a new BLE device has been discovered. It then checks a local file to determine if the device has been approved or not. If the device is not listed in the file, then the Sync Engine calls the get-approval API to alert the user of a new approval request on the UI and adds the device information to the local file. The Sync Engine asynchronously and routinely calls the get-devices API to check if the UI has updated the database. If it has, then the Sync Engine will reflect those changes in the local file to retain state on the gateway device and publish a message on the IoT Edge broker for the BLE Communicator Module to begin communication with the newly approved device. This module was written in Node.js and developed using Raspian Jesse on a Raspberry Pi 2.
Challenges
Many of the challenges with this module were presented during the architecture phase. Retaining state across device power cycles or updates proved to be one challenge. The decision to use a local JSON file to store important information allowed us to get up and running quickly during the hackathon.
Successes
As this portion of the project is continuing development, successes have been made so far with communicating across the gateway message broker, storing information into the local file, making necessary API calls, and posting messages to the broker through various npm packages.
Future Development
There are opportunities available within the gateway device that could support the Sync Engine module through IoT Edge v2. Having a localized database would eliminate the need for the local file and allow for quicker checking of approved devices.
The BLE Communicator Module
Principal Developer: Bret Stateham
Overview
The BLE Communicators role is to implement the actual communication with the approved BLE devices. A single instance of the module is used to communicate with ALL of the configured BLE devices as opposed to a single module instance per device. In addition to multiple devices, the module needed to support multiple communication patterns with the GATT characteristics on any given BLE device. The actual GATT characteristics and their usage pattern is be supplied to the BLE module via the IoT Edge v1. configuration mechanism:
Read Once at Init: A characteristic that is read once at the beginning of communication with the device. The GATT Characteristic value would be read, and included in a message sent to the IoT Edge v1 Message Broker. Read Once values typically include device metadata like Manufacturer, Firmware version, Serial Number, etc.
Write Once at Init: A characteristic that would be written to once at the beginning of communication with the device. The value to be written would come from the module configuration. This is often used to initialize the BLE device itself by enabling sensors, notifications, etc.
Write Once at Exit: A characteristic that would be written to once at the end of communication with the device. The value to be written would come from the module configuration. This is often used to turn off sensors, or features on the device to help reduce it’s power consumption when not in use.
Read Periodic: A characteristic that is read at a regular interval (the interval specified in the config). All periodic read sensor values would be collected and published to the Message Broker in a single payload.
Read Notification: A characteristic on the BLE device that supports notifications. The characteristic’s value will be published individually to the IoT Edge v1 Message Broker.
Challenges
This module shares the same core development foundation as the BLE Scanner above, and as such the same challenges around IoT Edge v1’s limitation around native npm packages. See the BLE Scanner challenges above for more details.
In addition to those challenges, we had some concurrency issues in the Node.js code that we were unable to resolve during the timeframe of the hackfest. The noble implementation is naturally asynchronous, but we were having issues maintaining the context of a characteristic read once the value was returned. We attempted numerous patterns include the use of promises, and the “async” module, but were unsuccessful.
Successes
We were able to get the module to read it’s configuration via the IoT Edge v1 configuration mechanism and initiate communication with the specified BLE devices.
Future Development
The code for this module needs to be refactored to properly leverage the asynchronous behavior of the noble module. In addition, the implementation of the various usage patterns above need to completed.
The API
Principal Developer: Joe Raio
Overview
We exposed four Azure Functions as our API for device management. This would be accessed by the front end to list all devices, get details on a specific device, create a new device, and update the properties of a device. All functions were written in node.js and setup and triggered via HTTP.
API Development, Debugging & Testing
We developed the functions locally using both the Azure Functions Core Tools and VS Code. This allowed us to rapidly iterate through changes as well as debug our code. This saved us a tremendous amount of time vs having to deploy to Azure each time we needed to verify our code updates.
Postman was used to both test API calls locally and against the live site. This allowed us to modify our request body on the fly and send GET, POST, and PUT requests to the API.
Challenges
Proxy Routes using /api – We set out with a goal of being able to call /api/device using different methods (i.e. POST, PUT, GET) which would in turn route to different Azure Functions. To do this we had to enable the use of Function Proxies. When doing this though it would not allow us to use /api in the route prefix because /api is the default route when creating a new function. To overcome this we modified the host.json and changed the default route for functions to /func. This allowed us to then use /api/device with our proxies.
MongoDB API – It was decided that that MongoDB API would be used to interact with CosmosDB. Because of this we were unable to use the built in CosmosDB bindings for Azure Functions. We had to use the Mongo npm packages and write custom code to read / write / update records in the database. While this was not a huge hurdle it would have been cleaner (and faster) for us to use the default DocumentDB api. Future version of the API will use this.
CORS – Early on we ran into CORS issues when trying to access the API from our front-end application. We found that when using proxies our default CORS rules were overwritten. We got past this by adding custom headers to each function directly in the code. Further testing needs to be done to determine the exact cause of this issue.
The UI
Principal Developer: Jeremy Foster
Overview
One part of the overall project workflow required a user interface – the authentication of found devices. For this, we turned to Angular and got a bit creative and modern in how we hosted this application – serverlessly!
Angular
Angular’s CLI makes getting started with a new website pretty quick and easy. Angular is a good, modern choice for a UI and offers plenty of features for this application.
Using the CLI, we had a basic site in just a couple of minutes. Then we added a simple DeviceList component and displayed this component on the main page… nothing fancy… one component.
The most interesting part of the UI was the DataService, which is responsible for fetching devices from the API, displaying them in the UI through the device list component, and keeping the list up to date as new devices are discovered and administrators approve or deny devices.
The next step in this part of the project would be to create another Angular component – perhaps called Device – that the DeviceList component would repeat. That Device component would then contain all of the UI and logic for user interactions for managing the devices – for instance, an Approve button and an Always Ignore button.
Next, because we started with BLE devices for this project, the individual found devices would need to have their characteristics (the properties on each device we’re able to read/write data values from/to) enumerated and give the administrator the ability to determine which characteristics are interesting and how those characteristics should be read (i.e. once, periodically, etc.).
REST Architecture
The API was designed to follow a pure REST architecture, so the higher level operations were absorbed by the UI’s DataService. In the future, a data access layer of sorts could be implemented in a separate or the same API project to make calling from our UI or other UI formats simpler and more consistent.
As an example, in order to keep the API pure REST, a call to approve a device would be something like…
PUT /api/device { "id":14, "approved":false } |
In the UI’s DataService, however, that would simply be a call to a higher level function like this…
approveDevice(14); |
Serverless Hosting
Being the UI is composed of all static files, we could serve it as a Serverless website by using an Azure Function with a custom proxy.
To do this we first created an empty blob container. In this container, we placed the production output of the Angular App (i.e. the /dist folder). Then, using a custom proxy route we routed all requests for /{restofpath} to the public url for the container.
The route definition is as follows:
"root": { |
With %mycontainer_uri% being an app setting for the URI for the blob storage account.
By doing this we avoid having a web app using 24/7 just to serve up static files. When a request is made, the Azure function simply pulls the file from blob storage and serves it to the browser.
You can view the live site here: https://edgediscover-functionapp.azurewebsites.net/index.html
To deploy the UI we used VSTS to create a custom build process with the following steps:
Get Sources – This gets the latest files that were committed to the repo
npm Install – installs all the required npm packages
npm run build-prod – this produces the output of the UI in the /dist folder
AzCopy – this then takes the output and copies it to the specified blob container.
Conclusion
Like many good projects, this one is unfinished, but I hope you have learned like I have to embrace unfinished projects. If you have to bring everything to completion, you may not start some things even though there may be a lot to learn. I certainly learned a lot on this one.