
How to do Semantic Zoom in an HTML/JS App
Semantic Zoom is super easy, but even the easy things can use some conceptual explanation and examples to clarify them. Rest assured that once you see it, you’ll go “Ah! That won’t be a problem then.”
If you use XAML/C# to make your Metro apps, then you should check out Jerry Nixon’s post on semantic zoom.
So, I’m going to be talking about Semantic Zoom. You know what that is right? It’s different from optical zoom. It’s a Windows 8 differentiator and it’s really helpful. It’s a way of zooming out of some information and making it easier to orient and easier to consume. Optical zoom just scales everything. Semantic zoom shows a different logical version of the same list.
Any given list in a Windows 8 screen may be 3 or 4 or 5 screens worth of horizontal information, right? Well, it’s not hard to pan that far, but it’s not always easy to really see what your scope is when it’s on 4 screens. When a user semantically zooms out, he is hoping to get oriented with your data. He is hoping to rise up so he can understand and/or so he can dive back in at just the right place.
I’m going to provide an example here. My example is a list of attractions in Kauai. Each has a category property - things like Flora, Scenery, Waterfall, etc. I will use these categories to group my list, but with the grouping and all of the content I want to show, the list is about 4 screens wide…

This might be a good scope of data for this view in my app, but at the same time it might be too much to expect a user to be able to consume in a glance. So, we implement semantic zoom. When the user pinch zooms, we want to show them something like this…
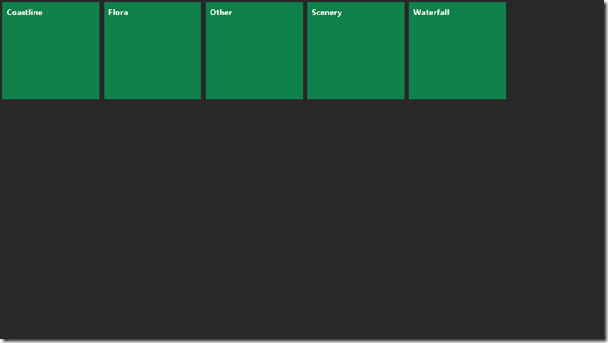
This is not very stylish, I know, but it serves to make the point. We want to indicate in much less horizontal space (and hopefully on a single screen) what our data contains. In this case, we’re showing the categories. We could get quite creative with what we show here. The concept is to logically expand our scope to orient the user.
Now when the user chooses the Waterfall tile, he’ll be semantically zoomed back in and will be taken directly to the waterfall section. The user can also zoom back in using a stretch zoom gesture (two fingers on the screen and then moved further apart).
Let’s move on to how to implement this. It’s by no means rocket science. Unless of course you’re building an app for… er… rocket science.
Start off with a blank Metro application. First thing you’re going to need is the data.
In your default.js file, add an onready function like this…
app.onready = function (args) { |
And then inside of it add your data like this…
var attractions = [ |
And then you need to turn that simple JavaScript array into a Binding List so you can bind to it. Like this…
var attractionsList = new WinJS.Binding.List(attractions); |
And then you group that list like this…
var attractionsListGrouped = attractionsList.createGrouped( |
And there’s that.
Now, let’s visit your HTML file (default.html).
You’ll need your actual ListView…
<div id="zoomedinlist" data-win-control="WinJS.UI.ListView"></div> |
And you’ll also need a template and a header template…
<div id="headertemplate" data-win-control="WinJS.Binding.Template"> |
And then you need to bind the ListView to your data, so go back to your default.js file and after the var attractionsListGrouped statement, add this…
var zin = q("#zoomedinlist").winControl; |
Now you should have a working list, and all we have to do is add the semantically zoomed out version and the semantic zoom control itself.
So, on the default.html page, add the semantic zoom control and the zoomedoutlist to the list you already have like this…
<div data-win-control="WinJS.UI.SemanticZoom"> |
(note that last code should be pasted over the existing zoomedinlist since we already had that there)
Then, that zoomedoutlist needs some data binding, so we go back to the default.js and add this…
var zout = q("#zoomedoutlist").winControl; |
OKAY STOP. Let me explain what’s going on here. Quite simply, we’re just adding two different ListView controls with their own data bindings (that happen to be based on the same data, and then we are wrapping both of those up with the WinJS.UI.SemanticZoom control.
Keep in mind, that there are no constraints necessarily on what can comprise those two lists. You, the developer, are responsible for making sure that your semantic zoom control makes good sense for the user.
Now, please notice that the data source for the zoomed in list is a grouped list of attractions, while the data source for the zoomed out list is a list of groups. Thanks why we get the categories for our zoomed out tiles.
I added a couple of classes in the templates that I had you paste into your HTML, so if you add the following style rules to your default.css file, then that should make everything look sensible…
.item-image { |
And that should do it. Leave a comment if this was helpful. Actually, leave a comment if it wasn’t helpful too. :)
Happy zooming.
When to Use ViewBoxes and FlexBoxes
HTML and CSS is great, but there’s at least one thing that has driven web designers mad for ages - layout. We used to use tables and it worked. We knew their weaknesses, but they worked. Then we were told that tables are for tabular data and div elements are for layout, but divs are wretched creatures. To set divs next to each other one had to float them, but then when finished floating had to be explicitly turned off - argh. Also, divs had no notion of filling vertical space or of controlling the vertical placement of anything within it.
So a myriad of web designers resorted to absolute positioning, browser hacks, jQuery UI positioning, or some other means just to get things to go where they ought.
Enter Windows 8.
Windows 8 allows us to design our Metro style apps using HTML and CSS. In doing so, however, it the CSS standards and Microsoft have given us some facilities to finally place things where we want them.
It’s not obvious how everything works though so let me give you a boost. If you start with a Fixed Layout Application (for the record, I think it should be called the Flexible Layout Application) project template you get the right stuff automatically, but here’s an explanation so you have the concept as well.
We’re dealing with two entities here: the WinJS.UI.ViewBox control and the -ms-flexbox css property value (for the display property).
WinJS.UI.ViewBox
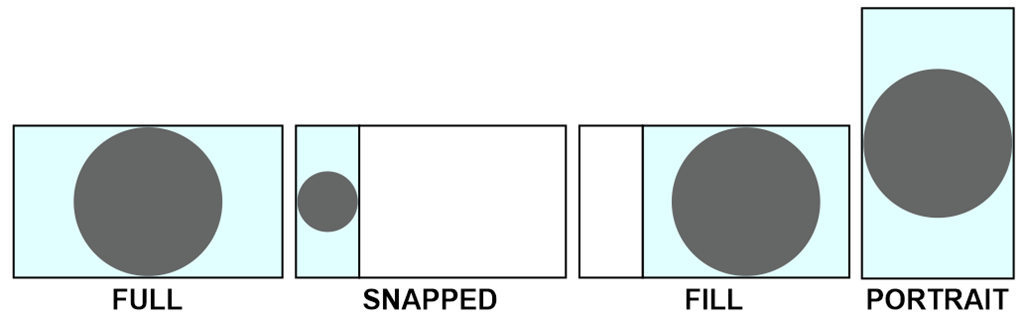
The purpose of the ViewBox is stated in the documentation. It says that it “Scales a single child element to fill the available space without resizing it. This control reacts to changes in the size of the container as well as changes in size of the child element. For example, a media query may result in a change in aspect ratio.”
The first thing I had a hard time wrapping my head around was the overlap between a ViewBox and a FlexBox. Then I discovered that there really isn’t any. The ViewBox control is quite simple. It scales the content that it contains but maintains it’s aspect ratio.
It works like this…
Note that it does not work like this…
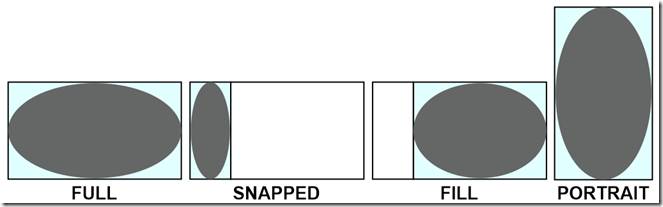
In other words, as it says in the documentation, it scales the contents, but it keeps their proportions.
And that’s really the end of it. The ViewBox serves this one purpose.
Flexbox
Now it’s time to talk about the flexbox. This is not a WinJS control, but rather an implementation of a CSS3 property. It’s not quite a standard property yet because all of the browsers are still implementing it with vendor specific properties and values, but it’s close. For Windows 8, we specify a display property with a value of -ms-flexbox to indicate flexbox layout.
The purpose and scope of the flexbox is a bit bigger than the ViewBox. Here’s what the W3C spec for the CSS Flexible Box Layout Module says “In the flexbox layout model, the children of a flexbox can be laid out in any direction, and can “flex” their sizes, either growing to fill unused space or shrinking to avoid overflowing the parent. Both horizontal and vertical alignment of the children can be easily manipulated. Nesting of these boxes (horizontal inside vertical, or vertical inside horizontal) can be used to build layouts in two dimensions.”
So, like the ViewBox, we still have the concept of the container’s content changing in size to fit the container, but this has more to do with a collection of child items.
Additionally, the flexbox offers a lot of properties to specify how it’s children are laid out. A quick glance in Blend at the CSS properties on a div in the Flexbox category will enumerate them for you…

Notice first the -ms vendor specific prefix as I mentioned.
To give a thorough description of the possibilities with these properties, I’d be duplicating what’s already done quite nicely on the flexbox page on w3.org, so just go there and read the nitty, gritty detail.
Differences
The ViewBox is a WinJS control, whereas the flexbox is a CSS property.
The ViewBox always acts on a single child item, but the flexbox can act on multiple child items.
The ViewBox itself changes size to fit it’s container as a core feature. The flexbox can be told to scale to 100% either in width or height, but it doesn’t have to.
The ViewBox does not extend control over the alignment and scale modes of it’s contents, but always does the same thing - scales the child item without changing it’s proportion.
All Together Now
Now that you know how different these controls are, consider them together. If you put a flexbox div inside of a ViewBox, you get a really effective layout tool. Try this for your HTML…
<body> |
With this as the CSS…
.flexy { |
What you have now is a flexbox that fills its area well. Look at these simulator screenshots so you can see what this would look like…
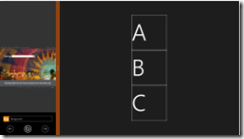
[more images missing]
XAML is unarguably the most powerful layout engine I’ve ever seen, but I really don’t feel like there’s too much in HTML/CSS that we’re missing now with additions like this. It’s rather empowering.
Happy layouts!
The Ocho
There’s nothing better for learning a new platform, framework, or language than getting together with other people. Shared experience brings not only technical know-how, but also know-how-not-to! I always say that our careers are made of three things: education, inspiration, and experience. You need all three. Education can be rote. You get it from books, videos, classes, etc. Inspiration is the energy and motivation for doing what you’re doing. If you’re not working on a project that is exciting and has the potential to change the world, you might just be a bit bored. Experience then is what you get when you try to do it over and over. You succeed, you fail, but each time you learn how to and how not to do things.
Meeting together with other people is magic because it’s an opportunity to get some of all three of these. You get some training. You get inspired by the content and what others are doing with it. And you get to try things and get experience and you also get to benefit from the experience of others.
So that’s why I started The Ocho. The Ocho is a user group for Windows 8 developers. Whether you’re beginner or advanced, go to http://www.meetup.com/theocho and sign up to visit a local meeting. You’ll learn a lot and you’ll have some fun too. Tell your friends about it, so we can build it up even more.
See you at The Ocho!
Microsoft vs. Apple - Differences in Tablet Philosophy
Microsoft and Apple have a long and tangled past. From most perspectives, the two would certainly be considered competitors, but when fitted with the right glasses (rose) one can also choose to see the two technology giants collaborating to add enjoyment, value, education, and information to the lives of billions. I used to teach high school and there were occasions when both companies made significant donations to classrooms to bring better education to my students.
But right now I want to talk about a fundamental difference in how each company appears to approach the tablet market.
There’s nothing special about a tablet. It’s just a form factor. Phones are this big… tablets are a bit bigger… desktop monitors a bit bigger still. They’re just screens. Sometimes they’re sideways and sometimes they’re upright. Sometimes they’re stationary and sometimes they’re on the move. Imagine for a minute where our children and their peers will find screens - in the kitchen, in the car, on the bus, on the train, and hopefully rolled up in their book bag. Remember… it’s just a screen.
Apple threw some words toward Microsoft recently saying that tablets and desktops are fundamentally different and that attempting to put the same OS on both devices would end up degrading the user’s experience. I suppose Apple is saying this precisely because they have a different OS their tablet than their desktop.
I see the Windows 8 strategy as relieving. It can be nothing but easier for devices to collaborate when they are running the same bits. I have Windows 8 on my TV, on my work PC, and on my tablet. We’re still in beta and already the experience is nothing short of delightful.
I look forward to the many more device form factors that are inevitably to come!
All Windows 8 Quickstarts
If you’re looking for training material for Windows 8, you’ll find quite a lot online. It can be overwhelming finding stuff online though. I consider it part of my job to help you locate things, so here’s a tip. Just do a search in the Windows 8 Dev Center (http://dev.windows.com) for the word ‘quickstart’; and you’ll find a lot of walk-through articles that are really helpful in figuring out how things work. Here’s a link to that search directly: http://social.msdn.microsoft.com/search/en-US/windows/apps?query=quickstart&Refinement=180
Giveaway - Visual Studio Windows Decals
I’m giving away one large (8.5” x 11”) Visual Studio 2012 logo window decal and one small “I heart VS2012” decal. I’m sure these will be all over the place soon, but you can be the first around if you’re the lucky winner.
To enter just follow me (@codefoster) on Twitter and retweet this tweet. I’ll randomly select a winner on June 7.
Art Matters
I’m in a Microsoft building today that I’ve not been in before. There are a lot of them since I’m a relatively new employee. This one houses a lot of the work that goes into the Windows Phone 7 operating system, and that’s pretty cool.
I arrived early for my conference and decided to spend some time meandering. A 3rd floor native told me I should visit the Windows Phone design studio on the 2nd. The design studio looks like a bunch of art supplies, flowers, and rainbows blew up. It’s very cool actually.
I’m a propeller head for sure, so it’s important to me that a system functions correctly, but I want never to forget that art matters. It matters because it’s human like your users. When I picked out my SCUBA gear, for instance, its ability to sustain my existence while I’m under water was certainly high on my priority list, but it was also an assumption for the most part. SCUBA gear wouldn’t likely make it to the consumer shelf if it wasn’t well tested. So I essentially set that aside and look for gear that I enjoy looking at - gear that makes me feel like a Navy Seal Ninja.
Know that your users are making the same assumptions that your application is going to function as it’s intended, and they are going to choose it, keep it, and pay for it based on its art. Is it beautiful? Is it smooth like butter? Is it inspirational.
The Counter Principles of Metro Style Design
Likely you’ve read the Metro style design principles, but you haven’t seen the counter principles yet (because I made them up). Here we go…
1. Show Shame in Mediocrity
To really show shame in mediocrity, just look at about 80% of the apps in any major app marketplace. These apps may get a users attention with a catchy title or a promise to solve some problem, but then they fail to add any value to anyones life. Even if they are not devoid of functional value they fail to provide any user joy.
- Ignore the little things
- Do something different in every little user interaction so you can keep them on their toes
- Embrace chaos
- Deviate slightly from the grid so the user knows something is wrong even though that can’t see it
2. Flow Like Peanut Butter
To be clear, peanut butter doesn’t flow. Even creamy peanut butter doesn’t flow. To meet this counter principle, perform actions synchronously, use while loops that peg the processor, and only use the UI thread.
- Add some offset between the user’s finger and the registered touch point
- No transitions or animations… all straight cuts
- Add boring graphics and boring interactions.
- Embrace lag and jitters
3. Be Faux Analog
It’s 2012, but give the user a solid 1994 experience by rendering an actual real-life scene and hope they’ll figure out which drawer their word processor is in. Even though there’s no actual need for a spiral binding, let’s add one. It’s nostalgic.
- Show a desk or a lobby or some other loose analogy to your navigation model
- Firmly draw your limits at real life paradigms and scenarios
- Expand on the success of Microsoft Bob©
4. Do Less With More
Pack that screen. You have millions of pixels at your disposal. You can use some for navigation, some for commanding, and if there’s room left over you can even include your user’s content.
- Assure that users can orient themselves to your views within 7.5 minutes
- Adhere to a strict 45 button limit per view
- Give users a sense of adventure as they discover your application
5. Die Alone
- Assume the user is only concerned with doing whatever it is that your app does.
- Assume they don’t have friends to share your content with.
- Assume they don’t need to find anything of your content
- Assume the user what’s to do one thing at a time… always… ever… only
I give you my word...
I’m excited about what I just implemented. I’m always excited when I figure something out or learn something big. This one is big for me. Hopefully this post will add some value to your life as well.
First the problem statement…
Here’s what I wanted to do. I am working on a Windows 8 Metro app using HTML/JavaScript.
I have a data.js file that represents (for now, until I put the data in the cloud) my data service. I am loading data up from a roaming file that contains simple JSON data. Actually, is “simply JSON” redundant. JSON just IS simple, right?
My hub page then needs to make sure that the application data is loaded and then it needs to request some. I can’t just directly request the data as is though because it needs to be massaged into the right shape to back the hub view. My application has items of Type A and Type B and I need to essentially flatten that into a super type that my hub will represent in different groups.
So I need to fetch some data and it needs to happen in an async fashion.
I’ve consumed objects that follow the Promise pattern plenty, but here I need to create my own Promise and get all custom about when it is considered complete and what it returns as its payload.
So I have two methods that I need to make asynchronous: loadAppDataAsync() and getHubItemsAsync(). The former is internal to my data.js function, but the latter is “exposed” to the rest of the app using a WinJS.Namespace called “data”.
loadAppDataAsync
This method, as I said, is “internal” to my data.js file. That is, it’s defined inside the modular function that encapsulates everything on my data.js file and thus is not available anywhere else in the application. The purpose of the function is to read the applicationData.json file and populate some arrays with the results. Here’s the method definition…
function loadAppDataAsync() { |
I added the Async suffix to the method name because this method not only calls an async method, but also acts asynchronously itself. Here’s how that’s implemented.
If I just wanted to wrap up the getFileAsync method call, then I could simple return the result of that call, but I need to add a little bit of my own logic. I only want to make the getFileAsync call in the condition that my data has not already been loaded. So I return a new WinJS.Promise specifying its function (which receives complete, error, and progress attributes that I’ve called c, e, and p). In the function, if the data has already been loaded I call the complete method c (passing no attributes) immediately indicating that we’re done loading app data (because it’s already loaded). If the data has not been loaded, however, we have some work to do and we will not complete (by calling c) until we’re done with it (that’s why it’s in the .then).
This one is pretty simple. Let’s move on to the next method that we use to get the hub items after the application data has already been loaded. Here’s the code…
WinJS.Namespace.define("data", { |
This one is defined in a Namespace so that we can call it from elsewhere in our app - namely from hub.js. What this method does is a little different from the former. Like before, we are returning a new Promise. Unlike before, after we populate our result (hubItems), we complete the promise with a result by calling c(hubItems).
Passing a value to the complete function makes that value available to the caller like this…
data.getHubItemsAsync().then(function(hubItems) { |
Simple, eh? That’s the way it’s supposed to be. I want to get then items and then I want to push each of the results into my WinJS.Binding.List (here called hubItemList).
Now the grid on my hub is bound to a List that gets populated with data after the application data has been loaded and after the getHubItemsAsync method has projected the application data to look how we want it to look.
Phew! This JavaScript stuff is pretty crazy. It’s pretty awesome though.
Happy promise keeping!
Update on ReSharper 7 EAP
I opted out of the ReSharper 7 EAP beta for a little while just because it was throwing a lot of exceptions and I had to get some code written, but now I’m back and it appears they’ve made a lot of improvements to it. I am noticing a lot more support in JavaScript code in Windows 8 development, so that’s awesome.
Also, they made it work with VS 2005, 2008, and 2010. Although, if you’re still using VS2005, can I please ask you why? :)
Go here and download the latest build now and try it out. ReSharper makes you more productive.