
Which Windows 8 Language Stack Should I Choose?
I had a conversation with an attendee at the recent Windows 8 developers event at LA Live on Monday that I want to put into words and share in case it is of benefit. The question was this:
I’m new to development and I’m jumping in to Windows 8 development. Which language stack should I choose – HTML/JavaScript or XAML/C#?
It’s a good question because there are a lot of contributing factors.
I’ll leave the other languages (Visual Basic, C++) out of the discussion for the most part since they were not part of the question.
Here are the factors I’d like to compare on:
- viability of employment
- scale
- interoperability
- developer joy
Finally, a direct comparison is difficult because the nature of each of these language stacks tends to push developers into application architectures. XAML/C# applications tend to enable a developer to create a lot of custom business logic inside the application itself, whereas HTML/JS applications tend to encourage a developer to push the business logic up to a separate service to be consumed in a JSON feed for instance.
Let’s go.
Viability of employment
First of all, I have to say this. Don’t jump into application development with high hopes of being employable but without any passion for the trade. It won’t work. I would love to play guitar, but I can’t. Why? Because I don’t love it enough. If I loved it enough I’d practice it every day and then I’d become really good. I guess my analogy breaks down there, because I wouldn’t necessarily be employable :) You really need to love software development and you need to do it every day. You need to read programming books in bed and you need to experience genuine, heart-felt aggravation when things aren’t working.
But it’s good to be employed, right?! Still, I don’t think viability of employment (now and in the future) is too much of a concern. Given the current developer and consumer investments in HTML and JavaScript as well as XAML and C#, none of these languages are going to leave their developers on the street any day soon.
If, however, you want to be a very portable employee, you should choose HTML and JavaScript. I’m not talking geographically portable but technically portable – as in, you want to work in a variety of roles at a variety of companies doing a variety of things. The HTML and JavaScript languages are everywhere. We don’t just have browsers on our computers anymore. There are browsers in cars and kitchens and phones. So, every role in every company in every industry needs to know something of these technologies.
Still speaking technically, the employment options for a XAML/C# developer are going to be more narrowly defined.
Scale and maintainability
When I say scale, I’m talking about the ability for an application’s code base to go from small to huge. You might consider this dynamic if you suspect your application will be growing a lot - say going from 3 features to 30. In this case, your codebase needs to grow and your architecture needs to evolve.
On the UI side, I can’t see any advantages of either XAML or HTML in this area. Behind the scenes, however, C# has some huge advantages over JavaScript. I’ve seen C# codebases that are mind boggling and yet still quite easy for the developer to traverse and debug. Handling a huge JavaScript applications on the other hand is about like handling Jell-O - both are a little too dynamic. That’s not to say it can’t be done; I’d never make that claim.
Interoperability
How good are these language stacks at cross communicating with other applications? Both are very good. You might want to jump in here and tell me how much better JavaScript is because of it’s lightweight JSON objects, integration with the web applications, and the like. But C# can do all of that too. Any of the C# objects are one small serialization step away from becoming the same JSON object that a JavaScript app uses and likewise in the other direction. Just because your C# application is fat with business logic, doesn’t mean it can’t communicate lightly with the outside world.
Developer Joy
This is an important category in my opinion. You don’t technically have to enjoy writing software to write a lot of good software, but it most certainly helps.
I find a lot of joy writing both C# and JavaScript. In C#, I enjoy the traversal of types, type hierarchy, and type conversion. I enjoy lambda statements a lot, and I really geek out on LINQ. In JavaScript, I enjoy JSON and dynamically creating, extending, and manipulating objects. I enjoy anonymous functions and passing them around willie nillie.
I think you have to run through some tutorials for each language and determine for yourself which one you might enjoy using more. The problem is that so much of my language enjoyment has come later when I’ve used a language for hundreds of hours and I’m starting to feel like I get it.
See if you can browse a bunch of JavaScript code and C# code and see if either feels more right to you. See if one of them comes more quickly to your intuition.
Conclusion
Overall, whatever language you choose for developing Windows 8 apps, you’re going to end up with the ability to create some awesome apps, you’re going to be employable, you’re going have fun doing it, and with the amazing opportunity you have to reach hundreds of millions of potential users, you are even likely to make some money!
Happy app development!
Ban the #Region
Just in case you didn’t know, you don’t need to use the #region designator any more to collapse code. When you use the #region indicator, you create a region for everyone you share your code with, and some people hate having regions in their files. I’m one of them.
If I’m looking at a code file that’s long enough to require regions, I’d rather not look at it at all. Even “in the real world” files should contain a single class, classes should follow the single responsibility principle, and methods should be short. If your code doesn’t look like that and you use regions to attempt to make your code remotely readable, that’s sinful enough, but to force those regions onto your fellow developers is just downright morbid.
How do you get away from them you ask? Simple. You just highlight code that you want to group and hit CTRL + M, CTRL + H (or the alternative mouse longcut of going to Edit | Outlining | Hide Selection). The code collapses just like a regions, but here’s the kicker – it’s only hidden for you! The change is saved in your .suo solution file which is for you only (never check this into source control), and now you can go ahead and collapse what you will and leave your fellows free to work how they will.
There you have it.
Big Windows Developer Event in LA!
If you are in the Los Angeles area Monday event or if you can get there, you should stop by the Nokia Theater Live next to the LA Convention Center and get a whirlwind tour of Windows 8 from a developers perspective!
Everything from breakfast to dinner will be information straight from Microsoft to you. Then, after dinner, you’ll be joining us for Coding with the Experts where you walk through an excellent series of tutorials to create a full-fledged Windows 8 app. You’re guaranteed to walk away with skills.
I personally will be presenting on the tooling you’ll use to create Windows 8 applications: Visual Studio 11 and Blend. I’ll also do a presentation on designing Windows 8 applications including a complete design scenario, so it will be theory and practice in one presentation.
Come introduce yourself to me when I’m not on stage. I’d love to meet you. See you there.
Go to http://bit.ly/Jjd9dato to get all the details. See you there!
Blend - Design, Execute, Interact
This is likely apparent to anyone that has already ventured into Windows 8 development using Blend for Visual Studio 11, but if you haven’t ventured in yet for some reason… like say you’re busy actually getting work done! I know how that goes. I was recently in industry trying to meet deadlines and didn’t have much opportunity to look at new technology.
So allow me to quickly highlight an incredible feature in Windows 8 development – specifically in Blend for Visual Studio 11.
Why Use Blend?
First of all, why and when should you open Blend? For a long time, Blend was downright offensive to me as a developer. I was and still am a Visual Studio guy. I don’t want another IDE offering in parallel to confuse and divide me! But now I’ve accepted the two tools as very different and each very powerful in their own role.
Some people will almost always use Visual Studio. Remember that the Express version is completely free. How do you know if you’re one of these people? Simple. Look down. Are you wearing one of these t-shirts right now?

If so then chances are you’re a geek and Visual Studio may be your primary if not your exclusive tool.
Are you wearing something more like this?

If so then you may call Blend your home and ask a geekier friend to write the actual code for you. If you’re like me, you might wear many hats (and shirts) and be able to geek out in the code and the design tools.
Design, Execute, Interact
But right now I want to show you something that is exclusive to Blend. That is its ability to execute your application live as you design it and its ability to even give you interaction with the application and why you need that.
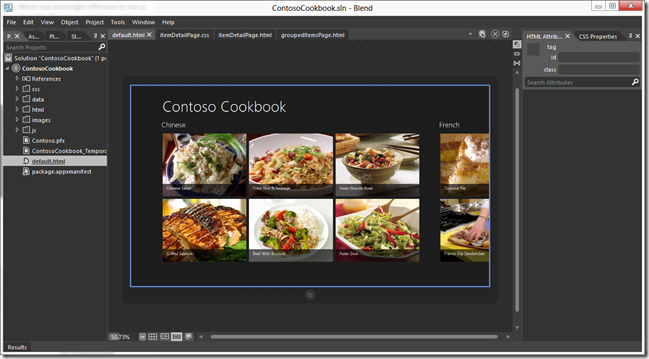
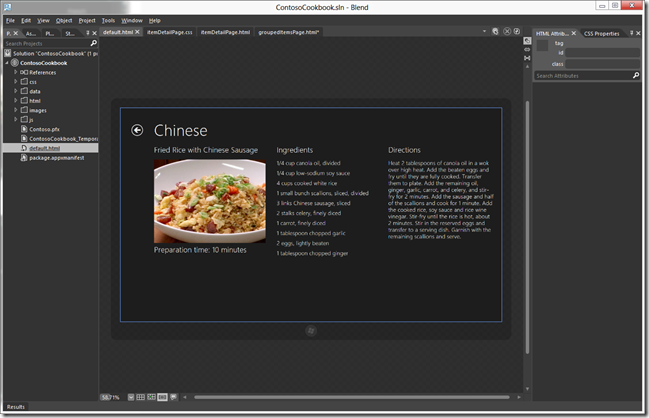
The figure above is what it looks like when you’re designing an application in Blend. The interesting tidbit of note is that those recipes you see in the design pallet are not declared in the HTML. They exist as JavaScript arrays in the data.js file and as images of food (yum) stored in the images folder.
Blend here is executing the application, running the JavaScript, and rendering the recipes accordingly on the screen. So just this is pretty awesome. Remember in Expression Blend days of old when we loaded sample data so we (designer role) could get an idea of what things looked like. Those are bygone days, my friend.
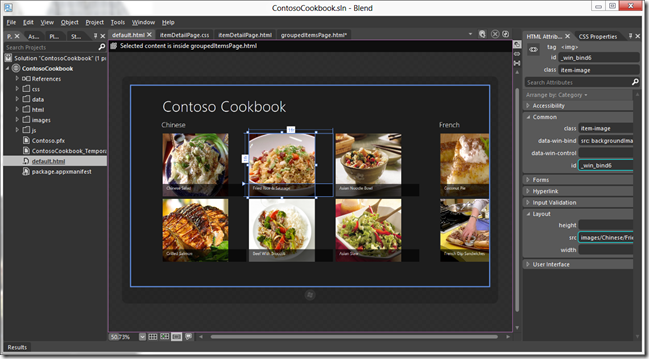
In this mode, we can actually grab one of the images (even though they’re being rendered live!) and resize it (see next figure) - effectively modifying the size of the image element in the item template utilized by the ListView control that forms this list.
But what about when you want to do some design on a different page. Say we want to resize the recipe image on its detail page as well. If we were actually executing this application, we would touch on the recipe to get to this page. But remember that we are actually executing this application. We just have to tell Blend that we want to interact with it. And to do that you hit the Interactive Mode icon…

…on the right side of the tab well. This hides all of Blend’s panes and puts you in a mode where input is passed on to the application (see next figure).
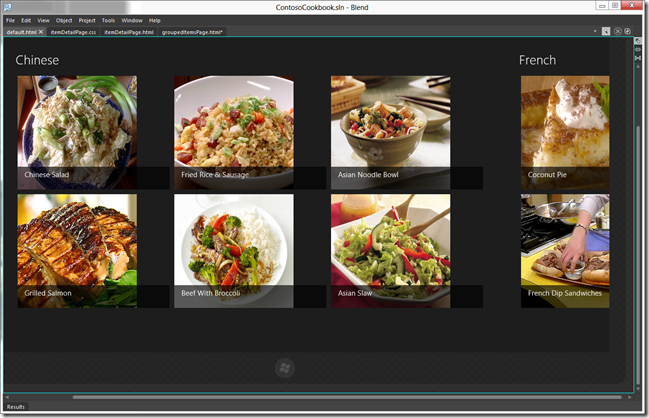
Now a click on a recipe takes you to the item’s detail page…
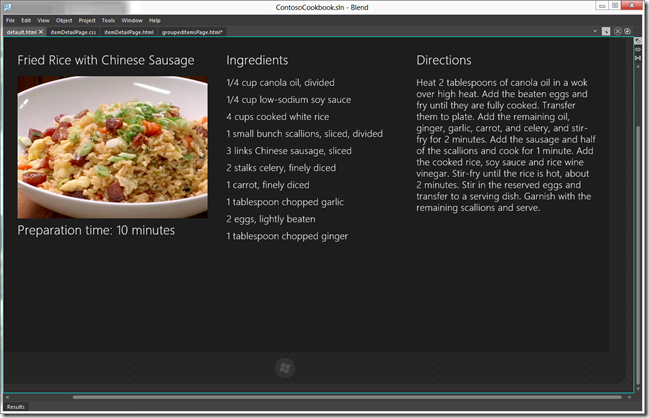
You can now click on the Interactive Mode icon again to turn it off…
…and now you’re ready to do some design on this page.
That’s all for now. Let the power and potential that is Blend sink deep. Now use it to create an awesome app.
Happy Blending!
A Tour Through the Windows 8 Documentation
Last night I did a presentation at a very active and exciting Seattle user group called vNext. The topic, of course, was Windows 8. If you read my blog, you know that that’s most of what I’m talking about these days. Instead of creating tangential content, I relied on the excellent documentation that you can browse any time in the Windows Dev Center at dev.windows.com.
The Dev Center is an enormous place, but it’s well organized and I think you’ll find it’s not too difficult to find what you’re looking for. Still, I’m including my compiled outline below in case it helps you navigate the sea of information.
The hierarchy of this outline exactly reflects that of the Dev Center, so hopefully mapping the sections will be easy and intuitive.
Getting started
Making great apps
Visual Studio 11 Beta
Blend for Visual Studio 11 Beta
Download samples
JavaScript tutorial
JavaScript doc roadmap
Visual Studio templates
Designing UX for apps
Design Principles
UX Patterns
Navigation design
Commanding design
Touch interaction design
Downloading design assets
Case studies
Website to Metro style app
Developing apps
Writing code for Metro style apps (JavaScript)
Coding basic apps
HTML, CSS, and JavaScript features and differences
HTML and DOM API changes list
Features and restrictions by context
Asynchronous programming
Asynchronous programming in JavaScript
Chaining promises in JavaScript
Creating a UI
Defining layout, navigation, and commands
Supporting navigation
Quickstart: Using single-page navigation
How to reference content
How to link to external web pages
How to create a mashup
Adding controls and content
Controls list
Animating your UI
Responding to user interaction
Touch input
Gestures, manipulations, and interactions
Quickstart: Identifying input devices
Working with data and files
Data binding
Quickstart: Binding data and styles to HTML elements
How to bind to a complex object
Managing app data
Accessing data and files
Transferring a file from a network resource
Sharing and exchanging data
Creating an Observable Object in Windows 8 JavaScript
Living in the JavaScript world for a while will help you to appreciate the offerings of C# for sure. Many concepts like classes, inheritance, observable collections, list extensions (LINQ) are simply absent and so a creative alternative has been created either in WinJS or just in recommended practice.
One of these is in the area of data binding.
First of all, I recommend Stephen Walther’s excellent article on Metro: Declarative Data Binding. He’s much more thorough than I intend to be here. I only want to relay my experience with following the instructions on dev.windows.com – specifically the article entitled How to bind a complex object, and following the sample project entitled Programmatic binding sample. If you want to learn a lot more about Windows 8 development using HTML and JavaScript, you can check out Stephen’s book Windows 8.1 Apps with HTML5 and JavaScript.
Here are the steps I took to get a very simple object to bind well.
- Write a simple class
- Add an _initObservable method
- Mix it
- Instantiate it
- Bind the properties
- Change a property to test
That’s it. I’ll elaborate a bit on each point.
Write a simple class
Here’s the rocket science class I wrote. It has a single property – name.
var Widget = WinJS.Class.define( |
Add an _initObservable method
var Widget = WinJS.Class.define( |
This is necessary so that “the observablility implementation is completed properly”.
Mix it
WinJS.Class.mix(Widget, |
This adds the necessary bindability to your custom class. If you only want a select few of your properties, you can specify a subset of properties in the parameter for the expandProperties method call. See the Programmatic binding sample to see what I mean.
Instantiate it
Now you’re ready to instantiate your object.
var widget = new Widget("Widget1"); |
Bind the properties
What you’re doing in the binding is specifying a function that you want to run whenever a property is changed.
widget.bind("name", function (newValue, oldValue) { |
Change a property to test
Now, somewhere in your code, change value of that property like this…
widget.setProperty("name", "Hi, Mom!"); |
And there you have it. The simplest possible example I could come up with for data binding a complex object by turning it into the JavaScript version of an observable object.
Happy binding!
Design Before You Develop
It has never been a good idea to jump right into development without putting time into the design of your project. It’s tempting to attribute your progress to the time when you’re actually typing the code into the computer, but application design like never before is more than fluff. It scopes and directs your efforts and saves you from real hours spent on divergent, throw-away work.
This is still true in Windows 8 development, but a lot of work has already been done to support application developers in creating Metro style applications. There’s a lot of design philosophy in the platform. The effort of which is to create an application ecosystem that has some consistency and thus some predictability and thus user joy.
Here’s a video I recorded that will walk you through the design philosophy – the 8 traits of Metro style design. Enjoy. Happy designing.
Save New Projects When Created
Do you occasionally write a one-off project in Visual Studio that you know is not going to go anywhere?
I used to have a console application that I called Sandbox that I had a shortcut to. I could open it, write some code, and then close without caring what it’s state was when it closed. The bummer was when I opened it, sometimes I had to do a little cleanup to get it ready for fresh code. It wasn’t ideal and I abandoned the practice a long time ago.
There’s a better way though. It seems there always is.
If you go to Tools | Options | Projects and Solutions in Visual Studio…
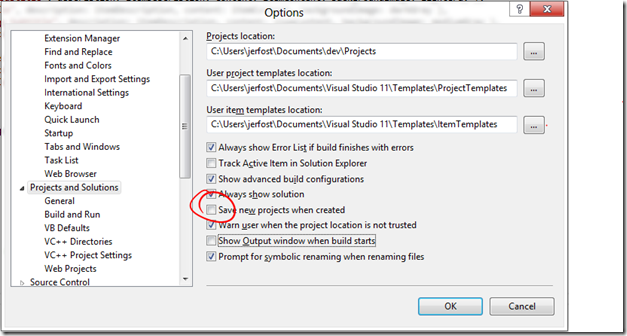
…and uncheck the Save new projects when created, Visual Studio makes the above scenario very nice.
The New Project dialog quits asking for a file path. What it actually does behind the scenes is create the project in your temporary files. Only when you try to close or save the project does it actually decide you need to specify a name and path for the project. The dialog actually gives you the option to either Save your project or Discard it.

Discarding eliminates it without a trace and leaves you about your merry way. I like this feature a lot.
Snippets Overview in VS11 and ReSharper
Following is an overview of getting started with Snippets. This will be the overview from 30,000 feet. If you want to get into the nitty gritty how-to then follow my links. As with all of my posts these days, this one will reference VS11 which is still in beta. Most of the concepts are the same for VS2010.
I would like to convince you that climbing the snippet learning curve is worth it because the view from the top is spectacular. In order to be convinced, you’re going to have to believe that you’ll save time. Here’s a brief comparison to help you believe…
<table border="0" cellpadding="2" cellspacing="0" style="width: 561px;"> |
I’m not exactly sure why Snippets in Visual Studio are so daunting for so many, but they are. I personally put off using them for a long time because creating and using them wasn’t just a “bam bam done” deal.
First, there’s the fact that the snippets are XML files, so you have to figure out the schema and what elements are expected. Then there’s the idea that Snippets are particular to languages. Then they need to be saved into a certain folder (C:\Users<username>\Documents\Visual Studio 11\Code Snippets\Visual C#\My Code Snippets).
But once I took a few minutes to dig in and see how they work, I realized that they’re not difficult, and although the learning curve is steep, it’s also short and I think the power and configurability of Snippets necessitates it.
Let’s start off with some facts:
Snippets are a way of saving typing and thus time (they also encourage more consistent code)
Visual Studio offers Snippets
ReSharper offers Live Templates which use a completely different technology to solve the same exact problem
If ReSharper is installed and configured for IntelliSense then you can use both VS Snippets and R# Live Templates… this is my recommended configuration *
Snippet Designer is a free plug-in for Visual Studio that helps you write Snippets
Snippet Designer does not yet work in VS11 Beta
in HTML/XML files, VS automatically creates closing tags for opening tags that you type. You can turn this off by going to Tools | Options | Text Editor | HTML | Formatting | Auto insert close tag.
Visual Studio – Snippets
Snippet functionality in VS is robust for certain. If it lacks anything, it’s ease of use and even that’s subjective. The process is to create a code snippet file – that is an XML file with a .snippet extension, drop it in the My Code Snippets folder, and then go to town with it. I obviously skipped over some details though, so just look at the _Walkthro__ugh – Creating a Code Snippet _link below for more.
Snippet Designer
I would say that if you want to or have to (because maybe your employer is cheap and doesn’t want to spring for R# licenses) stick with native snippets, you should at least go get the Snippet Designer. It’s free, so if your employer doesn’t have a group policy against installing free tools, then go get it from the link below, and if they do then consider a new employer or send them my way and I’ll give them some financial justification with my 100 level economics that they won’t be able to argue against.
Snippet Designer is a free plug-in for Visual Studio that makes it easier to create and modify your code snippets. One of the best features is the ability to just highlight a block of code you’ve already written by conventional means, right click it, and choose to turn it into a snippet.
You can create or edit a snippet in Snippet Designer by either opening a .snippet file or by choosing New File in Visual Studio. It uses a custom editor in VS so you can stay in the same environment. Behind the scenes, Snippet Designer is just editing the snippet XML.
The bummer is that Snippet Designer doesn’t work in VS11 yet. Sheesh, you’d think we’re still in beta or something!
ReSharper – Live Templates
R# extends and enhances the Snippets in VS. If you allow R# to handle your IntelliSense (recommended), then you get the best of bot world – VS snippets and R# templates.
The two biggest advantages to R# templates over VS snippets are:
- the “macros” you can attach to place holders in templates and
- the ease with which you can save your templates in the solution (for you only), in the solution (for everyone that uses the solution), or on your computer (to be used across multiple solutions)
For in-depth help with templates see ReSharper Templates in ReSharper’s online documentation.
Resources
Walkthrough- Creating a Code Snippet
Best Practices for Using Code Snippets
Visual Studio 11 Ninja Skills
This post is taken from a local presentation I did on April 2, or rather my presentation was taken from this post. One or the other is true, and so is the other.
As developers, we all aspire to be proverbial ninjas and we all love our tooling. If you don’t fit in those categories, then ask yourself whether you’re a developer or just on your way to project management.
This post and presentation are going to be highly distilled [I’m a big whisky fan]. In the distillation process, a mixture containing alcohol is heated until the pure alcohol turns to gas, rises, and is captured. I consider technology distillation a huge part of my job, so let’s boil out the pure essence and capture it. In fact, I’ll use the word essence or essential quite a lot.
I’ll walk you first through some essential Windows keyboard shortcuts that no power user in my opinion can live without. Then I’ll take you on a highlighted walk through Visual Studio 11 (Beta) – again, just the essence. And finally, I’ll do the same thing with ReSharper 7 (EAP) from JetBrains.
Essential Windows Shortcuts
First, I’m going to share with you some essential Windows shortcuts. These are the ones that I think you must have in your pocket. Even if you’re a Visual Studio rock star, if you don’t have these Windows shortcuts, you’re inhibited.
[WIN + SHIFT + LEFT/RIGHT] Move current window to an alternate monitor
[WIN + LEFT/RIGHT] Move current window to left/right half of the current screen
[WIN + 0-9] Launch the corresponding application from your task bar or switch to or flip through instances of the application
[WIN + SHIFT + 0-9] Launch a new instance of the corresponding application
[WIN + ALT + 0-9] Reveal the context menu and jump list for the corresponding application
[MIDDLE MOUSE (WHEEL) CLICK] Close a tab or launch a hyperlink in new tab. The tab close functionality becomes very handy and is supported in most tabbed applications.
[WIN + C] (Windows 8) Opens the Charms bar on the right allowing you to search, share, etc. There are many Windows 8 shortcuts for doing each of the functions in the Charms bar, but if you remember this one shortcut you can access most all of them.
See – essence – you don’t need to be overwhelmed with shortcut keys. You only need a few and you should have some pretty good window management skills. You can launch Visual Studio or launch a second instance of Visual Studio or launch the jump list for your Windows Explorer application so you can choose your development folder with all your projects. Okay, let’s move on.
Practice the keyboard shortcuts in this post. Actually practice them. You’re naturally blind to your own areas of poor keyboarding skills and productivity. Practice will reveal and improve them and save you time and real money.
First… what’s new in Visual Studio 11 (link)
There’s a lot of information about this already out on the web, so I’ll just offer highlights and some consolidation via links. Here are the biggest and most relevant features IMHO:
- HTML, CSS, and JS editor improvements
- Windows Metro Style Apps
- Design in Execution/Interactive Mode in Blend
- Windows 8 Simulator and DOM Explorer
- Page Inspector
Some of those links to go training courses on MSDN… not documentation… training courses. In my experience, it’s easy to read documentation, but you take home a lot more of the information if you take the time to walk through a tutorial or a lab or a training course.
You can find more VS11 training courses here.
Visual Studio Navigation
[CTRL + ALT + L] Open the Solution Explorer – face it, you need to get to that Solution Explorer rather often. Do it with a keystroke instead of a click.
[CTRL + ,] Navigate To… – the grand daddy of all keyboard shortcuts in VS if I can be so bold. Looking for something in your solution? You’ll likely find it here. Navigate to searches for all code symbols and file names and it uses a “contains” string search pattern and camel case. So CTRL + , and then “WL” will find you the WriteLine method you were looking for as well as the WLFoo.cs file.
[CTRL + ;] Search Solution Explorer – filters the files and symbols that appear in Solution explorer by your query. It should be called Filter Solution Explorer because it doesn’t take you off to some search results. It just hides everything from SE that doesn’t match your query.
[CTRL + Q] Quick Launch – if you’re looking for a command that you know is somewhere in the vast see of commands in the Tools | Options dialog, try CTRL + Q. Try “line numbers” for example.
[CTRL + F] Find – this one grew up from the incremental search that jumped you directly to the next query result on your current page. Now it’s all grown up and can do just about everything that the Find in Files dialog does. The only exception is that CTRL + F always just highlights and navigates you to your results, whereas (see next shortcut)…
[CTRL + SHIFT + F] Find in Files – …as I was saying. Whereas Find in Files actually gives you your results in the Find Results pane.
[CTRL + SHIFT + UP/DOWN] Find more instances in file – another winner in my book. This is an easy one to type. Use it when your mind says, “I wonder where else on the page I used this variable.” I like that it not only finds the other symbols for you, but it highlights them as well.
[F8 / SHIFT + F8] Find next search result, error, reference, etc. – it’s slow to mouse down to the find results or to your build errors and double click on each one. Instead just hit F8 and blaze through them. Use F8 to back up when you miss your exit (don’t try this on the interstate).
[CTRL + - / CTRL + SHIFT + -] Navigate back and forward – “Where was that code? I was just looking at it.”
Editing
[SHIFT + ALT + ENTER] Full screen – don’t forget this one. Now you can set up all of the supporting windows you want in VS, and when you want them all to go away so you can concentrate on your code, BAM!
[SHIFT + ALT + ARROWS] Block editing – this one never fails to surprise a few near-ninjas. I think it’s because they say, “Oh yeah, I know what block highlighting is, “ and they miss the latest greatest part. Not only can you hold ALT and select a block of text (to delete it for instance), but try this. Try just putting your cursor at the beginning of a line, holding SHIFT and ALT, and then pressing the down arrow a few times. Your cursor extends down. Now type. You can type on all of the lines at once. This works in the middle of a block of code too. You can paste something into there from the clipboard too.
[CTRL + SHIFT + V] Paste from clipboard ring – copy something, copy something else, copy something else. In most of Windows, your first and second somethings are gone – replaced by the last thing you copied right? Not so in VS. Now hit CTRL + SHIFT + V three times and you’ll see how this one works.
[CTRL + SHIFT + L] Delete current line – I have seen developers use all kinds of antics to delete an entire line. Most are quite a waste of precious seconds and some are downright silly. CTRL + SHIFT + L does it in a snap regardless of where on the line(s) your cursor happens to be. See the next shortcut for a follow on.
[SHIFT + DEL] Cut current line – this one is like the former except it’s FAR easier to reach on the keyboard and it puts the deleted line(s) on the clipboard. I changed this shortcut to do the same as CTRL + SHIFT + L.
ReSharper (aka R#)
The Uber Essential
[CTRL + SHIFT + R] Refactor this – this one is used for all kinds of stuff. You can extract a method, inline variables, or convert a method to a property. Spend some time placing your cursor on methods, properties, classes, etc. and hit this shortcut to bring up a list of all of the possible ways to refactor it.
[ALT + ENTER] Quick Fix – when R# has highlighted something either with a squiggly underline or by some other means and you have placed your cursor on it, hitting ALT + ENTER brings up the quick fix menu which is the recommended way to resolve the issue. Choosing the recommendation obviously puts it into effect.
[ALT + ` ] Navigate To – this is R#’s version of Navigate To (unlike VS’s CTRL + ,) This one navigates to symbols related to one one you’re on. If you’re on a class and hit this, you will have the option to navigate to its base type or derived types for instance. Most or all of the options in the list have a shortcut of their own, but if you can remember this one shortcut for navigating then you can get to any of them.
The Merely Essential
[ALT + PGUP/PGDN] Go to previous / next highlight - when R# suggests things, it draws a colored marker in the small bar that is rendered just right of your scroll bar. Each of these is a highlight. You can configure what sorts of things appear here and what their severity is. This shortcut jumps from one to the next or previous. Using ALT + PGDN and ALT + ENTER is a really fast way to go through all of the issues in your page and correct or ignore them.
[CTRL + SHIFT + ENTER] Complete Statement (aka Smart Enter) – this one is useful when you know you’re done with your line of code, but you haven’t yet typed all of the smiles and mustaches or the closing semicolon. It enters all of these for you and returns to the next line.
[CTRL + R, R] Rename – this one is available under the CTRL + SHIFT + R menu as well. It’s similar to Visual Studio’s built in ability to smart rename, but it goes a bit further and it’s really good at suggesting symbol names. It’s even able to find references to the symbol you’re renaming in code comments and ask you if you want them to be changes as well.
[ALT + INS] Insert code – depending on your context this shortcut inserts code for you. If you’re in a class and you hit it for instance, one of the options will be to insert a constructor for that class. The dialog boxes that pop up are full of great options, but you can also blaze by them to elect for default functionality.
Navigation
[CTRL + T, CTRL + SHIFT + T, SHIFT + ALT + T] Go to Type, File, Symbol – I mention it here because it has it’s place, but I like VS’s built in [CTRL + ,] better than these. It’s hard to remember whether what I’m looking for is a filename or a symbol and hard to remember which shortcut to use. The pause to remember is too much for me and I usually go for the comma.
[SHIFT + ALT + L] Locate in Solution Explorer – this is a wonderful shortcut that accompanies [CTRL + ALT + L] which is the VS native shortcut to focus on your Solution Explorer. This one locates the current file in the Solution Explorer though. There is an option to always have the Solution Explorer track which file you’re on, but this is disorienting to me and I’d rather just jump to it when I want it. I use this one all the time.
[ALT + DOWN/UP] Go to next/previous member – great for when you’re just getting the lay of the land, this one allows you to jump one method at a time sort of like how the CTRL key jumps by one word at a time. It’s faster than reaching for the scroll wheel in most cases.
[ALT + HOME / END] Go to Base / Derived Types – use this to traverse the inheritance tree in both directions. If you’re headed down the tree and there are multiple derived types then a quick menu pops up and lets you pick which one you’re interested in. This is very fast and helpful.
[SHIFT + ALT + F12] Go to Usage – this appears to duplicate the functionality of the VS native SHIFT + F12 command which finds references, but there are some strong differences. First, it’s finding usages instead of references which plays great with TDD (Test Driven Development). This means that if I’ve used a type somewhere then it will appear even if I haven’t defined that type yet. Another strong difference is that the results appear in a context menu instead of in the Find References pane of VS making it much faster to choose your target.
Editing
[CTRL + ALT + LEFT/RIGHT] Extend/Shrink Selection – I’d love to buy a beer for the guy that made this one. Selecting text with the mouse is one of the slowest things I see developers do. Using the CTRL and SHIFT keys is much quicker, but even that will cause significant delays. Wherever the cursor is, if I “extend” the selection, it will modify the selection to the next logical level. Perhaps something like: the variable, the statements right side, the entire statement, the entire method body the statement is in, the entire method including declaration, etc. And of course “shrinking” does the converse. This in combination with some quick CTRL + X, CTRL + C, CTRL + V (tell me you know those ones!!) makes for some lightning fast editing.
[CTRL + SHIFT + ALT + UP/DOWN] Move code up/down – holding down the whole suite of modifier keys (CTRL, SHIFT , and ALT) might require a few fingers, but remember – the mouse takes your whole hand! Combine them with an up, down, left, or right, and you can move the selected code around on the screen in a very intelligent way. You’ll have to try it to see what I mean.
That’s all for now. There are a billion more, but this is just the essence. Practice and advance beyond your samurai skills to full on ninja!