
Insert Formatted Code into OneNote
If you haven’t started using OneNote, you might want to consider it. You can create a notebook a free instance of SkyDrive and it makes note taking, collaboration, and sharing all very easy. The part I couldn’t live without is my ability to just hit [WIN + N] from anywhere in Windows and instantly get a new note. I don’t have to worry about saving it either. By default, it lands in my Unfiled Notes (in my SkyDrive notebook). I can move it to another location later for more organization if I want to, but honestly the searching in OneNote is so good, that I usually don’t bother. As long as I give it a good title, I’m always able to find it later. Actually, even if you paste images into your note, the indexer recognizes the text in your image and will even search on that!
On my Windows Phone 7, I can do the same thing. I pin a “New Note” tile to my start page and I can just hit that to create an unfiled note. The great thing is that both notes land in the same place… on my SkyDrive. So if I jot a note from the field, it’s available to me in Windows on my laptop later. Nice.
But I’m a software developer and I write a lot of code. Sometimes I just jot down little pieces of code. So I went looking for a syntax highlighter that worked in OneNote. I found it. It’s called NoteHighLight and it’s on CodePlex (here). The installer is in an asian font, so it was a blind install for me, but just choosing the default button on each page of the install wizard worked fine.
It installs into OneNote as its own tab. I decided I’d rather have it in the Insert menu, so I customized it like this…

Hitting Insert and then choosing one of these will get you a dialog like the following…
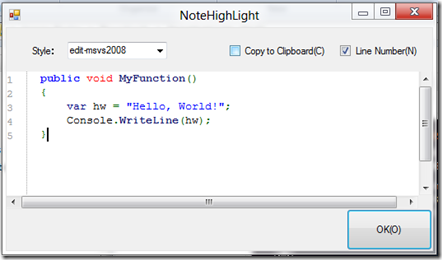
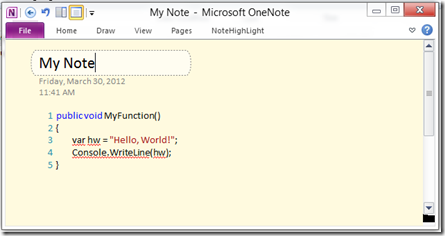
…and give you a nice way of typing or pasting in your code, and after completion, you’ll have something like this…
Happy note taking!
Creating a Timer in Windows 8 (C#)
Ready for the shortest blog post in history?
Looking for a time in Windows 8? Look no further. Just drop this code into the App constructor on the App.xaml.cs page…
var d = new DispatcherTimer(); |
Now go take a look at Visual Studio’s Output pane and watch it tick.
So Many Ways to Search in Visual Studio 11
There’s more than one way to skin a cat and more than one way to do a search in Visual Studio. There are 5 (that I know of, comment if you know of another) to be precise.
Navigate To (CTRL + ,)
Search for a file, object, object member, etc. anywhere in your project. For instance, if you know that you have something in your app called Widget, but it’s just too much to think about where exactly you put it, then just hit CTRL + , and type “widget” and you’ll get results for the class itself along with any other members with the word widget and any object members.
Search in Solution (CTRL + ;)
This one is new to VS11 (actually, you may have used it with the Productivity Power Tools in VS2010) and allows you to filter your Solution Explorer to show only files that match your query. It’s especially helpful in my opinion for filtering out anything except for a certain file type. Querying for “.js” for instance will get rid of anything except for JavaScript files.
Quick Launch (CTRL + Q)
This one was in previous releases of Visual Studio, but it wasn’t as prominent and was often overlooked. I use Quick Launch to quickly find that option that’s buried somewhere in Tools | Options but I know it’s going to take me about 4 minutes and 25 seconds to find exactly where. Take line numbers for instance. Now why line numbers are not turned on my default is absolutely beyond me, but turning them in used to be an arduous process on a normal day and all but impossible at the end of the day, or on Monday, or before coffee, or with a slight headache. Now you just hit CTRL + Q and type “line numbers” and you’re in good shape.
Find (CTRL + F)
Also introduced with Productivity Power Tools and then brought native into VS11, Find is best used for finding text in the current file (although it will search multiple files as well). It’s a quick way to search and has the added benefit of highlighting all results for you.
Find in Files (CTRL + SHIFT + F)
Although able to search only in the context of the current document, this command is most often used for finding files across the solution or project. I like to dock this dialog in the lower right pane with Properties so that I always know where it’s going to be and I can keep it up across multiple searches.
ReSharper 7 EAP in Visual Studio 11
I used to think that Visual Studio had an incredible set of keyboard shortcuts and productivity features. Then I installed ReSharper. Now a vanilla install of Visual Studio feels a bit vanilla.
Sure all of the refactorings are awesome, but what I end up missing when I’m missing R# is the little stuff. It’s the extend and shrink selection (Ctrl + Alt + Right Arrow/Left Arrow). It’s the next and previous member (Alt + Up/Down Arrow).
With R# 7 EAP, as with the Windows 8 Consumer Preview, I installed it the same day it was available. I was thrilled at first too – ready to blaze through my Windows 8 projects at the speed of sharp. But I discovered shortly that my IntelliSense was not working. For JavaScript behind Metro apps, I got an IntelliSense menu, but the entries were all wrong. And an acquaintance had the same issue. This was a deal breaker and I sadly uninstalled R# from my machine.
Today I tried again and low and behold everything works! So my mood swing is back at its acme and I’m ready to blaze through the code again.
Here’s the link to the EAP: http://bit.ly/resharper7eap
Metro on an Alternate Monitor?!
You know those sonic noise guns that you can shoot at people and they supposedly just stop in their tracks because it’s physically disorienting? I felt like I got hit with one when I ran across this little nugget.
Want to move your Metro experience from your primary monitor to another screen - say your second (or fourth) monitor or even to the projector for a show? I’ve been told that the start menu appears on the primary monitor (without resorting to the simulator). Period. But that’s not the case! look up thank God
If you press WIN + PGUP/PGDN, you can change which monitor the start menu and all Metro apps appears on. Now that’s awesome! Until now, I was resorting to the simulator for getting my icons on my second monitor or projector to show people. News must spread. Tell everyone.
Completed the Move - WordPress to BlogEngine.NET
EDIT (2014-07): Since writing this, I’ve since ditched this system and upgraded again. See this post to find where codefoster.com is at from a technical standpoint.
EDIT (2016-12): Well, I’ve done it again. Now I’m using Hexo.io - the Node.js static site generator.
I’ve done it. I’ve moved off of WordPress. I’m not sure what it is I didn’t like about WordPress, but I just didn’t. It’s not that they’re too big… shoot, I work at Microsoft. It’s not that their blogging solution doesn’t work because it definitely does. I guess I just felt like I was in a machine. I like to feel free.
I don’t like to feel like any second I’m going to get hit with another $12/yr charge because I want to add such-and-such feature.
I’m using BlogEngine.NET now and it has thrilled me so far. It plugged in easily to my own self-hosted site and seems to have the perfect set of features. Now I feel like I can customize all I want. I feel free.
navigator.js
If you create a blank JavaScript application in Windows 8, you get just that – a blank application. You don’t get page references to the WinJS library, you don’t get a grid or a list or any other navigation structure, and you don’t get the navigation code to implement the Microsoft recommended navigation method – single page navigation.
If you want to implement navigation, you can obviously just create a new application from the Navigation Appliction template (built-in), but if you’re like me, it’s nice to add in all of a given piece of functionality from scratch for understanding’s sake.
Follow these steps to add navigation to a blank application. And I encourage you to actually type all of the code instead of just copying and pasting. If you type it, your brain will pick it up better.
- In Visual Studio 11, create a new Blank Application using JavaScript
- Add an html folder at the root of your project
- Right click on the html folder and Add | New Item…
- Choose Page Control and call your new item page1.html
Note: You’ll see that you got your new .html file as well as a .css and a .js - Drag the .css file into the css folder and the .js file into the js folder
- Modify the css link reference and js script reference on your html file changing “page1.js” to “/js/page1.js” and “/css/page1.css”
- Grab a copy of navigator.js from any other sample app or template app. You can create a throw-away project from the Navigator Application to get a copy of this file if necessary.
- Modify the navigator.js file changing the name of the namespace to the project name of your application. For instance…
WinJS.Namespace.define("YourProjectName", { ...
- Add a reference to the navigator.js file into the default.html file
- Add a PageControlNavigator to the body of the default.html file like the following…
<span style="background: white; color: black;">    </span><span style="background: white; color: blue;"><</span><span style="background: white; color: maroon;">div </span><span style="background: white; color: red;">id</span><span style="background: white; color: blue;">="contenthost"
		</span><span style="background: white; color: red;">data-win-control</span><span style="background: white; color: blue;">="Application2.PageControlNavigator"
		</span><span style="background: white; color: red;">data-win-options</span><span style="background: white; color: blue;">="{ home: '/html/page1.html' }"></</span><span style="background: white; color: maroon;">div</span><span style="background: white; color: blue;">></span>

Note: the `data-win-control` makes this an official WinJS control. The data-win-options "home" property tells this control which page to start with and which page to return to when the user elects through the navigator to go home.
Learning a new environment or framework or object model always takes some time and exposure, so take some time, exposure yourself to tasks like this, and have fun.
Get Your Meetup Calendar on Your Windows Phone
This may be obvious to many, but as we all know what’s obvious to one is not necessarily obvious to a billion others. So we may as well throw it out on a blog for the betterment of mankind. Actually, that may be a lofty expectation for my next tip, but here goes.
If you use an internet site like Meetup or Facebook to manage calendar appointments and you want to see those events on your Windows Phone, do it like this.
- Go to calendar.live.com and log in with your Live account. If you don’t have a Live account, you can obviously get a free one and hopefully you know that this doesn’t mean you have to get a
@live.comor@hotmail.comemail address. Even if your email is george@joescrabshack.com, you can sign up for an email address. - Now click subscribe on the top
- Keep
Subscribe to a public calendarselected - Now go get the URL to the .ics file published by your site and paste it into the Calendar URL
- Give it a name
- Choose a color and a charm if you’d like
- Click Subscribe to calendar
Now you can see this calendar on your Windows Phone if you go to the calendar settings.
This is making my life a lot easier. I hope it enriches yours as well.
App Accelerator Resources
To everyone who joined @mjconnection and I (@codefoster) at the Windows 8 App Accelerator the last 3 days, thanks for bringing all the energy, questions, and app ideas! I know I had a great time.
I promised everyone that I would provide a list of resources that we brought up in class. If you think of any more that I missed, feel free to leave it in a comment and I’ll merge it into this list.
Keep me posted on the progress of your apps!
Metro Tile Sources
The Noun Project - this is a great collection of icons that represent things… you know… nouns
Icon Finder - find icons on the web and get either the PNG or the ICO file
Icons8.com - a cache of free glyphs that work well with Windows 8 Metro style tiles and art
The XAML Project - more
SyncFusion Metro Studio - more
http://raphaeljs.com/icons/ (broken)
Visual Studio Add-Ins
Debugger Canvas - use this to visualize your code and your call stack while you’re debugging. It even supports visualization of multi-threaded stacks and recursive functions.
Bug Aid - some more great help visualizing C# entities while you’re debugging
ReSharper 7 EAP - perhaps the biggest source of developer joy you can ask for
Art Tools
Inkscape.com - this is an awesome vector based graphics tool. If you’re still using a bitmap based image editing tool for generating app art, you should stop in your tracks and learn to use vector.
Kuler - a color palette picker.
ColourLovers.com - again
colorschemedesigner.com - again
App Stats
None of these support Windows 8 yet of course, but they were mentioned in class so I thought I should include them…
Other
All About Scope
Abstract
It may not be clear immediately how variable scopes work when you’re creating a Windows 8 app using HTML and JavaScript. Even if you’re very proficient at writing JavaScript code, you might not know where you’re supposed to write it! Let me take a stab at clarifying…
When you first look at a JavaScript page in a Windows 8 project you see something like this…
(function (){ |
…and what you’re seeing is kind of a cool little trick that’s not new to a seasoned JS scripter. Notice that what you have is a function wrapped in parenthesis and followed by what I like to affectionately call a football - that’s the empty parenthesis [()] that we developers hardly notice anymore. To make it a little bit more clear…
(function () { ... })(); |
So it’s a function that is defined AND called. But why? I’ll tell you.
It’s because when you declare things in a function, they are scoped to the function. They are visible and available within the function but not beyond. The code you write in this function is not available globally, and that’s a good thing. Windows 8 apps may get pretty big and namespace conflicts would be likely. If you declare the variable foo in more than one place but each globally, then they will start conflicting and causing some runtime errors that would be very difficult to debug.
So where should we declare our variables so that we have access to data but only in the scope we need? I’m glad you asked. Let’s look at the scopes available to us and what they might be used for.
Global Scope
Variables are said to be in global scope when they are defined outside of any function definition. Unlike C++, JavaScript does not support simple block quoting (blocks of code are surrounded by mustaches { }). This code snippet should make this clear…
(function () { |
Some developers would argue that global scope should never be used, but I think there’s a time and place for almost anything and that goes for global scope. At the end of the day, you as the developer are responsible for making sure that your app works and that defects are not introduced because of globally scoped variables.
Page Scope
I’m using the term page scope to refer to the variables that are defined in the wrapper function that you’ll find on the Windows 8 code behind JavaScript file – the myPage.js file behind your myPage.html.
The interesting thing to note is that these page scope variables are not even available on the HTML page itself. If you define a variable in your JS file and then attempt to access it from a script block on your HTML file, it will be “undefined”. Remember, that what happens in a function… stays in a function.
So, the page scope function is essentially all of the code that you want to run when your page is loaded, and it includes some cool tricks to allow you to specify functions that will run when your page is “ready” or when the layout is changed (when Joe User turns his tablet sideways).
So what if you want to write a function and then you want to call that function from your page (say when a button is clicked)? That’s where you use namespace scope - another term I’ll take ownership of – patent pending.
Namespace Scope
If you’ve determined that you want to be a good citizen and avoid global scope, but you want to actually use some of the brilliant code you’ve written in your page’s JS file, then defining your code in a WinJS namespace is a great way to do it.
Check out the following definition…
WinJS.Namespace.define("ordersPage", { |
Let me unpack that for you. Namespaces don’t exist in JavaScript proper, but we’re using WinJS here. Remember, WinJS is just a JavaScript library that Microsoft wrote that plays very well with Windows 8. After you use the above code to define a namespace, your namespace is available for you globally. So whether it be from your HTML page, from your JS file, from another HTML page, or from anywhere in your app really, you’ll be able to call your function like this…
ordersPage.calculateTotal() |
Now we’re cooking with Crisco! Now we are good citizens and we have the ability to architect our application in a way that is consistent and sensible and logical.
Conclusion
Now you know where your code should go when you’re writing a Windows 8 app to make sure it’s available where you need it and no further.
Make sure you follow me on Twitter (@codefoster) if you want more tips and tricks with Windows 8 as well as other musings that at least I would consider pertinent and helpful. Happy coding.