Posts tagged with "api"
The World's Quickest API
Sometimes you just need a quick API. Am I right?
I was working on a project recently and needed just that. I needed an API, and I didn’t want to spend a lot of time on it.
One of my strategies for doing this in days of old was to write up some code-first C# entities, reverse engineer the code to create an Entity Framework model, and serve it using OData. It was great and all that stuff is still around… still supported… still getting improved and released, so you could go that way, but that’s not how I made my last “instant API”.
My last one was even easier.
I found a node package called json-server that takes a JSON file and turns it into an API. Done. Period. End of story. A few minutes composing a JSON file if you don’t have one already and then a few lines of code to turn it into an API.
I also often use a node package called localtunnel that opens a local port up to the internet. Now I spend a few minutes writing a JSON file and 20 seconds opening a port and I have myself an API that I can share with the world.
For example. Let’s say I want to write an app for dog walkers.
Here’s some dog data…
{ |
Now let’s turn that into an API stat! I’m going to be thorough with my instructions in case you are new to things like this.
I’ll assume you have Node.js installed.
Create yourself a new folder, navigate to it, and run npm init -y. That creates you a package.json file. Then run touch index.js to create a file to start writing code in.
Now install json-server by running npm i json-server
The
iis short forinstall. As of npm version 5, the--saveargument is not necessary to add this new dependency to thepackage.jsonfile. That happens by default.
Finally, launch that project in your IDE of choice. Mine is VS Code, so I would launch this new project by running code .
Edit the index.js file and add the following code…
const jsonServer = require('json-server') |
Let me describe what’s going on in those few lines of code.
The first line brings in our json-server package.
The second line creates a new server much like you would do if you were using Express.
Lines 3 and 4 inject some middleware, and the rest spins up the server on port 1337.
Note that line 4 points to data.json. This is where your data goes. You can make this simpler by simply specifying a JavaScript object there like this…
server.use(jsonServer.router({dogs: {name"Rover"}})) |
But I discovered that if you use this method, then the data is simply kept in memory and changes are not persisted to a file. If you specify a JSON file, then that file is actually updated with changes and persisted for subsequent runs of the process.
So that’s pretty much all there is to it. You run that using node . and you get a note that the API is running on 1337. Then you can use CURL or Postman or simply your browser to start requesting data with REST calls.
Use http://localhost:1337/dogs to get a list of all dogs.
Use http://localhost:1337/dogs/1 to fetch just the first dog.
Or to create a new dog, use CURL with something like curl localhost:1337/dogs -X POST -d '{ "id":4, "name":"Bob", ...}
Now you have a new API running on localhost, but what if you want to tell the world about it. Or what if you are working on a project with a few developer friends and you want them to have access. You could push your project to the cloud and then point them there, but even easier is to just point them to your machine using a tunneler like ngrok or Local Tunnel. I usually use the latter just because it’s free and easy.
To install Local Tunnel, run npm i -g localtunnel.
To open up port 1337 to the world use lt -p 1337 -s dogsapi and then point your developer friend that’s working on the UI to fetch dogs using http://dogsapi.localtunnel.me/dogs.
Be kind though. You set your API up in about 4 minutes and your UI dev probably hasn’t gotten XCode running yet. :)
docs.microsoft.com
News flash. Microsoft is a big company.
It’s people big. I have hundreds of thousands of colleagues.
It’s geography big. We have offices, cloud datacenters and regions, and products around the globe.
It’s facility big. We have many campuses and hundreds of buildings here in the Pacific Northwest and more around the world.
It’s also products and services big. We have hundreds of products, services, platforms, libraries, frameworks, and hardware products by which we attempt to fulfill our mission statement to empower every person and every organization on the planet to achieve more.
As a developer, I think of Microsoft as an ecosystem, and it is increasingly an open ecosystem that provides essential developer tools without locking in the people that are building things. We all hate vendor lock-in.
Sometimes when you’re using a single product, a service, or a framework, it’s easy to get confused or overwhelmed when there are multiple entry points into the documentation, and when you’re talking about a developer ecosystem it’s even worse.
If you’re a developer, then, I want you to know that there’s…
** ONE LINK TO RULE THEM ALL **
…there’s docs.microsoft.com
Here’s what that looks like in your browser…
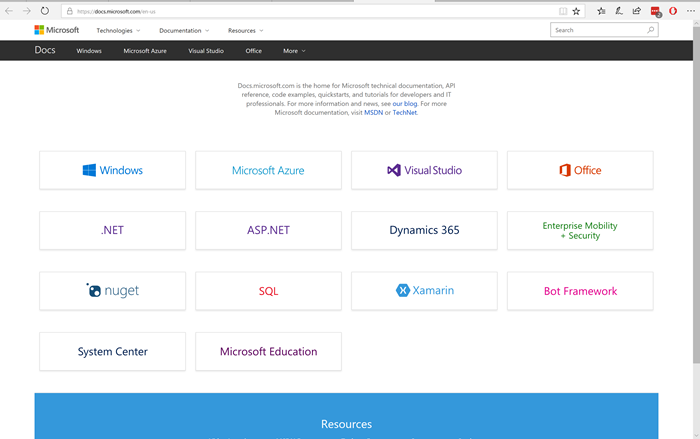
This site is the home for Microsoft technical documentation, API reference, code examples, quickstarts, and tutorials for developers and IT professionals, and it is your single entry point for learning how to consume an Azure service, install Visual Studio, build a Docker image for a .NET Core Application, use the Node.js Driver for SQL Server, interact programmatically with your Azure bill, and loads more.
Are you looking for the Azure Application Architecture Guide. Look no further.
Do you want to get started building a bot? Have at it.
Need the skinny on Authenticating Users with Forms Authentication using Visual Basic? Uh… okay… there you go.
In the past, you may have visited MSDN or TechNet to get the lowdown on how to do what, but going forward, it’s all migrating to Docs.
You should take note too that many of the documentation pages have a header like the following with a date, an indication of average time to read (super helpful), and a list of contributors…
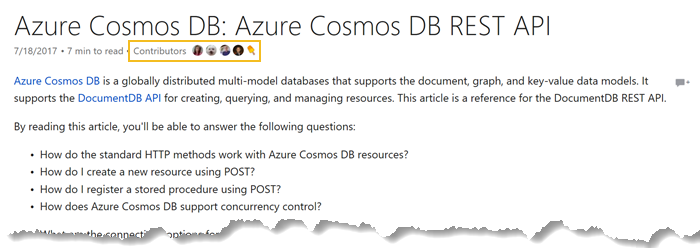
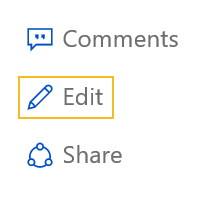
So Microsoft’s documentation, like code itself, is a collaborative effort - an open source project - and in many cases you’re encouraged to contribute! Just look for an Edit link like this one, and you’ll be whisked away to the GitHub repo where you can fork and PR.
Finally, have a glance at the Docs team’s blog to see what’s new. For instance, did you know there’s a new PowerShell Module Browser? Yeah, I didn’t either.
Have fun.
The Regatta Project
My role at Microsoft is that of an evangelist, and that implies that we speak broadly to audiences about technology. Recently, however, my team is working one-on-one with organizations on exciting new Microsoft technologies - making sure they’re exactly what developers need.
One of the projects I’ve been working on recently is called Regatta championed by Baiyin Zhou (@baiyinvc) from Boston.
This entire idea is super fun. Imagine exercising on a rowing machine in a studio in a group session. Now imagine a visual on the wall depicting your rowing machine and those of the other session participants as real boats. As you heave and ho, you see your little boat moving across the screen.
There are just so many awesome scenarios that are possible at this point.
The visual of the boats alone is encouragement for you to work harder to compete against others in the class. But that’s pretty obvious isn’t it. What about the less obvious scenarios? What about being able to add in a phantom boat that represents the group’s average from yesterday’s workout? Now you’re not competing against your fellow rowers - you’re competing with them. You have to beat that phantom boat!
As soon as things in the real world - like our efforts to stay in shape - are digitized and turned into data, we get to do things like capture our progress, integrate with other fitness tracker systems, or even do data analysis to determine some deep learning from it.
This is the type of concept where digital systems really have an opportunity to affect our lives for the better. I keep saying that technology is not so interesting unless it improves our lives. For being such a technophile, I’m actually quite the skeptic, because all too often technology just gets in the way.
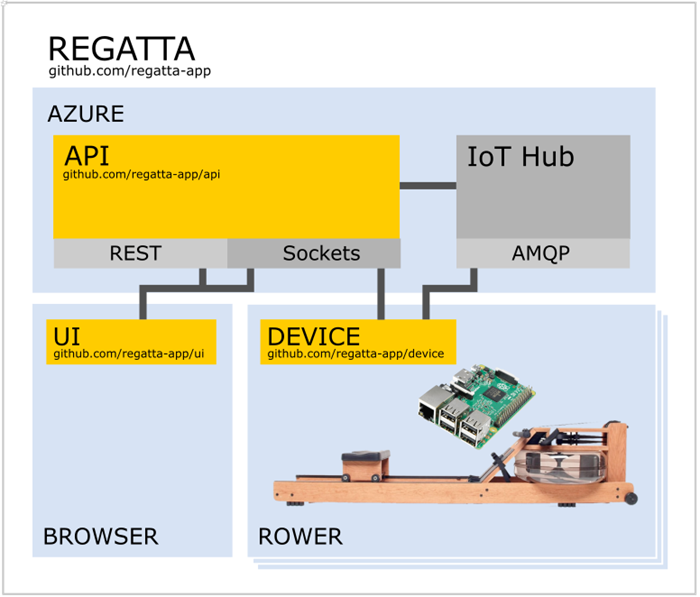
The Regatta Project envisions a future with a whole lot of rowing machines deployed with smart devices (the Raspberry Pi Zero at this point) attached to them, and assuring good communication with all of these devices is a great job for Azure IoT Hub.
Go check out the details of the [Regatta](https://microsoft.github.io/techcasestudies/iot/2016/12/10/regatta.html) project and let me know what you think with a comment below.
Building Things Using Fusion 360 and JavaScript
I like making things.
I used to mostly just make things that show up on the computer screen - software things. Lately, however, I’ve been re-inspired to make real things. Things out of wood and things out of plastic and metal and fabric and string.
The way I see it, we design things either manually or generatively.
By manual I mean that I conceive an idea then design and build it step by step. I - the human - am involved every step of the process. Imperative code is manual. Here’s some pseudocode to describe what I’m talking about…
// step 1 |
See what I mean?
I’m not arguing that this sort of code and likewise this sort of technique for building is not essential. It is. I am, however, going to propose that it’s often not altogether exciting or inspiring. The reason, IMO, is that the entire process is no greater than the individual or organization that implements it. An individual only has so many hours in the day and is even limited in ideas. An organization can grow rather large and put far more time and effort into a problem and obviously generate more extensive results. But the results are always linearly related to the effort input - not so exciting.
By generative I mean that instead of creating a thing, I create rules to make a thing. The rules may be non-deterministic and the results completely unexpected - even from one run to another. The results often end up looking very much like what we find in nature - the fractal patterns in leaves, the propagation of waves on the water, or the absolute beauty of ice crystals up close.
What’s exciting is when an individual or organization puts their time and effort into defining rules instead of defining steps. That is, after all, the way our own brains work, and in fact, that’s the way the rest of nature works too. It’s amazing and awesome and I would venture to say it’s even miraculous.
I think a lot of my ideas on the matter parallel and perhaps stem from Stephen Wolfram’s book A New Kind of Science.

Most of the book is about cellular automata. The simple way to understand these guys is to think back to Conway’s Game of Life. The game is basically a grid of cells that each have a finite number of states - often times two states: black and white. Initially, the cells in the grid are seeded with a value and then iterations are put into place that may change the state of the cells according to some rules.
The result is way more interesting than the explanation. The cell grid appears to come to life. The fascinating part is that the behavior of the system is usually not what the author intended - it’s something emergent. The creator is responsible for a) creating an initial state and b) creating some rules. The system handles the rest. It usually takes a lot of trial and error if the intention is to create something that serves some certain purpose.
Check out Wikipedia’s page on cellular automata, and specifically look at Gosper’s Glider Gun.
I don’t know about you, but I find that completely awesome.
Okay, so when are you going to get to the point of the blog post, codefoster?
Calm down. It’s called build up. :)
First, let me say that generating graphics in either 2D or 3D is nothing conceptually new. What I like about discovering and learning an API for CAD software, though, is that I can not only generate something that targets the screen, I can generate something that targets the 3D printer or the laser cutter. That’s all sorts of awesome!
The example I’m going to show you now is a simple one that I hope will just get your gears turning. You could, by the way, take that literally and generate some gears and get them turning.
If you don’t have Fusion 360, go to fusion360.autodesk.com and download it. If you’re a hobbyist, maker, student, startup type you can get it for free.
If you’re new to the program, let me suggest the learning material on their website. It’s great.
After you install Fusion 360, the first thing you need to do is launch the program. This API is attended. It requires that you open the program and launch the scripts. I have suggested to the team at Autodesk to research and consider implementing unattended scenarios as well.
Now launch the Scripts and Add-ins… option from the File menu…
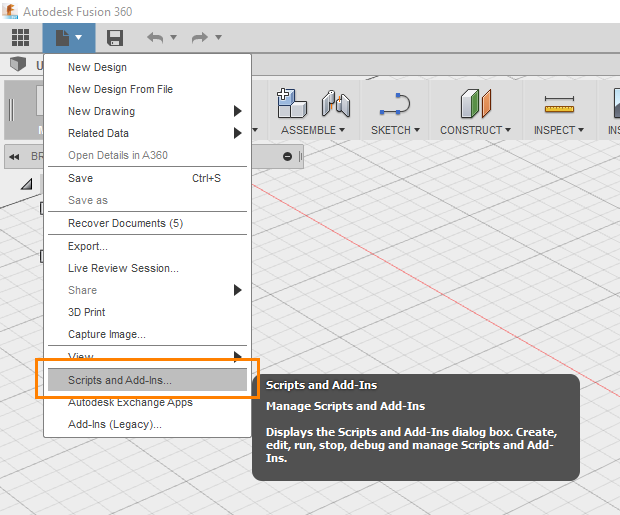
Don’t be confused by the Add-Ins (Legacy) option in the same File menu. That’s for an old system that you don’t want to use anymore.
That should launch the Scripts and Add-Ins dialog…
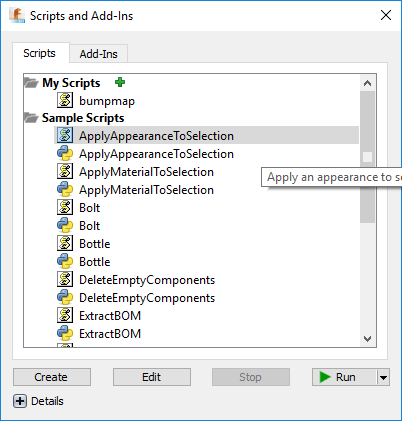
There are two tabs - Scripts and Add-Ins. They’re the same thing except that Add-Ins can be run automatically when Fusion 360 starts and can provide commands that the user can see in their UI and invoke by hitting buttons. Add-Ins ask you to implement an interface of methods that get called at certain times. If you simply click the Create button on the Add-Ins page, it will make you a sample with most of that worked out for you already.
Let’s focus on the Scripts tab for now.
You’ll see a number of sample scripts in there. Some of them will have the JavaScript icon…  …and others will have the Python icon…
The Fusion 360 API supports 3 languages: C++, Python, and JavaScript.
Above those, you’ll see the My Scripts area that contains any scripts you have written or imported.
It’s not entirely clear at first how this works. Let me explain. If you click Create at the bottom, you’ll get a new script written in a strange folder location. It’s good because it gives you the right files (a .js file, an .html file, and a .manifest), but it’s bad because it’s in such an awkward location. The best thing to do in my opinion is to hit create and get the sample code files and then move the files and their containing folder to wherever you keep your code. Then you can hit the little green plus and add code from wherever you want.
One more nuance of this dialog is that if you click the Edit button, Fusion 360 will launch an IDE of its choice. I think this is weird and should be configurable. If I edit a JavaScript file it launches Brackets. I don’t use Brackets. I use Visual Studio Code. It doesn’t end up being that much trouble, but it’s weird.
To edit my code, I just go to my command line to whatever directory I decided to put it in and I type…
code . |
That launches Code with this directory as the root. Here’s what I see…
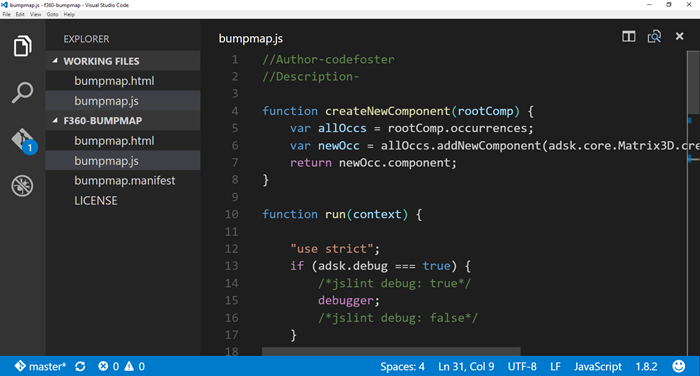
There you can see the .html, .js, and .manifest files.
I’m not going to take the screen real estate to walk you entirely through the code. You can see it all on GitHub. But I’ll attempt to show you what it’s doing at a high level.
Here’s the code…
<style type="text/css">.gist {width:700px ;} |
Let’s break that down some.
The createNewComponent function is just something I made. That’s not a special function the API is expecting or anything. The run function is, however, a special function. That’s the entry point.
Essentially, I’m creating a 20x20 grid, prompting the user to select a body, and then doing a 2D loop to copy the selected body. The position is all done using a transformation that shifts each body into place and then offsets it a certain amount in the Z direction. In this case, I’m just using a random number, but I could very well be feeding data in to this and doing something with more meaning.
Watch this short video as I create a cube and then invoke this script on it…
So, here is where you just have to sit back and stare at the ceiling and think about what’s possible - about all the things you could generate with code.
My example was a basic, linear iterator. Perhaps, however, you want to create something more organic - more generative?
Check out this example by Autodesk’s own Mike Aubry (@Michael_Aubry) where he uses Python code to persuade Fusion 360 to build a spiral using the API.

That has a bit more polish than my gray cubes!
If you build something, make sure you toss a picture my way on Twitter or something. I’d love to see it.
Getting Windows Device Info
I have plenty of experience in the C# space with accessing Windows API, but I’m still finding it rather novel and delightful to do the same thing in JavaScript. The fact that I can do something like…
Windows.Devices.Enumeration.DeviceInformation |
…is just slick. That’s all. There’s no interop’ing, no dll loading, no service calls. WinRT just delivers it to my front door and doesn’t even make me sign.
Recently, I went looking for how to enumerate the devices currently recognized by the system and found it to be quite nice and thought I’d share.
I started by creating a ListView and an item template in the HTML and imperatively binding that to a WinJS.Binding.List in my JavaScript file. In the interest of being DRY, I won’t walk through that process, but you can see the concept here.
With a ListView and a WinJS.Binding.List in place and with the two hooked together, we’re ready to just fetch our device information and push it into the List. I’ll just lay out all the JS code at once and then explain. Perhaps it will be self-explanatory.
Windows.Devices.Enumeration.DeviceInformation.findAllAsync().done(function (devices) { |
If you follow me much, you likely know that my code tends to be rather dense. I like using the horizontal space that God (and Visual Studio) gave me instead of wearing out my enter key and your scroll wheel. So there are a few things going on in this relatively short snippet.
First, I’m calling into Windows.Devices.Enumeration.DeviceInformation and calling findAllAsync(). That will asynchronously return all of the devices found on the system.
.done() is how we proceed with the results of an asynchronous call in case you haven’t seen that before, and we have a chance to capture the async payload (in this case a bunch of devices) by specifying a devices paramter.
Next, I’m calling a few array functions.
The filter function takes a lambda function and in this case I’m only concerned with devices that have a name and are enabled.
The distinct function is my own. If you want the code for that one, leave me a comment. It reduces the array to only those with unique entries, and it gives you an opportunity to specify what you mean by “unique$rdquo;. In this case, I’m saying that two devices are distinct if their name values are distinct.
Then I do a fancy forEach on the array. Notice how all of these array functions themselves return arrays making it convenient to chain functions together. The forEach function simply calls the provided function on each of the items in the list. No more (or far fewer at least) awkward for iterations. Yay!
In this forEach function, I’m doing another async call - this time to retrieve the Windows 8-style, super fancy glyph graphic to represent the device (hint: you can also call getThumbnailAsync() to get a boring, old-style, full color, supposedly realistic icon for each device.
When the call returns, I create an anonymous object shaped like the data that my template is expecting and push it into my WinJS.Binding.List. Just like that.
A little bit of CSS work later we have something that looks like this…
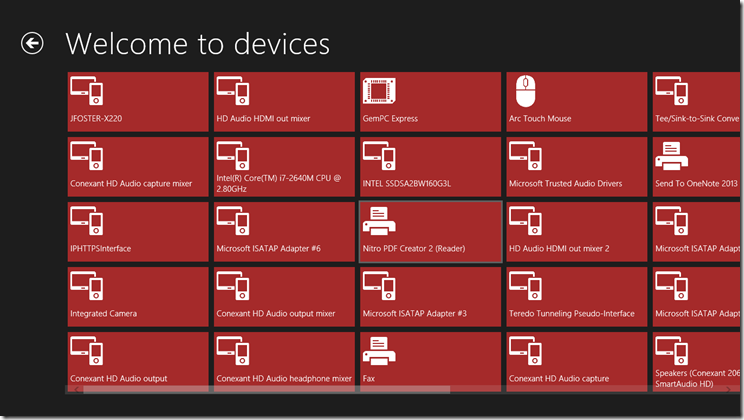
If you have any questions, just leave a comment and I’ll approve and respond as soon as I can.
Happy device enumerating!
