Posts tagged with "javascript"
Presentation at ASB
The topic of our conversation was encouragement to go beyond our inevitable role as digital consumers and aspiring to be digital producers first and foremost.
That means, we don’t just entertain ourselves with what others have created, but we get behind the paint brush, the hand saw, or the mouse and we create it ourselves. We use it to inspire others, to lead others, and ultimately to love others. That’s a charter.
First, we talked about making websites. You each got free Azure Passes, and I hope you’ll redeem them for some cloud time. We made a website in just a few seconds in class, and you can do the same thing from home.
To redeem your pass, go to microsoftazurepass.com and enter the code. Ignore the number on the left. The code starts with ‘M’.
Next, we looked at Touch Develop by visiting touchdevelop.com. You can go there any time from pretty much any device and make something awesome. When you’re done, publish it and then send me a tweet at @codefoster, so I can help you tell the world about what you made!
We couldn’t help ourselves and started talking about the exciting and coming Microsoft HoloLens project and the world of 3D. I showed you Autodesk Fusion 360, which is my 3D modeling software of choice. If I had a HoloLens to design with, I would, but Fusion 360 is awesome too :) Since you’re students, you can download and use Fusion 360 without charge.
Finally, we learned how you can take your JavaScript skills to the world of devices and the Internet of Things. We set up Tweet Monkey, sent a tweet with #tweetmonkey, and watched him dance away.
Tweet Monkey is a really simple project that will help you get the basics of using JavaScript to control things. It’s controlled by the awesome Intel Edison. I have blogged extensively about this device at codefoster.com/edison. You can get all the details at codefoster.com/tweetmonkey. If you want to graduate from Tweet Monkey and try something harder, check out his older brother Command Monkey at codefoster.com/commandmonkey.
Thank you again for your motivation. That’s inspiring to me. Be sure to keep in touch and tell me about the cool things you make.
Command Monkey
Alright, this is going to be fun. The process is going to be fun, and the end game is going to be even more so.
Let me paint a picture of the final product. I have a monkey toy on the table before me. I then hold my Microsoft Band up to my mouth and talk into it like Maxwell Smart. I say two simple words - “Monkey, dance!”
And in no time flat, the monkey toy obeys my command and is set into motion.
The whole thing reminds you of Tweet Monkey and it should. This is Tweet Monkey’s older and slightly more involved brother.
Where Tweet Monkey was a device to cloud scenario, Command Monkey is a Cortana to phone app to cloud to device scenario. Where Tweet Monkey relied on the Twitter Streaming API (which is very cool), Command Monkey involves our very own streaming API using web sockets.
I know it sounds like it’s going to be a lot of code, but it’s really not. You’ll see. Let me just say too that if for some reason you don’t have any interest in going through this step by step, then don’t. Just go grab the code on GitHub, because that’s how we roll.
I’m going to be using the free community version of Visual Studio and the Node.js Tools for Visual Studio. You could obviously use anything beyond an abacus to generate ASCII, so let’s not get opinionated here. Use what you love. It should go without saying that you’ll need Node.js installed to make this work. That can be found at nodejs.org.
I’m going to host my Node.js project in Azure and in fact, I’m going to get it there in a rather cool way. I’m going to use the cross platform CLI for Azure to create the site and then I’ll use git deployment to publish the app.
The architecture diagram is going to look something like this…
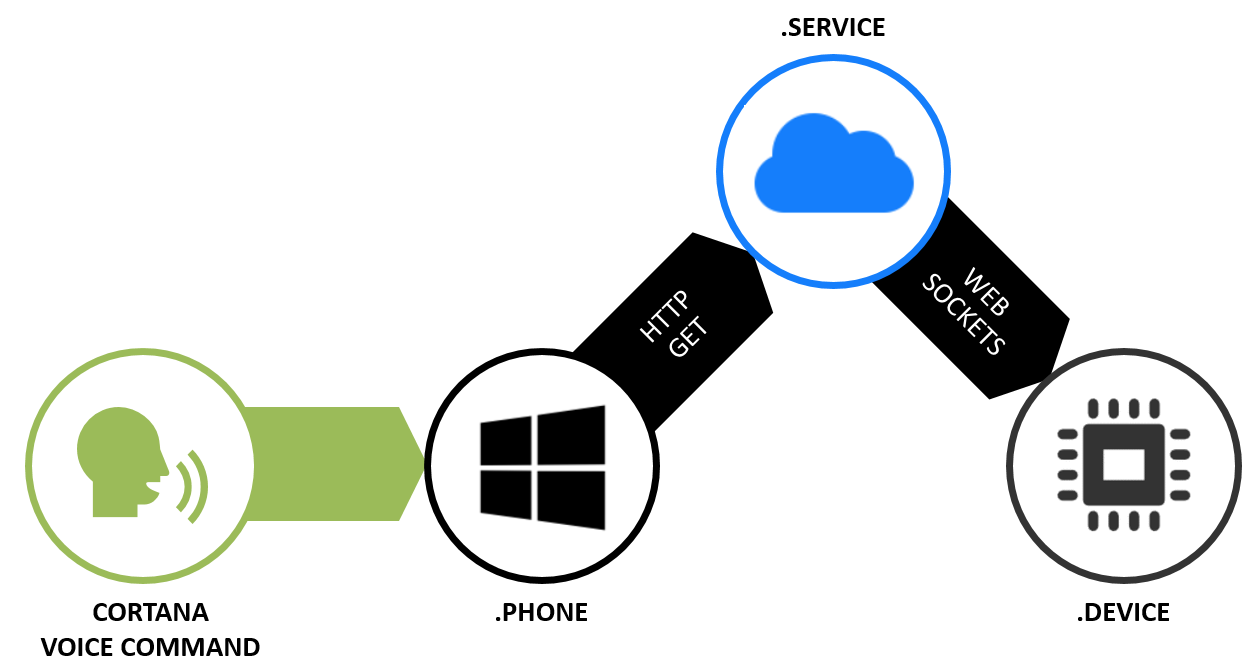
The part about speaking the command into a Microsoft Band just looks like special sauce, but you get that for free with a Band. The Band already knows how to talk to Cortana on your phone.
You will need to teach Cortana to talk to you app, so let’s do that first. Let’s build a Windows Phone app.
Building the Phone App
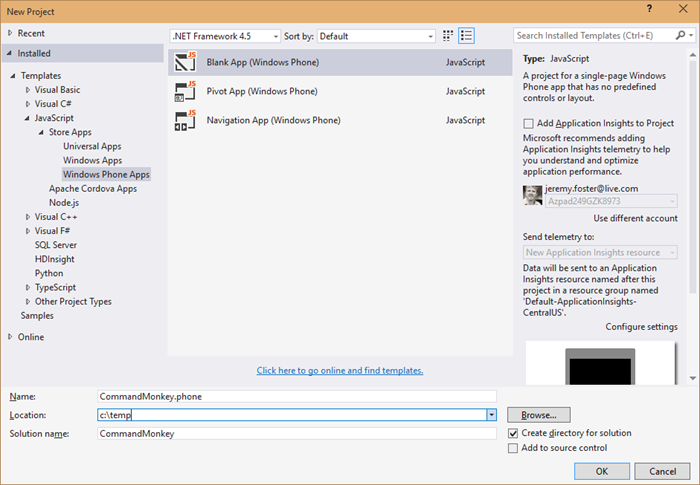
In Visual Studio, hit File | New | Project and create a blank Windows Phone App using JavaScript called CommandMonkey.phone. Call the solution just CommandMonkey. Like this…
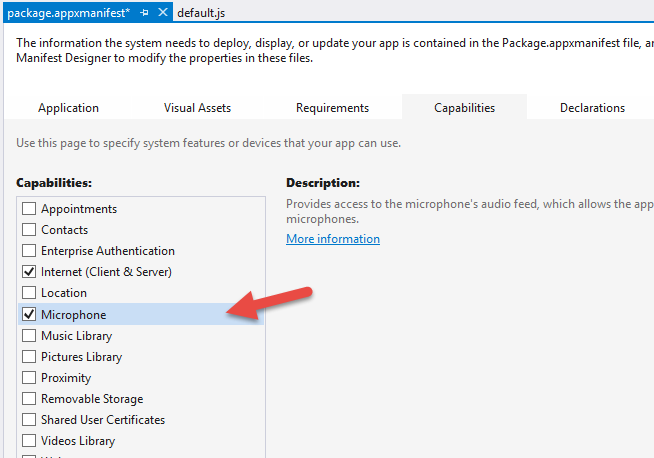
In order to customize Cortana, we need to define a voice command and that requires the Microphone capability. To add that, double click on your package.appxmanifest, go to the Capabilities tab, and check Microphone…
Now we need to create a Voice Command Definition (VCD) file. This file defines to Cortana how to handle the launching of our app when the user talks to her. Here’s what you should use…
|
The interesting bits are lines 6 and 9-14. The combination of the prefix with the command name means that we’ll be able to say “Monkey dance” and Cortana will understand that she should invoke the Command Monkey app and use “dance” for the command.
You’ll notice that I have a second command in the phrase list for the command - chatter. I don’t currently have a mechanical monkey capable of both dancing and chattering, but you can imagine a device capable of doing more than one action and so the capability is already stubbed out.
Next we need to register this VCD file in our phone app. When we do this and then install the app on a phone, Cortana will then have awareness of the voice capabilities of this app. She’ll even show it to the user when they ask Cortana “What can I say?” To do that, open the js/default.js file and add this to the beginning of the onactivated function…
var sf = Windows.Storage.StorageFile; |
And there’s one more step to completing the Cortana integration. We need to actually do something when our application is invoked using this voice command.
Still in the default.js, add this after the if statement that is looking for the activation.ActivationKind.launch
else if (args.detail.kind === activation.ActivationKind.voiceCommand) { |
Now let’s talk about what that does.
The if statement we hung that else if off of is checking to see just how the app was launched. If the user clicked the tile on the start screen, then the value will be activation.ActivationKind.launch. But if they activated it using Cortana then the value will be activation.ActivationKind.voiceCommand, so this is simply how we handle that case.
The way we handle it is to access the parsed semantic using the event argument and then to send whatever command the user spoke to the CommandMonkey.azurewebsites.net website.
How did that website get created you might ask? I’m glad you did, because we’ll look at that next. As for the phone project, that’s it. We’re done. It’s not fancy, and in fact if you run it, you’ll see the default “Content goes here” on a black screen, but remember, we’re keeping this simple.
Building the Node.js Web Service
Visual Studio is able to hold multiple projects in a single solution. So far we have a single solution (called CommandMonkey) with a Windows Phone project (called CommandMonkey.phone).
Now we’re adding the web service.
Find the solution node in Visual Studio’s Solution Explorer and right click on it and choose Add | New Project…
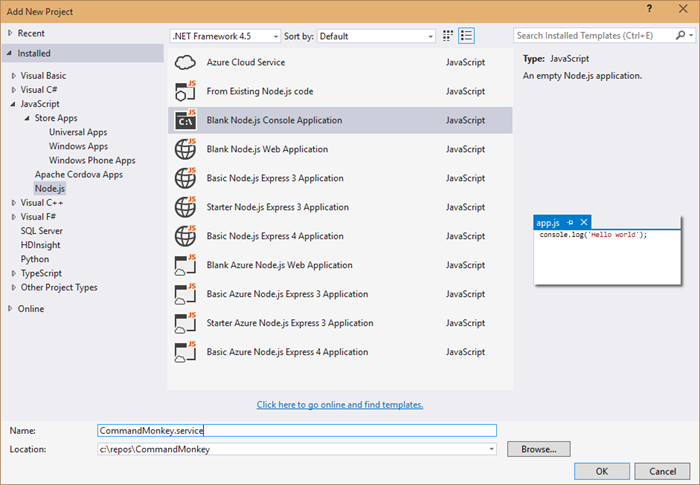
Now install the express and socket.io Node modules. You can either do it the graphical way or the command line way.
The graphical way is to right click on npm in the .service project and choose Install New npm Packages… Then search for and install express and socket.io. For each leave the Add to package.json checked so they’ll be a part of your project’s package.json.
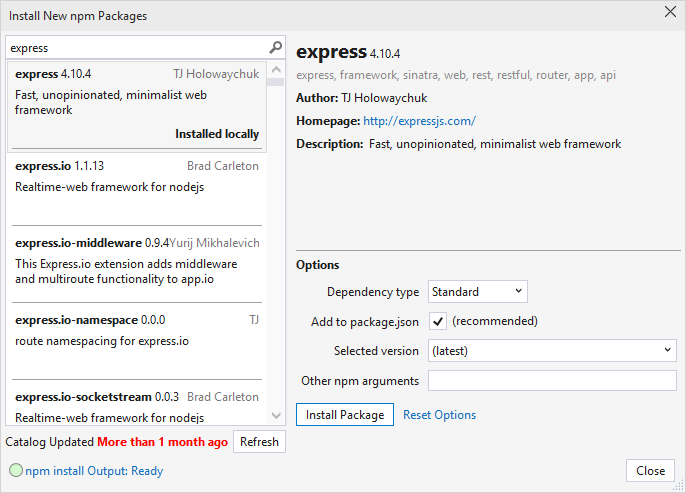
Now the command line way. Navigate to the root of this project at a command line or in PowerShell and enter npm install express socket.io --save
Now open up the app.js and paste this in…
var http = require('http'); |
This is not a lot of code for what it’s doing. This is…
- creating a web server
- setting up web sockets using socket.io
- setting up a handler for when clients call the ‘setTarget’ event
- defining a route to /api/command which calls the “target” client with the specified command
That’s what I love about JavaScript and Node.js. The code is short enough to really be able to see the essence of what’s going on.
Okay, the service is done, but it’s still local. We need to get this published.
We’re going to use Azure Websites feature called git deployment.
There’s something interesting about our project though. The git repository would exist at the solution level and include all of our code, but the folder that contains the Node.js project that we actually want published to Azure is in a subdirectory called CommandMonkey.service. So we need to create a “deployment file”. To do that just create a file at the root of the project called .deployment and use this as the contents…
[config] |
And in typical fashion, we’re going to have a few files that we have no interest in checking in to source control, so make yourself a .gitignore file (again at the root of the CommandMonkey solution) and use this as the content…
node_modules |
Now git commit the project using…
git init |
Now you need to create an Azure website. Note, you need to already have your account configured via the Azure xplat-cli in order to do this. I’ll consider that task outside the scope of this article and trust you can find out how to do that with a little internet searching.
azure site create CommandMonkey --git |
And of course, you can’t use CommandMonkey, because I’ve already used that one, but you can come up with your own name.
The --git parameter, by the way, tells the create command to also set up git deployment on the remote website and will also create a git remote in the local repository so that you’ll be able to execute the next line.
To publish the website to azure, just use…
git push azure master |
…and that will push all of your code to a repository in Azure and will then fire off a process to deploy the site for you out of the CommandMonkey.service directory which you specified earlier.
There’s one thing you need to do in the Azure portal to make this work. If anyone knows how to do this from the xplat-cli, be sure to drop me a comment below. I’d love to know. You need to turn on web sockets. Just go to your website in the portal, go to the configuration tab, and find the option to turn on web sockets. Easy.
Whew, done with that. Not so hard. Now it’s time to write the Node.js app that’s going to represent the device.
Building the Device Code
As is often the case, the device project is the simplest project in the solution. It does, after all, only have one job - listen for socket messages and then turn the relay pin high for a couple seconds. Let’s go.
In Visual Studio, right click on the solution and Add | New Project… and add another blank Node.js app. This time call it CommandMonkey.device…
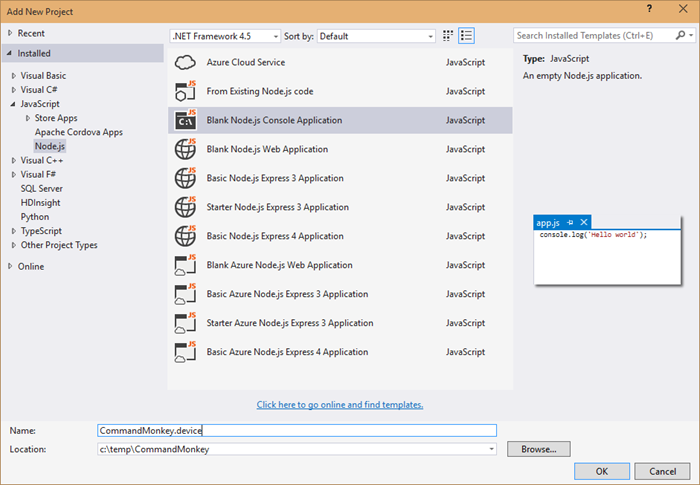
Using the technique above for installing npm packages, install the socket.io-client npm package.
var cylon = require('cylon'); |
You can see that this code is connecting to our web service in Azure - CommandMonkey.azurewebsites.net.
It also requires and initializes the Cylon library so it can talk to the hardware in an easy, expressive, and modern way.
The Cylon work method is like Cylon’s ready method, and so that’s where we’ll invoke the setTarget event. This socket event request for the server to save this socket as the “target” socket. That just means that when anyone triggers messages on the server, this is the device that’s going to pick them up. You may want to create this as an array and thus allow for multiple devices to be targets, but I’m keeping it simple here.
Finally, it handles the ‘command’ event that the server is going to pass it and simply raises the digital pin for 2 seconds.
To make this work, you need to deploy this project to your device. I use an Intel Edison, but this will work on any SoC (System on a Chip) that will run Linux. I am not going to repeat how to setup the Edison or deploy to it. You can find that in my series of Intel Edison posts indexed at codefoster.com/edison.
Once you get the code deployed to the device, you then run the CommandMonkey.phone project on your phone emulator or on your device. I run mine directly on my device so I can talk to my Microsoft Band.
And that should pretty much do it. If I haven’t made any gross errors in relaying this and you haven’t made any errors typing or pasting it in, then you’re scenario should work like mine. That is… you hold the action button on your Microsoft Band and say…
“Monkey, dance!”
…and a very short time later you get a message with the command on the screen.
I hope you’re mind is awhir like mine is with all the ideas for things you could do with this. We have real time device to device communication going on, and users really get excited when they utter a command and a half a second later something is happening in front of them.
Go. Make.
I recorded a CodeChat episode with my colleague Jason Short (@infinitecodex) about Command Monkey. Here you go…
Event Handlers in a Windows 8 App
One of the nicest things about JavaScript is the way it considers function. Instead of being wholly owned subsidiaries of classes, functions are as portable as any other object, and their arguments are dynamic too. This makes for some elegant event handling.
In this screencast, I’ll attempt to give you a taste of how to wire up events in a Windows 8 app using JavaScript. It’s a pretty basic scope and I don’t enumerate the many events available on the many WinJS controls. I also don’t cover the event model around gestures or manipulations, but I hope to share more about those exciting areas later.