
Maker
A Simple Model using Fusion 360
In the interest of avoiding a TL;DR situation, here’s the video first and explanation afterward. Basically, I’m just showing you a simple model in Fusion 360. I get excited about things and explain them to the n-th degree though, so if you’re up for it, read on.
Here’s why I’m spending nights watching YouTube videos teaching myself how to model. Spoiler alert… it’s not just so I can create project enclosures.
It recently hit me how incredible important 3D modeling skills already are and are going to be in the future - the very near future.
The trigger - the thing that pushed me over the edge and caused me to realize the importance of this skill - is the hope I see in building things using the basic 3D printing paradigm. The same paradigm, but dramatically more materials and dramatically larger sizes.
Imagine this. Imagine a ship yard that has a giant frame over its dry dock. The frame is 600’ long!
The facility essentially has a hopper for raw steel, a furnace to melt it, and then a print head capable of delivering this liquefied steel to whatever target it’s set to.
And then, the operator goes to File | Print and the whole thing is set into motion. The car moves back and forth via screw gears, slowly climbs up, and spits out tiny drops of molten steel all along the way. The molten steel quickly hardens and forms a solid bond with the steel next to it.
Factory workers and engineers kick back in their desk and monitor the process, make improvements on v2 as they are implied, and otherwise leave well alone.
Three months later the hull of a shiny, new ship is ready to have fixtures and furnishings installed and eventually ready to launch.
The ship - being printed in one piece - is stronger than assemblies.
The element of human error has been eliminated.
The production variables have been reduced leaving whether or not to print 1 ship or 10 a simple decision of time, cost, and supply.
When we can relegate the production process - I mean taking the design you’ve made and turning it into something real - to a machine, it leaves us with the important part… the design.
If I 3D print something, assemble it, and it breaks, I tweak the design and print it again. If it doesn’t, then I upload it to Thingiverse and let the rest of the world make them too.
If the ship doesn’t stand up to its static testing, then the steel is melted down, the hull design is improved, and the printing operation begins anew.
I’m quite sure that the technology behind the machine itself will be improved. Perhaps 3 months (an only slightly educated guess on my part) will be reduced to 1 week, and the resolution will improve. It’s going to happen. You know it’s going to happen, and just like the same photograph you took 20 years ago now prints much crisper thanks to improvements in photo production devices (aka printers), the benefits of such improvements will result in massive, cross cutting improvements to vast quantities of products.
It’s all very exciting.
I am asking myself where I fit in the process. It’s hard not to be a specialist in today’s world. I love the code. I love telling machines how to do things. But building the machine itself is fun too.
It’s fun pretty much the same reasons, in my opinion. It’s fun because it’s fundamentally fulfilling to take chaos and make order. I don’t just write code… I organize digital bits. I don’t just design and print 3D things… I organize raw matter like scrap wood and plastic into something with meaning and purpose.
That’s super cool.
Have fun designing.
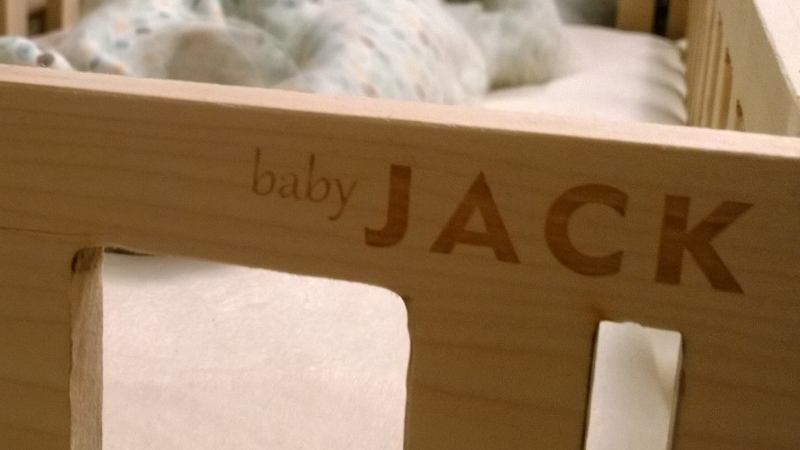
Jack in the Box
My wife and I just recently had our second son. His name is Jack. I made him a bassinet to sleep in, and this is an article about the process and method.
I warn you now - this project doesn’t involve any electronics or software of any kind. I know that makes it a bit boring, and I realize there are a myriad ways to bring digital awesomeness to such a scenario - moisure detection, controlled motion, music or white noise, notifications, camera integration - but it just isn’t happening at this point. Someday. The infamous someday.
I call it a bassinet so you’ll know what I’m talking about, but we actually call it a Jack in the Box - get it? Jack… in the box. Yeah, I know.
First, a little back story.
We had an army of grandmas (two actually) lined up to help the first few weeks of his life, because as we learned with our first son, being a parent of a newborn can be quite difficult.
Well, Grandma #1 had a little family emergency back home and had to cut her trip short and fly home. Then Grandma #2 had a change of plans and was not able to fly out at all. That left my wife and I alone to battle the days. And more significantly… the nights.
We consoled ourselves with the fact that this has been done a thousand times in the past and with each other we’re double the man power that a single parent has and even they can make this happen. Our three year old sleeps 12 hours a night like a champ and is at an easy and even helpful stage, so that’s helpful.
Anyway. Enough about our baby woes though. We feel like we’re over the hardest part now, and the light at the end of the tunnel is getting brighter every day. There are fewer of those nights where I am up and down every two hours like a Navy Seal in training. Fewer days that require nearly illegal doses of caffeine.
Somewhere in the whole process, we decided we wanted to reduce the size of the sleeper that we use in our room. We have a Pack-n-Play, and it was taking up too much space in our little bedroom. My wife exercised her amazing online research and shopping skills, but came up short on an ideal solution, so she said “Can you just make one?” My answer is to that, out of principle, is usually yes… even if it’s a stretch.
She gave me a 33” x 15” mattress to work with. I had plenty of midnight hours for step 1 - brainstorming designs. I ended up deciding to employ the laser cutter at the Maker Garage where I work at Microsoft. It turned out to be kind of a fun project, so I’ll share the process and the final product here.
My only raw material was some 7 1/2” x 1/2” x 3” poplar wood from Home Depot. I was out $35 overall, which isn’t necessarily a savings over what we were finding online, but this design had the advantage of being custom and chemical free and entirely fun.
The laser cutter I use has a bed size of 24” x 18”. The 33” mattress was obviously going to demand something longer, so I had to get creative and design it in two pieces and stitch it together. This ended up working quite nicely.
I’ll show you the final product first so you can envisage the whole thing…

Now, here are the designs I made in CorelDRAW to bring that to life. The laser cutter will translate the red lines as cuts and the black as rasterized etching, so we should end up with a piece cut out that has some personalized, burnt-in images with Jack’s name, the date, and the attribution to daddy.
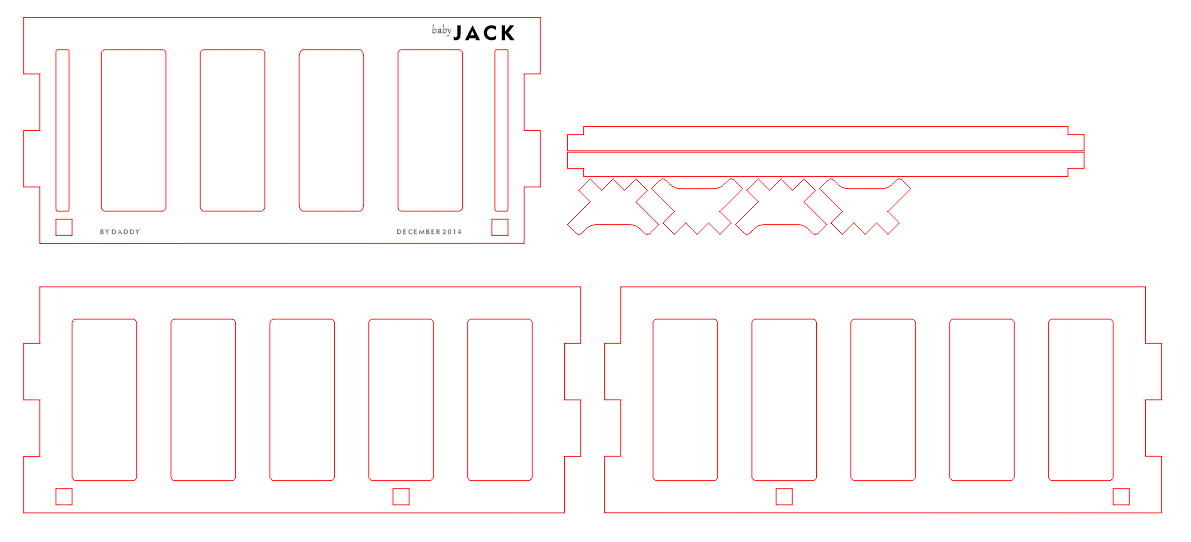
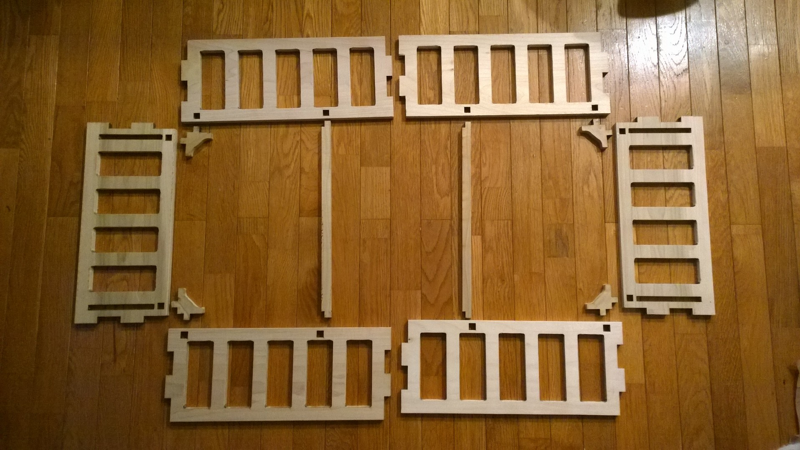
Here’s how it looks when the pieces are all cut out…
So you can see that the corner joints are tabs as are the midway joints. I have also cut small 1/2” square holes in the corners and at two points along the length of the box to allow me to insert some braces. These braces add strength and support a piece of hard board that will form the bed of the unit.
One of the fun things about using a laser cutter is snapping everything together afterword and seeing it fit perfectly every time.
I did not use any metal fasteners in the assembly of this. It is entirely held together with the shape of the components and some basic wood glue.
Here’s the main structure assembled…
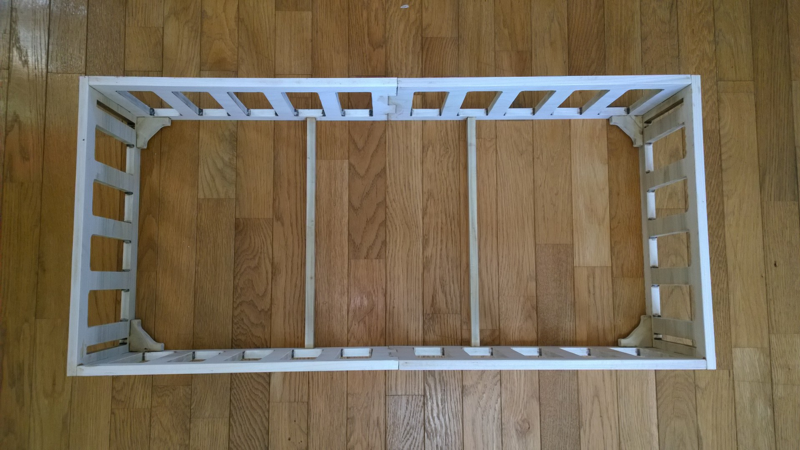
And then with the hard board installed to support the mattress…

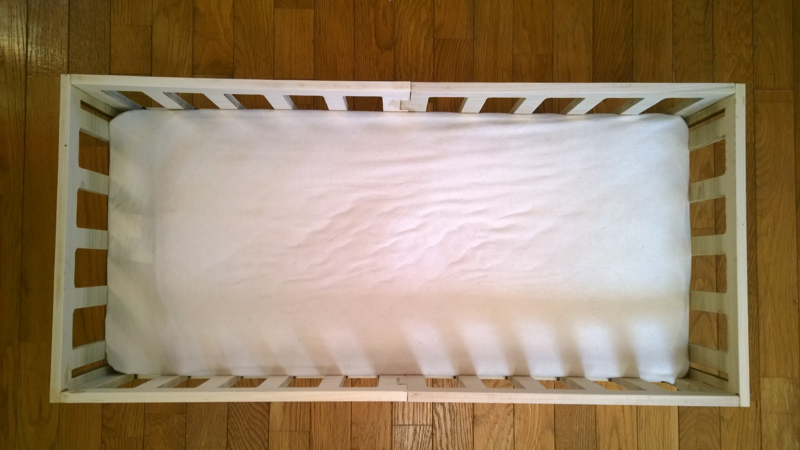
And finally with the mattress fitting snuggly (which is important for babies)…
And here’s how the etching turned out…
Overall, I’m happy with the result, but I by no means consider it a perfect work. Here are some of the things I learned…
I should have done a better job of testing the properties of the laser cutter to get to just the right settings. You set the speed and the power of the cuts, and I thought it was best to just turn it up to be sure it was cutting all the way through 1/2” of wood. If the power is up too much, the speed is down too low, or both, then it will cut through the wood, but will leave unnecessarily high levels of soot behind on the cut edges. If you power is too low, the speed is too high, or both then it won’t cut all the way through the wood and you’ll have to use a blade or chisel of some kind to free your design from the raw material - a time consuming endeavor that often times results in broken edges too.
Laser cutters leave burnt edges. If you get those settings right, the edge is dark brown and sort of carmelized - arguably an acceptible finish in most circumstances, though not for a sleeping baby. If edges need to be cleaned, there will be some work involved. Sandpaper clogs quickly. I finally discovered that for accessible edges, a small hand plane works great. For interior edges inaccessible to the plane, a broad cutting bit on a Dremel followed by a sanding bit work fine but amount to quite a bit of work - perhaps an hour of Dremel time for this entire project.

I should have rounded the inner corners more to allow for easier Dremeling
I should have created square holes and braces to mechanically hold the two halves of the unit together. As it is, the two halves are only bonded with glue and I believe it is the weakest point of the project.
We’re happy to have this fun little project done and serving its purpose. And Jack seems to like it, so that’s what matters.
Drop me a comment and let me know what you think of this project, and if it sparked any ideas or questions. Happy making!
Tweet Monkey!
This is a very, very simple maker project. It’s clean. It’s easy. It’s quick. I’m hoping the process and architecture inspire you to make something of your own, and I hope the world of possibilities in this space start opening up for you as they are for me (as evidenced by my fantastically long project idea list).
Let’s get started!
Here’s the Big Idea
We’re going to use a microprocessor with wifi to monitor Twitter’s streaming API for tweets with a certain hash tag and then when one lands, we’ll activate a dancing, squawking, symbol clanging monkey for 2 seconds. Two seconds should be enough to see him go through his entertaining gyrations. Each subsequent tweet will again set our monkey into motion and hilarity will ensue.
Perhaps you’ve seen projects done with low-level boards like the Arduino, one of Particle‘s boards, or the tiny ESP8266. I’m a fan of those boards, but for this project, we’re calling into Twitter’s streaming API. On the surface, that seems like a simple thing, but under the hood there’s a lot that needs to happen. Regardless of what sort of client you’re using to connect to the popular Twitter service, you have to authenticate. That means that you have to use Oauth. And that means that you have to do a bunch of work in your HTTP headers. But I don’t want to do that work. I want this to be easy. Node.js makes it easy, so we’re going to use a board that supports Node.js.
For this project, we’re going to use an Intel Edison running Node.js. Node.js runs JavaScript, which is a high-level scripting language that, despite its origins in front-end development, feels very much at home on the server, in apps, or on devices. The syntax of JavaScript is nice and all, but the real value of running Node.js for this project is the fact that we can use a Node module that has already been written to handle all of the Twitter complexity. We’ll end up with a very short code block that does just what we want.
You can use whatever you like for editing the text files, but I’ll be using the free Visual Studio Code.
My original Tweet Monkey product used the Edison on an Arduino breakout board with a USB battery pack and a big relay. The entire solution was pretty huge.
I’ve modified the steps below to make it more accessible. I include the complete list of materials you’ll need to purchase, and it’s cheaper than if you were to purchase the Arduino dev board and the Seeed Grove Kit that included the relay. Furthermore, because the Edison is no longer required to live on the Arduino breakout board, it takes advantage of one of Edison’s biggest features - it’s small size.
Here’s what the entire project is going to look like from a hardware standpoint, just so you know…

Here’s what you’ll need
| **Item** | **Price** | **Link** |
| Monkey | $12 | [Amazon](http://www.amazon.com/dp/B0000V4H4O/ref=sr_ph_1?m=A2NL9UUKFTRQH&ie=UTF8&qid=1438886567&sr=sr-1&keywords=magic+monkey) |
| Intel Edison | $50 | [Sparkfun](https://www.sparkfun.com/products/13024) |
| Edison battery module | $25 | [Sparkfun](https://www.sparkfun.com/products/13037) |
| Edison GPIO module | $15 | [Sparkfun](https://www.sparkfun.com/products/13038) |
| MOSFET | $0.88 | [Digikey](http://www.digikey.com/product-detail/en/STP16NF06/497-2766-5-ND/603791) |
| 1/4W Resistor Kit | $15 | [Digikey](http://www.digikey.com/product-detail/en/RS225/RS225-ND/7110) |
| Drill and 1/6" drill bit | ||
| 2' 22-gauge wire | ||
| Short M-F jumper wires | $3 | [Digikey](http://www.digikey.com/product-detail/en/MIKROE-512/1471-1231-ND/4495595) |
| 20-pin Pin Header Strips | $6 | [Digikey](http://www.digikey.com/product-detail/en/M20-9992046/952-1902-ND/3727869) |
| Micro-USB cable and power source | ||
| 2 AA batteries |
Step 1. Buy the monkey
I found mine at a local novelty shop here in Seattle called Archie McPhee, but it’s the same as this one on Amazon.
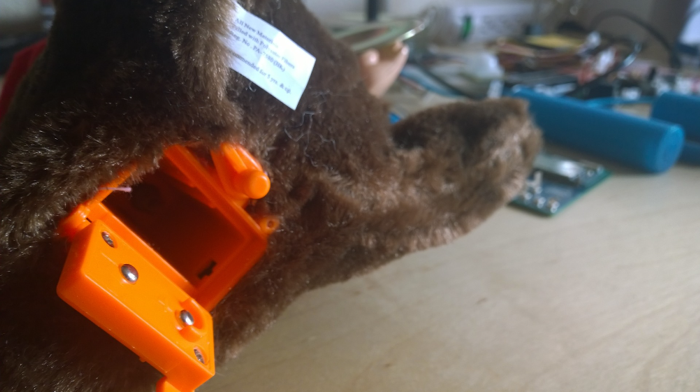
Step 2. Mod the monkey
This monkey comes out of the box ready to entertain children with a simple on/off switch on his butt. Well, we’re not children, and that’s not going to work for us. We’re using our monkey for serious business - serious monkey business.
So the first thing we need to do is inspect our monkey’s downstairs and see how this on/off contraption works.
Here’s what I see…
Every project is different. Here’s what I’m looking for.
We’re dealing with a complete circuit here. There are two AA (1.5V) batteries and they’re hooked up in serial, so that means that this monkey runs on 3V and some unknown amount of current will be drawn.
You don’t often know how much current any given load is going to require. You could put meters in the circuit and measure, but the better thing to do is to simply leave a circuit as is with it’s own power source and everything. The other option would be to attempt to merge the circuits of our load (the monkey) and our microprocessor, but that’s where you have to be careful. Microprocessors tend to cost real dollars. Ironically, the Edison I’m going to introduce soon - an amazing work of engineering art - is only 3x the price of this silly mechanical monkey! The inner workings of computers are child’s play compared to the inner workings of our global economy. But I digress. My point was that you don’t want to toast your Edison. So we want to control the monkey by simply doing the equivalent of turning the switch on an off.
What we discover in this monkey’s butt is that the switch on the outside of the trapdoor is simply connecting or disconnecting the ends of the batteries and completing or breaking the circuit. So let’s do the same. Let’s simply tap into the two contacts with some wires, run them out, and use software to virtually touch the ends of the wire together.
We need to run wires outside all clean like, so let’s drill some very small holes through the trap door and run wires through. Then we’ll set up a soldering station and solder the wires directly to the contacts.
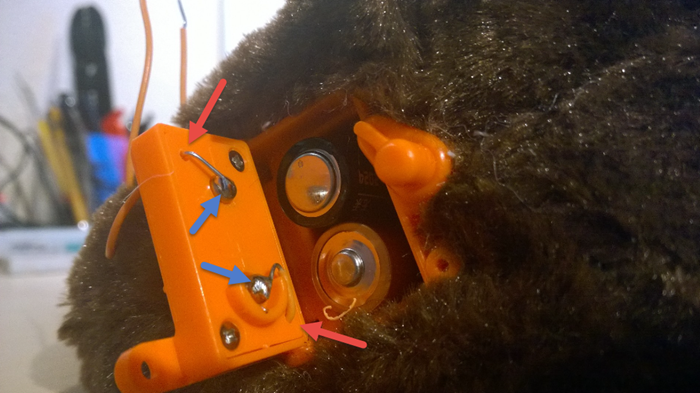
Now we can close the door and we’ve got two wires that when touched together complete the circuit and set the monkey in motion. Conveniently, we have not disabled our on/off switch, so if we wish to use it to turn the monkey on, we can still do that.
And just like that, we’re done with surgery. Your monkey should recover nicely.
Step 3. Add a component to complete the circuit
The question now is how to programmatically connect these two wires to complete the circuit. There are a number of options, and I’ll enumerate them.
Option 1. We could hook the positive wire to a pin on our microprocessor and the negative wire to the ground of our circuit. There are some considerations with this approach, and in our case here, there are some real problems. Different devices have different voltage levels for their logic. We’re going to be using an Edison with the Arduino dev board installed. The logic on the Arduino board are 5V, and that’s actually because the dev board is level shifting them up for us, because the logic levels on the Edison itself are only 1.8V. So as long as we’re using the dev board, if we attempted to hook our logic directly up to the monkey’s circuit, we’d be combining the power source of our microprocessor with our monkey’s own AA power source. That’s not a good idea.
Option 2. A mechanical relay is a nifty device that has 2 circuits. On one circuit, it let’s you give it a logical 0V or 5V level. If you give it 0V, then the second circuit will be open. If you give it 5V, then it will mechanically connect (as in, internally touch two pins together with metal) the other circuit so that electricity will flow. You will actually hear a click when a relay is activated. It is not, obviously, a power source. It simply let’s you decide whether to open or close a circuit so that whatever power source it has will or will not flow. This is the option we’re going to use for this project simply because I have one readily available.
Option 3. A solid state relay works exactly like a mechanical relay except: a) it tends to handle smaller amperage values on the secondary circuit, and b) it is perfectly silent. I have some of these on order, but they’re not in yet. A solid state relay is usually created with an optoisolator that uses a small light source (an LED) and a small light pickup (a phototransistor) internally. This decouples the circuits and allows the whole thing to operate silently.
As I mentioned, I have a mechanical relay on hand, so I’ll use that. It’s capable of handling 10A which is far more than we’ll need it for, but it will work. By the way, I believe this relay takes 5V to trigger, so we wouldn’t be able to use it with the Edison alone. We must have the Arduino dev board. The wires coming out of the monkey’s hind end are attached to the relay board in the green connector with flat screws on top. Here’s the relay…
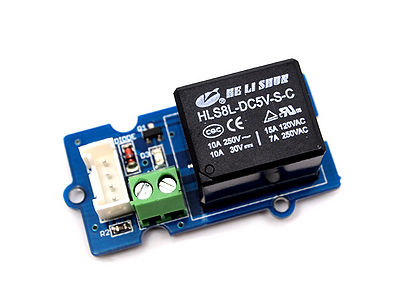
I got this relay from a Grove Seeed Kit (intentionally misspelled). The nice thing about this kit is that it makes all of the components easy to hook up. The white 4-pin connector you see on the component fits a bundle of wires that also comes with the kit and again into an Arduino-compatible shield, which you’ll see next.
Step 4. Adding the microprocessor
Next, I plugged my relay into my base shield. The base shield is on my Arduino dev board, and the Edison is mounted to the same. The Edison needs power, and that’s easily provided with a simple USB battery pack.
At this point, we have all of our hardware hooked up and are ready to implement some logic.
Step 5. Writing the software
We’re going to be writing JavaScript in a Node.js project on this Intel Edison to get this monkey grooving. If you are pulling an Edison out of the box and need help setting it up, have a look at codefoster.com/edison-setup. For the rest of this article, you’ll need your device to be all configured and on the same wifi network as your host PC (the one you’re using Visual Studio on) and you’ll need to know the IP address and the login password.
If you haven’t already, go to visualstudio.com and download and install Visual Studio Community 2015. Then go to http://nodejstools.codeplex.com and download and install the Node.js Tools for Visual Studio.
Now clone https://github.com/codefoster/tweetmonkey.git and open the tweetmonkey.njsproj file in Visual Studio. Let me point out a few things about this project.
- There’s a config.js file that you need to fill in with your particulars.
- Go to apps.twitter.com and create a new app to get the Twitter API keys and secrets.
- There’s a gulpfile.js that has a deployment project. The IP address and password you enter into the config.js will determine where this project gets deployed.
- There’s a
{ track: '#cfmonkey' }in the app.js that you need to change the value of. This is what the search is going to look for. This is not looking for tweets from a user actually, but rather looking for tweets with certain text in the body. I will try to update the GitHub repo with comments for how to search for tweets to a certain user. - The code in the app.js is hooking into Twitter’s “streaming API”. This means that you don’t have to poll the service every second to see if any relevant tweets have landed yet. Rather, Twitter will look for them and when one does land, it will call the your code’s function. That’s a thing of beauty!
Step 6. Running the app
Ideally, I’d have another gulp task for executing the Node.js project on the device, but I haven’t quite figured that out yet, so I just SSH to the device and run it.
I’ll assume you’re all set up for using SSH since you’ve supposedly gone through my /edison-setup article already.
To SSH, use…
ssh root@192.168.1.13 (or whatever your IP address happens to be)
Once on the device, cd to the project directory (it should be in the default location depicted by the ~ in the prompt - this is likely /home/root) and then use…
node app.js
Step 7. Testing it
Testing it is easy. Just send a tweet with the chosen text and watch your monkey dance!
Something more compact perhaps?
The final solution is by no means compact. You have a big, green board hanging out of monkey’s bum by wires and a USB batter pack to boot. So how might we make this solution more compact? I’ll tell you. Take a look at the Edison on its Arduino dev board. Most of that is dev board, right? The Edison itself is very small. So if we could get rid of the dev board, that would be a huge step. Of course, then we need to power the thing and a way to access the logical pin that controls the relay. So, we could simply head back to SparkFun.com and order a couple of Edison modules. These things are great in my opinion. For this solution, we could use the Edison itself, a GPIO breakout module, and a battery module. Then we’d have to replace our relay with something smaller - no problem since the relay I used was way overkill. Then we’d probably want to find a creative way to conceal the whole thing. We could give our monkey a backpack, for instance. In some cases, you can power your Edison from the same source as your project, but in this case, the monkey is carrying 3V and our Edison needs 3.7V at a minimum, so I wouldn’t feel good about that.
Conclusion
So there you have it - a simple, end-to-end tweet monkey! Just what everyone needs.
I hope you had fun with the monkey specifically, but more importantly, I hope you’re just a little bit more comfortable hooking into an existing electronic circuit and using logic from a program you wrote to manipulate it. When you get the concepts behind the procedures, you really start to see the possibilities, and that is the heart of the maker movement.
I recorded a session about Tweet Monkey’s older brother - Command Monkey as a CodeChat episode with my colleague Jason Short (@infinitecodex). Here you go…
Using Visual Studio to Write Node for Devices
In previous blog posts, I explained how to setup your Intel Edison and how to start writing code for it. And in case you got here directly, I created a full index of my Edison posts to help you find what you need.
In this post, we’ll take a look at writing code for it using Visual Studio. Visual Studio, once you add the free Node.js Tools for Visual Studio plugin, happens to be pretty great at working with Node.js projects. It runs node behind the scenes, so it offer the following…
- Editing
- Intellisense
- Profiling
- npm
- TypeScript
- Debugging (local, remote, and Azure!)
That’s an impressive list, and we’ll take a look at a few of these features in this post.
Closer to the end of this post, I’ll tell you about my edref project. “edref” stands for Edison Reference project and is intended to get you started quickly with an Intel Edison project in Visual Studio. If you want to skip all the rhetoric and just download the reference project, I’ll understand.
Visual Studio
In case you missed the announcement in November, Visual Studio Community edition is now free. That’s huge. The Community edition is essentially the existing Professional edition, and facilitates a huge array of development scenarios. VS is intuitive, intelligent, and has a lot of Microsoft and community support behind it.
Installing Visual Studio Community 2013
To download Visual Studio, start at visualstudio.com, but know that visualstudio.com sort of has two meanings right now. Visual Studio is the IDE, but it’s also the ALM tools for taking any size projects from conception to completion with any size group of developers. So click the download button under Visual Studio the IDE and (at least at the time of this writing) you’ll get a direct link to the Visual Studio Community 2013 package.

Installation is pretty straight-forward, and I won’t include a screenshot series, but one decision you will have to make is which features of the product to install. Do you want to play with Lightswitch? Windows Phone? Just check the boxes.
The next version of Visual Studio is Visual Studio 2015 and there’s pretty good support for it already (including a working version of the Node.js Tools), so if you want to be a trailblazer at work, go for it.
The Node.js Tools for Visual Studio
Installing the Tools
The Node.js Tools are found at nodejstools.codeplex.com. Go there and click the gigantic, unmistakable DOWNLOAD button. Again, the download is assumedly self-explanatory.
Creating a New Project
Creating a project using Node.js in Visual Studio begins like any other project type - with the File | New Project dialog…
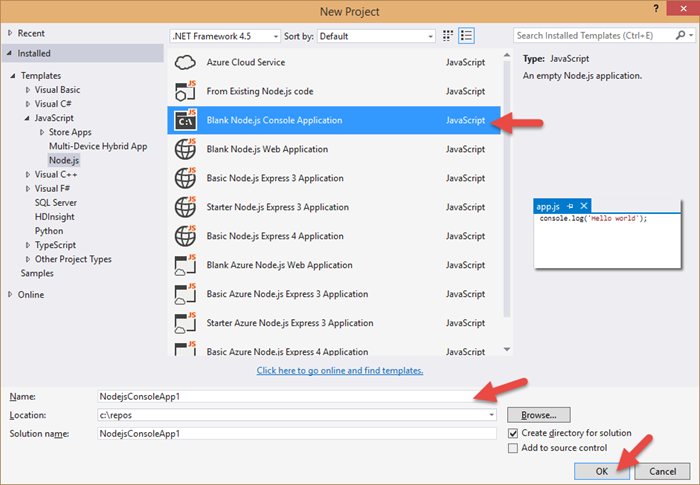
There are a number of projects to choose from. For what we’re dealing with - writing Node.js for devices - the Blank Node.js Console Application will suffice. The rest are web applications for creating node apps on the server.
As per usual, give your project a name and location and OK away.
Now, when Visual Studio finished with our bidding, let’s take a look at what we’ve got…
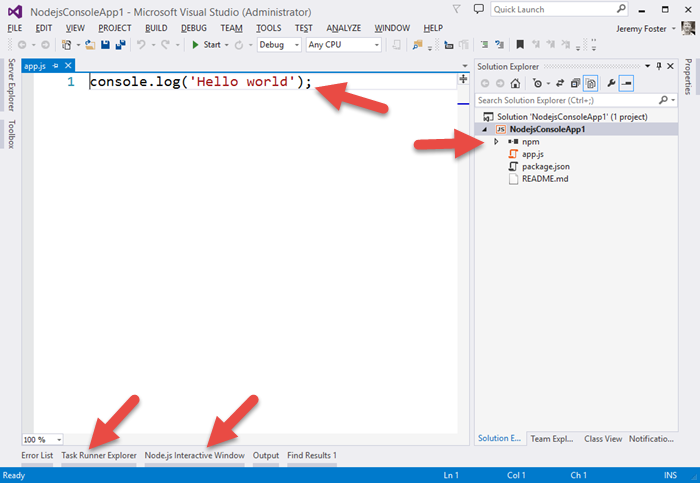
Let me point out a few things.
First of all, perhaps the simplest Hello World app in the world :) Next, notice the npm folder in the project. This is going to give you a graphic way of managing your npm packages. Some people like to do things the graphic way. I personally never use this, but for some people it’s just your kind of thing. It actually works pretty slick too showing you all of your global modules, all of the modules that are installed, and visually differentiating the packages that have been added to your package.json file.
If you begin typing a dependency directly into the package.json, it gives you some Intellisense with an under-the-covers search of the npm repository, and it even helps you with the version…
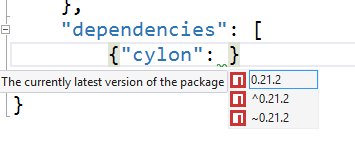
I like that. I never type my dependencies in directly, but if I did, I’d certainly come to rely on it.
You can also use the npm dialog to install packages.
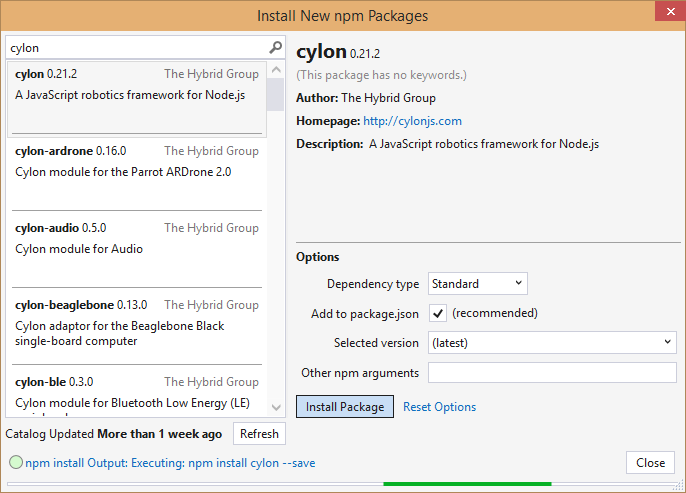
Again, nice, but I still keep a CLI open and execute npm install mypackage --save on my own. And of course, in that case, all of the installed packages are recognized by the tools, so I do enjoy having the visual indication that my package has been installed.
By the way, if you want to create a new Visual Studio Node.js project from an existing Node.js project that you have in your file system (perhaps recently cloned with git?) then check out my post Open an Existing Node.js Project in Visual Studio.
Using gulp for Deployment
We saw in the last post in this series how to wirelessly deploy your code to your device. You can keep doing it that way if you want, but there’s an easier way. Deploying your code is essentially a build task, and that’s what grunt and gulp are for.
NTVS also gives you a little bit of help with grunt and gulp. It’s hilarious that most people still refer to “grunt and gulp” whenever they talk about JavaScript task running frameworks. They do the exact same thing and I don’t imagine to many folks actually use grunt _and _gulp. Rather, most likely use grunt if they have to and gulp if they can. gulp is better hands down. grunt uses JSON files for configuration of tasks and gulp uses JavaScript. So, instead of composing gigantic JSON files to attempt to define what sort of tasks you need to run, you can stay in code and do whatever the heck you want or need. And gulp is supposedly way faster too, although I haven’t done any of my own tests.
Adding some gulp tasks to your app is easy. You just add a gulpfile.js to the project and add the gulp npm module both globally and at the project level.
The edref project has a little bit of gulp built in to deploy your code to your Edison device. Here’s that gulpfile.js content so we can talk about what gulp tasks look like…
/// <vs BeforeBuild='jshint' AfterBuild='deploy' /> |
Notice the actual gulp tasks (where I put the <———— indicators). Those define what tasks are configured to run.
Now this next part I love. Visual Studio looks at the gulpfile.js at these tasks and adds them to a new pane called the Task Runner Explorer…
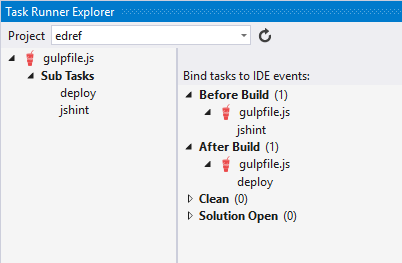
So jshint and deploy under Sub Tasks exist because they are defined in the gulpfile.js code.
Any time you need (or just want), you can right click one of those bad boys and hit Run and just run your tasks ad hoc individually. But also notice that under Before Build I have determined that the gulpfile.js/jshint task should run, and After Build the gulpfile.js/deploy task should run. That means that I can change a line of code, hit CTRL+SHIFT+B to build my project, and know that the targeted Edison (whether it’s on my desk or installed in a wall or gadget absolutely anywhere!) is going to contain the latest version of my project. That’s pretty awesome.
I’m working on another task as we speak that will fire off the node process for that app so your device will not only get its code, but start cranking on it as well.
Remote Debugging
Another scenario unlocked for us using the NTVS tools is debugging - even remote debugging. I’m thrilled about this one.
Note that you can also check out the official documentation for the remote debugging feature of the NTVS tools.
I did a little research online and found that most people working with devices are resorting to the classic console.log method of debugging. When you’re writing Wiring code for an Arduino, for example, you use a serial debug library that allows you to send messages back to the console in your Arduino IDE. You can then add something like…
Serial.println("Made it here!");
This reminds me of JavaScript development circa 1999 and by no means turns my crank.
What does turn my crank is running my project, perhaps watching a couple thing happen on my gadget, then hitting a breakpoint in my code in Visual Studio and being able to hover over any variables to see what their value is and hit F5 to continue. That’s an awesome dev scenario!
Here’s how to do it.
Write or open a Node.js project targeting your device.
You can clone http://github.com/codefoster/tweetmonkey if you’re looking for inspiration. You can see more about my good friend TweetMonkey at codefoster.com/tweetmonkey, but in short, he taps into Twitter’s streaming API and waits for tweets with the hashtag #tweetmonkey. When he see’s one, he comes to life, nods his head, squeaks, and clangs his symbols. My 3 year old loves it :)
Make sure you have a RemoteDebug.js deployed to your device
I like to include the RemoteDebug.js file in my project and check it into source so it’s ready to go for anyone that clones the project.
If you have the NTVS tools installed, you have this file. To see where it is, go to Tools | Node.js Tools | Remote Debugging Proxy | Open Containing Folder. Copy that file to your project or deploy it directly to your device. By the way, the gulp task that I include with the edref project (see later) copies all .js files, so if you put the RemoteDebug.js file in your project, it will get deployed automatically.
Execute your node app
You normally execute your app by remoting to your device (using something like ssh root@mydevice.local), changing to your project folder, and then executing the line…
node app.js
For remote debugging, you do it like this…
node RemoteDebug.js app.js
…and you should get some feedback like…
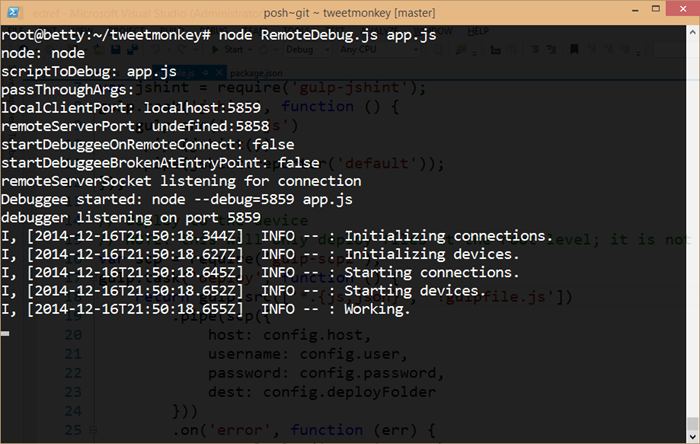
So you can see that the RemoteDebug.js file is launching a proxy for us using port 5858. And it introduces a term that was new to me - debuggee. I think I like it.
With that going, we’re ready for the next step.
Attach to Process from Visual Studio
In Visual Studio, go to the Debug menu and Attach to Process… and change the Transport to Node.js remote debugging.
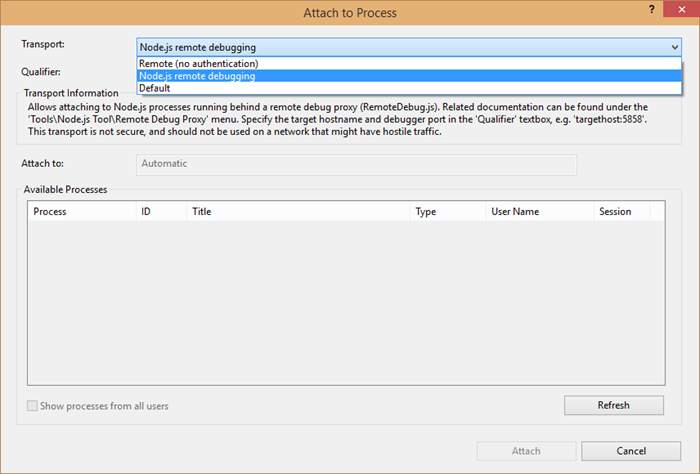
Now, in the Qualifier field, enter tcp://devicename.local:5858 and check the Show processes from all users box. You should see your node process appear in the Available Processes.
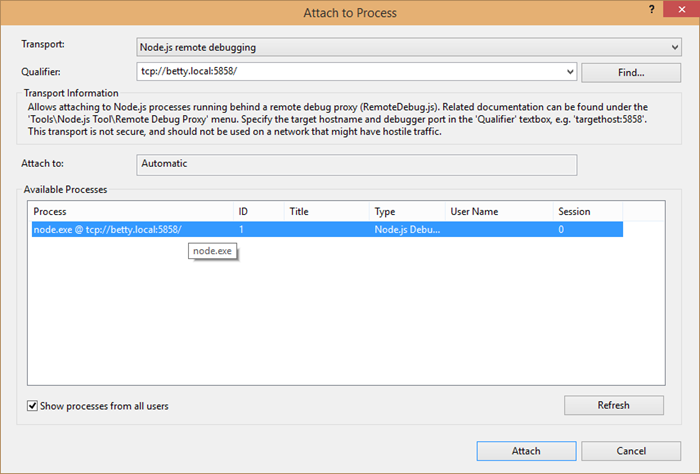
Attach.
Now set a breakpoint.
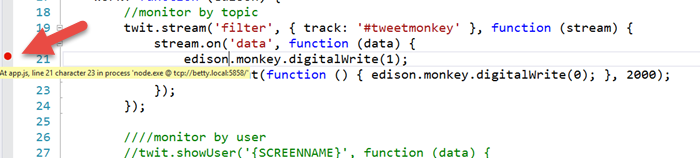
And in the case of the app we’re working with here (tweetmonkey), send a tweet to hashtag #tweetmonkey and you should break at your breakpoint. As the French say, “Formidable!”
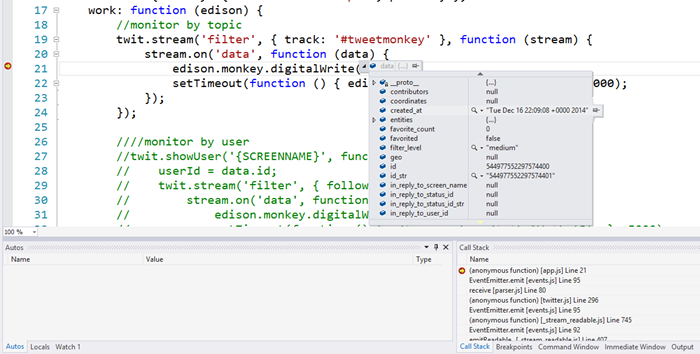
And, of course, in typical VS fashion, while broken, you can hover over JavaScript objects and check out all of their property values.
And you can open QuickWatch and enter any dynamic expressions you want and browse the results.
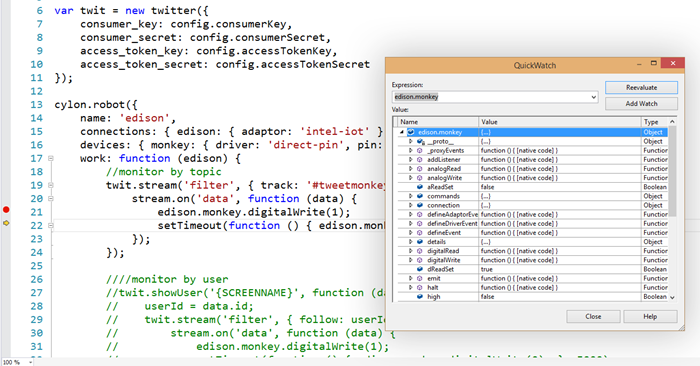
So, now you’re cruising!
The edref Project
There’s one last thing that I said I’d talk about, and that’s my edref project. There are a few things to do to set up a good, working Node.js environment in Visual Studio that will get you the kind of rich development environment I’ve lined out. It’s not a lot, but there’s not sense in doing it from scratch every time, so I’ve created a project called edref on GitHub that you can clone and get started right away. Feel free to fork and issue pull requests if you have ideas for how to improve it. I personally use this project for starting new hardware hacks, so when I find more efficient ways to do something, I’ll update the GitHub project.
The one thing I’d like to point out about the project is that the gulpfile.js is all set up to deploy your project to a remote device. You just have to fill out the config.js file with your particulars.
Conclusion
You should have what you need to not only write code for your Intel Edison, but write it in Visual Studio style! If you have any questions about this, please let me know in the comments. Consider this a living blog post still in that I’ll add edits here as I learn more about this fun device.
Happy hardware hacking!
The Intel Edison
I am playing with the Intel Edison a lot these days. I’m a big promoponent of it, because I’m a big proponent of both power and simplicity. This device has enough power for whatever maker, robotic, gadgeteer project I can conceive of, and it’s all set up to easily run JavaScript via Node via Linux. This means I can use higher level libraries like Cylon.js. This means if I want to turn a motor, it’s easy. If I want to read accelerometer data from an ADXL377, it’s easy. If I want to include a Node module for storing temperature and humidity data in Azure, it’s super duper easy. I like easy - just not at the cost of power.
I’ll stop being wordy, though and just index the posts that I’ve creating (and am still creating) for the Intel Edison. Here they are.
Getting Started with the Intel Edison should help you pull it out of the box, mount the device to the dev board, flash the latest OS to the device, and get your toes wet writing code.
Writing JavaScript for the Intel Edison intends to pick up where the former left off and should help you get started writing Node.js apps using Cylon.js for the device.
Using Visual Studio to Write Node for Devices will bring a bit of awesome to coding for devices. You’ll have a rich development environment including remote debugging so you can actually step through breakpoints and watch your gadget react!
Flashing an LED when you get a Tweet (up next) will use what we’ve learned so far along with a Node.js module to hook into Twitter’s streaming API to turn your LED on for a couple seconds when you get a tweet.
Tweet Monkey is actually similar to the flashing LED sample I was going to do, but more fun. Would you rather see an LED flash or a monkey clanging symbols?! The real value in this tutorial is the JavaScript that combines calling in to the Twitter Streaming API with the using of the cylon library to talk to the monkey.
Command Monkey is Tweet Monkey’s older brother. Command Monkey is a fun and full-featured scenario where Cortana on the Windows Phone is used to tell the monkey to dance. This tutorial will teach you a pretty wide scope. You’ll learn to integrate Cortana, write a Windows Phone app using JavaScript, write a Node.js service on Azure, and how to communicate down to the device (the monkey in our case) using web sockets. It’s surprisingly little code overall.
Network IoT Devices (queued) is all about getting devices to form local or extremely broad networks that form huge logical apps and scenarios.
So you can actually check out posts in progress before I’ve polished them and called them done. Do please feel free to engage in the comments and offer feedback, advice, or questions.
Writing JavaScript for an Intel Edison
In my last article about the Intel Edison, I showed you how to take yours out of the box, and get it set up. Consider this article a follow-on. I’m going to pick up pretty much where the last one ended.
We actually wrote a little bit of code in the setup article, so you got a taste. Now we’re going to learn…
- how to use the power of Node.js to bring in libraries and command our device
- how to deploy code to the device wirelessly (zoing!)
- how to use the excellent Cylon library to make our code elegant and expressive
Let’s start off in this article without employing the help of Visual Studio, and then my next article will capture the many productivity benefits of VS. It’s always nice to start at the base and climb up to awesome tooling. That way, we’re thankful for the conveniences it brings. :)
Using Node.js
Installing Node.js
I’m assuming your host PC is Windows. I’m running the technical preview of Windows 10 and it’s all working great. I like to live on the edge.
The easiest way to install Node.js is by simply clicking the big green button you’ll find at nodejs.org…
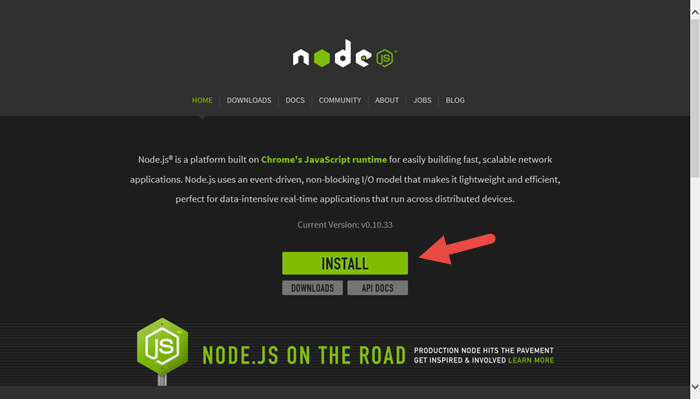
You’ll see in the installation wizard, that you’re actually getting the NPM utility installed along with the Node.js engine. The installation should take care of a lot of busy work for you such as adding node and npm to your path so you can actually call it from the CLI. My CLI of choice, BTW, is PowerShell. To be clear, I’m talking here about installing Node.js on your host PC. Node and NPM should already be installed on the device if you flashed it according to the instructions in the last post.
After you have Node.js installed, we’ll walk through a few steps to create a new node project on your host PC. When we’re done with that, we’ll turn our attention to getting that code over to the Edison and running it there.
Creating the Folder and File Structure
Node.js projects have a pretty well defined, convention based folder and file structure. They’re very simple too - all of the metadata is in one spot. I don’t know where you keep your development projects, but I keep all of mine under c:\repos and I’ll start there. Watch the following video as I create a new project folder, generate an app package description file (package.json), and then create my initial app.js file…
As you can see, the npm init makes the creation of our package.json file very easy. The package.json file describes your node project and has a few purposes - the two most prominent that I can think of are a) it provides the metadata necessary in case we end up publishing this package to the node package store and b) it defines the project dependencies so that when the project is copied somewhere else, a simple command is all that’s necessary to actually go out and copy in all binaries necessary for the app to work.
Writing the Code
Now, in keeping with a simple workflow at first, let’s open app.js in Notepad++, and fill out the following…
var mraa = require('mraa'); |
This code depends on the mraa module, but if you followed my setup guide and flashed the Intel with the latest image, then you already have it. The mraa module maps the C libraries for interacting with the Edison’s hardware (the GPIO pins, the I2C bus, etc.) to Python and to JavaScript.
The code simply creates a new pin out of pin 13. Pin 13 is the one that conveniently has an LED on the dev board, so we don’t even have to plug anything in to see it. It then sets the direction of that pin to out. And finally, it raises the logic level of the pin by writing a value of 1.
Deploying Wirelessly
We saw in the last guide how to SSH directly to our device. If you gave your device the name “betty” like I did, then you’ve been provided a DNS name of betty.local which represents the IP address that your device was assigned on the network. If you’re not sure the device or the DNS name are working, just do ping betty.local from the CLI (replacing ‘betty’ with the name of your device of course). I’ve actually started pinging to discover the IP address and then using the IP address explicitly for SSH and SCP, because it takes a little time for the alias to resolve but hitting the IP address directly is snappy.
First, we’ll get our code copied to the device, and then we’ll SSH to the device in order to execute the code. It is also possible to simply execute the node app.js command remotely with SSH, but it’s fun to see what’s actually happening.
In this video, I’m going to SSH to the device, make a directory for our hellonode app, then jump back to my host machine, copy the files to the device (and specifically to that project folder) using SCP, and then back to the device to execute the app. The workflow can be simplified a bit, but I’m not arguing at this point. It’s pretty wonderful actually.
Notice the syntax of the SCP command. It wants scp
You didn’t see anything happen there, but I did. My LED came on.
There are a few things that are cool about this. It’s cool that the mraa library preexists and makes communicating with the device pins so easy from a high-level language like JavaScript. Also, it’s great that we’re remoting and remote deploying our project wirelessly. This means that we can build something like an intelligent camera device, install it in a bird nest, and then remotely upgrade our software without disturbing the birds. That’s just the first example that came to mind.
Alright, now lets make our development really clean and easy by employing the CylonJS library.
Using CylonJS
CylonJS can be found at cylonjs.com. You won’t even need to go there to get the code, because we’re going to use NPM, but you may want to go check it out to get familiar with the project and eventually to research the documentation for whatever device and driver you’re using.
Let’s run through the steps to do something similar to our hellonode app above, but use the Cylon library.
In this video we will: create a project folder, create our app.js file with some sample code from cylonjs.com that will cause pin 13 to blink, generate a package.json file, install cylon.js via NPM using the --save parameter to add it as a dependency in our package.json file, then we’ll deploy to the device, and finally SSH to the device and execute the node program. You’ll actually see a video of the device with the LED blinking. Just a quick warning - we’re not only going to be holding off on Visual Studio at this point, but I’ve decided to use a CLI text editor for the hilarious factor as well as the convenience of showing everything in one window. I actually really like using the command line, but GUI’s are great too. As long as I don’t have to remove my hands from my keyboard, I’m a happy programmer.
EDIT: Thanks to Roberto Cervantes in the comments for pointing out a step that I should have called special attention to. In the following video, notice that after I
scpthe files to the device and thensshto the device, I execute the commandnpm install. This looks into thepackage.jsonfile that we just deployed to see what my project’s dependencies are, it goes out to the internet (to the NPM repository) to fetch the packages, and then it installs them. If you skip this step your app will have no idea whatrequire('cylon')means.
A few things to note about this video…
My
edit app.jscommand won’t work for you because that’s a special command line text editor that I use. I’m going to go ahead and assume you have your own favorite way to edit a text file. :)Note that installing the
cylon-intel-iotmodule added dependencies in the package.json for itself as well as for its dependencies. We actually never had to create thecylonmodule as a dependency. That happened implicitly because the cylon-intel-iot module knew that it needed it. That’s a cool thing about node modules - they each know exactly what they depend on and a singleinstallcommand recursively takes care of business.We copied over only the app.js and the package.json. We did not copy over the node_modules folder - you’ll notice that I deleted it before deploying. This is the right way to deploy project. You don’t check the
node_modulesin to source control and don’t copy it over in a deployment. Instead, you rely on the dependencies defined in your package.json file. On the deployment server, you executenpm installand if anything doesn’t get installed correctly, then you need to add it to yourpackage.jsonfile.
And now a bit about the CylonJS code. Here it is…
var Cylon = require('cylon'); |
Just like in our simpler hellonode app, we are doing a require right off the bat here. We are not, however, requiring the mraa library. Instead we’re requiring the cylon module. The cylon-intel-iot module will be invoked from within cylon and it will make calls to the mraa library. We risen up one layer of abstraction. The big benefit here is that we’re no longer writing device specific code. We could theoretically switch our Edison out for a Spark and it would just work.
The code block is, I admit, unnecessarily heavy if you’re just blinking a light, but ponder for a minute the elegance of this compared to the inevitable mass of imperative code that would occur were we doing anything more complicated.
There are a couple of Cylon terms that I should explicitly call out…
A Cylon robot is the device - the Edison or Beaglebone or Spheo or Tessel or any the other 32 or so devices that Cylon already has adaptors for. You define your robot with a connection and you use an adaptor (in the example it’s intel-iot).
A device in Cylon parlance is more like a component on the device. In our example above, the pin is a component and so it’s registered as a device. The important part of the device declaration is the driver. A driver is the interface that Cylon will use to interact with it. When the led driver is used, then the thing we’re calling led will have functions like .turnOn() and .turnOff(). This makes it so that our we only ever speak to our components with sensible language - you tell a servo motor .clockwise() and you capture a button press with .on('push',function(){}). Sensible is good in my book.
Besides declaring the connections and devices, we declare a function that is to run when the robot is finished with its setup. In this case, we’re using the built-in every function provided by the Cylon library to toggle the led every second. Easy peasy.
Well, folks, there you have it. This is the point in my learning that I felt like the gate was open and I was running free and wild. Oh, the myriad of devices to communicate with. Oh, the plethora of components. Oh, the possibilities.
I have a few more posts to write on this, but I’m keeping them all separate so I can get them out the door. All of these articles are indexed at codefoster.com/edison.
Please feel free to comment below if you have any trouble here. There’s a good chance I ran into the trouble you’re finding, and if I didn’t I’m willing to bang my head against the wall a bit with you - just a bit.
Setting up an Intel Edison
This is a guide to getting started with the Intel Edison.
Intel has published a guide for getting started with this device as well, but I wanted to get everything into one place, tell it from my perspective, and smooth over a couple of the bumps I hit on the way. Let me know with a comment below if you have any questions.
I like to keep things simple, so I’m going to help you get started with the Edison as easily as possible.
In a subsequent post, I’m going to show you how you can very, very easily start writing JavaScript to control your Edison. You won’t have to deal with Wiring code, you won’t have to install the Arduino IDE (argh!), and you won’t have to install Intel’s attempt at an IDE - Intel XDK IoT Edition. You’ll be able to use Visual Studio, deploy to the device wirelessly, and then have plenty of time when it’s done to jump in the air and click your heels together.
In another post, I’m going to show you how to use Azure’s Event Hub and Service Bus (via a framework called NitrogenJS) to not only do cool things on one Edison, but to do cool (likely cooler actually) things on multiple Edisons, other devices, webpages, computers, etc.
Introducing the Edison
The Edison is tiny. It’s the size of an SD card. Despite its size, though it has built in WiFi and Bluetooth LE and enough processor and memory oomph to get the job done.

The design of the Edison is such that it’s pretty easy to implement a quasi-production solution. It’s not always easy getting a full Arduino board into your project, but the Edison is almost sure to fit.
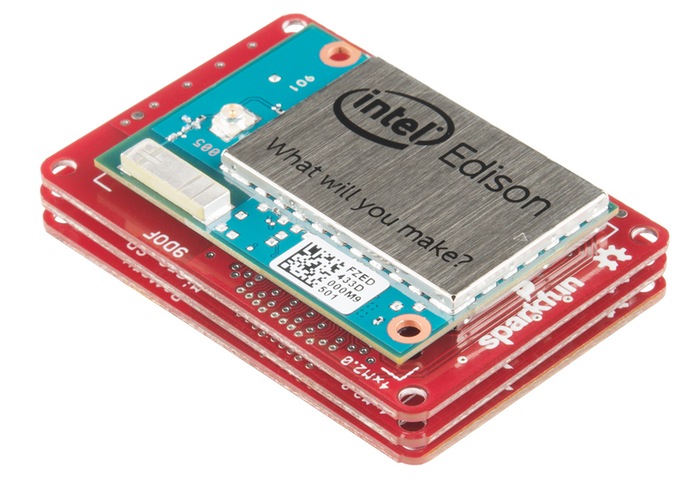
I’m not the only one that’s excited about this System on a Chip (SoC) either. Sparkfun.com is too. They made a great video introducing the technical specs of the Edison and showcasing their very cool line of modules that snap right on to the Edison’s body. Here you can see a few of those modules piled up to produce a very capable solution…

That’s the kind of compact solution I’m talking about. The only problem is that at the time of writing, the modules are only available for pre-order.
Not to worry though, there are a couple of other ways to interface with the Edison and get working on your project. The recommended way is by using the Arduino dev board. This is what the Edison looks like when it’s snapped to the dev board.
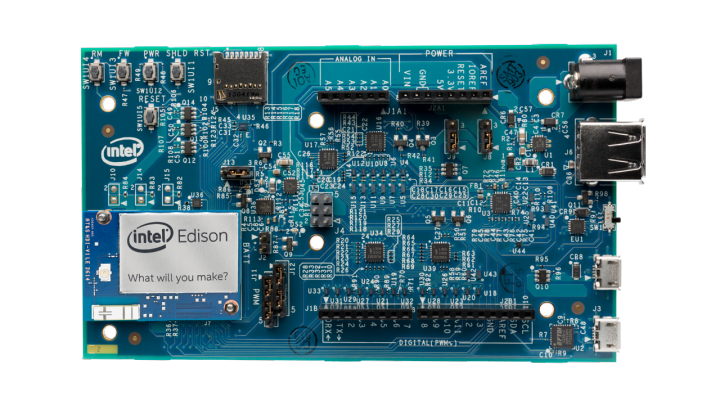
This dev board explodes all of the functionality packed into the Edison and makes life easy. It gives you USB headers, a power plug, GPIO (general purpose input/output) pins, a few buttons, and a micro-SD card slot.
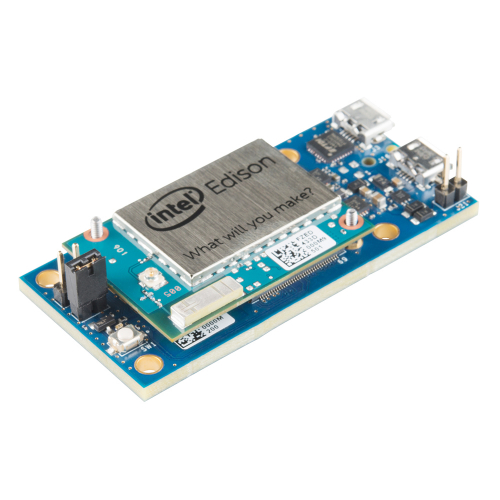
There’s another dev board available for the Edison - a mini board - but it’s less used because it requires soldering and doesn’t offer as many breakouts. If you’re looking for compact, you can just wait for the Sparkfun modules I mentioned. Here’s the Edison mounted on its mini board…
In this guide, I’ll take you end to end with getting the Edison setup on a Windows machine. I am not prepared to detail instructions for Mac/Linux, but Intel did a good job of that on their guide anyway. I’m going to mention the physical setup of the device, installation of the drivers (on your host PC running Windows), then walk you through flashing it with Intel’s custom Yocto Linux image and training it to connect to Wifi. When we’re all said and done, we’ll never have to plug the Edison into our host PC via USB again. We’ll be able to wirelessly deploy software and otherwise communicate with the device. Finally, we’ll write a simple bit of code, but in a follow up post, we’ll get crazy with software, because that’s what we do.
Physical Setup
Physically setting up the Edison once you’ve pulled it out of the box is pretty straight forward. I’ll assume you’re starting with the Arduino dev board.
Add the plastic standoffs to the dev board if you’d like. They’re good for keeping Edison’s sensitive underbelly from touching anything conductive and creating a dreaded short.
Next snap the Edison chip onto the board. You can put the tiny nuts onto the posts to hold the chip on, but I choose to rely on the solid friction fit instead.
Flashing
Before your Edison is going to do anything exciting, you’ll need to connect to it and flash it with the latest version of the Yocto Linux distribution that is provided by Intel. At first, it has no idea how to connect to a Wifi hotspot, so we’ll have to establish a serial connection. It’s quite easy actually.
Intel’s guide does a decent job of walking you through these steps, but again, I’m going to do it on my own to add my own perspective and lessons learned.
The guide asks you to plug in both USB cables. That will work, but it helps to understand why. One of the USB micro plugs (the one closest to the power plug and the larger USB port) is a host plug that will a) power the Edison via USB and b) will cause a certain directory from its file system to appear in Windows Explorer as a drive. The other USB micro plug (the one closest to the edge of the board) is a serial connection that will allow you to establish a 115200 baud serial connection before Wifi is established.
What I prefer to do is power the Edison with a barrel connector, and then just use one USB cable plugged in to whichever header I need. This works well especially since one of them is only need for one step upon initial setup - to flash the device. I have a USB to barrel connector, so I can simply plug my Edison into a USB battery pack and emphasize that it’s completely wireless.
Do make sure the itty bitty switch next to the USB micro plugs is switched toward the USB micro plugs.
Download and install FTDI drivers. First, you need to download and install the FTDI drivers which allow your host computer to communicate with the USB header on the Edison. The file you download (“CDM…”) can be directly executed, but **I had to run it in compatibility mode **since I’m running Windows 10. I won’t insult your intelligence by telling you how to hit Next, Next, Finish.
Download Intel Edison Drivers. Now you need drivers for RNDIS, CDC, and DFU. It sounds hard, but it’s not. Go to Intel’s Edison software downloads page and look for the “Windows Driver setup”. This downloads a zip file called IntelEdisonDriverSetup1.0.0.exe. Execute the file and comlete installation. The download goofed up for me in IE11 on Windows 10, so if you run into that, go to the link at the bottom of the page that says it’s for “older versions”. The download for that same file is there and it’s not an older version.
Note: In case you want to know, the RNDIS (Remote Network Driver Interface Spec) is for virtual Ethernet link over USB, the CDC (Composite Device Class) is a standard for recognizing and communicating with devices, and DFU (Device Firmware Upgrade) is functionality for updating firmware on devices.
**Copy flash files over. **With these two driver packs installed, you should have a new Windows drive letter in Explorer called Edison. This is good, because that’s where you copy the files that will be used to flash the device. Go back to the Intel Edison software downloads page and locate and download “Edison Yocto complete image”. Save it local and unzip it. Now make sure the Edison drive in Windows Explorer is completely empty and then copy the entire contents of the zip file you just downloaded into that drive.
Connect to the device using serial. Since we’re finished copying files to the device and ready to connect to it over serial, we need to switch the USB cable from the inner port to the outer port. Do make sure you have the USB to barrel connector in place so you get the reassuring power light on the board.
The Intel guide walks you through using PuTTY (a Windows client for doing things like telnet, SSH, and serial connections). I’m a command line guy, so I use a slightly different approach using PowerShell which I’ll present. You can choose which you like better.
Go to the PuTTY download page, download plink and save the resulting plink.exe file into some local directory. I use c:\bin. Now you’re ready to use PowerShell to connect to a serial port. Very cool.
Note: plink in PowerShell does something goofy with the backspace key. It works, but it renders
?[Jfor each time it’s pressed. If you know a way around this, let me know.
Before you connect, you have to see what the COM port is for the Edison. Go to Device Manager and expand the Ports (COM & LPT). Now look for USB Serial Port (COM_X_). Mine is COM5.

Here’s the line I use to connect (actually, I put a plink function in my $profile to make it even easier… ask me if you want to see how)…
. c:\bin\plink.exe -serial COM5 -sercfg 115200,8,1,n,Namely |
…if you saved your plink.exe into a different location or if your COM port is different then change accordingly.
Execute that line and then hit enter a couple of times. You should find yourself at a root@edison:~# prompt. That’s good news. Your on the device!
Initiate the flash. To flash your Edison using the files you copied into the drive, you simply type reboot ota and hit Enter. Watch your device do a whole bunch of stuff that you don’t have time to understand, and rejoice when it finishes and returns you to the login prompt. Your login is root and you don’t have a password. You should be sitting at root@edison:~# again.
Setup wireless. You have a full Linux distribution flashed to your Edison now, and it’s ready to talk Wifi. You just have to configure a couple things. Namely, you have to a) give your Edison a password (technically, provide a password for the root account), b) make sure your host PC is on the same network as your Edison, and c) provide your SSID and password. The first point is one thing the Intel guide skips - the need to set a password on the root account. If you don’t do it, you won’t be able to SSH to the device over Wifi. To initiate, execute configure_edison --setup. You’re prompted for a device name. I like to name mine (mine are called Eddie and Betty) so they’re easier to differentiate in terminal windows. I provide easy passwords for mine, because I’m not exactly worried about getting hacked. Next, you’ll be prompted to setup up Wifi. Follow along, choose the right hotspot, and enter the Wifi password when prompted.
Connect to the device using SSH over TCP/IP via the Wifi. Let’s get rid of this silly hard link and serial connection and join the modern era with a Wifi connection. Disconnect from the plink connection using CTRL+C. You can pull that USB cable out of your Edison’s dev board too. Your Edison is now untethered! Well, except for power, but a battery could take care of that.
Now again, I’ll diverge from the Intel guide here so I can stick with the command line. I use Cygwin on my box to allow me to SSH via PowerShell. I like it a lot. EDIT: Thanks to @palermo4 for pointing out that it’s not Cygwin that’s giving me this functionality, but rather my install of GitHub for Windows and the fact that I subsequently added GitHub’s bin folder to my path in Windows. Simply install GitHub for Windows and then go to your Environment Variables in Windows, edit the PATH variable, and append your bin directory to the end. On my system, it’s at C:\Users\jerfost\AppData\Local\GitHub\PortableGit_7eaa994416ae7b397b2628033ac45f8ff6ac2010\bin; I’m guessing yours is different :) After adding this, test it by typing SSH<Enter> in PowerShell and see if you get something besides an error.
You can use this approach, or you can go back to the Intel guide and use the PuTTY approach.
Before you can SSH to your device, you have to figure out what it got for an IP address. But the Edison has done something nice for you there. It created name.local as a DNS entry, so to connect to an Edison with the name eddie, you can simply use eddie.local. Mine is resolving to 192.168.1.9. If this doesn’t work for you, you can always log in to your router and find out what IP address was assigned to it or you can go back to the serial connection and type ifconfig at the prompt and look for the wlan0 network and see what address was assigned.
From my PowerShell prompt, I can just type ssh root@eddie.local. You’re connected to your Edison over Wifi now, and you’re so very happy!
Ready to Write Code!
From here, you’re ready to write some code. I’m going to write an extensive blog post on the topic, but for now, let’s get at least a taste.
First, make sure you’re SSH’ed to the device. So run that same ssh root@eddie.local command and sign in with your password.
Hello World! First things first. Let’s greet the world using JavaScript (via NodeJS). Type node and hit Enter and you should be at a > prompt. You’re in NodeJS… on your Edison. Man, that was easy.
Now type console.log('Hello World'); and hit Enter. There you have it.
Hit CTRL+C twice to get back to your Linux prompt.
Blink the light, already! You haven’t gotten started with an IoT device until you’ve blinked an LED, so let’s get to it. Still SSH’ed to your device, execute each of these lines (each at the prompt) followed by Enter…
node //enter NodeJS again |
And this is full-on JavaScript, so you can go crazy with it (recommended). Try this…
var state = 0; //create a variable for saving the state of the LED |
The light should be flashing on and off, but your state of bliss should be sustained high!
It’s obviously not sustainable to write our code at the prompt, so stay tuned for my next guide on writing code for your Edison.
Have fun!
Create Something
I recently found a wallpaper for my desktop that reminds me that it is a fundamental human tennant to create. Creation is built into us, but it’s an inherantly difficult process. Many of us in many small ways forego creation for the fear of “doing it wrong” or making something that doesn’t have value. But we also realize that foregoing creation is frustrating because it’s what we’re meant to do.
One of my favorite things about software development is the opportunity to create things that are both expressive and functional. When you make an app, you are filling a need and at the same time you are inspiring someone. If you remember that you have the opportunity to do both of those things well (as well as the opportunity to do them poorly), you’ll be on your way to an app that users fall in love with.