Posts tagged with "device"
The Most Basic Way to Access GPIO on a Raspberry Pi
I’ve been hacking on the Raspberry Pi of late and wanted to share out some of the more interesting learnings.
I think people that love technology love understanding how things work. When I was a kid I took apart the family phone because I was compelled to see what was inside that made it tick. My brother didn’t care. If it made phone calls, he was fine with it. I had to understand.
Likewise, I knew that I could use a Node library and change the GPIO pin levels on my Raspberry Pi, but I wanted to understand how that worked.
In case you’re not familiar, GPIO stands for General Purpose Input/Output and is the feature of modern IoT boards that allows us to controls things like lights and read data from sensors. It’s a bank of pins that you can raise high (usually to something like 3.3V) or low (0V) to cause some electronic behavior to occur.
On an Intel Edison (another awesome IoT board), the platform developers decided to provide a C library with mappings to Node and Python. On the default Edison image, they provided a global node module that a developer could include in his project to access pins. The module, by the way, is called libmraa.
On a Raspberry Pi, it works differently. Instead of a code library, a Pi running Raspbian uses the Linux file system.
When you’re sitting at the terminal of your pi (either hooked up to a monitor and keyboard or ssh’ed in), try…
cd /sys/class/gpio |
You’ll be taken to the base of the file system that they chose to give us for accessing GPIO.
The first thing to note is that this area is restricted to the root user. Bummer? Not quite. There’s a way around it.
The system has a function called exporting and unexporting. Yes, I know that unexport is not a real word, but alas I’m not the one that made this stuff up, and besides, who said Linux commands had to make sense?
To access a pin, you have to first export that pin. To later disallow access to that pin, you unexport it.
I had a hard time finding good documentation on this, but then I stumbled upon this znix.com page that describes it quite well. By the way, this page references “the kernel documentation,” but when I hit that link here’s what I get…

Oh well.
Now keep in mind that to follow these instructions you have to be root. You cannot simply sudo these commands. There is an alternative called gpio-admin that I’ll talk about in a second. If you want to just become root to do it this way, you do…
su root |
If you get an error when you do that, you may need to first set a password for root using sudo passwd.
To export then, you do this…
echo <pin number> > /sys/class/gpio/export |
And the pin number is the pin name - not the header number. So pin GPIO4 is on pin 7 on an RP2, and to export this you use the number 4.
When you do that, a virtual directory is created inside of /sys/class/gpio called gpio4, and that directory contains virtual files such as direction, value, edge, and active_low. These files don’t act like normal files, by the way. When you change the text inside one of these files, it actually does something - like perhaps the voltage level on a GPIO pin changes. Likewise, if a hardware sensor causes the voltage level on a pin to change, the content of one of these virtual files is going to change. So this becomes the means by which we communicate in both directions with our GPIO pins.
The easiest way, then, to read the value of the /sys/class/gpio/gpio4/value file is…
cat /sys/class/gpio/gpio4/value |
Easy.
To write to the same file, you have to first make sure that it’s an out pin. That is, you have to make sure the pin is configured as an output pin. To do that, you change the virtual direction file. Like this…
echo out > /sys/class/gpio/gpio17/direction |
That’s a fancy (and quick) way to edit the contents of the file to have a new value of “out”. You could just use vi or nano to edit the file, but using echo and the direction operator (>) is quicker.
Once you have configured your pin as an output, you can change the value using…
echo 0 > /sys/class/gpio/gpio4/value //set the pin low (0V) |
Now that I’ve described the setting of the direction and the value, you should know that there’s a shortcut for doing both of those in one motion…
echo high > /sys/class/gpio/gpio4/direction |
There’s more you can do including edge control and logic inversion, but I’m going to keep this post simple and let you read about that on the znix.com page.
Now, although it’s fun and satisfying to understand how this is implemented, and it might be fun to manipulate the pins using this method, you’ll most likely want to use a language library to control your pins in your app. Just know that the Python and Node libraries that change value are actually just wrappers around these file system calls.
For instance, let’s take a look at the pi-gpio.js file in the pi-gpio module…
write: function(pinNumber, value, callback) { |
When you call the write() method in this library, it’s just calling the file system.
So there you have it. I hope you feel a little smarter.
Easy and Offline Connection to your Raspberry Pi
Getting a Raspberry Pi online is really easy if you have an HDMI monitor, keyboard, and mouse.
Subsequently getting an SSH connection to your pi is easy if you have a home router with internet access that you’re both (your PC and your pi) connected to.
But let’s say you’re on an airplane and you pull your Raspberry Pi out of its box and you want to get set up. We call that provisioning. How would you do that?
I’ll propose my method.
First, you need to plug your pi into your PC using an ethernet cable. If you’re a technologist of old like I am, you may be rummaging through your stash for a crossover cable at this point. It turns out that’s not necessary though. I was pretty interested to discover that modern networking hardware has auto-detection that is able to determine that you have a network adapter plugged directly into another network adapter and crosses it over for you. This means I only have to carry one ethernet cable in my go bag. Nice.
If you put a new OS image on your pi and boot it up, it already detects and supports the ethernet NIC, so it should get connected and get an IP automatically.
Here comes the seemingly difficult part. How do you determine what the IP address of your pi is if you don’t have a screen?
The great thing is that the pi will tell you if you know how to listen.
The means by which you listen is called mDNS. mDNS (Multicast DNS) resolves host names to IP addresses within small networks that do not have a local name server. You may also hear mDNS called zero configuration and Apple implemented it and felt compelled (as they tend to) to rename it - they call it Bonjour.
This service is included by default on the Raspberry Pi’s base build of Raspbian, and what it means is that out of the box, the pi is broadcasting its IP address.
To access it, however, you also need mDNS installed on your system. The easiest way I am aware of to do this is to download and install Apple’s Bonjour Print Services for Windows. I’m not certain, but I believe if you have a Mac this service is already there.
Once you have mDNS capability, you simply…
ping raspberrypi.local -4 |
The name raspberrypi is there because that’s the default hostname of a Raspberry Pi. I like to change the hostname of my devices so I can distinguish one from another, but out of the box, your pi will be called raspberrypi. The .local is there because that’s the way mDNS works. And finally, the -4 is an argument that specifically requests the IPv4 address.
If everything works as expected you’ll see something like…
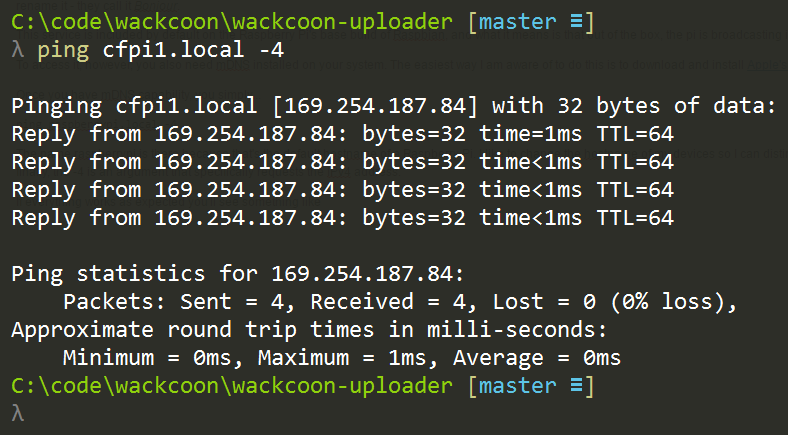
Again, my pi has been renamed to cfpi1, but yours should be called raspberrypi if it’s new.
My system uses 192.168.1.X addresses for my wireless adapter and 169.254.X.X for my ethernet adapter.
So that’s the information I needed. I can now SSH to the device using…
ssh pi@169.254.187.84 |
I could just use ssh pi@raspberrypi.local to remote to it, but I’ve found that continuing to force this local name resolution comes with a little time cost, so it’s sometimes significantly faster to hit the IP address directly. I only use the mDNS to discover the IP and then I use the IP after that.
Provisioning a Raspberry Pi usually includes a number of system configuration steps too. You need to connect it to wireless, set the locale and keyboard language, and maybe turn on services like the camera. If you’re used to doing this through the Raspbian Configuration in XWindows, fear not. You can also do this from the command line using…
sudo raspi-configuration |
Most everything you need is in there.
You may also be wanting to tell your pi about your wifi router so it’s able to connect to via wireless the next time you boot up. For that, check out my post at codefoster.com/pi-wifi. Actually, if you’re playing a lot with the Raspberry Pi, you might want to visit codefoster.com/pi and see all of the posts I’ve written on the device.
Happy hacking!
Accidental Old Version of Node on the Raspberry Pi
I beat my head against a wall for a long time wondering why I wasn’t able to do basic GPIO on a Raspberry Pi using Node. Even after a fresh image and install, I was getting cryptic node error messages when I ran my basic blinky app.
Lucky for me (and perhaps you) I got to the bottom of it and am going to document it here for posterity. Let’s go.
The head beating happened at a hackathon I recently attended with some colleagues.
The task was simple - turn on an LED. It’s so simple that it’s become the “hello world” app of the IoT world. There’s zero reason in the world why this task should take more than 10 minutes. And yet I was stumped.
After a fresh image of Raspbian, an install of NVM, and then a subsequent installation of Node.js 6.2.2, I wrote a blink app using a variety of modules. I used pi-gpio, rpi-gpio, onoff, and finally johnny-five and the raspi-io driver.
None of these strategies were successful. Ugh. Node worked fine, but any of the libraries that accessed the GPIO were failing.
I was getting an obscure error about an undefined symbol: node_module_register. No amount of searching was bringing me any help until I found this GitHub issue where nodesocket (thanks, nodesocket!) mentioned that he had the same issue and it was caused by an NVM install of Node and an accidental, residual version of node still living in /usr/local/bin. In fact, that was exactly what was happening for me. It was a subtle issue. Running node -v returned my v6.2.2. Running which node returned my NVM version. But somewhere in the build process of the GPIO modules, the old version (v0.10) of node from the /usr/local/bin folder was being used.
There are two resolutions to this problem. You can kill the old version of node by deleting the linked file using sudo rm /usr/local/bin/node and then create a new one pointing to your NVM node. I decided, however, to deactive NVM…
nvm deactivate |
…and then follow these instructions (from here) to install a single version node…
wget http://nodejs.org/dist/v6.2.2/node-v6.2.2-linux-armv7l.tar.xz`` # Copied link |
I like using NVM on my dev machine, but it’s logical and simpler to use a single, static version of Node on the pi itself.
EDIT (2016-12-14): Since writing this, I discovered the awesomeness of nvs. Check it out for yourself.
And that did it. I had blinky working in under 3 minutes and considering I get quite obsessive about unresolved issues like this, I had a massive weight lifted.
BTW, through this process I also learned about how the GPIO works at the lowest level on the pi, and I blogged about that at codefoster.com/pi-basicgpio.
Wifi on the Command Line on a Raspberry Pi
I hate hooking a monitor up to my Raspberry Pi. It feels wrong. It feels like I should be able to do everything from the command line, and the fact is I can.
If you’re pulling your Raspberry Pi out of the box and are interested in bootstrapping without a monitor, check out my other post on Easy and Offline Connection to your Raspberry Pi.
Afterward, you may want to set up your wifi access - that is, you want to tell your pi about the wireless access points at your home, your coffee shop, or whatever.
Doing that from the command line is pretty easy, so this will be short.
You’re going to be using a utility on Raspbian called wpa_cli. This handles wireless configuration and writes its configuration into /etc/wpa_supplicant/wpa_supplicant.conf. You could even just edit that file directly, but now we’re talking crazy talk. Actually, I do that sometimes, but whatever.
First, run…
wpa_cli status |
…to see what the current status is. If you get Failed to connect to non-global ctrl_ifname: (null) error: No such file or directory, that’s just a ridiculously cryptic error message that means you don’t have a wifi dongle. Why they couldn’t just say “you don’t have a wifi dongle” I don’t know, but whatever.
If you do have a wifi dongle, you’ll instead see something like…

Yay! You have a wireless adapter, which means you likely have a wifi dongle plugged into a USB port. It says here that the current state is INACTIVE. That’s because you’re not connected to any access points.
To do so, you need to run scan, but at this point, you may want to enter the wpa_cli interactive mode. That means that you don’t have to keep prefixing your commands with wpa_cli, but can instead just type the commands. To enter interactive mode, just do…
wpa_cli |
To get out at any time just type quit <enter>.
Now do a scan using…
scan |
It’s funny, because it appears that nothing happened, but it did. Use…
scan_results |
…to see what it found.
This scanning step is not necessary, by the way, there’s a good chance you already know the name (SSID) of your access point, and in that case you don’t need to do this.
Next you create a new network using…
add_network |
You’ll get an integer in return. If it’s your first network, you’ll get a 0. That’s the ID of the new network you just created, and you’ll use it on these subsequent commands.
To configure your network do this…
set_network 0 ssid "mynetwork" |
Something I read online said that as soon as you enter this, it would start connecting, but I had to also do this to get it to connect…
select_network 0 |
Now there’s one more thing. If you’re like me, you don’t just connect to a single AP. I connect from home, my mifi, my local coffee shop, from work, etc. I want my pi to be able to connect from any and all of those networks.
Adding more networks is as easy as following the instructions above multiple times, but you want to set one more network property - the priority. The priority property takes an integer value and higher numbers are higher priority. That means that if I have network1 (priority 1) and network2 (priority 2), and when my pi boots it sees both of those networks, it’s going to choose to connect to network2 first because it has the higher priority.
Okay, that does it.
If you want to see everything I’ve written about the Raspberry Pi, check out codefoster.com/pi
Index of my Raspberry Pi Posts
I’ve been doing a lot of hacking on the Raspberry Pi, and I’ve written a few articles on the topic. I’ve assembled all of my posts here for easy access.
- Accidental Old Version of Node on the Raspberry Pi - I beat my head against a wall for a long time wondering why I wasn’t able to do basic GPIO on a Raspberry Pi using Node. Even after a fresh image and install, I was getting cryptic node error messages when I ran my basic blinky app.Lucky for me (and perhaps you) I got to the bottom of it and am going to document it here for posterity.
- The Most Basic Way to Access GPIO on a Raspberry Pi - I’m always looking for the lowest level understanding, because I hate not knowing how things work. On a Raspberry Pi, I’m able to write a Node app that changes GPIO, but how does that work? Turns out it’s pretty interesting. I’ll show you.
- Easy and Offline Connection to your Raspberry Pi - Getting a Raspberry Pi online is really easy if you have an HDMI monitor, keyboard, and mouse, but what about if you want to get connected to your Pi while you’re, say, flying on a plane?
- Wifi on the Command Line on a Raspberry Pi - How to configure wireless connections on your Raspberry Pi from the command line.
Using Visual Studio to Write Node for Devices
In previous blog posts, I explained how to setup your Intel Edison and how to start writing code for it. And in case you got here directly, I created a full index of my Edison posts to help you find what you need.
In this post, we’ll take a look at writing code for it using Visual Studio. Visual Studio, once you add the free Node.js Tools for Visual Studio plugin, happens to be pretty great at working with Node.js projects. It runs node behind the scenes, so it offer the following…
- Editing
- Intellisense
- Profiling
- npm
- TypeScript
- Debugging (local, remote, and Azure!)
That’s an impressive list, and we’ll take a look at a few of these features in this post.
Closer to the end of this post, I’ll tell you about my edref project. “edref” stands for Edison Reference project and is intended to get you started quickly with an Intel Edison project in Visual Studio. If you want to skip all the rhetoric and just download the reference project, I’ll understand.
Visual Studio
In case you missed the announcement in November, Visual Studio Community edition is now free. That’s huge. The Community edition is essentially the existing Professional edition, and facilitates a huge array of development scenarios. VS is intuitive, intelligent, and has a lot of Microsoft and community support behind it.
Installing Visual Studio Community 2013
To download Visual Studio, start at visualstudio.com, but know that visualstudio.com sort of has two meanings right now. Visual Studio is the IDE, but it’s also the ALM tools for taking any size projects from conception to completion with any size group of developers. So click the download button under Visual Studio the IDE and (at least at the time of this writing) you’ll get a direct link to the Visual Studio Community 2013 package.
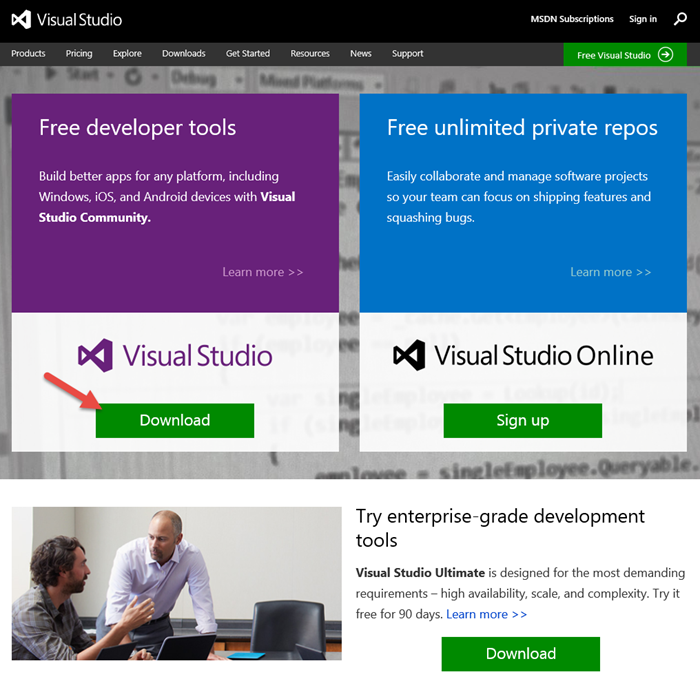
Installation is pretty straight-forward, and I won’t include a screenshot series, but one decision you will have to make is which features of the product to install. Do you want to play with Lightswitch? Windows Phone? Just check the boxes.
The next version of Visual Studio is Visual Studio 2015 and there’s pretty good support for it already (including a working version of the Node.js Tools), so if you want to be a trailblazer at work, go for it.
The Node.js Tools for Visual Studio
Installing the Tools
The Node.js Tools are found at nodejstools.codeplex.com. Go there and click the gigantic, unmistakable DOWNLOAD button. Again, the download is assumedly self-explanatory.
Creating a New Project
Creating a project using Node.js in Visual Studio begins like any other project type - with the File | New Project dialog…
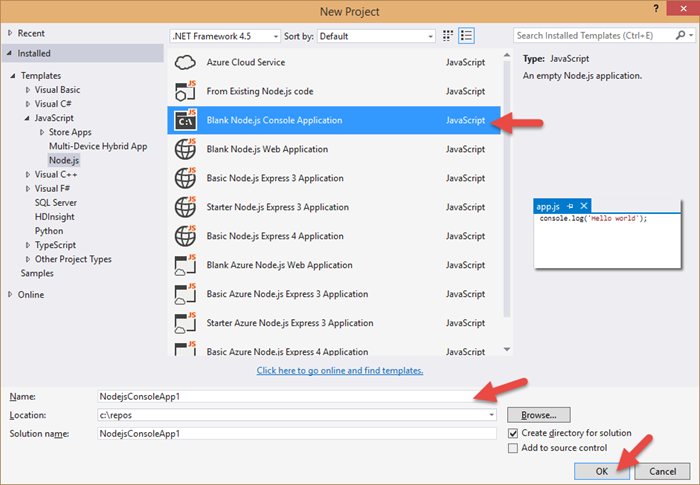
There are a number of projects to choose from. For what we’re dealing with - writing Node.js for devices - the Blank Node.js Console Application will suffice. The rest are web applications for creating node apps on the server.
As per usual, give your project a name and location and OK away.
Now, when Visual Studio finished with our bidding, let’s take a look at what we’ve got…
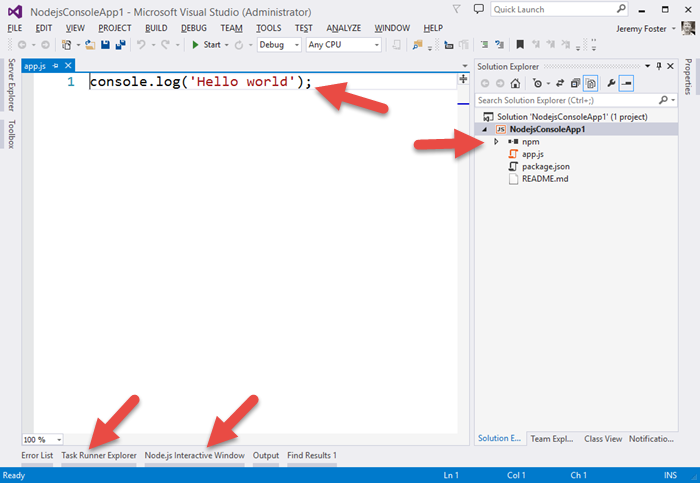
Let me point out a few things.
First of all, perhaps the simplest Hello World app in the world :) Next, notice the npm folder in the project. This is going to give you a graphic way of managing your npm packages. Some people like to do things the graphic way. I personally never use this, but for some people it’s just your kind of thing. It actually works pretty slick too showing you all of your global modules, all of the modules that are installed, and visually differentiating the packages that have been added to your package.json file.
If you begin typing a dependency directly into the package.json, it gives you some Intellisense with an under-the-covers search of the npm repository, and it even helps you with the version…
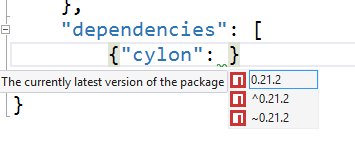
I like that. I never type my dependencies in directly, but if I did, I’d certainly come to rely on it.
You can also use the npm dialog to install packages.
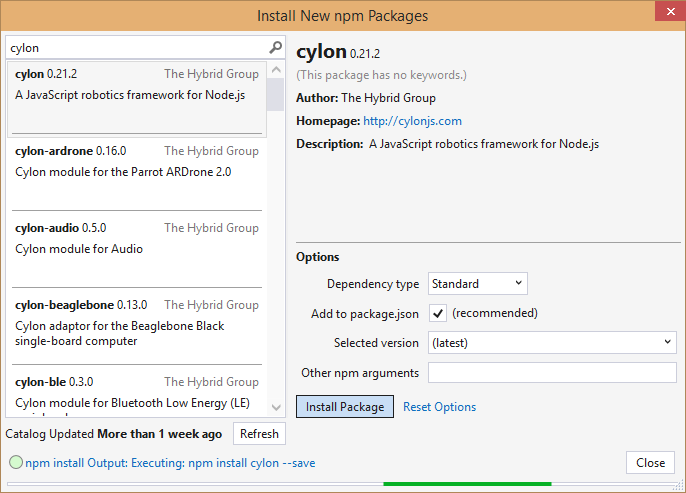
Again, nice, but I still keep a CLI open and execute npm install mypackage --save on my own. And of course, in that case, all of the installed packages are recognized by the tools, so I do enjoy having the visual indication that my package has been installed.
By the way, if you want to create a new Visual Studio Node.js project from an existing Node.js project that you have in your file system (perhaps recently cloned with git?) then check out my post Open an Existing Node.js Project in Visual Studio.
Using gulp for Deployment
We saw in the last post in this series how to wirelessly deploy your code to your device. You can keep doing it that way if you want, but there’s an easier way. Deploying your code is essentially a build task, and that’s what grunt and gulp are for.
NTVS also gives you a little bit of help with grunt and gulp. It’s hilarious that most people still refer to “grunt and gulp” whenever they talk about JavaScript task running frameworks. They do the exact same thing and I don’t imagine to many folks actually use grunt _and _gulp. Rather, most likely use grunt if they have to and gulp if they can. gulp is better hands down. grunt uses JSON files for configuration of tasks and gulp uses JavaScript. So, instead of composing gigantic JSON files to attempt to define what sort of tasks you need to run, you can stay in code and do whatever the heck you want or need. And gulp is supposedly way faster too, although I haven’t done any of my own tests.
Adding some gulp tasks to your app is easy. You just add a gulpfile.js to the project and add the gulp npm module both globally and at the project level.
The edref project has a little bit of gulp built in to deploy your code to your Edison device. Here’s that gulpfile.js content so we can talk about what gulp tasks look like…
/// <vs BeforeBuild='jshint' AfterBuild='deploy' /> |
Notice the actual gulp tasks (where I put the <———— indicators). Those define what tasks are configured to run.
Now this next part I love. Visual Studio looks at the gulpfile.js at these tasks and adds them to a new pane called the Task Runner Explorer…
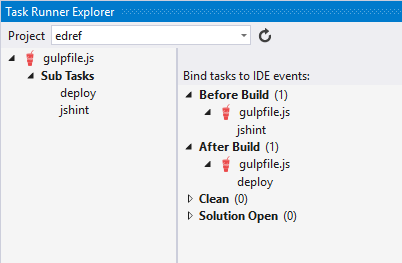
So jshint and deploy under Sub Tasks exist because they are defined in the gulpfile.js code.
Any time you need (or just want), you can right click one of those bad boys and hit Run and just run your tasks ad hoc individually. But also notice that under Before Build I have determined that the gulpfile.js/jshint task should run, and After Build the gulpfile.js/deploy task should run. That means that I can change a line of code, hit CTRL+SHIFT+B to build my project, and know that the targeted Edison (whether it’s on my desk or installed in a wall or gadget absolutely anywhere!) is going to contain the latest version of my project. That’s pretty awesome.
I’m working on another task as we speak that will fire off the node process for that app so your device will not only get its code, but start cranking on it as well.
Remote Debugging
Another scenario unlocked for us using the NTVS tools is debugging - even remote debugging. I’m thrilled about this one.
Note that you can also check out the official documentation for the remote debugging feature of the NTVS tools.
I did a little research online and found that most people working with devices are resorting to the classic console.log method of debugging. When you’re writing Wiring code for an Arduino, for example, you use a serial debug library that allows you to send messages back to the console in your Arduino IDE. You can then add something like…
Serial.println("Made it here!");
This reminds me of JavaScript development circa 1999 and by no means turns my crank.
What does turn my crank is running my project, perhaps watching a couple thing happen on my gadget, then hitting a breakpoint in my code in Visual Studio and being able to hover over any variables to see what their value is and hit F5 to continue. That’s an awesome dev scenario!
Here’s how to do it.
Write or open a Node.js project targeting your device.
You can clone http://github.com/codefoster/tweetmonkey if you’re looking for inspiration. You can see more about my good friend TweetMonkey at codefoster.com/tweetmonkey, but in short, he taps into Twitter’s streaming API and waits for tweets with the hashtag #tweetmonkey. When he see’s one, he comes to life, nods his head, squeaks, and clangs his symbols. My 3 year old loves it :)
Make sure you have a RemoteDebug.js deployed to your device
I like to include the RemoteDebug.js file in my project and check it into source so it’s ready to go for anyone that clones the project.
If you have the NTVS tools installed, you have this file. To see where it is, go to Tools | Node.js Tools | Remote Debugging Proxy | Open Containing Folder. Copy that file to your project or deploy it directly to your device. By the way, the gulp task that I include with the edref project (see later) copies all .js files, so if you put the RemoteDebug.js file in your project, it will get deployed automatically.
Execute your node app
You normally execute your app by remoting to your device (using something like ssh root@mydevice.local), changing to your project folder, and then executing the line…
node app.js
For remote debugging, you do it like this…
node RemoteDebug.js app.js
…and you should get some feedback like…
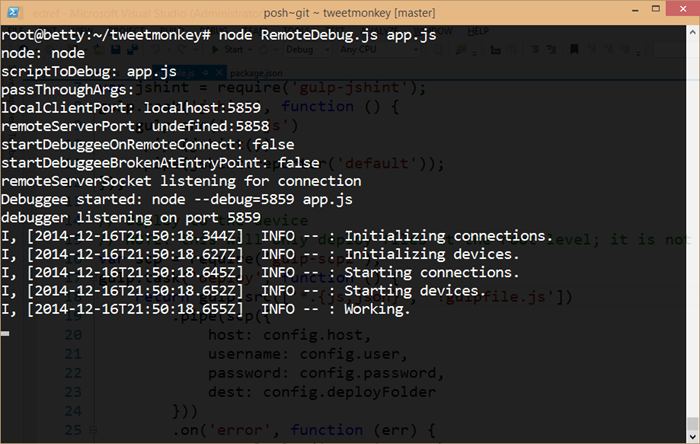
So you can see that the RemoteDebug.js file is launching a proxy for us using port 5858. And it introduces a term that was new to me - debuggee. I think I like it.
With that going, we’re ready for the next step.
Attach to Process from Visual Studio
In Visual Studio, go to the Debug menu and Attach to Process… and change the Transport to Node.js remote debugging.
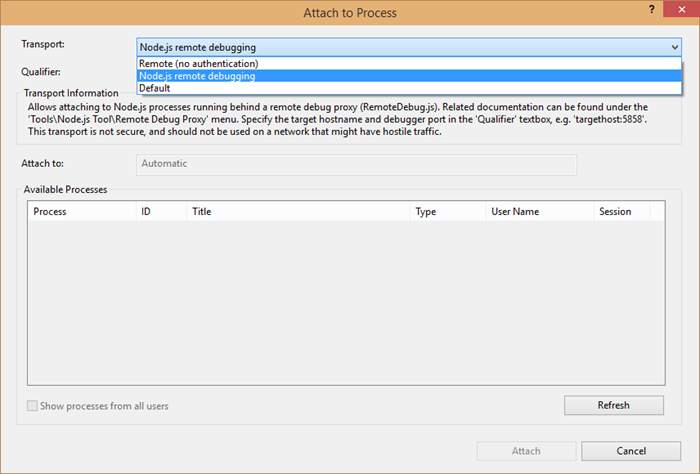
Now, in the Qualifier field, enter tcp://devicename.local:5858 and check the Show processes from all users box. You should see your node process appear in the Available Processes.
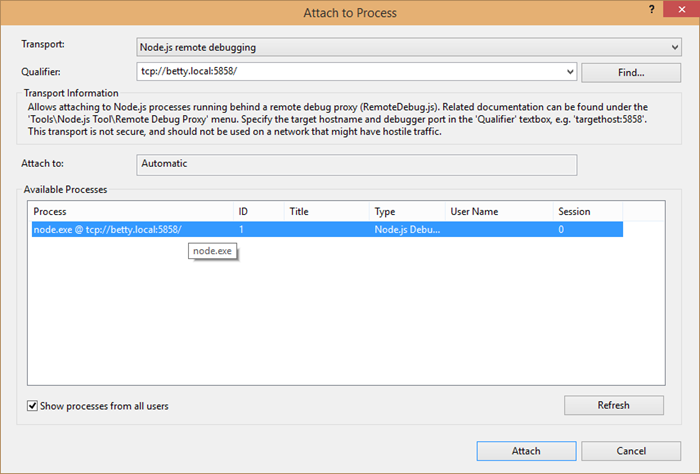
Attach.
Now set a breakpoint.

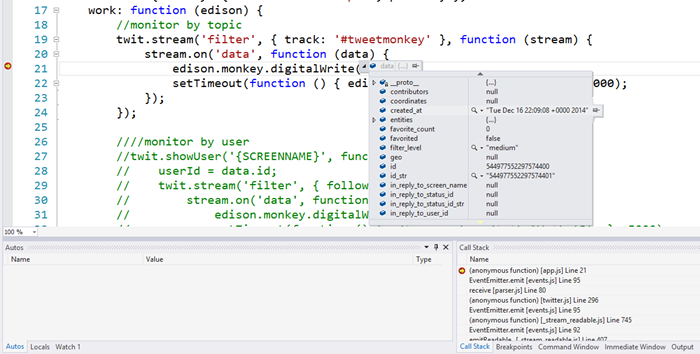
And in the case of the app we’re working with here (tweetmonkey), send a tweet to hashtag #tweetmonkey and you should break at your breakpoint. As the French say, “Formidable!”
And, of course, in typical VS fashion, while broken, you can hover over JavaScript objects and check out all of their property values.
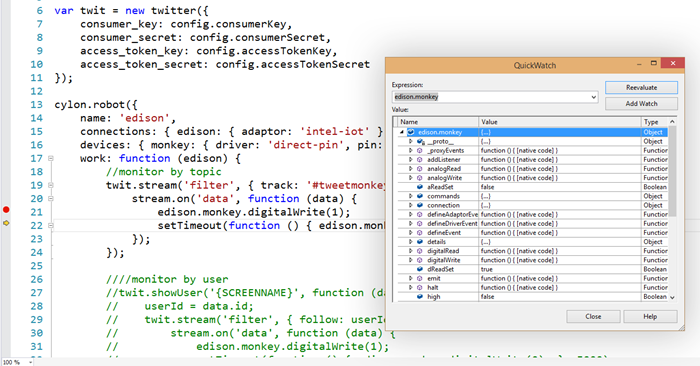
And you can open QuickWatch and enter any dynamic expressions you want and browse the results.
So, now you’re cruising!
The edref Project
There’s one last thing that I said I’d talk about, and that’s my edref project. There are a few things to do to set up a good, working Node.js environment in Visual Studio that will get you the kind of rich development environment I’ve lined out. It’s not a lot, but there’s not sense in doing it from scratch every time, so I’ve created a project called edref on GitHub that you can clone and get started right away. Feel free to fork and issue pull requests if you have ideas for how to improve it. I personally use this project for starting new hardware hacks, so when I find more efficient ways to do something, I’ll update the GitHub project.
The one thing I’d like to point out about the project is that the gulpfile.js is all set up to deploy your project to a remote device. You just have to fill out the config.js file with your particulars.
Conclusion
You should have what you need to not only write code for your Intel Edison, but write it in Visual Studio style! If you have any questions about this, please let me know in the comments. Consider this a living blog post still in that I’ll add edits here as I learn more about this fun device.
Happy hardware hacking!
The Intel Edison
I am playing with the Intel Edison a lot these days. I’m a big promoponent of it, because I’m a big proponent of both power and simplicity. This device has enough power for whatever maker, robotic, gadgeteer project I can conceive of, and it’s all set up to easily run JavaScript via Node via Linux. This means I can use higher level libraries like Cylon.js. This means if I want to turn a motor, it’s easy. If I want to read accelerometer data from an ADXL377, it’s easy. If I want to include a Node module for storing temperature and humidity data in Azure, it’s super duper easy. I like easy - just not at the cost of power.
I’ll stop being wordy, though and just index the posts that I’ve creating (and am still creating) for the Intel Edison. Here they are.
Getting Started with the Intel Edison should help you pull it out of the box, mount the device to the dev board, flash the latest OS to the device, and get your toes wet writing code.
Writing JavaScript for the Intel Edison intends to pick up where the former left off and should help you get started writing Node.js apps using Cylon.js for the device.
Using Visual Studio to Write Node for Devices will bring a bit of awesome to coding for devices. You’ll have a rich development environment including remote debugging so you can actually step through breakpoints and watch your gadget react!
Flashing an LED when you get a Tweet (up next) will use what we’ve learned so far along with a Node.js module to hook into Twitter’s streaming API to turn your LED on for a couple seconds when you get a tweet.
Tweet Monkey is actually similar to the flashing LED sample I was going to do, but more fun. Would you rather see an LED flash or a monkey clanging symbols?! The real value in this tutorial is the JavaScript that combines calling in to the Twitter Streaming API with the using of the cylon library to talk to the monkey.
Command Monkey is Tweet Monkey’s older brother. Command Monkey is a fun and full-featured scenario where Cortana on the Windows Phone is used to tell the monkey to dance. This tutorial will teach you a pretty wide scope. You’ll learn to integrate Cortana, write a Windows Phone app using JavaScript, write a Node.js service on Azure, and how to communicate down to the device (the monkey in our case) using web sockets. It’s surprisingly little code overall.
Network IoT Devices (queued) is all about getting devices to form local or extremely broad networks that form huge logical apps and scenarios.
So you can actually check out posts in progress before I’ve polished them and called them done. Do please feel free to engage in the comments and offer feedback, advice, or questions.
Writing JavaScript for an Intel Edison
In my last article about the Intel Edison, I showed you how to take yours out of the box, and get it set up. Consider this article a follow-on. I’m going to pick up pretty much where the last one ended.
We actually wrote a little bit of code in the setup article, so you got a taste. Now we’re going to learn…
- how to use the power of Node.js to bring in libraries and command our device
- how to deploy code to the device wirelessly (zoing!)
- how to use the excellent Cylon library to make our code elegant and expressive
Let’s start off in this article without employing the help of Visual Studio, and then my next article will capture the many productivity benefits of VS. It’s always nice to start at the base and climb up to awesome tooling. That way, we’re thankful for the conveniences it brings. :)
Using Node.js
Installing Node.js
I’m assuming your host PC is Windows. I’m running the technical preview of Windows 10 and it’s all working great. I like to live on the edge.
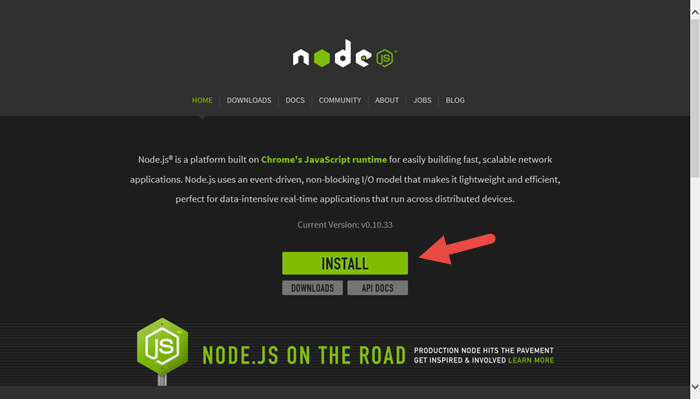
The easiest way to install Node.js is by simply clicking the big green button you’ll find at nodejs.org…
You’ll see in the installation wizard, that you’re actually getting the NPM utility installed along with the Node.js engine. The installation should take care of a lot of busy work for you such as adding node and npm to your path so you can actually call it from the CLI. My CLI of choice, BTW, is PowerShell. To be clear, I’m talking here about installing Node.js on your host PC. Node and NPM should already be installed on the device if you flashed it according to the instructions in the last post.
After you have Node.js installed, we’ll walk through a few steps to create a new node project on your host PC. When we’re done with that, we’ll turn our attention to getting that code over to the Edison and running it there.
Creating the Folder and File Structure
Node.js projects have a pretty well defined, convention based folder and file structure. They’re very simple too - all of the metadata is in one spot. I don’t know where you keep your development projects, but I keep all of mine under c:\repos and I’ll start there. Watch the following video as I create a new project folder, generate an app package description file (package.json), and then create my initial app.js file…
As you can see, the npm init makes the creation of our package.json file very easy. The package.json file describes your node project and has a few purposes - the two most prominent that I can think of are a) it provides the metadata necessary in case we end up publishing this package to the node package store and b) it defines the project dependencies so that when the project is copied somewhere else, a simple command is all that’s necessary to actually go out and copy in all binaries necessary for the app to work.
Writing the Code
Now, in keeping with a simple workflow at first, let’s open app.js in Notepad++, and fill out the following…
var mraa = require('mraa'); |
This code depends on the mraa module, but if you followed my setup guide and flashed the Intel with the latest image, then you already have it. The mraa module maps the C libraries for interacting with the Edison’s hardware (the GPIO pins, the I2C bus, etc.) to Python and to JavaScript.
The code simply creates a new pin out of pin 13. Pin 13 is the one that conveniently has an LED on the dev board, so we don’t even have to plug anything in to see it. It then sets the direction of that pin to out. And finally, it raises the logic level of the pin by writing a value of 1.
Deploying Wirelessly
We saw in the last guide how to SSH directly to our device. If you gave your device the name “betty” like I did, then you’ve been provided a DNS name of betty.local which represents the IP address that your device was assigned on the network. If you’re not sure the device or the DNS name are working, just do ping betty.local from the CLI (replacing ‘betty’ with the name of your device of course). I’ve actually started pinging to discover the IP address and then using the IP address explicitly for SSH and SCP, because it takes a little time for the alias to resolve but hitting the IP address directly is snappy.
First, we’ll get our code copied to the device, and then we’ll SSH to the device in order to execute the code. It is also possible to simply execute the node app.js command remotely with SSH, but it’s fun to see what’s actually happening.
In this video, I’m going to SSH to the device, make a directory for our hellonode app, then jump back to my host machine, copy the files to the device (and specifically to that project folder) using SCP, and then back to the device to execute the app. The workflow can be simplified a bit, but I’m not arguing at this point. It’s pretty wonderful actually.
Notice the syntax of the SCP command. It wants scp
You didn’t see anything happen there, but I did. My LED came on.
There are a few things that are cool about this. It’s cool that the mraa library preexists and makes communicating with the device pins so easy from a high-level language like JavaScript. Also, it’s great that we’re remoting and remote deploying our project wirelessly. This means that we can build something like an intelligent camera device, install it in a bird nest, and then remotely upgrade our software without disturbing the birds. That’s just the first example that came to mind.
Alright, now lets make our development really clean and easy by employing the CylonJS library.
Using CylonJS
CylonJS can be found at cylonjs.com. You won’t even need to go there to get the code, because we’re going to use NPM, but you may want to go check it out to get familiar with the project and eventually to research the documentation for whatever device and driver you’re using.
Let’s run through the steps to do something similar to our hellonode app above, but use the Cylon library.
In this video we will: create a project folder, create our app.js file with some sample code from cylonjs.com that will cause pin 13 to blink, generate a package.json file, install cylon.js via NPM using the --save parameter to add it as a dependency in our package.json file, then we’ll deploy to the device, and finally SSH to the device and execute the node program. You’ll actually see a video of the device with the LED blinking. Just a quick warning - we’re not only going to be holding off on Visual Studio at this point, but I’ve decided to use a CLI text editor for the hilarious factor as well as the convenience of showing everything in one window. I actually really like using the command line, but GUI’s are great too. As long as I don’t have to remove my hands from my keyboard, I’m a happy programmer.
EDIT: Thanks to Roberto Cervantes in the comments for pointing out a step that I should have called special attention to. In the following video, notice that after I
scpthe files to the device and thensshto the device, I execute the commandnpm install. This looks into thepackage.jsonfile that we just deployed to see what my project’s dependencies are, it goes out to the internet (to the NPM repository) to fetch the packages, and then it installs them. If you skip this step your app will have no idea whatrequire('cylon')means.
A few things to note about this video…
My
edit app.jscommand won’t work for you because that’s a special command line text editor that I use. I’m going to go ahead and assume you have your own favorite way to edit a text file. :)Note that installing the
cylon-intel-iotmodule added dependencies in the package.json for itself as well as for its dependencies. We actually never had to create thecylonmodule as a dependency. That happened implicitly because the cylon-intel-iot module knew that it needed it. That’s a cool thing about node modules - they each know exactly what they depend on and a singleinstallcommand recursively takes care of business.We copied over only the app.js and the package.json. We did not copy over the node_modules folder - you’ll notice that I deleted it before deploying. This is the right way to deploy project. You don’t check the
node_modulesin to source control and don’t copy it over in a deployment. Instead, you rely on the dependencies defined in your package.json file. On the deployment server, you executenpm installand if anything doesn’t get installed correctly, then you need to add it to yourpackage.jsonfile.
And now a bit about the CylonJS code. Here it is…
var Cylon = require('cylon'); |
Just like in our simpler hellonode app, we are doing a require right off the bat here. We are not, however, requiring the mraa library. Instead we’re requiring the cylon module. The cylon-intel-iot module will be invoked from within cylon and it will make calls to the mraa library. We risen up one layer of abstraction. The big benefit here is that we’re no longer writing device specific code. We could theoretically switch our Edison out for a Spark and it would just work.
The code block is, I admit, unnecessarily heavy if you’re just blinking a light, but ponder for a minute the elegance of this compared to the inevitable mass of imperative code that would occur were we doing anything more complicated.
There are a couple of Cylon terms that I should explicitly call out…
A Cylon robot is the device - the Edison or Beaglebone or Spheo or Tessel or any the other 32 or so devices that Cylon already has adaptors for. You define your robot with a connection and you use an adaptor (in the example it’s intel-iot).
A device in Cylon parlance is more like a component on the device. In our example above, the pin is a component and so it’s registered as a device. The important part of the device declaration is the driver. A driver is the interface that Cylon will use to interact with it. When the led driver is used, then the thing we’re calling led will have functions like .turnOn() and .turnOff(). This makes it so that our we only ever speak to our components with sensible language - you tell a servo motor .clockwise() and you capture a button press with .on('push',function(){}). Sensible is good in my book.
Besides declaring the connections and devices, we declare a function that is to run when the robot is finished with its setup. In this case, we’re using the built-in every function provided by the Cylon library to toggle the led every second. Easy peasy.
Well, folks, there you have it. This is the point in my learning that I felt like the gate was open and I was running free and wild. Oh, the myriad of devices to communicate with. Oh, the plethora of components. Oh, the possibilities.
I have a few more posts to write on this, but I’m keeping them all separate so I can get them out the door. All of these articles are indexed at codefoster.com/edison.
Please feel free to comment below if you have any trouble here. There’s a good chance I ran into the trouble you’re finding, and if I didn’t I’m willing to bang my head against the wall a bit with you - just a bit.
Setting up an Intel Edison
This is a guide to getting started with the Intel Edison.
Intel has published a guide for getting started with this device as well, but I wanted to get everything into one place, tell it from my perspective, and smooth over a couple of the bumps I hit on the way. Let me know with a comment below if you have any questions.
I like to keep things simple, so I’m going to help you get started with the Edison as easily as possible.
In a subsequent post, I’m going to show you how you can very, very easily start writing JavaScript to control your Edison. You won’t have to deal with Wiring code, you won’t have to install the Arduino IDE (argh!), and you won’t have to install Intel’s attempt at an IDE - Intel XDK IoT Edition. You’ll be able to use Visual Studio, deploy to the device wirelessly, and then have plenty of time when it’s done to jump in the air and click your heels together.
In another post, I’m going to show you how to use Azure’s Event Hub and Service Bus (via a framework called NitrogenJS) to not only do cool things on one Edison, but to do cool (likely cooler actually) things on multiple Edisons, other devices, webpages, computers, etc.
Introducing the Edison
The Edison is tiny. It’s the size of an SD card. Despite its size, though it has built in WiFi and Bluetooth LE and enough processor and memory oomph to get the job done.
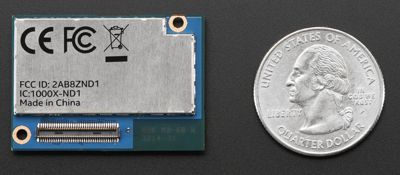
The design of the Edison is such that it’s pretty easy to implement a quasi-production solution. It’s not always easy getting a full Arduino board into your project, but the Edison is almost sure to fit.
I’m not the only one that’s excited about this System on a Chip (SoC) either. Sparkfun.com is too. They made a great video introducing the technical specs of the Edison and showcasing their very cool line of modules that snap right on to the Edison’s body. Here you can see a few of those modules piled up to produce a very capable solution…
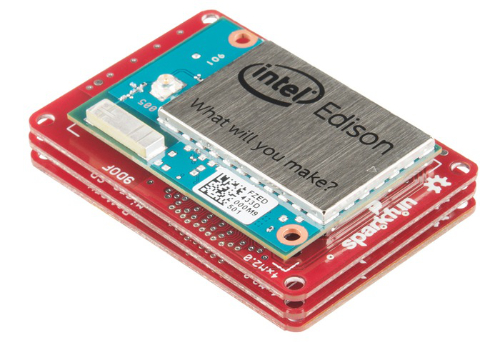
That’s the kind of compact solution I’m talking about. The only problem is that at the time of writing, the modules are only available for pre-order.
Not to worry though, there are a couple of other ways to interface with the Edison and get working on your project. The recommended way is by using the Arduino dev board. This is what the Edison looks like when it’s snapped to the dev board.
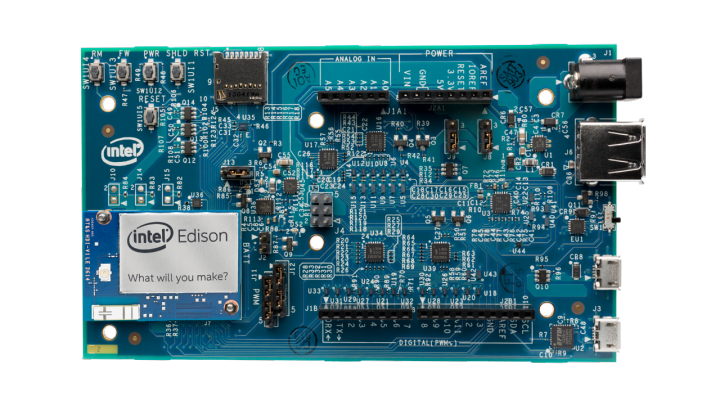
This dev board explodes all of the functionality packed into the Edison and makes life easy. It gives you USB headers, a power plug, GPIO (general purpose input/output) pins, a few buttons, and a micro-SD card slot.
There’s another dev board available for the Edison - a mini board - but it’s less used because it requires soldering and doesn’t offer as many breakouts. If you’re looking for compact, you can just wait for the Sparkfun modules I mentioned. Here’s the Edison mounted on its mini board…
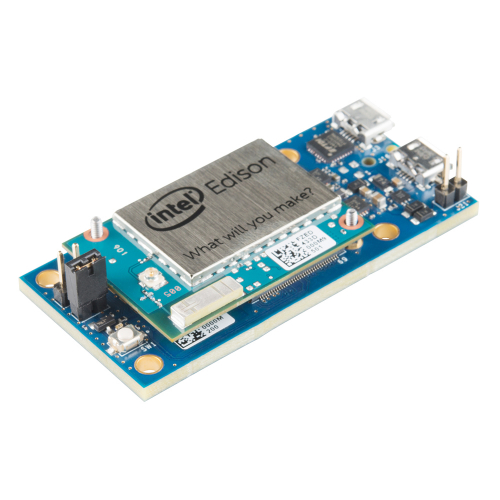
In this guide, I’ll take you end to end with getting the Edison setup on a Windows machine. I am not prepared to detail instructions for Mac/Linux, but Intel did a good job of that on their guide anyway. I’m going to mention the physical setup of the device, installation of the drivers (on your host PC running Windows), then walk you through flashing it with Intel’s custom Yocto Linux image and training it to connect to Wifi. When we’re all said and done, we’ll never have to plug the Edison into our host PC via USB again. We’ll be able to wirelessly deploy software and otherwise communicate with the device. Finally, we’ll write a simple bit of code, but in a follow up post, we’ll get crazy with software, because that’s what we do.
Physical Setup
Physically setting up the Edison once you’ve pulled it out of the box is pretty straight forward. I’ll assume you’re starting with the Arduino dev board.
Add the plastic standoffs to the dev board if you’d like. They’re good for keeping Edison’s sensitive underbelly from touching anything conductive and creating a dreaded short.
Next snap the Edison chip onto the board. You can put the tiny nuts onto the posts to hold the chip on, but I choose to rely on the solid friction fit instead.
Flashing
Before your Edison is going to do anything exciting, you’ll need to connect to it and flash it with the latest version of the Yocto Linux distribution that is provided by Intel. At first, it has no idea how to connect to a Wifi hotspot, so we’ll have to establish a serial connection. It’s quite easy actually.
Intel’s guide does a decent job of walking you through these steps, but again, I’m going to do it on my own to add my own perspective and lessons learned.
The guide asks you to plug in both USB cables. That will work, but it helps to understand why. One of the USB micro plugs (the one closest to the power plug and the larger USB port) is a host plug that will a) power the Edison via USB and b) will cause a certain directory from its file system to appear in Windows Explorer as a drive. The other USB micro plug (the one closest to the edge of the board) is a serial connection that will allow you to establish a 115200 baud serial connection before Wifi is established.
What I prefer to do is power the Edison with a barrel connector, and then just use one USB cable plugged in to whichever header I need. This works well especially since one of them is only need for one step upon initial setup - to flash the device. I have a USB to barrel connector, so I can simply plug my Edison into a USB battery pack and emphasize that it’s completely wireless.
Do make sure the itty bitty switch next to the USB micro plugs is switched toward the USB micro plugs.
Download and install FTDI drivers. First, you need to download and install the FTDI drivers which allow your host computer to communicate with the USB header on the Edison. The file you download (“CDM…”) can be directly executed, but **I had to run it in compatibility mode **since I’m running Windows 10. I won’t insult your intelligence by telling you how to hit Next, Next, Finish.
Download Intel Edison Drivers. Now you need drivers for RNDIS, CDC, and DFU. It sounds hard, but it’s not. Go to Intel’s Edison software downloads page and look for the “Windows Driver setup”. This downloads a zip file called IntelEdisonDriverSetup1.0.0.exe. Execute the file and comlete installation. The download goofed up for me in IE11 on Windows 10, so if you run into that, go to the link at the bottom of the page that says it’s for “older versions”. The download for that same file is there and it’s not an older version.
Note: In case you want to know, the RNDIS (Remote Network Driver Interface Spec) is for virtual Ethernet link over USB, the CDC (Composite Device Class) is a standard for recognizing and communicating with devices, and DFU (Device Firmware Upgrade) is functionality for updating firmware on devices.
**Copy flash files over. **With these two driver packs installed, you should have a new Windows drive letter in Explorer called Edison. This is good, because that’s where you copy the files that will be used to flash the device. Go back to the Intel Edison software downloads page and locate and download “Edison Yocto complete image”. Save it local and unzip it. Now make sure the Edison drive in Windows Explorer is completely empty and then copy the entire contents of the zip file you just downloaded into that drive.
Connect to the device using serial. Since we’re finished copying files to the device and ready to connect to it over serial, we need to switch the USB cable from the inner port to the outer port. Do make sure you have the USB to barrel connector in place so you get the reassuring power light on the board.
The Intel guide walks you through using PuTTY (a Windows client for doing things like telnet, SSH, and serial connections). I’m a command line guy, so I use a slightly different approach using PowerShell which I’ll present. You can choose which you like better.
Go to the PuTTY download page, download plink and save the resulting plink.exe file into some local directory. I use c:\bin. Now you’re ready to use PowerShell to connect to a serial port. Very cool.
Note: plink in PowerShell does something goofy with the backspace key. It works, but it renders
?[Jfor each time it’s pressed. If you know a way around this, let me know.
Before you connect, you have to see what the COM port is for the Edison. Go to Device Manager and expand the Ports (COM & LPT). Now look for USB Serial Port (COM_X_). Mine is COM5.
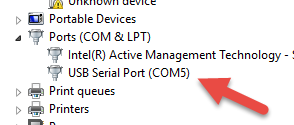
Here’s the line I use to connect (actually, I put a plink function in my $profile to make it even easier… ask me if you want to see how)…
. c:\bin\plink.exe -serial COM5 -sercfg 115200,8,1,n,Namely |
…if you saved your plink.exe into a different location or if your COM port is different then change accordingly.
Execute that line and then hit enter a couple of times. You should find yourself at a root@edison:~# prompt. That’s good news. Your on the device!
Initiate the flash. To flash your Edison using the files you copied into the drive, you simply type reboot ota and hit Enter. Watch your device do a whole bunch of stuff that you don’t have time to understand, and rejoice when it finishes and returns you to the login prompt. Your login is root and you don’t have a password. You should be sitting at root@edison:~# again.
Setup wireless. You have a full Linux distribution flashed to your Edison now, and it’s ready to talk Wifi. You just have to configure a couple things. Namely, you have to a) give your Edison a password (technically, provide a password for the root account), b) make sure your host PC is on the same network as your Edison, and c) provide your SSID and password. The first point is one thing the Intel guide skips - the need to set a password on the root account. If you don’t do it, you won’t be able to SSH to the device over Wifi. To initiate, execute configure_edison --setup. You’re prompted for a device name. I like to name mine (mine are called Eddie and Betty) so they’re easier to differentiate in terminal windows. I provide easy passwords for mine, because I’m not exactly worried about getting hacked. Next, you’ll be prompted to setup up Wifi. Follow along, choose the right hotspot, and enter the Wifi password when prompted.
Connect to the device using SSH over TCP/IP via the Wifi. Let’s get rid of this silly hard link and serial connection and join the modern era with a Wifi connection. Disconnect from the plink connection using CTRL+C. You can pull that USB cable out of your Edison’s dev board too. Your Edison is now untethered! Well, except for power, but a battery could take care of that.
Now again, I’ll diverge from the Intel guide here so I can stick with the command line. I use Cygwin on my box to allow me to SSH via PowerShell. I like it a lot. EDIT: Thanks to @palermo4 for pointing out that it’s not Cygwin that’s giving me this functionality, but rather my install of GitHub for Windows and the fact that I subsequently added GitHub’s bin folder to my path in Windows. Simply install GitHub for Windows and then go to your Environment Variables in Windows, edit the PATH variable, and append your bin directory to the end. On my system, it’s at C:\Users\jerfost\AppData\Local\GitHub\PortableGit_7eaa994416ae7b397b2628033ac45f8ff6ac2010\bin; I’m guessing yours is different :) After adding this, test it by typing SSH<Enter> in PowerShell and see if you get something besides an error.
You can use this approach, or you can go back to the Intel guide and use the PuTTY approach.
Before you can SSH to your device, you have to figure out what it got for an IP address. But the Edison has done something nice for you there. It created name.local as a DNS entry, so to connect to an Edison with the name eddie, you can simply use eddie.local. Mine is resolving to 192.168.1.9. If this doesn’t work for you, you can always log in to your router and find out what IP address was assigned to it or you can go back to the serial connection and type ifconfig at the prompt and look for the wlan0 network and see what address was assigned.
From my PowerShell prompt, I can just type ssh root@eddie.local. You’re connected to your Edison over Wifi now, and you’re so very happy!
Ready to Write Code!
From here, you’re ready to write some code. I’m going to write an extensive blog post on the topic, but for now, let’s get at least a taste.
First, make sure you’re SSH’ed to the device. So run that same ssh root@eddie.local command and sign in with your password.
Hello World! First things first. Let’s greet the world using JavaScript (via NodeJS). Type node and hit Enter and you should be at a > prompt. You’re in NodeJS… on your Edison. Man, that was easy.
Now type console.log('Hello World'); and hit Enter. There you have it.
Hit CTRL+C twice to get back to your Linux prompt.
Blink the light, already! You haven’t gotten started with an IoT device until you’ve blinked an LED, so let’s get to it. Still SSH’ed to your device, execute each of these lines (each at the prompt) followed by Enter…
node //enter NodeJS again |
And this is full-on JavaScript, so you can go crazy with it (recommended). Try this…
var state = 0; //create a variable for saving the state of the LED |
The light should be flashing on and off, but your state of bliss should be sustained high!
It’s obviously not sustainable to write our code at the prompt, so stay tuned for my next guide on writing code for your Edison.
Have fun!
I had one gripe with the Microsoft Band... Now I have zero.
For the most part, I’ve been really enjoying the Microsoft Band that I bought the day they went on sale.
Like the rest of the world, I learned about the landing of some new Microsoft Health apps in the various app stores on Wed, Nov 29, and like the rest of the world, was thrilled to hear the next morning that they were available for sale. Serindipidously, I had broken my last watch (of 8 years!) only weeks before, and was holding out on buying a new one in case we released something. Then we did, so I was ready to buy.
Since my purchase, I have been continuously pleased to have certain bits of information on my wrist. I’ve never really had any useful information on my wrist before. Sure, I had a Casio Data Bank watch in the 80’s like any good geek.

But I’m talking about useful information. The difference between a helpful computer and a truly useful computer, in my opinion, has always been connectivity. A computer without connectivity is a glorified calculator. So there’s a big difference between my Data Bank and my new Band.
But I had one gripe.
My Band was not glancable. When I glanced at my Band, I saw a black screen. I assumed this was a concession that just had to be made because of battery, and I was okay with it, but I was slightly disappointed on a regular basis that I had something on my wrist, but was not able to have a glance and note the time. It was not just disappointing, but somewhat disorienting, since this glancing was a strong habit from the last 8 years with a normal watch.
There was one more caveat to my gripe. I didn’t have any way that I could find to see the date. Seeing the current date is a major use case for me. When I sign something at a register, I don’t have time to actually think about what the current date is, I like to simply have a quick look at my watch. The Band, however, didn’t have this information for me - it was just a black screen.
Sure, I found watch mode in the settings, but immediately made the wrong assumption. I assumed that watch mode was going to keep the screen on full all the time. Intuitively, that would be an unacceptable battery drain, and likely a bit of a distraction. Even if the screen were to remain on all the time, it wouldn’t solve the second part of my gripe - information about today’s date.
Recently I actually gave watch mode a try and am absolutely thrilled to realize that both of my problems are solved.
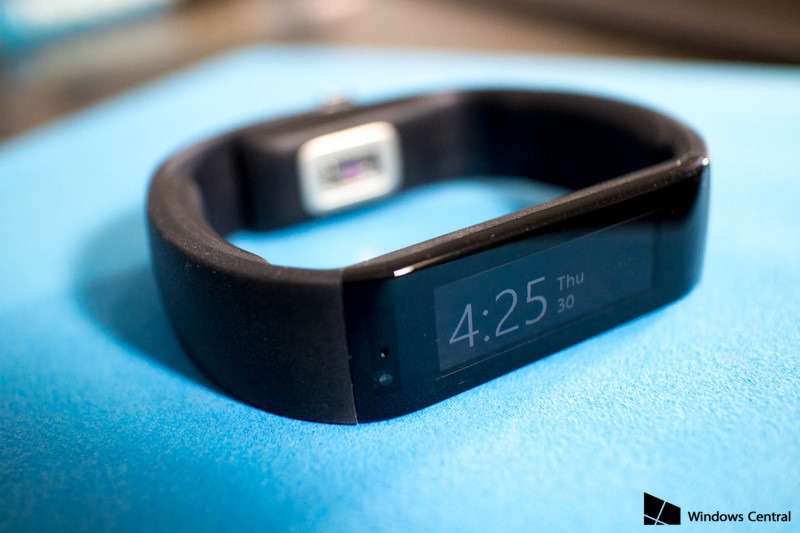
Certainly there will be an amperal impact to keeping certain pixels white 24/7, but my intuition tells me it won’t be much and my colleague Tobiah Marks tells me he’s been using watch mode and still gets at least 1.5 days. I don’t have any trouble, as I initially thought, finding time to charge my Band, so this is absolutely fine with me.
Watch mode actually works a bit like the much-loved glance feature on Microsoft’s Lumia phones - it blacks the screen and shows the time in white. In the case of the Band, it also shows the date. Now I have the time and date at a glance all the time and that makes me super happy. When I wake the Band up with a power button press, I still see the date on the main screen in place of the steps. In essence, then, watch mode has told my Band that I use my device a bit more like a watch than a fitness band. Which is correct in my case. I’m thrilled to have all of the fitness features, but primarily I want a watch that makes me feel like I’m on the Starship Enterprise.
Beam me up, Cortana.