Productivity
Zoom in Windows
I do a lot of presentations. The only thing I like more than writing code is talking about writing code.
I’ve always had a little angst about zooming my screen though because…
The built-in Windows Magnifier seemed to get in my way
The excellent and popular Zoom It tool requires an extra install and I never seem to have it running when my presentation starts.
I recently discovered, though, a couple of options that make theh built-in Windows Magnifier work way better for me.
First, I looked up the keyboard shortcuts and beyond the basics of WIN + = for zooming in and WIN + - for zooming out, you can use WIN + ESC to exit the zoom altogether. Prior to discovering that, I thought it was necessary to zoom all the way back out. I also found that CTRL + ALT + Mouse Wheel works to zoom in and out with your mouse.
Now, my biggest aggravation with the Magnifier was how the UI rendered every time I performed a zoom. There’s a Magnifier settings to “Collapse to magnifying glass icon”. That’s better than the full window, but it’s still fairly obtrusive. So here’s the trick.
Start Magnifier so the icon appears on the Task Bar.
Now right click on the Magnifier icon, right click on the Magnifier entry in the context menu, and hit Properties.
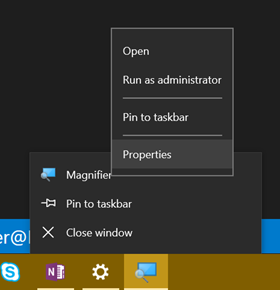
Now set Run to Minimized

That’s it. Now when you hit WIN + = to zoom in, the screen zooms in to the mouse cursor and doesn’t render any obtrusive UI.
It’s the simple things that light me up!
Quick note. A colleague just read and tried this and it didn’t seem to work for him. I tried it again and the behavior is not exactly like I indicated in this post. I spent some time trying to figure out exactly what’s up, and I figured out that if the magnifier is not running, then it will still create the UI. If you check the box I mentioned to earlier - Collapse to magnifying glass icon - the UI is smaller, but it’s still there. The application is not active, but if it happens to show up where your cursor is, then it’s still obstructive. So, I am going to submit this feedback to the Windows team to see if I can be an advocate of change. It does help if you move the Magnifier’s window to a remote area of the screen, and you can also just minimize it, but both of those take a little effort. Anyway, we’ll get this figured out :)
Okay, folks. I submitted this feedback via Windows Feedback and it was promoted to bug 16580796 within the hour. Impressed. Fingers crossed this is fixed in the next Windows update.
A Month of Soylent
I’ve been one month now on an (almost) exclusively Soylent diet.
Soylent is a drink engineered to be everything the human body needs for food. They don’t explicitly recommend that a person eats nothing besides Soylent, but they certainly don’t say it can’t be done, and there are plenty of folks that do it.
Soylent is billed as a “healthy, convenient, and affordable food”. In my experience, it’s quite easily all three. I’m pretty excited about this stuff.
Let me start by saying that I’m not a diet guy. I’ve made various attempts in the past to count my caloric intake, but I can’t remember the last time I imposed any kind of constraints on what I ate. In my opinion, counting calories sucks. It’s quite a chore stopping to think about what I’m eating, try to find its rough equivalent in a table somewhere, recording it, and trying to time the intake so that you end the day at the right number.
@kennyspade first introduced me to Soylent a full year ago. He brought the topic up in response to my mention of Mark Zuckerberg wearing the same attire each day to alleviate decision fatigue. Soylent is similar in its ability to eliminate the decisions we make about what we eat.
Kenny handed me a bottle of Soylent’s premixed product that they dub version 2.0 to try. I don’t remember being particular taken by the flavor or the texture, but I wasn’t turned off either.
Finally, the beginning of this September, I decided to try Soylent longer term, and I set my sites pretty high. I decided to reduce my diet to almost exclusively Soylent and water.
Soylent is available as a powder or a drink with the former being cheaper and the latter being more convenient. I opted for convenience for now.
I expected to be in for a bit of a personal battle. You see, I’m not that disciplined when it comes to eating. I’m basically just not accustomed to thinking about what I eat. I like sugar, so when candy is offered or available, I take it. If a bowl or a bag is offered, I take a few. I work hard and stay up late, so I drink coffee - perhaps 3 cups a day. And I like rich food in large portions. I was never overly excessive, but I haven’t been thrilled with my fitness either.
Well, it’s October now, so let me fill you in on my September…
Soylent is Tastier than I Thought
I started out not minding the taste, texture, and overall experience of Soylent 2.0 at all, but I ended up, somehow, absolutely loving it. Soylent tastes a bit like the milk left in your bowl after you’ve eaten Frosted Flakes, but a bit less sweet. I have a bottle every 4 hours, and after about 2 I’m really looking forward to the next one… not because I’m starving - I’m not - but because I enjoy the drink. The mouth feel is excellent too. It’s a little bit grainy in a good way, and I much prefer that to the overly thin texture I find in the other (usually milk-based) protein or meal replacement drinks I’ve tasted.
Soylent is Quite Filling
I decided to eat four 400 kcal Soylent drinks each day at 7am, 11am, 3pm, and 7pm. That’s 4 hours between meals and 1600 calories a day. The product is engineered to be 20% of the food a person needs for a day - 20% of the calories and 20% of the vitamins and nutrients - but I wanted to reduce my intake a bit and trim some fat.
After 4 hours of fasting, my stomach is ready for some substance, and whether I take my time drinking a bottle or throw it back in a hurry (in the TSA security line!) it does satisfy. I don’t feel full per say as I pitch the bottle into the recycle bin, but I don’t feel hungry either. I feel perfectly content for at least 2 hours and then start slowly getting hungry as I approach the 4 hour mark.
If I decided on a standard 2000 kcal diet, that would be 5 Soylents a day and a meal every 3 hours. That would be even easier.
Soylent is Easier than I Thought
The entire effort was much easier than I thought. I could hardly call it a battle, actually, as I initially thought it would be. The reason for this I attribute to the simplicity of my rule set…
- I will eat only Soylent and drink only water
- As a single exception to rule 1, if I get too hungry at any point, I’ll allow myself to eat broccoli. You can hardly go wrong with steamed, plain broccoli. It’s very healthy and doesn’t exactly pose a temptation.
- If I have culinary social opportunities (team dinners, family outings, etc.) I’ll go and I’ll engage, but I just won’t eat. Believe it or not, you can still enjoy a conversation across the table from someone without eating. It grinds against habit perhaps, but it works. Admitted, it does take a little bit away from a romantic dinner, but actually, that’s a bit strange isn’t it? For some reason, it’s not as fun eating with someone when you’re doing all the eating. My wife was kind and accommodating though.
In previous attempts to eat well, I had to spend extra time considering each morsel that passed in front of me.
“Should I eat that cracker?”
“Should I eat a cookie?”
“Should I eat another cookie?”
“Just one more pretzel?”
“My own carton of fries or share with my wife?”
But this time it was different. The answer was always the same - “no”.
No soda. No coffee. No cereal. No cookie. No nothing.
No chicken, no carrots, no milk. No to seconds. No to firsts! No nothing. The answer is always no.
That greatly simplifies things and leaves my mind free to really concentrate on the project at hand or on what my 4 year old is trying to say to me.
Eating Includes a Lot of Ceremony
There’s a whole lot of ceremony around food that I wasn’t aware of until I got on the outside of it all.
Several time per day we think about food - we consider our hunger, we decide to eat, we decide what, we decide when, we decide where, we transport, we stand in line or wait on a server, we acquire, we consume, we ask to be excused while we chew and try to talk to others, and finally we clean up the mess on our table and on our hands. And after hardly any time at all, we start thinking about our next meal!
I also neglected to notice just how often we come up with the idea to find coffee. Is there a machine nearby? Is there a Starbucks nearby? And then again with the relatively long process of acquisition and consumption.
Food acquisition is still a cinch compared to ancient times when our food was running around with teeth. But the reality is that times are different and there may just be room for some efficiency improvements.
Recreational Eating Rocks
I wonder if you’re thinking, “Yeah, but I like eating, and I don’t have any desire to give it up.”
I like eating too. September was a bit exceptional, but as a normal course I think it’s a good idea to use Soylent for all of the boring meals - the ones where you just need to put food in the belly - and then truly enjoy all the other meals - the recreational meals. It’s interesting too that my enjoyment of them is inversely proportional to their frequency. A weekly turkey sandwich tastes way better than a daily one.
Soylent is Convenient
There are a number of scenarios that I ran across during my experiment that accentuated the convenience of my new found food.
- Sometimes you don’t have time for breakfast. A Soylent is about as convenient as a bar.
- Same thing when you’re heads-down at work and acquiring lunch feels like a real chore.
- Reducing your diet to a very narrow menu of Soylent and water allows you to experiment with possible food allergies.
- Lunch meetings at work afford ample opportunity to show off bad habits or spill food on your lap. Starting your own lunch at 11:00 and finishing at 11:01 frees you up to focus on colleagues, partners, or the topics at hand.
- When you’re running around town running errands or having fun, stopping at a restaurant doesn’t have to be another thing on your list. Unless, that is, the rest of your family is on something other than a Soylent diet :)
Overall, it’s just nice to be in control of your own daily diet.
The Cost of Engineered Eating
Shelling out the money for a month’s worth of Soylents ($323 for 1600 kcal/day) feels like a lot. Consider, however, that this includes the convenience of the premixed option (a month of powder @1500 kcal/day is ~$180/mo), and may or may not be kinder on your budget than whatever else you were going to eat that month.
Some Other Things I Learned in Soylentember
Although weight loss was not my primary goal in this endeavor, I have lost 5 pounds over 4 weeks. That’s a healthy weight loss rate, and I always have the option to maintain my 1600 calorie diet or bump it up to 2000. Soylent is not a weight loss product - it’s just food, but it makes calorie counting much easier.
Air travel is not easy if you’re doing the liquid version of Soylent, because you can’t take liquid through security. I’m forced to check a bag and make sure that there’s not too much time between when I go through security and when I visit baggage claim on the other end, which is often more than 4 hours. If you like to get to the airport 2 hours early like me, then you are constrained to flights that are roughly 2 hours or less. This is a good reason to get some of the powder version (1.6), which is exactly what I intend to do.
The bottles are recyclable**. **I recommend giving them a quick rinse before finding your nearest recycling bin.
When I get my hands on some powder I intend to mix up a day at a time and then use some of my 2.0 bottles for mixing
I chilled my Soylent bottles in the fridge when I started, because I read that it’s better cold. It is good when it’s cold, but I later discovered that I like it at least as much when it’s room temperature. I think comes back to the texture. For some reason, when it’s cold it feels smoother in the mouth, but I like my Soylent to feel like food in my mouth. It’s more convenient leaving them at room temperature too, because you can just throw the day’s worth of food in your backpack and take off.
Soylent also offers bars that are 250 kcal and I’m told are quite delicious. I like having the option of finer control of caloric intake by adding in this smaller increment.
Going Forward
I’m not 100% certain about how I want to proceed now. Like I mentioned, I expected this to be a chore, and expected to be rather excited about getting back to normal eating when September was over. On the contrary, I quite enjoy my new freedom from food ceremony, and I’m sure I’ll continue supplementing some portion of my days kcal intake at least. I like how easy it is to come up with a daily plan of something like…
- 2 Soylent 2.0 drinks (800 kcal) + 1 bar (250 kcal) + 1 light dinner
- 3 Soylent 2.0 drinks (800 kcal) + 1 big dinner
I’m pretty sure I’ll either do one of those or perhaps just keep on with a fully Soylent diet! We’ll have to see.
Saving Your Code Settings and Snippets
I finally realized why I wasn’t investing a lot of thought or time on my Visual Studio Code snippet library. It’s transient.
I looked up where the user settings are being saved - C:\users\<me>\AppData\Roaming\Code\User.
Well, that’s a bit of a crock. It’s 2016. I want everything saved to my OneDrive folder so I can do a reload without considering the various settings files I’ll have to back up and restore. What, am I a caveman?
I searched VS Code and my registry and didn’t see an obvious (I only have about 2.5 minutes to spend on tasks like this) way to customize the path, so I did what any developer in this modern era would do. I posted a question on StackOverflow.
And in true SO form, I got an answer back very quickly. Well, it wasn’t exactly an answer, but close. DAXaholic responded that there is an extension for VS Code that may fit the bill.
It’s called Visual Studio Code Settings Sync by Shan Khan. You can install it in Visual Studio Code by going to your command palette (CTRL+P) and typing ext install code-settings-sync.
Now, I had to spend a few synapses on this strategy for saving settings. The way Shan set this up it saves your settings, snippets, launch, and keybindings to your GitHub account as gists. Creative, Shan. It’s not exactly the same as having my settings and snippets saved to my OneDrive, but I kinda like it. I do have to manually upload everything, and by manual I only mean that I have to execute the Sync: Update/Upload Settings command in Code. And then when I reload or slide over to a new work machine I have to Sync: Download Settings.
I sort of like, however, storing bits of code in my GitHub Gists repository.
One advantage is that I could easily share my settings with the world. By default, the extension creates the gist as secret. I don’t like secrets though, so I can just edit that gist on gist.github.com and hit the Make Public button.
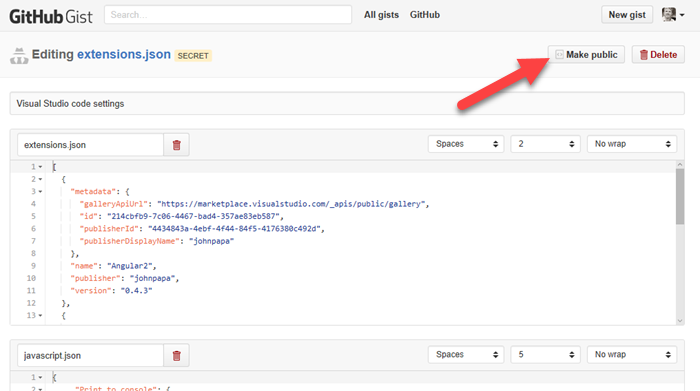
And now I can share the link with you. Very cool. And that’s a live link too so that every time I add an awesome new snippet, you can see it. Now, I just have to remember not to put any secret keys in my settings or snippets :)
Anyway. I thought this was very cool. Kudos to Shan Khan on the cool extension.
Happy coding.
Moving Desktop and Downloads to OneDrive
The fierce competition between online storage providers has led to where we are today. Today a consumer can store their entire life in the cloud. Okay, “their entire life” might be an exaggeration, but you know what I mean.
Do you have multiple terabytes of family photos, videos, and email archives? Yeah, me too. How would you feel if you lost them? Pretty rotten. Me too.
Maybe you already know the concepts behind basic system backups, but I’ll share some things here for context.
You can protect against a hard drive crash by backing up your valuables to a separate drive. That will dramatically reduce your chance of failure from a faulty drive, a lost laptop, an accidental format, or someone hacking into your system and deleting everything. It won’t, however, protect you from a fire, natural disaster, or perhaps a burglary. In that case, you need an offsite backup.
An offsite backup can be a little hard drive that you drop everything on and hand to a friend. And not that sketchy friend… someone you trust.
Unless your friend lives in another state, however, even this measure isn’t going to protect you from what I like to call the meteorite scenario. The meteorite in my scenario could be replaced by an earthquake, tornado, flood, or whatever else mom nature likes to bring your way wherever you live. Not that nature likes to bring meteorites my way here in Seattle. In fact, I’ve never seen a meteorite enter the atmosphere over the Emerald City, but I digress. To protect against the meteorite scenario, you need cloud backup.
Cloud backup is a bit more than just a fancy offsite backup. When you get your files to the cloud, you’re counting on a professional and commoditized backup strategy. You’re counting on the fact that your cloud provider assumes an extremely high potential value on the documents in question and creates multiple backup copies themselves to assure they don’t end up with a huge number of extremely dissatisfied customers.
It’s not without risk. It’s entire possible that any of the major cloud providers could completely goof up and lose your files. It’s a remote possibility, but the risk is there.
So in my opinion, the ultimate setup is as follows.
You keep all of your documents in your cloud storage provider of choice. I like OneDrive.
You sync some of your documents on each of your devices, but you sync all of your documents on one device with a hard drive that can handle it. You be sure that one master device - perhaps a desktop PC at home in your closet - is always on and thus syncing changes down from the cloud as you modify things from your various devices.
With that configuration, you have all of your documents locally and in the cloud. It’s all live too and doesn’t require an intermittent backup strategy.
Now more to the point.
If you’re running Windows, you have the concept of the system folders. These are the folders like Documents, Pictures, Videos, Desktop, and Downloads. They’re special folders in that they are not just a file container, but they’re also a concept. You want to store files in your Documents folder, but you may want to configure what that folder is called or where it is, and you want applications to not have to worry about where it is.
It’s similar to what happened to the paradigm of printers. A long time ago in this very galaxy, applications used to be responsible for printing. If you were an application developer, you had to create printer drivers. Now you just sort of toss your document over the wall to the operating system and say “I want to print to that one” and the common printer drivers are invoked.
It’s like that with the Documents system folder. An application might default to saving in your Documents folder regardless of where you the user have deemed that folder to live.
Perhaps you know already how to configure your Documents folder location. If not, here’s how…
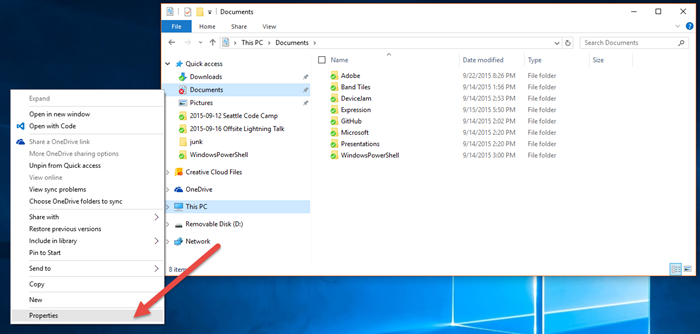
So you just right click on the Documents folder in Windows Explorer (here I’m finding it in my Quick Access list on the left) and choose Properties.
Then you go to the Location tab and change the path. To move your documents to the cloud you simply configure a path that is somewhere in your OneDrive folder (by default in c:\users{user}\OneDrive).
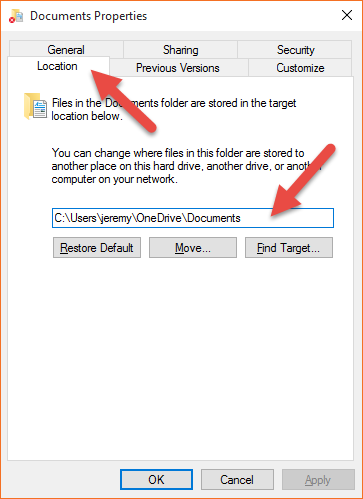
The result of this change is that now when most any application on your computer saves a document - say a letter to grandma, your tax returns, or whatever - it puts it in the Documents folder (the concept) which you have configured to be in your OneDrive. So that tax return is going to be synced to the cloud and all of your other devices.
Now even more to the point.
Many people don’t know that you can do the same thing with your all of your system folders including your Desktop and your Downloads folders.
It goes like this.
You may not yet have a folder in your OneDrive for Desktop and Downloads, so create them. Don’t put them inside your Documents folder. Just put them right on the root of your OneDrive file store. I did this on onedrive.com in my browser. Whenever I want to explicitly do something to my OneDrive files on the server I do it in the browser and essentially bypass the sync tool built into Windows.
Now, just like you did for your Documents folder, you go to Properties and then the Location tab and you change the path to your newly created folders in OneDrive. Mine are…
- c:\Users\jeremy\OneDrive\Desktop
- c:\Users\jeremy\OneDrive\Downloads
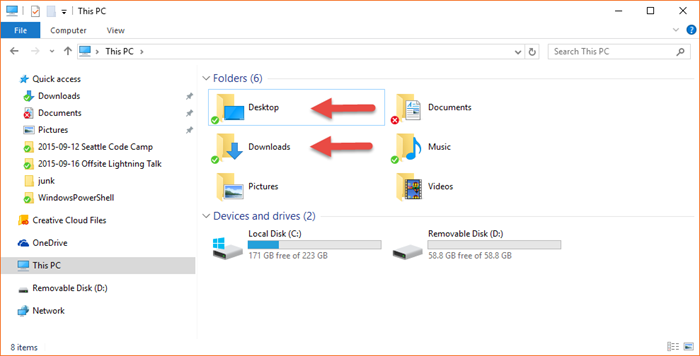
And that will do it.
Now when you download a file from internet using Microsoft Edge and it defaults to the Downloads folder and then you have to reload your machine, you don’t have to think about what’s in your Downloads folder and whether you want to back it up. It’s already done. And if you’re the type to save the really important tasks that you want to be front-of-mind to your desktop it’s the same thing. By the way, you know that guy at work with a thousand icons on his desktop? Don’t be that guy. :)
The whole goal here is to cloud enable our devices - making them as stateless as possible. You know you’re cloud enabled when a complete OS reload takes 30 minutes and you’re done.
There you go. Happy downloading.
Visual Studio Code
If you haven’t watched the first day’s keynote from Microsoft’s Build 2015 conference, go do that now. It has a few wow moments such as Android and iOS code for building Windows 10 apps, elastic pools for Azure SQL databases, and the amazing HoloLens robot that was a hologram and a real robot in one - amazing!
One of the pieces of the conference that’s going to affect my every day, though is Visual Studio’s new, free, light edition called simply Code. Code is what I’ve been looking for in a code editor - in a text editor even. It will replace a few other apps in my MRU list - Visual Studio Community, Notepad++, and Atom to name a few.
Console. code.exe is in your path after your basic install, so from your shell, you can type code to run the app from scratch. You can also type code myfile.txt and launch into the editing of your file or code mydirectory to open it with the explorer pane’s context already set to your directory. So my new favorite command is going to be code . for opening the current directory in Code. I was looking for some PowerShell magic to make that possible with VS Community, but now I no longer have the need.
Speed. It takes about 3 seconds to launch code.exe cold, and iut doesn’t appear to take any extra milliseconds to load either a file or a directory.
Essentials. Code is just the essentials. It’s basically a new perspective on authoring code that hopefully complements Visual Studio. If I’m an enterprise developer with a massive code base and a lot of static analysis, workflow automation, and other tooling built in to my development environment, then I can see running the full editions of Visual Studio. There are a lot of support features, it’s plug-in capable, it has excellent GUI Azure tooling. But if I’m working on what I might call more of a scrappy project - a website, a Node.js app, a sample, or whatever - Code is all I need. For some people, I suspect Code will cover 10% of the use cases, but for me, it’s more like 90%. And actually, this is only the beginning. Check out what it says in the official docs: “In future previews, as we continue to evolve and refine this architecture, Visual Studio Code will include a public extensibility model that lets developers build and use plug-ins, and richly customize their edit-build-debug experience.”
Languages. There are a ton of languages supported out of the box. Code recognizes Batch, C#, C++, CSS, Clojure, CoffeeScript, Dockerfile, F#, Go, HTML, Handlebars, Ini, JSON, Jade, Java, JavaScript, Less, Lua, Makefile, Markdown, Objective-C, PHP, Perl, Perl 6, Plain text, PowerShell, Python, R, Razor, Ruby, SQL, Sass, Shell Script (Bash), TypeScript, Visual Basic, XML, and YAML. If that doesn’t cover what you’re writing, I’d be really interested to know what you’re writing!
Commands. Hit CTRL + SHIFT + P to open the Command Palette and do most anything you want.
Autosave. Code can be configured to autosave your file as you change it like Atom does. Keep in mind, of course, that if you’re using file watchers like gulp’s .watch() method, this is going to trigger every time you type a character in your code. Autosave is off by default. To turn it on, hit CTRL + SHIFT + P and type auto.
Search. You can CTRL + SHIFT + F search over all files in the open folder and it supports regex. It ignores certain folders like node_modules by default since that’s the right thing to do.
There’s a ton more in Code, but that’s all I’m mentioning for now.
I hope you like your new home for code as much as I do so far.
SnagIt 12 Tip
I have been using SnagIt by TechSmith for a few versions. A few months back I upgraded to SnagIt 12. The UI is quite different from version 11, and I think the changes are for the better. The design is cleaner, flatter, and more appealing in my opinion, and the functionality of new UI is intuitive and functional.
My main workflow is this…
- press PrtSc
- define the area to capture
- maybe mark up the clipping
- either save the result to file (for attachment to an online post) or copy to clipboard for pasting into an app
This latest version of SnagIt added video capture capability. That’s pretty huge and helpful, but it necessitated a change to the UI that adds a step for me.
After pressing PrtSc and choosing my region, SnagIt comes up with a prompt to ask me if I want to capture an image or video, and the thing is, I want to capture an image about 95% of the time.
Well, the software recently created for me an unobtrusive (thanks for that!) alert for me, and when I got around to looking at it, it was a note to see if I wanted to learn how profiles work. I did. I watched a quick video, and learned how they work. You can too here if you’re interested.
The great thing is that each profile can have its own hotkey attached, so here’s how I configured it to make my life easier.
First, I removed the PrtSc hotkey as the default capture key. This is not done in the profiles window, but in the main preferences.
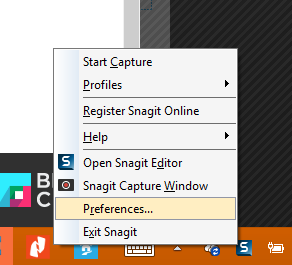
Just go to the Hotkeys tab and clear all three of the Ctrl, Shift, and Alt checkboxes next to Global Capture and set the dropdown to None.
Now go back to the system tray icon, choose Profiles | Manage Profiles.
In this screen, if your defaults are like mine, you’ll have Image, Video, and Send to Clipboard. You won’t need to add or remove any if you want to set yours up like mine.
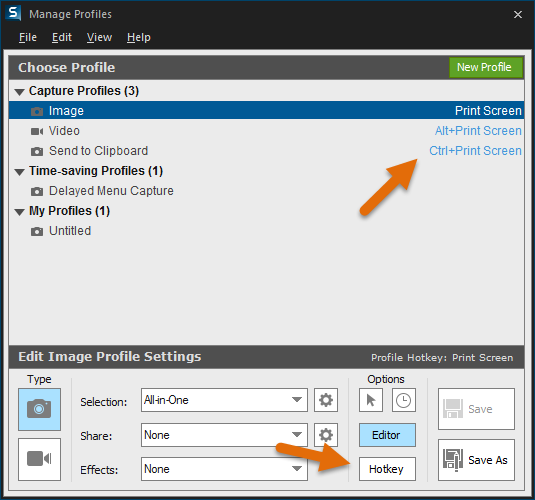
For Image, click on the profile, then choose the Hotkey button and set it to PrtSc with no modifiers. Now set the Video to Alt + PrtSc and set the Send to Clipboard to Ctrl + PrtSc.
Now you can use PrtSc as you did before, but you won’t have the extra step of choosing between image and video. Additionally, you can hit Alt + PrtSc to take a video, or you can hit Ctrl + PrtSc to avoid the SnagIt Editor altogether and just copy the defined region directly to the clipboard.
In my opinion, this is just perfect and I’m thrilled. I guess it’s the little things that delight.
PowerShell Profile That Enables Posh Git and Azure
I know how it goes. You run into an inconvenience such as having to load an extra window, type an extra line, or whatever and you face a quick decision - should I get off the track I’m on and spend some time fixing this workflow or should I just make it work for now and get back to what I’m paid for? It’s not an easy call.
I’ve heard it said, if you do something more than once, script it. That rule doesn’t normally equate to gains for me. If I can spend 2 minutes twice, that’s a win over spending 30 minutes perfecting a script. If I have to do it a few times though, then it certainly starts to pay off. The big wins come when you find someone else that already did it and just plug it in. Win!
Creating Your PowerShell Profile in OneDrive
Perhaps you’ve done this already, but I won’t assume that. The PowerShell profile is simple a .ps1 file that is executed whenever PowerShell is launched. It’s your chance to write some PowerShell script that you want to preclude every session.
Unfortunately, the location of the profile is hard coded. Type $profile at your PowerShell prompt and hit enter to see its location. Yours is likely at C:\Users\{USERNAME}\Documents\WindowsPowerShell\Microsoft.PowerShell_profile.ps1. That can’t be changed. Well, actually it can. There’s a trick. It’s called hard linking.
Hard linked files are essentially a low-level file alias in the Windows operating system. If you set up a hard link from c:\a.txt to c:\b.txt, then when any application requests c:\a.txt, it will get c:\b.txt. You can create a hard link then that points from where PowerShell is expecting you to have your profile, to wherever you want to put it. I put mine in a nice, organized folder in my OneDrive. This way, when I need to reload my system, I don’t have to remember to backup my PowerShell profile and restore it again after the reload. I just have to recreate the hard link. That’s good because I reload my system a lot. I consider my entire system volatile. Everything I do is either a client application that I can easily reinstall or it’s in the cloud. Special thanks to unlimited storage with an O365 subscription!
Here’s how to create a hard link from the default location to your OneDrive…
fsutil hardlink create $profile "c:\users\{USERNAME}\onedrive\documents\Microsoft.PowerShell_profile.ps1" |
You can use whatever path and filename you want for that last argument.
By the way, I use the same technique for my .gitconfig file, since it too is expected to be in a certain location. The code for that is…
fsutil hardlink create "C:\Users\{USERNAME}\.gitconfig" "C:\Users\jerfost\OneDrive\Documents\gitconfig" |
Adding Azure command capabilities
Once you have your profile set up and persisted, you want to sprinkle in some code to make a few things automatic. I’m just going to share the things that I do and hope it helps.
I installed the Azure PowerShell module. You can do the same by following the instructions in the Azure documentation.
Once you’ve done that, you get a launch shortcut to launch PowerShell with Azure support. That’s great and all, but I already have a shortcut to PowerShell. I don’t want a new one.
I actually put my PowerShell shortcut right on my taskbar. It’s in the third slot - browser, email, and then PowerShell. That means I can press WIN + 3 and launch or switch to PowerShell. I can also press WIN + SHIFT + 3 and launch a new instance. I can also press WIN + ALT + 3 and open the jump list for it. All sweet. I just need to get my Azure commands available in there. I do that by putting a single line in my profile.
Now I’ll tell you how I did this. I went looking into the Azure shortcut that the install of the Azure PowerShell module gave me and looked for the magic line that lit up support for all of the Azure commands.
And here it is…
Import-Module "C:\Program Files (x86)\Microsoft SDKs\Azure\PowerShell\ServiceManagement\Azure\Services\ShortcutStartup.ps1" |
I actually add a bit more so that when my profile is loading I can see what it’s working on…
#azure functionality |
That’s a comment, a little echo to tell me in my console what it’s working on next, and then the actual module import.
Adding Posh Git integration
Next, let’s add Posh Git. It’s a little more involved.
The first thing to do is install GitHub for Windows. I don’t really use GitHub for Windows that often, but it’s the easiest way to install Git, PoshGit, and some other utilities all at once.
Again, after installation, you’ll have a Windows shortcut called Git Shell that opens PowerShell with Git integration (including Posh Git which gives nice color coding for repositories, tab completion, etc.). Nice. Except, again, I don’t want a separate PowerShell window for when I want to look at repositories. And again, the solution is to put it in my profile.
First, since I’m _code_foster and am usually working on code, I default to my repositories directory (c:\repos)…
#start in my dev directory |
Second, I light up the Posh Git features…
#install GitHub for Windows and then these will light up Posh Git |
And finally, I like to customize the colors a bit so they’re easier to see and I do that using…
#set the Git POSH colors to something easy to see against a blue background |
And again you see my comment and the echo that lets me know at the console what’s going on.
Some More Helpful Functions
There are three more functions in my profile that I want to share with you just to give you a taste of the kinds of things you might want to do here. Here they are…
Function get ($uri){ |
The first two are shortcut ways to do simple web get and post requests. They allow me to do something like get codefoster.com and get back the actual HTML from my website. Or I can request something from a webservice and then pipe the resulting JSON to a file. Fun.
The third is something I do a lot - create a directory and then change into it. This allows me to simply type mcd newdirectoryname and do it all in one step.
Let me know in the comments if this has been helpful and how you customized your profile in a cool way.
Microsoft Exam 70-532 Study Guide
I’m currently studying for Microsoft exam 70-532 - Developing Microsoft Azure Solutions. I do enjoy studying for exams. It’s hard, but it’s an excellent forcing function. I learn bits and pieces here and there now and then about this and that, but when I have an exam schedule for a set date, I have to study! And not only do I put in more hours, but I follow a more systematic approach. In this article, I’m going to share my approach and give you my study guide for exam 70-532 in case you too are studying and this method works for you.
Here’s my strategy…
Visit the official exam page
For 70-532, the page is at https://www.microsoft.com/learning/en-us/exam-70-532.aspx
Click show all under the Skills Measured section and copy the whole thing
Paste it into a OneNote notebook
Format it by breaking all of the skill points out onto separate lines and adding checkboxes
Study each point and check it off when I feel like I understand
Here’s what it ends up looking like when I’m done…
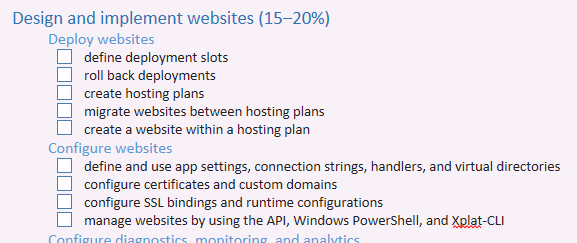
So I start by asking myself if I know what a _deployment slot _is. I don’t. I Bing it and find something like this Staged Deployment on Microsoft Azure Websites article that does an excellent job of defining the term and goes on to discuss the next point roll back deployments as well. So I read up, try it myself, grok the concept, then check the boxes. Simple as that. Notice I said that my study process is simple. The concept aren’t always, but then that’s one of the reasons I like software… it’s complicated!
So attached you’ll find a OneNote notebook that’s yours to keep. Just open it up, start studying, and start checking. And give me a shout on Twitter when you pass the exam! Best of luck!
I had one gripe with the Microsoft Band... Now I have zero.
For the most part, I’ve been really enjoying the Microsoft Band that I bought the day they went on sale.
Like the rest of the world, I learned about the landing of some new Microsoft Health apps in the various app stores on Wed, Nov 29, and like the rest of the world, was thrilled to hear the next morning that they were available for sale. Serindipidously, I had broken my last watch (of 8 years!) only weeks before, and was holding out on buying a new one in case we released something. Then we did, so I was ready to buy.
Since my purchase, I have been continuously pleased to have certain bits of information on my wrist. I’ve never really had any useful information on my wrist before. Sure, I had a Casio Data Bank watch in the 80’s like any good geek.
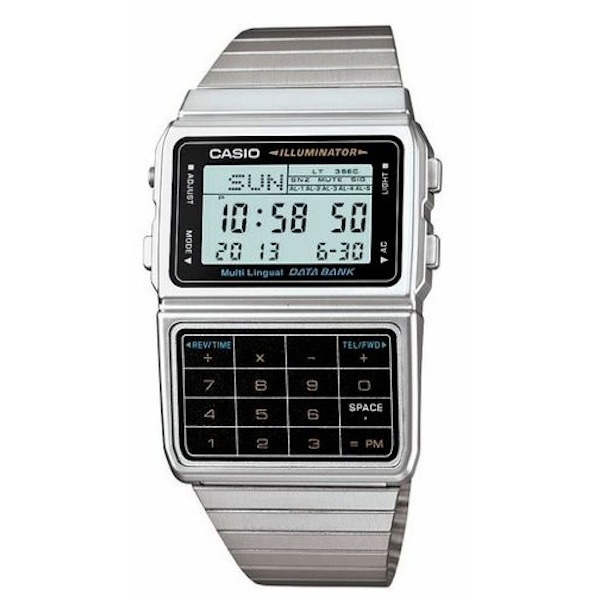
But I’m talking about useful information. The difference between a helpful computer and a truly useful computer, in my opinion, has always been connectivity. A computer without connectivity is a glorified calculator. So there’s a big difference between my Data Bank and my new Band.
But I had one gripe.
My Band was not glancable. When I glanced at my Band, I saw a black screen. I assumed this was a concession that just had to be made because of battery, and I was okay with it, but I was slightly disappointed on a regular basis that I had something on my wrist, but was not able to have a glance and note the time. It was not just disappointing, but somewhat disorienting, since this glancing was a strong habit from the last 8 years with a normal watch.
There was one more caveat to my gripe. I didn’t have any way that I could find to see the date. Seeing the current date is a major use case for me. When I sign something at a register, I don’t have time to actually think about what the current date is, I like to simply have a quick look at my watch. The Band, however, didn’t have this information for me - it was just a black screen.
Sure, I found watch mode in the settings, but immediately made the wrong assumption. I assumed that watch mode was going to keep the screen on full all the time. Intuitively, that would be an unacceptable battery drain, and likely a bit of a distraction. Even if the screen were to remain on all the time, it wouldn’t solve the second part of my gripe - information about today’s date.
Recently I actually gave watch mode a try and am absolutely thrilled to realize that both of my problems are solved.
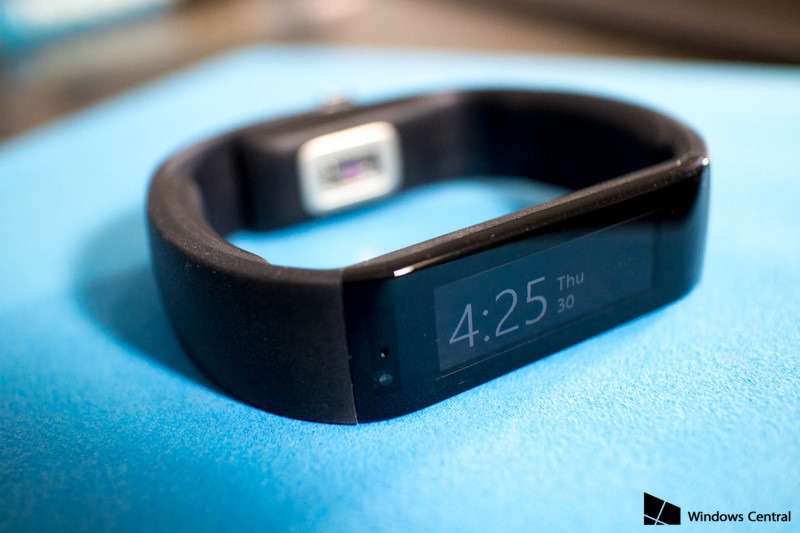
Certainly there will be an amperal impact to keeping certain pixels white 24/7, but my intuition tells me it won’t be much and my colleague Tobiah Marks tells me he’s been using watch mode and still gets at least 1.5 days. I don’t have any trouble, as I initially thought, finding time to charge my Band, so this is absolutely fine with me.
Watch mode actually works a bit like the much-loved glance feature on Microsoft’s Lumia phones - it blacks the screen and shows the time in white. In the case of the Band, it also shows the date. Now I have the time and date at a glance all the time and that makes me super happy. When I wake the Band up with a power button press, I still see the date on the main screen in place of the steps. In essence, then, watch mode has told my Band that I use my device a bit more like a watch than a fitness band. Which is correct in my case. I’m thrilled to have all of the fitness features, but primarily I want a watch that makes me feel like I’m on the Starship Enterprise.
Beam me up, Cortana.
Git Cheat Sheet
I spend a lot of time using Git these days. It’s one of those technologies you love and hate. I guess I use it because it feels just scrappy and simple and elegant enough to be the right tool for the job in most cases.
I’ve heard it said and completely agree that Git would be the ideal offline source control solution if you didn’t have to search online for the syntax.
Well, maybe this will help. GitHub was at OSCON and they were handing out these handy little cheat sheets. I’m going to decorate my workstation wall with this. Perhaps you’ll save it somewhere close or print and pin it yourself and get some use out of it. Hope so. Cheers.