
Extensible Code
Visual Studio Code has extensions!
The bells ring, the confetti flies, the fans go wild!
The two things we all wanted from Code was…
- to see it go open source
- to get extensions.
If you were following the user voice page for Code like I was, you’d have seen way more votes for extensions than for any other feature. The size of the vote count made it look like not having extensions was a total deal breaker and for many folks I talked to… it was.
Well, now it’s here!
It’s here in full force. Not only are extensions available, but there are already a whole lotta cool extensions available in the online gallery. There were about 60 a couple days before launch - a metric that jumped over 20 points by the time Sean McBreen was showing off (here and here) the announcement at the Connect() conference. And there are obviously a lot more now just a few weeks later.
Getting extensions is like getting three wishes from a genie in a bottle and for your first wish requesting unlimited wishes. Code is a great tool, but with extensions, you can make it do most anything you want.
Some of the great things about Code extensions are…
they’re easy to write. To run and test an extensions, Code launches an instance of itself. It’s a bit like Inception that way. Then you can just play with your extension as it currently is and be sure it’s behaving as you designed.
they run in a different process. When you start up Code, it’s okay if you have 38,329,420 installed, because they’re not loading synchronously in the same process as your main editor. Granted 38M+ extensions is going to bog something down and I think you’ll have a hard time finding that many unique extensions in the marketplace any time soon, but my point is that you don’t have to worry about the performance impact of installing your favorite few.
they can be written in either raw JavaScript or in TypeScript, and generating them is quick and easy using Yeoman (which by the way is awesome!).
publishing them is just about the easiest thing in the whole world. It’s literally one command - nay, one short command…
vcse publish
My Favorite Extensions So Far
I haven’t found the time to install every extension (who has that kind of time?!), but here are three of my favorites so far…
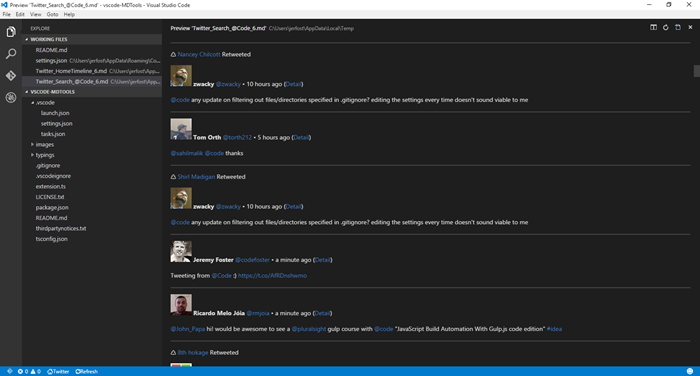
MDTools
Markdown (.md) files are really handy. If you’re not familiar with markdown files, just think of them as a cross between text files and HTML files. Text files are nice because they are very readable. Markdown files are readable still but they give us the ability to easily bring in rich content like hyperlinks, images, and formatting. One of the great additions to markdown is the ability to indicate spans or blocks of code and even in some cases to specify the code language and get great formatting.
So it’s no surprise that markdown files have become the standard for creating documentation and meta text for code repositories. Developers work with markdown a lot and it’s exciting to have a bit of help.
The MDTools extension allows you to do a lot of those little things to a selected block of text. You can convert to upper case, lower case, or title case, you can HTML encode or decode, and you can even convert to ASCII art - an extremely fun use case! To activate these tools, install the extension, restart the editor, select some text, and then use the ALT + T keyboard shortcut.
There’s a lot more the MDTools extension can do to, so check it out.
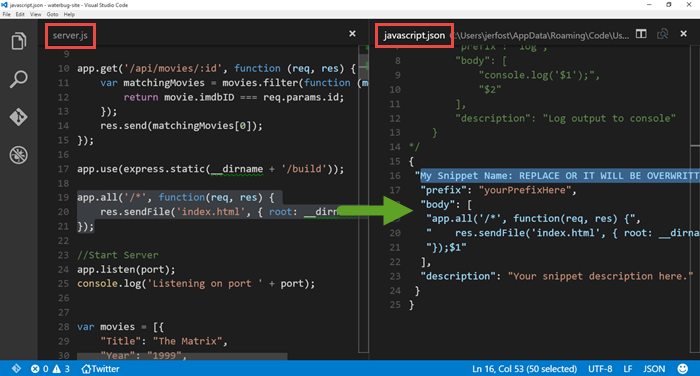
Quick Snippet
Quick Snippet is a great idea for an extension by my colleague Sara Itani (@mousetraps). See my interview of Sara on episode 048 of my podcast CodeChat. It allows a developer to highlight a block of text they’ve written and quickly and easily create a snippet out of it. In my experience, it takes a little bit of discipline to create snippets today to save time tomorrow. This extension excites me because it removes some of the friction and makes snippet creation fast. Now I can save time on saving time!
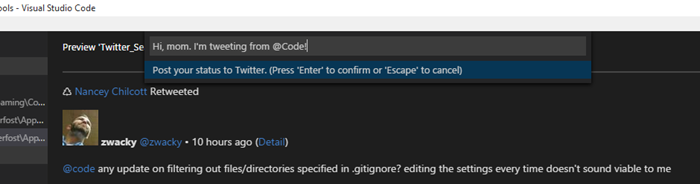
This one’s just cute and fun and shows off the power and versatility of extensions in Code. The Twitter extension let’s you read and even write
Create Your Own
Now here’s the real winning tip. You don’t have to just check every week to see if someone has created your new doodad yet. You can just build it yourself!
If you’re wondering if it’s hard, it’s not. If I can make an extension, you can.
Watch this. I’m going to build the hello world extension from start to finish in just over a minute. Granted I sped it up a little and skimmed over the long running npm install bits, but still. You can see that it’s an easy process. Note: this assumes you have Node.js and Visual Studio Code installed already.
If that went just a little bit too fast for you, you can get the complete tutorial by going to code.visualstudio.com/docs/extensions/example-hello-world, and for a bunch more information about getting started creating Code extensions, go to code.visualstudio.com/docs/extensions/overview.
My team has put together a bunch of different videos and blog posts to sum up the announcements from Connect(). You can see the rest of them by visiting Jerry Nixon‘s post Inside the Code: What’s New with Visual Studio.
VS Code Goes Open
Visual Studio Code is now open source.
Me: What do you think of Visual Studio Code?
Some Dude: It’s awesome. I just wish it were open source.
Me: You need to fork it? Tweak it?
Some Dude: No.
Me: Okay.
I get it. I like open source stuff too.
Realistically, there are few products I have time to fork and fewer still that I have need to fork.
But even when I have no need to fork a project and no intention to submit a pull request any time soon, still I want it to be open source. Why? Because… freedom.
I like closed source products too, actually. Closed source products can be sold. Selling products earns a company money. Companies with money can create big research and development departments that can tinker with stuff and make new, cool stuff. And ultimately, I like new cool stuff.
The best scenario for me, a consumer, though, is when a big company with a big research and development department can afford to make something cool and free and open, because they make money on other products.
Some products (think Adobe Photoshop) are obviously a massive mess of proprietary code that feel right to belong to their parent company. They need the first-party control.
Others, like Code feel more like they belong to the community. That’s how I feel anyway.
**And now I can. Visual Studio Code is officially OSS! **
In case you missed it, Microsoft announced at Connect() 2015 that Code was graduating from preview to beta status and that it would be open sourced.
To see Code’s code comfortably settled into its new home, just head over to github.com/microsoft/vscode. From there, you can clone it, fork it, submit an issue, submit a PR… or look at what the team is working on and who else is involved. You know… you can do all of the GitHub stuff with it.
So there it is. It’s not only free as in “free beer” now, but also as in “free speech”.
The actual announcement is buried in the keynote, so the best way to get the skinny on this announcement, the details, and the implications is to watch the Visual Studio Code session hosted on Connect() Day 2 by @chrisrisner. The panel shows off Code in serious depth. It’s a must-see session if you’re into this stuff.
One of the more exciting things they showed off is actually the second gigantic announcement regarding Code… the addition of extensions to the product, but that’s a big topic for another day and another blog post.
What exactly does the open sourcing of Code mean for you? As I mentioned, you may or may not be interested in ever even viewing the source code for Code. The real gold in this announcement is the fact that Code now belongs to the community. It’s ours. It’s something that we’re all working on together. That’s no trivial matter. Microsoft may have kicked it off and may be a huge contributor to it here forward, but so are you and I.
So whether you’re going to modify the code base, study the code base, or just take advantage of the warm feeling that open source software gives us, you know now that the best light-weight code editor for Windows, Linux, and Mac, is ready for you.
Let’s have a quick look at the code for Code using Code. The official repo is at http://github.com/Microsoft/vscode. So start by cloning that into your local projects folder. My local projects folder is c:\code, so I do this…

Then, you launch that project in Code using…

You’ve got it now. So I just added “codefoster” to a readme.md file to simulate a change and then hit CTRL + SHIFT + G to switch to the Git source control section of VS Code, and here’s what I see…
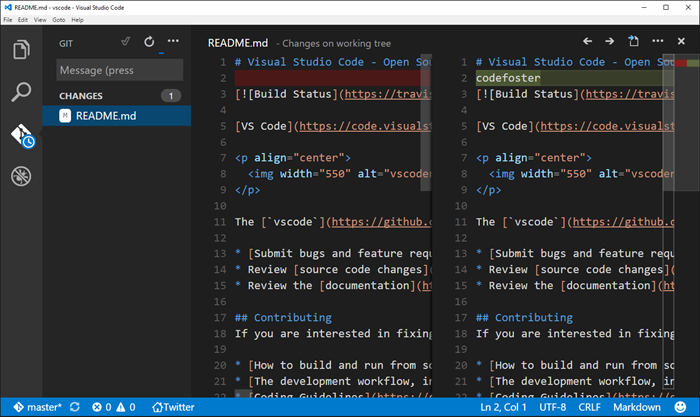
Notice that the changed file is listed on the left and when highlighted the lines that were changed are compared in split panes on the right. Checking this change in would simply involve typing the commit message (above the file list) and then hitting the checkmark.
This interface abstracts away some of the git concepts that tend to intimidate newcomers - things like pushing, pulling, and fetching - with a simpler concept of synchronizing which is accomplished via the circle arrow icon.
It’s important to note that I wouldn’t be able to check this change in here because I don’t have direct access to the VS Code repo. Neither do you most likely. The git workflow for submitting changes to a repo that you don’t have direct access to is called a pull request. I’ll leave the expansion of this topic to other articles online, but in short it’s done by forking the repo, cloning your fork, changing your files, committing and pushing to your fork, and then using github.com to submit a pull request. This is you saying to the original repo owner, “Hey, I made some changes that I think benefit this project. They are in my online repository which I forked from yours. I hereby request you _pull _these changes into the main repository.
It’s quite an easy process for the repo owner and I don’t think a repo owner on earth is opposed to people doing work for them by submitting PR’s. :)
Again, getting involved simply means interacting and collaborating on GitHub. Here’s how…
- Check out the list of issues (there are already over 200 of them as I type this) on microsoft/vscode repo.
- Chime in on the issues by submitting comments.
- Create your own issue. See how.
- Clone the code base using your favorite git tooling or using
git clone https://github.com/microsoft/vscode.giton your command line. That will allow you togit pullanytime you need to get the latest. Having the code means you can browse it whenever you’re wondering how something works. See how. - Fork the code using GitHub if you want to create a copy of the code base in your own GitHub repo. Then you can modify that code base and submit it via a pull request whenever you’re certain you’ve added some value to the project. See how.
And you can chatter about Code as well on Twitter using @Code. As to how they got such an awesome handle on Twitter I have no idea.
Also check out my mini-series I’m calling Tidbits of Code and Node on the Raw Tech blog on Channel 9 where I’ve been talking a lot about Code (and Node) and plan to do even more now that the dial for its awesome factor was turned up a couple of notches.
Happy coding in Code!
Moving Desktop and Downloads to OneDrive
The fierce competition between online storage providers has led to where we are today. Today a consumer can store their entire life in the cloud. Okay, “their entire life” might be an exaggeration, but you know what I mean.
Do you have multiple terabytes of family photos, videos, and email archives? Yeah, me too. How would you feel if you lost them? Pretty rotten. Me too.
Maybe you already know the concepts behind basic system backups, but I’ll share some things here for context.
You can protect against a hard drive crash by backing up your valuables to a separate drive. That will dramatically reduce your chance of failure from a faulty drive, a lost laptop, an accidental format, or someone hacking into your system and deleting everything. It won’t, however, protect you from a fire, natural disaster, or perhaps a burglary. In that case, you need an offsite backup.
An offsite backup can be a little hard drive that you drop everything on and hand to a friend. And not that sketchy friend… someone you trust.
Unless your friend lives in another state, however, even this measure isn’t going to protect you from what I like to call the meteorite scenario. The meteorite in my scenario could be replaced by an earthquake, tornado, flood, or whatever else mom nature likes to bring your way wherever you live. Not that nature likes to bring meteorites my way here in Seattle. In fact, I’ve never seen a meteorite enter the atmosphere over the Emerald City, but I digress. To protect against the meteorite scenario, you need cloud backup.
Cloud backup is a bit more than just a fancy offsite backup. When you get your files to the cloud, you’re counting on a professional and commoditized backup strategy. You’re counting on the fact that your cloud provider assumes an extremely high potential value on the documents in question and creates multiple backup copies themselves to assure they don’t end up with a huge number of extremely dissatisfied customers.
It’s not without risk. It’s entire possible that any of the major cloud providers could completely goof up and lose your files. It’s a remote possibility, but the risk is there.
So in my opinion, the ultimate setup is as follows.
You keep all of your documents in your cloud storage provider of choice. I like OneDrive.
You sync some of your documents on each of your devices, but you sync all of your documents on one device with a hard drive that can handle it. You be sure that one master device - perhaps a desktop PC at home in your closet - is always on and thus syncing changes down from the cloud as you modify things from your various devices.
With that configuration, you have all of your documents locally and in the cloud. It’s all live too and doesn’t require an intermittent backup strategy.
Now more to the point.
If you’re running Windows, you have the concept of the system folders. These are the folders like Documents, Pictures, Videos, Desktop, and Downloads. They’re special folders in that they are not just a file container, but they’re also a concept. You want to store files in your Documents folder, but you may want to configure what that folder is called or where it is, and you want applications to not have to worry about where it is.
It’s similar to what happened to the paradigm of printers. A long time ago in this very galaxy, applications used to be responsible for printing. If you were an application developer, you had to create printer drivers. Now you just sort of toss your document over the wall to the operating system and say “I want to print to that one” and the common printer drivers are invoked.
It’s like that with the Documents system folder. An application might default to saving in your Documents folder regardless of where you the user have deemed that folder to live.
Perhaps you know already how to configure your Documents folder location. If not, here’s how…
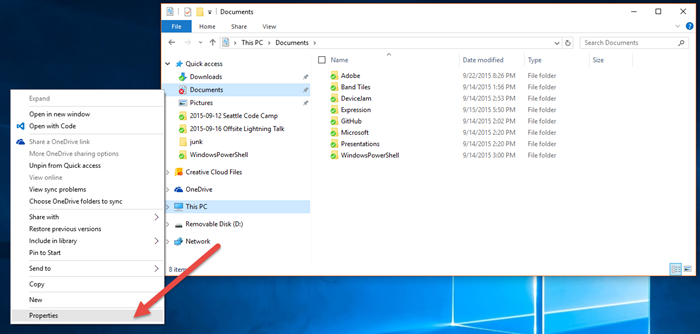
So you just right click on the Documents folder in Windows Explorer (here I’m finding it in my Quick Access list on the left) and choose Properties.
Then you go to the Location tab and change the path. To move your documents to the cloud you simply configure a path that is somewhere in your OneDrive folder (by default in c:\users{user}\OneDrive).
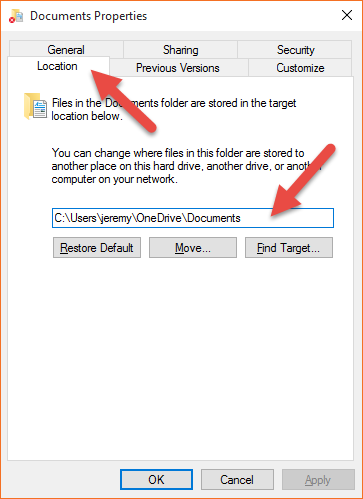
The result of this change is that now when most any application on your computer saves a document - say a letter to grandma, your tax returns, or whatever - it puts it in the Documents folder (the concept) which you have configured to be in your OneDrive. So that tax return is going to be synced to the cloud and all of your other devices.
Now even more to the point.
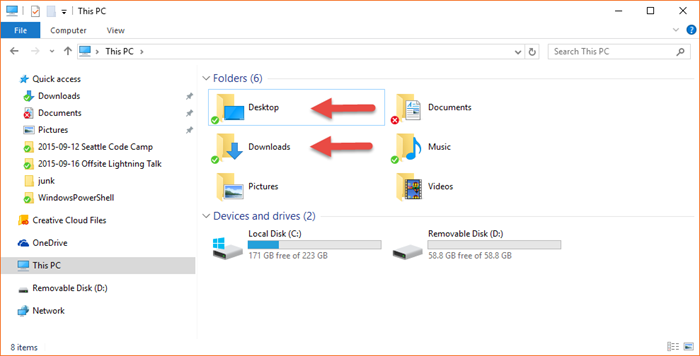
Many people don’t know that you can do the same thing with your all of your system folders including your Desktop and your Downloads folders.
It goes like this.
You may not yet have a folder in your OneDrive for Desktop and Downloads, so create them. Don’t put them inside your Documents folder. Just put them right on the root of your OneDrive file store. I did this on onedrive.com in my browser. Whenever I want to explicitly do something to my OneDrive files on the server I do it in the browser and essentially bypass the sync tool built into Windows.
Now, just like you did for your Documents folder, you go to Properties and then the Location tab and you change the path to your newly created folders in OneDrive. Mine are…
- c:\Users\jeremy\OneDrive\Desktop
- c:\Users\jeremy\OneDrive\Downloads
And that will do it.
Now when you download a file from internet using Microsoft Edge and it defaults to the Downloads folder and then you have to reload your machine, you don’t have to think about what’s in your Downloads folder and whether you want to back it up. It’s already done. And if you’re the type to save the really important tasks that you want to be front-of-mind to your desktop it’s the same thing. By the way, you know that guy at work with a thousand icons on his desktop? Don’t be that guy. :)
The whole goal here is to cloud enable our devices - making them as stateless as possible. You know you’re cloud enabled when a complete OS reload takes 30 minutes and you’re done.
There you go. Happy downloading.
Seattle Code Camp - It's a Doozy!
Here it comes again. Seattle Code Camp happens every year and it’s one of those events where you don’t even think about whether or not to attend - you just attend. This year it’s September 12, 2015 at Seattle University in the Capitol Hill area.
As always, it’s free. As always, there’s food. And as always, it’s a big collection of coders of every skill level presenting on subjects that inspire them and hopefully inspire you too.
Several tracks give you a wide choice of information to glean, and a couple of gatherings of the entire crowd give you a chance to rub shoulders with your peers.
If my sessions are accepted, I’ll be presenting on some IoT topics. That’s what really drives my boat these days. As of this writing, the speaker registration is still open. You don’t have to be a wizard to present. Beginners are just as welcome as experts. So work up some courage, dust off your public speaking book from college, and sign up.
I’m looking forward to it. See you there.
Configuring a Custom Domain Using Namecheap and Azure Web Apps
Namecheap.com is a domain registrar that treats me very well. Domain registration and DNS records is a strange world that I don’t understand very deeply, so I appreciate a registrar that makes things clear and keeps it fairly simple.
If you’ve created a website in Azure and you’re not opting to use Azure’s recently announced domain registration service, but have instead registered your domain using Namecheap, then this post is for you. Actually, this post is for me since I always forget a step or two and need this as a reference. But you can use it too.
Step 1. Register your domain with Namecheap. I don’t have any trouble with this step and I’m going to assume you won’t either. If you do need help, look for support on namecheap.com. For the purposes of this article, I’m going to assume the domain is tweetmonkey.io since that’s one that I recently created.
Step 2. Create your web app on Azure. Again, this is sort of out of scope for this article, but it’s not hard.
Step 3. Point your Namecheap domain to Azure. This is where we tell Namecheap to point to Azure. It’s not hard, but it’s just not always easy to remember.
Log in to your Azure web app using portal.azure.com, go to Settings, then Custom Domains and SSL, then Bring External Domains, then copy the IP address. We’ll need that soon.
Now log in to namecheap.com, go to manage your domains, and choose the domain you want to forward.
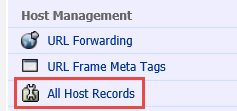
Click All Host Records on the left
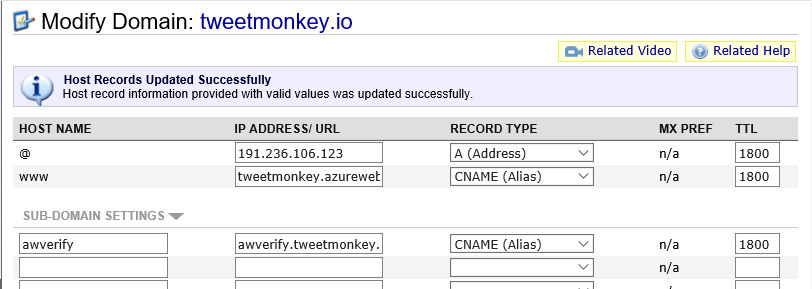
There are two host records that should already exist. One has a prefix of @ and one has a prefix of www.
- For the @ record, paste the IP address into the IP Address/URL field. Make sure the record type is still A (Address). Change the TTL to 1800.
- For the www record, enter your given Azure address such as tweetmonkey.azurewebsites.net. That’s always prefix you chose for your Azure web app and then .azurewebsites.net. Make sure it’s a CNAME (Alias) record type and enter 1800 for the TTL.
- Under subdomain settings, add awverify into the first field, awverify.tweetmonkey.azurewebsites.net into the second, and drop down and choose CNAME (alias) for third. Again enter 1800 in the TTL field.
Here’s what it should look like…
Step 4. Check your DNS propogation. Now Namecheap has been forwarded, but you likely can’t continue yet, and that’s because it can take up to 30 minutes for this change to propagate across the internet. I like to go to http://www.dnsunlimited.com/propagation_check every 30 seconds or so (actually, I’m more patient than that) and doing a CNAME search for www.tweetmonkey.io and awverify.tweetmonkey.io. As soon as you see a response value of tweetmonkey.azurewebsites.net or awverify.tweetmonkey.azurewebsites.net respectively, I know the propagation is done and I’m ready for the next step.
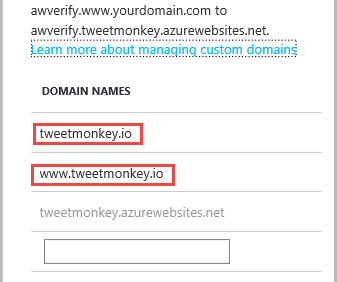
Step 5. Add your domain to Azure. Now that the entire internet knows about your change, you’re ready to configure it in Azure. Go back to that same Azure portal location that you did in step 3a and under domain names add your root domain and your www prefix - tweetmonkey.io and www.tweetmonkey.io. Azure will check your CNAME records to be sure you are authorized to use this domain (we wouldn’t want people able to redirect domains willy nilly!), and since you checked the propagation of your CNAME records in step 4, it should pass. Save your changes.
Step 6. Test, drop the mic, and exit stage right. After step 5, you should immediately be able to open your browser of choice and hit either your root or your www. site. Hope it works for you.
Keep in mind that you may choose to get all sorts of fancy with your domain prefixes. You may choose to have your root domain (tweetmonkey.io in this case) go to the same place as your www prefix and then point your api prefix to a separate Azure web app that you made with Web API and then perhaps you could create an admin prefix that takes users to a different web app still. In any case, I think you qualify as an official webmaster now!
Code speed to you!
The Simplest Node Website
I’ll start with the code…
require('express')().get('/',function(req,res){ |
There it is. The simplest Node.js webserver/website. Three lines of code.
I know I’ve got it a bit mungled together. I’m not recommending this code. Just having fun.
Notice that I’m hanging a () directly off of the require('express'). The require statement returns a function. This is one of the most popular of the Node module patterns. Since it returns a function, hanging parenthesis off of it executes the function.
The execution of the function returns an express app, and the app supports chaining like jQuery or LINQ, so you do a .get() and then a .listen() and those are both methods of an express app.
The .get() creates the root route ('/') and then allows you to provide a function to handle that route. The function does a simple hello world.
The .listen() starts up the engine.
After creating a JavaScript file called app.js with this content in it, just type node app, and you should get zero feedback. But then hit http://localhost:3000 in your browser of choice and you’ll get the reassuring “hello world”.
By the way, if you’re using ES2015, that gets even shorter…
require('express')().get('/',(req,res)=>res.send('hi')).listen(3000);
Hail Bridge Mode
My wife and I have acquired a coach RV, parked it on our property, remodeled the interior, and done most of the work of listing it on Airbnb.
I was looking to allow guests that stay in the space to use wireless internet for free, but I am not interested in giving them credentials to just jump onto my network.
The solution, I knew, was a bridge - essentially a device with two wireless NICs and the ability to communicate between them for you. I hadn’t hooked up a bridge before, and I expected it was going to be hard. I expect most things to be hard and am seldom disappointed. Actually, that’s not entirely true. I do expect most things to be hard, but I’m still quite often disappointed.
I talked with my colleague @KennySpade about it and I liked his answer - “I think this little device I have in my hand will do the trick. I’ll send it to you. It was only $12.”
The device Kenny was referring to is a TP-LINK WR702N Nano Router.
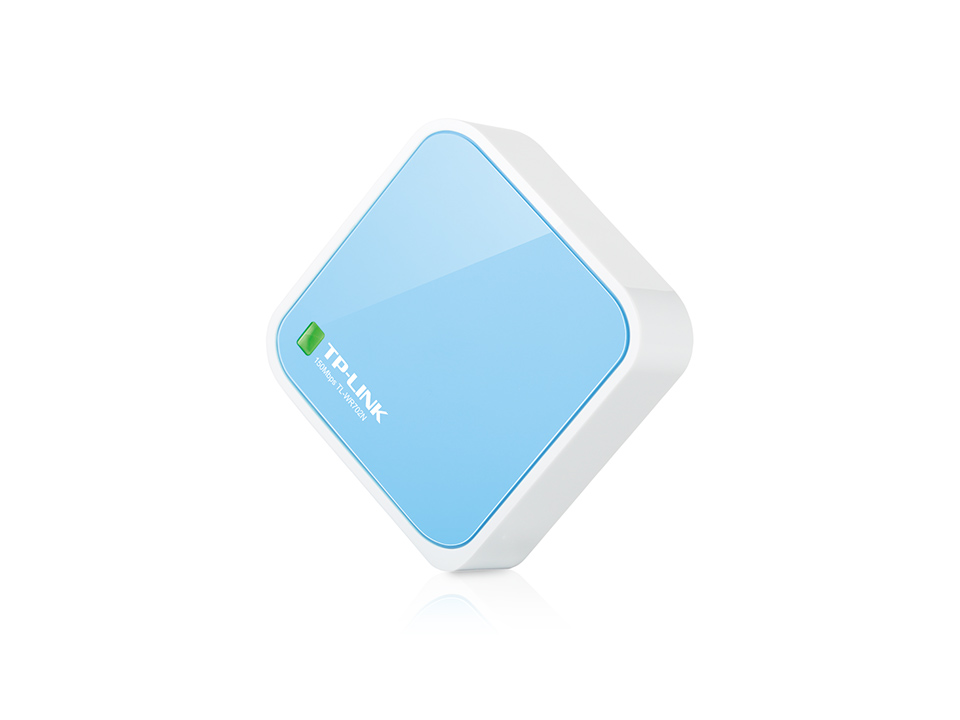
I was wrong in believing that a device like this would contain a single wireless NIC and would thus be capable of speaking to a single wireless device. In fact, when configured for “bridge mode” the device is able to be configured such that it communicates with my home network, but then itself broadcasts a second network with a new SSID and credentials.
The three primary reasons I wanted to go this route (rim shot) are…
- It feels right for the RV to have its own wireless network. I can’t explain it. It just feels right.
- It provides the security of keeping guests on a separate physical network.
- It allows me at some point in the future to travel around with this rig all the time allowing all of its occupants to a) communicate with each other on a network and b) get internet access when we stop somewhere when I simply tell the TP-LINK what the SSID is. We stop at a coffee shop, I point the TP-LINK to the coffee shop’s wifi, and voila all of the inhabitants of the RV instantly have internet access.
I’m quite tickled with this solution.
Help Me Design a Candy Dispenser
I’m going to keep much of my latest project under wraps for now, but I need your help designing one piece of it.
I’m looking to create a device that is small and light and will dispense one piece of candy at a time programmatically.
Here are the requirements…
- Light - no more than 1oz
- One at a time - it needs to dispense a piece of candy one at a time. If I have to constrain it to hold only round candy of a set size, then so be it, but ideally it would hold candy of varying size and shape. Ideally it will hold Runts bananas.
- It has to operate on a 3.7V power supply
- It has to be an electro-mechanical assembly that I can control with an IoT device (an easy req to fulfill I think)
- It should hold some reasonable number of candy pieces - say at least 10.
So far I’ve thought of the following…
- An Archimedes screw that “pumps” candy up from the bottom of a hopper (like this)
- A wheel that sits horizontal and on each incremental rotation lets one candy piece at a time fall into a hole in the top and lets another fall out a hole at the bottom
- A screw that sits on a horizontal axis that is loaded with candy pieces (one per screw rotation… not in a hopper) and pushes one piece out at a time when rotated 360 degrees. A bit like snack vending machines.
If you can come up with any other brilliant ideas, I’d be glad to hear them.
Thanks in advance.
What's New in Azure
Sometimes it’s the most obvious things that are the easiest for me to miss. I can see being in a usability study with the folks that designed the new Azure portal and giving feedback like, “you know, this is great and all, but it would be really nice to get some visibility into what sort of functionality is getting added to this portal as it’s added”. I can see the designers ripping off their white lab coats in frustration, with clenched teeth and fists, muttering “it’s right… there… and it’s huge!”
Here it is…
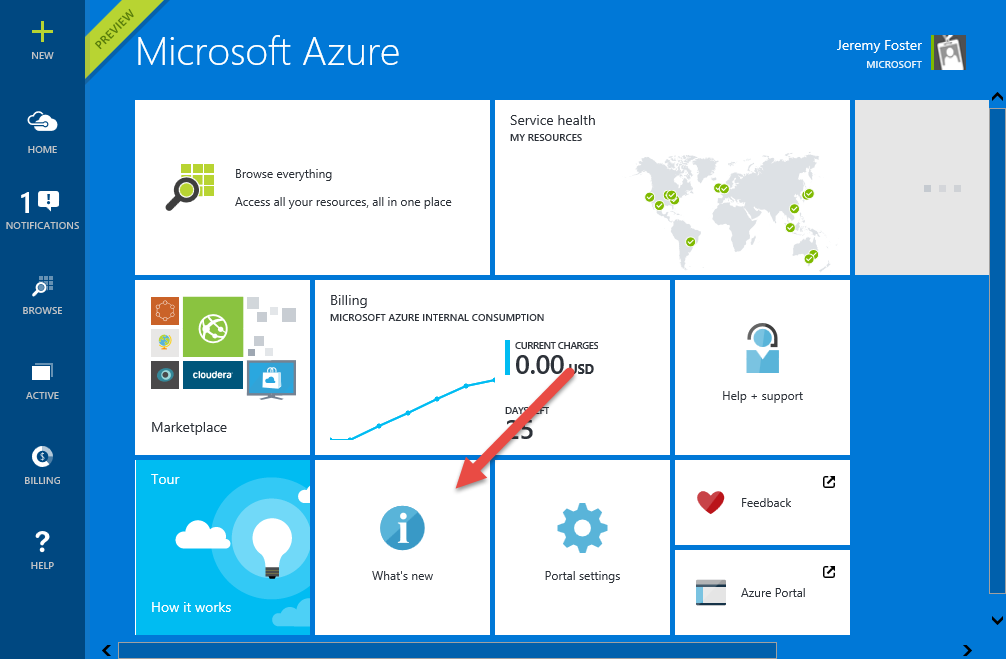
Click on that, and you’re going to get a blog essentially that enumerates all of the additions to this new version of the Azure portal as they happen. It’s good visibility into this ever changing portal.
For instance,recently - on May 13 - we got the ability to create connectors in the logic apps designer. That’s helpful. Thanks, Azure team.
Visual Studio Code
If you haven’t watched the first day’s keynote from Microsoft’s Build 2015 conference, go do that now. It has a few wow moments such as Android and iOS code for building Windows 10 apps, elastic pools for Azure SQL databases, and the amazing HoloLens robot that was a hologram and a real robot in one - amazing!
One of the pieces of the conference that’s going to affect my every day, though is Visual Studio’s new, free, light edition called simply Code. Code is what I’ve been looking for in a code editor - in a text editor even. It will replace a few other apps in my MRU list - Visual Studio Community, Notepad++, and Atom to name a few.
Console. code.exe is in your path after your basic install, so from your shell, you can type code to run the app from scratch. You can also type code myfile.txt and launch into the editing of your file or code mydirectory to open it with the explorer pane’s context already set to your directory. So my new favorite command is going to be code . for opening the current directory in Code. I was looking for some PowerShell magic to make that possible with VS Community, but now I no longer have the need.
Speed. It takes about 3 seconds to launch code.exe cold, and iut doesn’t appear to take any extra milliseconds to load either a file or a directory.
Essentials. Code is just the essentials. It’s basically a new perspective on authoring code that hopefully complements Visual Studio. If I’m an enterprise developer with a massive code base and a lot of static analysis, workflow automation, and other tooling built in to my development environment, then I can see running the full editions of Visual Studio. There are a lot of support features, it’s plug-in capable, it has excellent GUI Azure tooling. But if I’m working on what I might call more of a scrappy project - a website, a Node.js app, a sample, or whatever - Code is all I need. For some people, I suspect Code will cover 10% of the use cases, but for me, it’s more like 90%. And actually, this is only the beginning. Check out what it says in the official docs: “In future previews, as we continue to evolve and refine this architecture, Visual Studio Code will include a public extensibility model that lets developers build and use plug-ins, and richly customize their edit-build-debug experience.”
Languages. There are a ton of languages supported out of the box. Code recognizes Batch, C#, C++, CSS, Clojure, CoffeeScript, Dockerfile, F#, Go, HTML, Handlebars, Ini, JSON, Jade, Java, JavaScript, Less, Lua, Makefile, Markdown, Objective-C, PHP, Perl, Perl 6, Plain text, PowerShell, Python, R, Razor, Ruby, SQL, Sass, Shell Script (Bash), TypeScript, Visual Basic, XML, and YAML. If that doesn’t cover what you’re writing, I’d be really interested to know what you’re writing!
Commands. Hit CTRL + SHIFT + P to open the Command Palette and do most anything you want.
Autosave. Code can be configured to autosave your file as you change it like Atom does. Keep in mind, of course, that if you’re using file watchers like gulp’s .watch() method, this is going to trigger every time you type a character in your code. Autosave is off by default. To turn it on, hit CTRL + SHIFT + P and type auto.
Search. You can CTRL + SHIFT + F search over all files in the open folder and it supports regex. It ignores certain folders like node_modules by default since that’s the right thing to do.
There’s a ton more in Code, but that’s all I’m mentioning for now.
I hope you like your new home for code as much as I do so far.