
3D Printed Tiny Sea Creatures
I hack in Microsoft’s Maker Garage whenever I can. The Maker Garage is a relatively new addition to The Garage, which you may already be familiar with. The Maker Garage is a space where Microsoft Employees can come build things - hardware things, electronic things, software things, any things.
I’m a recent convert to the hardware side. I studied a bit of both hardware and software in my undergraduate Computer Engineering course many years ago, but it’s been almost entirely software for me since then. This return to resistors, capacitors and NPN transistors is a lot of fun, and in my role as a Developer Evangelist at Microsoft, it’s excellent for engaging with beginners, young folks, and anyone looking for a bit of a change from the sometimes humdrum enterprise app engineering space (hand raised!).
My last project in the Maker Garage was not a typical Azure-backed, IoT project, however. This time the customer was my 3 year old son. My wife notified me that we needed some random little figurines to complete a birthday gift, and why should we mail order figurines from across the globe when we can print them?! That’s right… no good reason.
There are a number of 3D printers in the Maker Garage, but the most recent adoption is a Form 1+ lithographic printer by FormLabs.
I first learned about the Form 1 watching the Netflix special Print the Legend some weeks ago. If you have a Netflix subscription, I recommend the documentary.
The Form 1 does not use the more popular filament extrusion technique employed by most of the 3D printers you see in the headlines. Instead, it uses stereolithography. Instead of melting plastic filament and shooting it out of a nozzle, a stereolithographic printer builds your model in a pool of liquid resin. The resin is photo-reactive and cures when exposed to a UV laser. This means you can shoot a tiny spot in the resin and it will harden. That’s perfect for turning goo into a ‘thing’.
The ‘things’ I decided to print were sea creatures. My son likes them, and they’re easy to find on Thingiverse.
I found an octopus, a submarine (not a creature I understand), a crab, a ray, an angler fish, a seahorse, and a whale.
Here’s the model of the octopus opened in 3D Builder that comes with Windows - a very slick touch-smart 3D model viewer, editor, and printer driver…
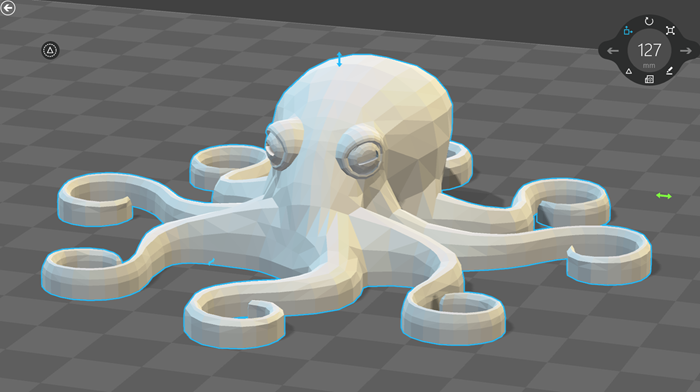
You could intuit even if you didn’t know that 3D models, like 2D vector graphics, can be scale to most any size, but unlike 2D vector graphics, they don’t always maintain their fidelity. 2D vector graphics tend to fully describe shapes. A circle is described as a circle that renders fine when you set its diameter to a millimeter or a kilometer.
3D models in .stl format - the common format for 3D printers - on the other hand are meshes. These meshes can lose their fidelity when you scale your model up. In my case here, though, I’m scaling these guys way down, so quality is not a problem.
I use Autodesk Fusion 360 for my modeling, but in this case I was able to import the .stl files directly into the software FormLabs ships with the printer. It’s the best printer driver software I’ve seen yet from a manufacturer and allowed me to scale, orient, layout, and print all seven of my characters with no trouble at all. I wish I had a screen shot of the layout just before I hit print, but I didn’t save that.
I scaled each character to somewhere between .75” and 1” on its longest axis.
You have a chance to choose the resolution of your print, and your decision has a linear impact on the print time. I chose .1mm layers at an estimated 1 hour print instead of upgrading to .05mm and adding another hour.
And here are my results.

I was impressed.
Take a look at a closeup of the whale…
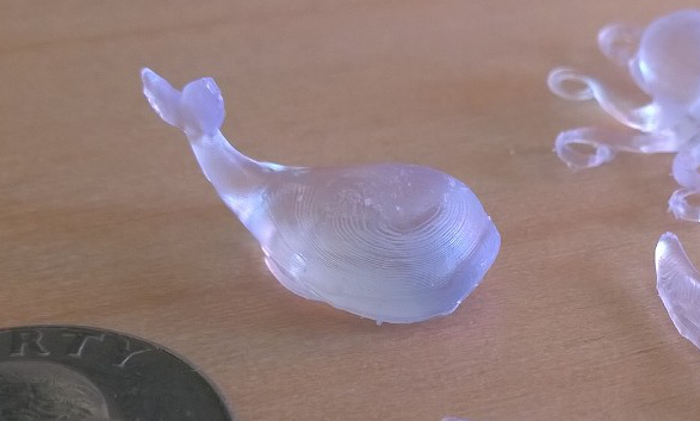
You can see the layering. That’s quite fine, and as I mentioned, it could have been double that had I had more patience.
The piece that really impressed me was the tiny seahorse…
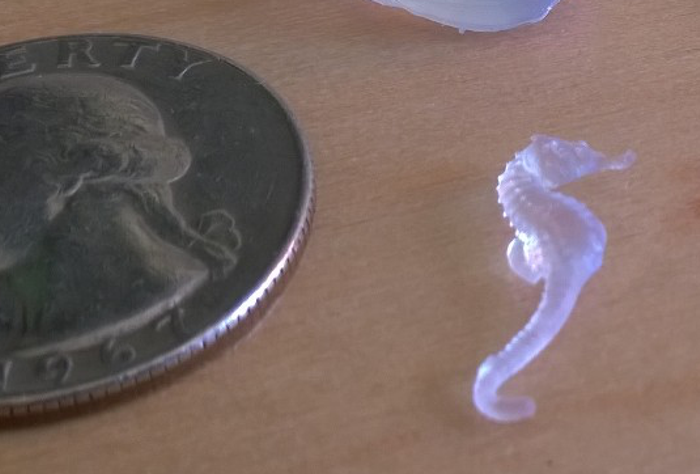
That’s just an itty bitty piece and it’s looking so smooth and detailed. Check out the small snout, dorsel fin, and tail. The same is true with the octopus legs.
One of my favorite things about the output of a lithographic printer is the transparent material. I much prefer a transparent, color-agnostic piece to the often random filament color that you end up with in community 3D printers. You can get tinted resin for the lithographic printers too, but the results are still models that are at least translucent.
I hope you enjoy this report out. Feel free to add suggestions or questions in the comments section below.
Presentation at ASB
The topic of our conversation was encouragement to go beyond our inevitable role as digital consumers and aspiring to be digital producers first and foremost.
That means, we don’t just entertain ourselves with what others have created, but we get behind the paint brush, the hand saw, or the mouse and we create it ourselves. We use it to inspire others, to lead others, and ultimately to love others. That’s a charter.
First, we talked about making websites. You each got free Azure Passes, and I hope you’ll redeem them for some cloud time. We made a website in just a few seconds in class, and you can do the same thing from home.
To redeem your pass, go to microsoftazurepass.com and enter the code. Ignore the number on the left. The code starts with ‘M’.
Next, we looked at Touch Develop by visiting touchdevelop.com. You can go there any time from pretty much any device and make something awesome. When you’re done, publish it and then send me a tweet at @codefoster, so I can help you tell the world about what you made!
We couldn’t help ourselves and started talking about the exciting and coming Microsoft HoloLens project and the world of 3D. I showed you Autodesk Fusion 360, which is my 3D modeling software of choice. If I had a HoloLens to design with, I would, but Fusion 360 is awesome too :) Since you’re students, you can download and use Fusion 360 without charge.
Finally, we learned how you can take your JavaScript skills to the world of devices and the Internet of Things. We set up Tweet Monkey, sent a tweet with #tweetmonkey, and watched him dance away.
Tweet Monkey is a really simple project that will help you get the basics of using JavaScript to control things. It’s controlled by the awesome Intel Edison. I have blogged extensively about this device at codefoster.com/edison. You can get all the details at codefoster.com/tweetmonkey. If you want to graduate from Tweet Monkey and try something harder, check out his older brother Command Monkey at codefoster.com/commandmonkey.
Thank you again for your motivation. That’s inspiring to me. Be sure to keep in touch and tell me about the cool things you make.
Command Monkey
Alright, this is going to be fun. The process is going to be fun, and the end game is going to be even more so.
Let me paint a picture of the final product. I have a monkey toy on the table before me. I then hold my Microsoft Band up to my mouth and talk into it like Maxwell Smart. I say two simple words - “Monkey, dance!”
And in no time flat, the monkey toy obeys my command and is set into motion.
The whole thing reminds you of Tweet Monkey and it should. This is Tweet Monkey’s older and slightly more involved brother.
Where Tweet Monkey was a device to cloud scenario, Command Monkey is a Cortana to phone app to cloud to device scenario. Where Tweet Monkey relied on the Twitter Streaming API (which is very cool), Command Monkey involves our very own streaming API using web sockets.
I know it sounds like it’s going to be a lot of code, but it’s really not. You’ll see. Let me just say too that if for some reason you don’t have any interest in going through this step by step, then don’t. Just go grab the code on GitHub, because that’s how we roll.
I’m going to be using the free community version of Visual Studio and the Node.js Tools for Visual Studio. You could obviously use anything beyond an abacus to generate ASCII, so let’s not get opinionated here. Use what you love. It should go without saying that you’ll need Node.js installed to make this work. That can be found at nodejs.org.
I’m going to host my Node.js project in Azure and in fact, I’m going to get it there in a rather cool way. I’m going to use the cross platform CLI for Azure to create the site and then I’ll use git deployment to publish the app.
The architecture diagram is going to look something like this…
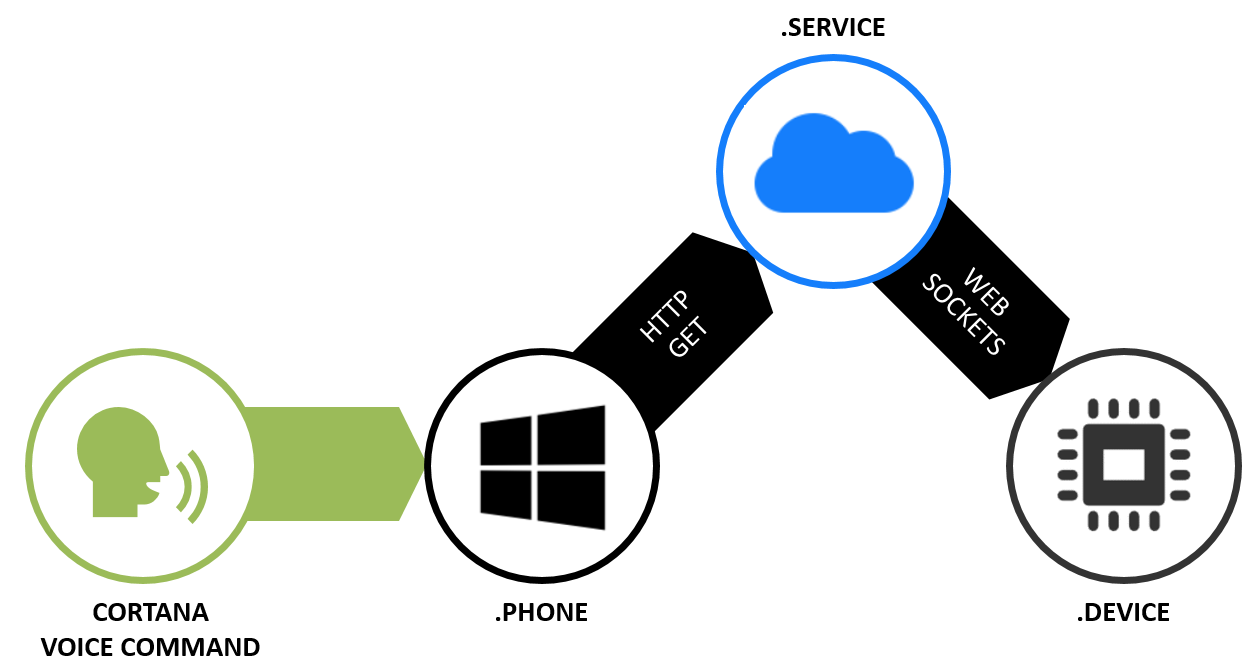
The part about speaking the command into a Microsoft Band just looks like special sauce, but you get that for free with a Band. The Band already knows how to talk to Cortana on your phone.
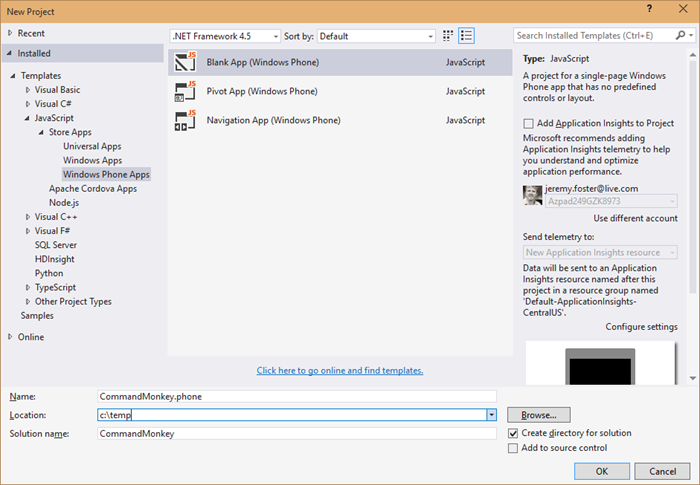
You will need to teach Cortana to talk to you app, so let’s do that first. Let’s build a Windows Phone app.
Building the Phone App
In Visual Studio, hit File | New | Project and create a blank Windows Phone App using JavaScript called CommandMonkey.phone. Call the solution just CommandMonkey. Like this…
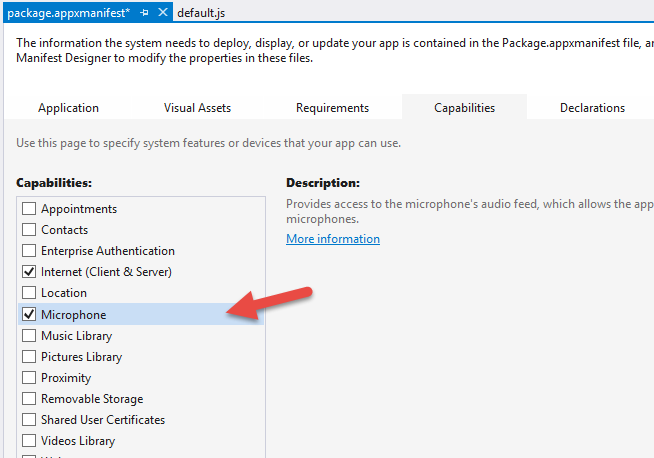
In order to customize Cortana, we need to define a voice command and that requires the Microphone capability. To add that, double click on your package.appxmanifest, go to the Capabilities tab, and check Microphone…
Now we need to create a Voice Command Definition (VCD) file. This file defines to Cortana how to handle the launching of our app when the user talks to her. Here’s what you should use…
|
The interesting bits are lines 6 and 9-14. The combination of the prefix with the command name means that we’ll be able to say “Monkey dance” and Cortana will understand that she should invoke the Command Monkey app and use “dance” for the command.
You’ll notice that I have a second command in the phrase list for the command - chatter. I don’t currently have a mechanical monkey capable of both dancing and chattering, but you can imagine a device capable of doing more than one action and so the capability is already stubbed out.
Next we need to register this VCD file in our phone app. When we do this and then install the app on a phone, Cortana will then have awareness of the voice capabilities of this app. She’ll even show it to the user when they ask Cortana “What can I say?” To do that, open the js/default.js file and add this to the beginning of the onactivated function…
var sf = Windows.Storage.StorageFile; |
And there’s one more step to completing the Cortana integration. We need to actually do something when our application is invoked using this voice command.
Still in the default.js, add this after the if statement that is looking for the activation.ActivationKind.launch
else if (args.detail.kind === activation.ActivationKind.voiceCommand) { |
Now let’s talk about what that does.
The if statement we hung that else if off of is checking to see just how the app was launched. If the user clicked the tile on the start screen, then the value will be activation.ActivationKind.launch. But if they activated it using Cortana then the value will be activation.ActivationKind.voiceCommand, so this is simply how we handle that case.
The way we handle it is to access the parsed semantic using the event argument and then to send whatever command the user spoke to the CommandMonkey.azurewebsites.net website.
How did that website get created you might ask? I’m glad you did, because we’ll look at that next. As for the phone project, that’s it. We’re done. It’s not fancy, and in fact if you run it, you’ll see the default “Content goes here” on a black screen, but remember, we’re keeping this simple.
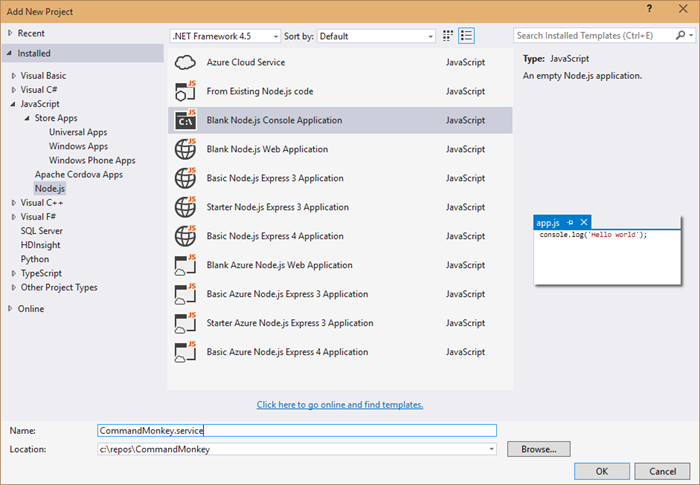
Building the Node.js Web Service
Visual Studio is able to hold multiple projects in a single solution. So far we have a single solution (called CommandMonkey) with a Windows Phone project (called CommandMonkey.phone).
Now we’re adding the web service.
Find the solution node in Visual Studio’s Solution Explorer and right click on it and choose Add | New Project…
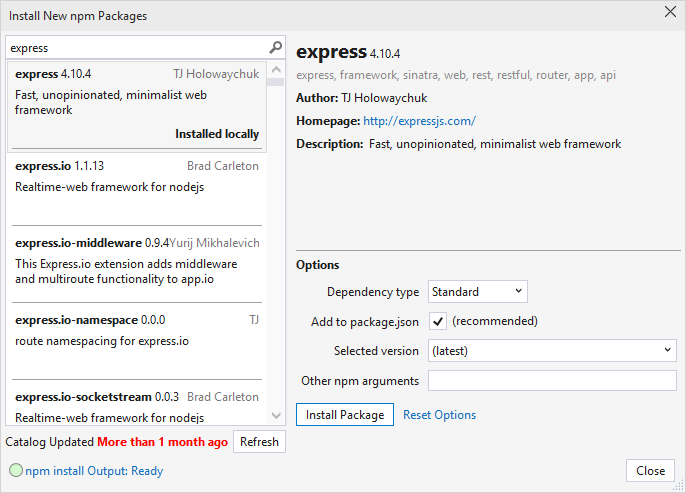
Now install the express and socket.io Node modules. You can either do it the graphical way or the command line way.
The graphical way is to right click on npm in the .service project and choose Install New npm Packages… Then search for and install express and socket.io. For each leave the Add to package.json checked so they’ll be a part of your project’s package.json.
Now the command line way. Navigate to the root of this project at a command line or in PowerShell and enter npm install express socket.io --save
Now open up the app.js and paste this in…
var http = require('http'); |
This is not a lot of code for what it’s doing. This is…
- creating a web server
- setting up web sockets using socket.io
- setting up a handler for when clients call the ‘setTarget’ event
- defining a route to /api/command which calls the “target” client with the specified command
That’s what I love about JavaScript and Node.js. The code is short enough to really be able to see the essence of what’s going on.
Okay, the service is done, but it’s still local. We need to get this published.
We’re going to use Azure Websites feature called git deployment.
There’s something interesting about our project though. The git repository would exist at the solution level and include all of our code, but the folder that contains the Node.js project that we actually want published to Azure is in a subdirectory called CommandMonkey.service. So we need to create a “deployment file”. To do that just create a file at the root of the project called .deployment and use this as the contents…
[config] |
And in typical fashion, we’re going to have a few files that we have no interest in checking in to source control, so make yourself a .gitignore file (again at the root of the CommandMonkey solution) and use this as the content…
node_modules |
Now git commit the project using…
git init |
Now you need to create an Azure website. Note, you need to already have your account configured via the Azure xplat-cli in order to do this. I’ll consider that task outside the scope of this article and trust you can find out how to do that with a little internet searching.
azure site create CommandMonkey --git |
And of course, you can’t use CommandMonkey, because I’ve already used that one, but you can come up with your own name.
The --git parameter, by the way, tells the create command to also set up git deployment on the remote website and will also create a git remote in the local repository so that you’ll be able to execute the next line.
To publish the website to azure, just use…
git push azure master |
…and that will push all of your code to a repository in Azure and will then fire off a process to deploy the site for you out of the CommandMonkey.service directory which you specified earlier.
There’s one thing you need to do in the Azure portal to make this work. If anyone knows how to do this from the xplat-cli, be sure to drop me a comment below. I’d love to know. You need to turn on web sockets. Just go to your website in the portal, go to the configuration tab, and find the option to turn on web sockets. Easy.
Whew, done with that. Not so hard. Now it’s time to write the Node.js app that’s going to represent the device.
Building the Device Code
As is often the case, the device project is the simplest project in the solution. It does, after all, only have one job - listen for socket messages and then turn the relay pin high for a couple seconds. Let’s go.
In Visual Studio, right click on the solution and Add | New Project… and add another blank Node.js app. This time call it CommandMonkey.device…

Using the technique above for installing npm packages, install the socket.io-client npm package.
var cylon = require('cylon'); |
You can see that this code is connecting to our web service in Azure - CommandMonkey.azurewebsites.net.
It also requires and initializes the Cylon library so it can talk to the hardware in an easy, expressive, and modern way.
The Cylon work method is like Cylon’s ready method, and so that’s where we’ll invoke the setTarget event. This socket event request for the server to save this socket as the “target” socket. That just means that when anyone triggers messages on the server, this is the device that’s going to pick them up. You may want to create this as an array and thus allow for multiple devices to be targets, but I’m keeping it simple here.
Finally, it handles the ‘command’ event that the server is going to pass it and simply raises the digital pin for 2 seconds.
To make this work, you need to deploy this project to your device. I use an Intel Edison, but this will work on any SoC (System on a Chip) that will run Linux. I am not going to repeat how to setup the Edison or deploy to it. You can find that in my series of Intel Edison posts indexed at codefoster.com/edison.
Once you get the code deployed to the device, you then run the CommandMonkey.phone project on your phone emulator or on your device. I run mine directly on my device so I can talk to my Microsoft Band.
And that should pretty much do it. If I haven’t made any gross errors in relaying this and you haven’t made any errors typing or pasting it in, then you’re scenario should work like mine. That is… you hold the action button on your Microsoft Band and say…
“Monkey, dance!”
…and a very short time later you get a message with the command on the screen.
I hope you’re mind is awhir like mine is with all the ideas for things you could do with this. We have real time device to device communication going on, and users really get excited when they utter a command and a half a second later something is happening in front of them.
Go. Make.
I recorded a CodeChat episode with my colleague Jason Short (@infinitecodex) about Command Monkey. Here you go…
Windows Phone Emulator on Windows 10 TP Build 9926
After upgrading to Windows 10 Technical Preview Build 9926, I found myself unable to run the Windows Phone Emulator either from the Developer Power Tools or by executing a phone app from Visual Studio 2013.
I found a forum post online that showed how to resolve it. Here it is.
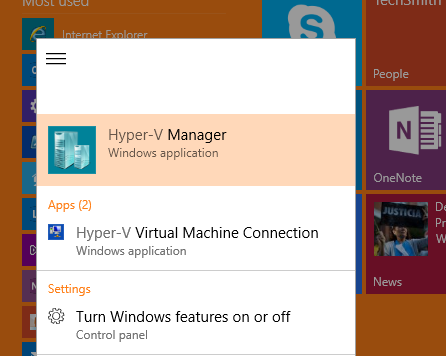
Open the Hyper-V Manager
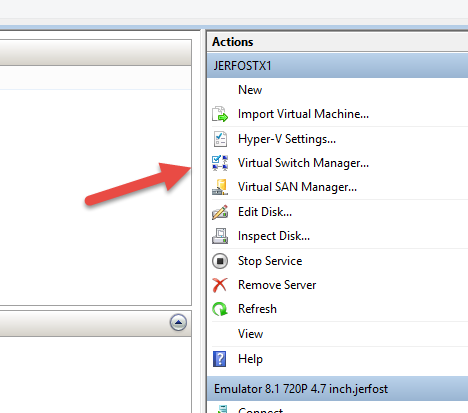
Now click on Virtual Switch Manager on the right under Actions…
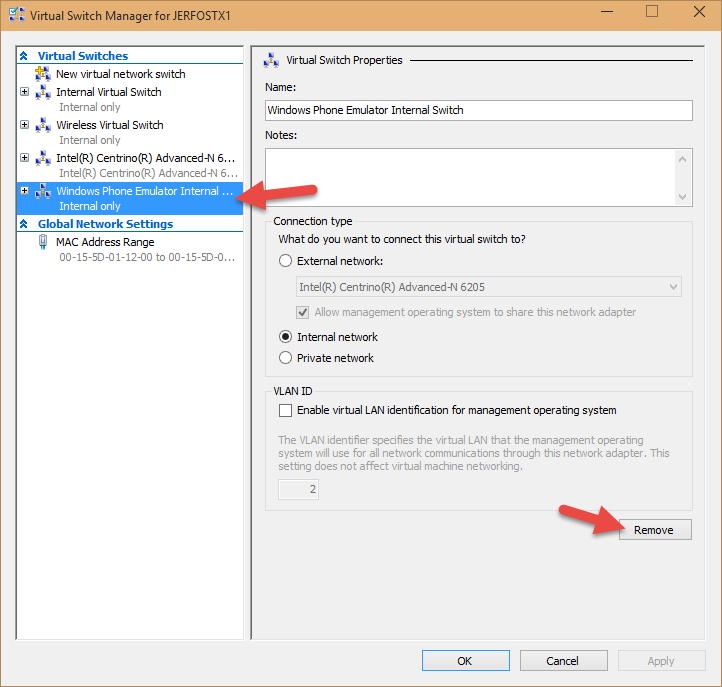
And then choose the Windows Phone Emulator Internal Switch from the list of switches and hit Remove. Don’t worry, a new one will be automatically created for you the next time you try to connect to the emulator in Visual Studio.
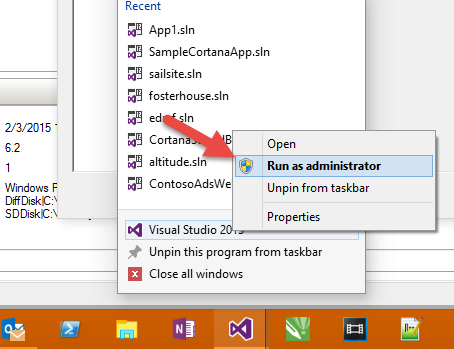
Now launch Visual Studio as an administrator…
And try again to execute a Windows Phone project. The emulator took quite a while for me to open up, but it eventually did and worked great.
Hope this helps someone.
SnagIt 12 Tip
I have been using SnagIt by TechSmith for a few versions. A few months back I upgraded to SnagIt 12. The UI is quite different from version 11, and I think the changes are for the better. The design is cleaner, flatter, and more appealing in my opinion, and the functionality of new UI is intuitive and functional.
My main workflow is this…
- press PrtSc
- define the area to capture
- maybe mark up the clipping
- either save the result to file (for attachment to an online post) or copy to clipboard for pasting into an app
This latest version of SnagIt added video capture capability. That’s pretty huge and helpful, but it necessitated a change to the UI that adds a step for me.
After pressing PrtSc and choosing my region, SnagIt comes up with a prompt to ask me if I want to capture an image or video, and the thing is, I want to capture an image about 95% of the time.
Well, the software recently created for me an unobtrusive (thanks for that!) alert for me, and when I got around to looking at it, it was a note to see if I wanted to learn how profiles work. I did. I watched a quick video, and learned how they work. You can too here if you’re interested.
The great thing is that each profile can have its own hotkey attached, so here’s how I configured it to make my life easier.
First, I removed the PrtSc hotkey as the default capture key. This is not done in the profiles window, but in the main preferences.
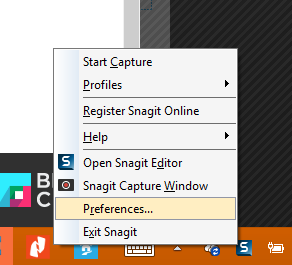
Just go to the Hotkeys tab and clear all three of the Ctrl, Shift, and Alt checkboxes next to Global Capture and set the dropdown to None.
Now go back to the system tray icon, choose Profiles | Manage Profiles.
In this screen, if your defaults are like mine, you’ll have Image, Video, and Send to Clipboard. You won’t need to add or remove any if you want to set yours up like mine.
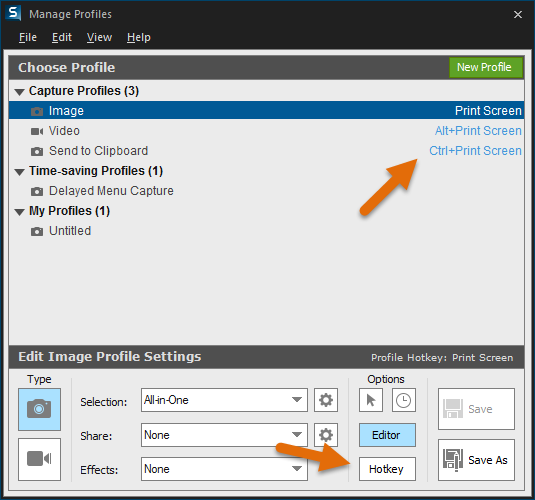
For Image, click on the profile, then choose the Hotkey button and set it to PrtSc with no modifiers. Now set the Video to Alt + PrtSc and set the Send to Clipboard to Ctrl + PrtSc.
Now you can use PrtSc as you did before, but you won’t have the extra step of choosing between image and video. Additionally, you can hit Alt + PrtSc to take a video, or you can hit Ctrl + PrtSc to avoid the SnagIt Editor altogether and just copy the defined region directly to the clipboard.
In my opinion, this is just perfect and I’m thrilled. I guess it’s the little things that delight.
Making
I’m going to wander philosophically for a little bit about the very recent yet surprisingly welcome divergence of my job role.
Though the functions are much the same, the differences feel pronounced.
The primary job of a technology evangelist is to know technology, connect with people, and inspire.
That’s my definition at least.
I work hard to understand the concepts behind Microsoft technologies - our platforms, frameworks, applications, and libraries.
Then, I work to create genuine engagements with folks online and in person. The key word there is genuine. I’m not here to blow smoke. There’s no room in the industry for shills.
Then, I do my best to relay the bits about bits that will really turn people’s cranks. There really are a lot of developer concepts that make me go “whoa… that’s completely awesome.” I’m thinking about the first time I saw zen coding, the first time I saw Signal R, or the first time I wrote a Node.js app.
So what’s changing? Well, nothing and everything.
I’ll focus on the everything.
Think about three years ago. I mean architecturally speaking. Pretty different, right? The cloud as we know it was still nascent, and the Internet of Things concept was not really on most people’s minds. Fundamentally, app domains were narrow. Your total app was that code running on your client’s device, and perhaps included some cloud data and authentication.
We were still talking about the 3 screens that each person was going to have connected to the internet - not the 47 different gadgets, sensors, and other things.
Right now, we’re in an ambiguous time. Blogs and tweets about with decent speculations of what the imminent future of technology will look like, but I feel like a few bombs have dropped - 3D printing… boom!, cloud-based platform as a service options… boom!, and an unlimited number of device form factors… boom! - and everyone’s still trying to get the ringing out of their ears and adjust to their new surroundings.
That’s where I’m at. I’m resurrecting formulas I studied in my electronics degree decades in the past. I’m doing Azure training on new features weekly it seems. I’m trying to keep up.
When I on-boarded at Microsoft, they said it’s going to feel like drinking from a fire hose. It hasn’t stopped and someone turned the hose up on me. And don’t think I’m saying I don’t LOVE IT.
One unavoidable component of this modern evolution is what you might call the Maker Movement. It’s not new, but I think it has new steam. It could just be me, but I don’t think so.
What gives the maker movement its appeal? It’s a subjective question, but for me, it’s just a perfect definition of what we have been doing anyway - we’ve been building things. We’ve been making. Today, however, the convergence of a number of technology categories has enabled someone with the maker gene to step into a few categories.
I can do some design, make a site, a cross-platform app, an electronic device, and an enclosure. If I’m ambitious (which I am), I can build a UAV and strap it on, then fly it around the neighborhood. Then I can upload the design, the code, and the end video all to Instructables, and get good feelings from giving back to the community.
And all of these things have something in common. It’s making. It’s essentially taking chaos and turning it into order. The meaning of the order is determined by the producer and interpreted by the consumer, but it’s usually order (about half of the YouTube videos out there withstanding :)
It’s all pretty inspiring. I’m thinking again about those “Awesome!” moments. I’m thinking about when my colleague Bret Stateham and I pulled a creation out of the laser printer in the Microsoft Maker Garage the other day and then proceeded to look at each other and go “Awesome!”. I’m thinking about the first time I hooked into the elegance of Twitter’s Streaming API.
Putting a raw piece of plywood into a laser cutter and pulling out the intended shape is certainly the ordering of chaos, and so is writing code. It’s all just arranging atoms and bits into patterns that communicate something to the consumer.
Whether it’s code, wood, plastic, DC motors, or solder, it’s all media for making. It’s all awesome!
PowerShell Profile That Enables Posh Git and Azure
I know how it goes. You run into an inconvenience such as having to load an extra window, type an extra line, or whatever and you face a quick decision - should I get off the track I’m on and spend some time fixing this workflow or should I just make it work for now and get back to what I’m paid for? It’s not an easy call.
I’ve heard it said, if you do something more than once, script it. That rule doesn’t normally equate to gains for me. If I can spend 2 minutes twice, that’s a win over spending 30 minutes perfecting a script. If I have to do it a few times though, then it certainly starts to pay off. The big wins come when you find someone else that already did it and just plug it in. Win!
Creating Your PowerShell Profile in OneDrive
Perhaps you’ve done this already, but I won’t assume that. The PowerShell profile is simple a .ps1 file that is executed whenever PowerShell is launched. It’s your chance to write some PowerShell script that you want to preclude every session.
Unfortunately, the location of the profile is hard coded. Type $profile at your PowerShell prompt and hit enter to see its location. Yours is likely at C:\Users\{USERNAME}\Documents\WindowsPowerShell\Microsoft.PowerShell_profile.ps1. That can’t be changed. Well, actually it can. There’s a trick. It’s called hard linking.
Hard linked files are essentially a low-level file alias in the Windows operating system. If you set up a hard link from c:\a.txt to c:\b.txt, then when any application requests c:\a.txt, it will get c:\b.txt. You can create a hard link then that points from where PowerShell is expecting you to have your profile, to wherever you want to put it. I put mine in a nice, organized folder in my OneDrive. This way, when I need to reload my system, I don’t have to remember to backup my PowerShell profile and restore it again after the reload. I just have to recreate the hard link. That’s good because I reload my system a lot. I consider my entire system volatile. Everything I do is either a client application that I can easily reinstall or it’s in the cloud. Special thanks to unlimited storage with an O365 subscription!
Here’s how to create a hard link from the default location to your OneDrive…
fsutil hardlink create $profile "c:\users\{USERNAME}\onedrive\documents\Microsoft.PowerShell_profile.ps1" |
You can use whatever path and filename you want for that last argument.
By the way, I use the same technique for my .gitconfig file, since it too is expected to be in a certain location. The code for that is…
fsutil hardlink create "C:\Users\{USERNAME}\.gitconfig" "C:\Users\jerfost\OneDrive\Documents\gitconfig" |
Adding Azure command capabilities
Once you have your profile set up and persisted, you want to sprinkle in some code to make a few things automatic. I’m just going to share the things that I do and hope it helps.
I installed the Azure PowerShell module. You can do the same by following the instructions in the Azure documentation.
Once you’ve done that, you get a launch shortcut to launch PowerShell with Azure support. That’s great and all, but I already have a shortcut to PowerShell. I don’t want a new one.
I actually put my PowerShell shortcut right on my taskbar. It’s in the third slot - browser, email, and then PowerShell. That means I can press WIN + 3 and launch or switch to PowerShell. I can also press WIN + SHIFT + 3 and launch a new instance. I can also press WIN + ALT + 3 and open the jump list for it. All sweet. I just need to get my Azure commands available in there. I do that by putting a single line in my profile.
Now I’ll tell you how I did this. I went looking into the Azure shortcut that the install of the Azure PowerShell module gave me and looked for the magic line that lit up support for all of the Azure commands.
And here it is…
Import-Module "C:\Program Files (x86)\Microsoft SDKs\Azure\PowerShell\ServiceManagement\Azure\Services\ShortcutStartup.ps1" |
I actually add a bit more so that when my profile is loading I can see what it’s working on…
#azure functionality |
That’s a comment, a little echo to tell me in my console what it’s working on next, and then the actual module import.
Adding Posh Git integration
Next, let’s add Posh Git. It’s a little more involved.
The first thing to do is install GitHub for Windows. I don’t really use GitHub for Windows that often, but it’s the easiest way to install Git, PoshGit, and some other utilities all at once.
Again, after installation, you’ll have a Windows shortcut called Git Shell that opens PowerShell with Git integration (including Posh Git which gives nice color coding for repositories, tab completion, etc.). Nice. Except, again, I don’t want a separate PowerShell window for when I want to look at repositories. And again, the solution is to put it in my profile.
First, since I’m _code_foster and am usually working on code, I default to my repositories directory (c:\repos)…
#start in my dev directory |
Second, I light up the Posh Git features…
#install GitHub for Windows and then these will light up Posh Git |
And finally, I like to customize the colors a bit so they’re easier to see and I do that using…
#set the Git POSH colors to something easy to see against a blue background |
And again you see my comment and the echo that lets me know at the console what’s going on.
Some More Helpful Functions
There are three more functions in my profile that I want to share with you just to give you a taste of the kinds of things you might want to do here. Here they are…
Function get ($uri){ |
The first two are shortcut ways to do simple web get and post requests. They allow me to do something like get codefoster.com and get back the actual HTML from my website. Or I can request something from a webservice and then pipe the resulting JSON to a file. Fun.
The third is something I do a lot - create a directory and then change into it. This allows me to simply type mcd newdirectoryname and do it all in one step.
Let me know in the comments if this has been helpful and how you customized your profile in a cool way.
A Simple Model using Fusion 360
In the interest of avoiding a TL;DR situation, here’s the video first and explanation afterward. Basically, I’m just showing you a simple model in Fusion 360. I get excited about things and explain them to the n-th degree though, so if you’re up for it, read on.
Here’s why I’m spending nights watching YouTube videos teaching myself how to model. Spoiler alert… it’s not just so I can create project enclosures.
It recently hit me how incredible important 3D modeling skills already are and are going to be in the future - the very near future.
The trigger - the thing that pushed me over the edge and caused me to realize the importance of this skill - is the hope I see in building things using the basic 3D printing paradigm. The same paradigm, but dramatically more materials and dramatically larger sizes.
Imagine this. Imagine a ship yard that has a giant frame over its dry dock. The frame is 600’ long!
The facility essentially has a hopper for raw steel, a furnace to melt it, and then a print head capable of delivering this liquefied steel to whatever target it’s set to.
And then, the operator goes to File | Print and the whole thing is set into motion. The car moves back and forth via screw gears, slowly climbs up, and spits out tiny drops of molten steel all along the way. The molten steel quickly hardens and forms a solid bond with the steel next to it.
Factory workers and engineers kick back in their desk and monitor the process, make improvements on v2 as they are implied, and otherwise leave well alone.
Three months later the hull of a shiny, new ship is ready to have fixtures and furnishings installed and eventually ready to launch.
The ship - being printed in one piece - is stronger than assemblies.
The element of human error has been eliminated.
The production variables have been reduced leaving whether or not to print 1 ship or 10 a simple decision of time, cost, and supply.
When we can relegate the production process - I mean taking the design you’ve made and turning it into something real - to a machine, it leaves us with the important part… the design.
If I 3D print something, assemble it, and it breaks, I tweak the design and print it again. If it doesn’t, then I upload it to Thingiverse and let the rest of the world make them too.
If the ship doesn’t stand up to its static testing, then the steel is melted down, the hull design is improved, and the printing operation begins anew.
I’m quite sure that the technology behind the machine itself will be improved. Perhaps 3 months (an only slightly educated guess on my part) will be reduced to 1 week, and the resolution will improve. It’s going to happen. You know it’s going to happen, and just like the same photograph you took 20 years ago now prints much crisper thanks to improvements in photo production devices (aka printers), the benefits of such improvements will result in massive, cross cutting improvements to vast quantities of products.
It’s all very exciting.
I am asking myself where I fit in the process. It’s hard not to be a specialist in today’s world. I love the code. I love telling machines how to do things. But building the machine itself is fun too.
It’s fun pretty much the same reasons, in my opinion. It’s fun because it’s fundamentally fulfilling to take chaos and make order. I don’t just write code… I organize digital bits. I don’t just design and print 3D things… I organize raw matter like scrap wood and plastic into something with meaning and purpose.
That’s super cool.
Have fun designing.
Jack in the Box
My wife and I just recently had our second son. His name is Jack. I made him a bassinet to sleep in, and this is an article about the process and method.
I warn you now - this project doesn’t involve any electronics or software of any kind. I know that makes it a bit boring, and I realize there are a myriad ways to bring digital awesomeness to such a scenario - moisure detection, controlled motion, music or white noise, notifications, camera integration - but it just isn’t happening at this point. Someday. The infamous someday.
I call it a bassinet so you’ll know what I’m talking about, but we actually call it a Jack in the Box - get it? Jack… in the box. Yeah, I know.
First, a little back story.
We had an army of grandmas (two actually) lined up to help the first few weeks of his life, because as we learned with our first son, being a parent of a newborn can be quite difficult.
Well, Grandma #1 had a little family emergency back home and had to cut her trip short and fly home. Then Grandma #2 had a change of plans and was not able to fly out at all. That left my wife and I alone to battle the days. And more significantly… the nights.
We consoled ourselves with the fact that this has been done a thousand times in the past and with each other we’re double the man power that a single parent has and even they can make this happen. Our three year old sleeps 12 hours a night like a champ and is at an easy and even helpful stage, so that’s helpful.
Anyway. Enough about our baby woes though. We feel like we’re over the hardest part now, and the light at the end of the tunnel is getting brighter every day. There are fewer of those nights where I am up and down every two hours like a Navy Seal in training. Fewer days that require nearly illegal doses of caffeine.
Somewhere in the whole process, we decided we wanted to reduce the size of the sleeper that we use in our room. We have a Pack-n-Play, and it was taking up too much space in our little bedroom. My wife exercised her amazing online research and shopping skills, but came up short on an ideal solution, so she said “Can you just make one?” My answer is to that, out of principle, is usually yes… even if it’s a stretch.
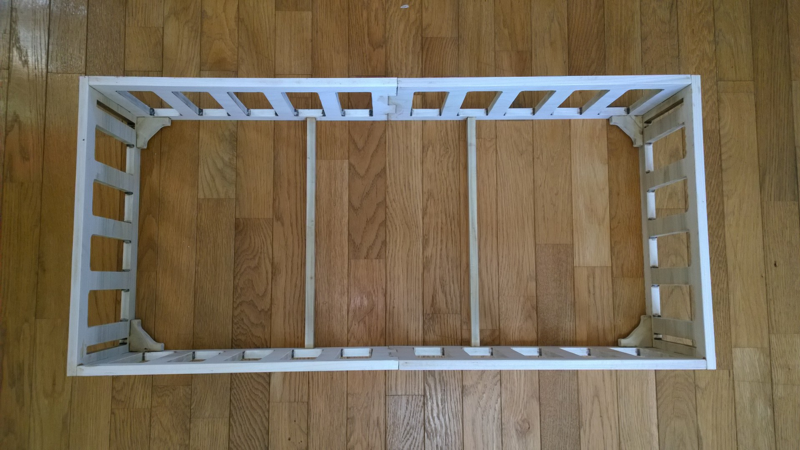
She gave me a 33” x 15” mattress to work with. I had plenty of midnight hours for step 1 - brainstorming designs. I ended up deciding to employ the laser cutter at the Maker Garage where I work at Microsoft. It turned out to be kind of a fun project, so I’ll share the process and the final product here.
My only raw material was some 7 1/2” x 1/2” x 3” poplar wood from Home Depot. I was out $35 overall, which isn’t necessarily a savings over what we were finding online, but this design had the advantage of being custom and chemical free and entirely fun.
The laser cutter I use has a bed size of 24” x 18”. The 33” mattress was obviously going to demand something longer, so I had to get creative and design it in two pieces and stitch it together. This ended up working quite nicely.
I’ll show you the final product first so you can envisage the whole thing…

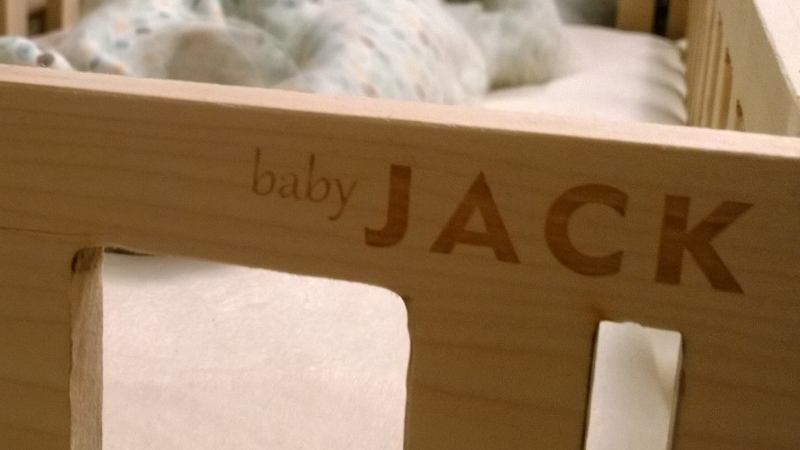
Now, here are the designs I made in CorelDRAW to bring that to life. The laser cutter will translate the red lines as cuts and the black as rasterized etching, so we should end up with a piece cut out that has some personalized, burnt-in images with Jack’s name, the date, and the attribution to daddy.
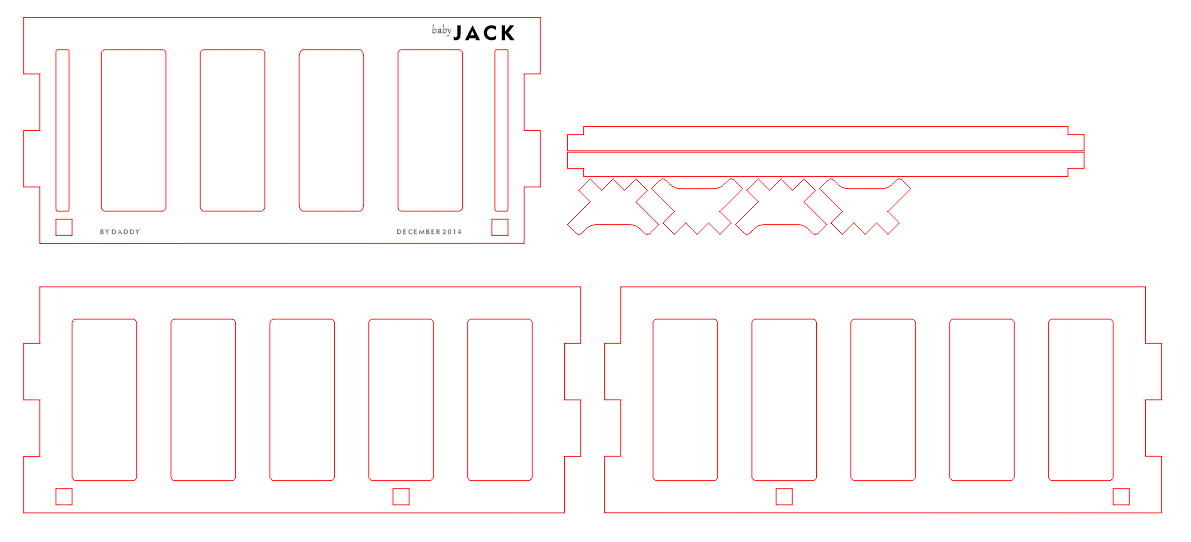
Here’s how it looks when the pieces are all cut out…
So you can see that the corner joints are tabs as are the midway joints. I have also cut small 1/2” square holes in the corners and at two points along the length of the box to allow me to insert some braces. These braces add strength and support a piece of hard board that will form the bed of the unit.
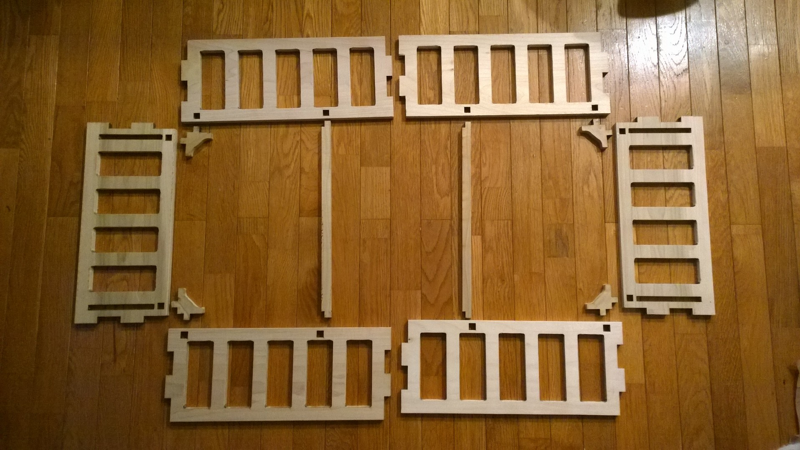
One of the fun things about using a laser cutter is snapping everything together afterword and seeing it fit perfectly every time.
I did not use any metal fasteners in the assembly of this. It is entirely held together with the shape of the components and some basic wood glue.
Here’s the main structure assembled…
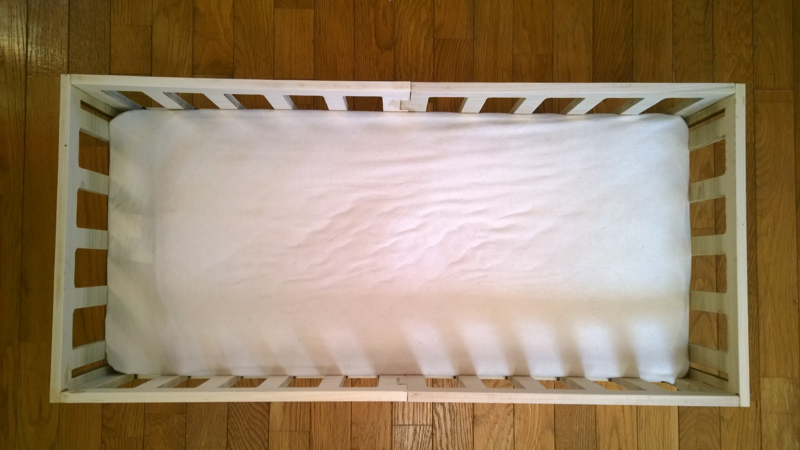
And then with the hard board installed to support the mattress…

And finally with the mattress fitting snuggly (which is important for babies)…
And here’s how the etching turned out…
Overall, I’m happy with the result, but I by no means consider it a perfect work. Here are some of the things I learned…
I should have done a better job of testing the properties of the laser cutter to get to just the right settings. You set the speed and the power of the cuts, and I thought it was best to just turn it up to be sure it was cutting all the way through 1/2” of wood. If the power is up too much, the speed is down too low, or both, then it will cut through the wood, but will leave unnecessarily high levels of soot behind on the cut edges. If you power is too low, the speed is too high, or both then it won’t cut all the way through the wood and you’ll have to use a blade or chisel of some kind to free your design from the raw material - a time consuming endeavor that often times results in broken edges too.
Laser cutters leave burnt edges. If you get those settings right, the edge is dark brown and sort of carmelized - arguably an acceptible finish in most circumstances, though not for a sleeping baby. If edges need to be cleaned, there will be some work involved. Sandpaper clogs quickly. I finally discovered that for accessible edges, a small hand plane works great. For interior edges inaccessible to the plane, a broad cutting bit on a Dremel followed by a sanding bit work fine but amount to quite a bit of work - perhaps an hour of Dremel time for this entire project.

I should have rounded the inner corners more to allow for easier Dremeling
I should have created square holes and braces to mechanically hold the two halves of the unit together. As it is, the two halves are only bonded with glue and I believe it is the weakest point of the project.
We’re happy to have this fun little project done and serving its purpose. And Jack seems to like it, so that’s what matters.
Drop me a comment and let me know what you think of this project, and if it sparked any ideas or questions. Happy making!
Microsoft Exam 70-532 Study Guide
I’m currently studying for Microsoft exam 70-532 - Developing Microsoft Azure Solutions. I do enjoy studying for exams. It’s hard, but it’s an excellent forcing function. I learn bits and pieces here and there now and then about this and that, but when I have an exam schedule for a set date, I have to study! And not only do I put in more hours, but I follow a more systematic approach. In this article, I’m going to share my approach and give you my study guide for exam 70-532 in case you too are studying and this method works for you.
Here’s my strategy…
Visit the official exam page
For 70-532, the page is at https://www.microsoft.com/learning/en-us/exam-70-532.aspx
Click show all under the Skills Measured section and copy the whole thing
Paste it into a OneNote notebook
Format it by breaking all of the skill points out onto separate lines and adding checkboxes
Study each point and check it off when I feel like I understand
Here’s what it ends up looking like when I’m done…
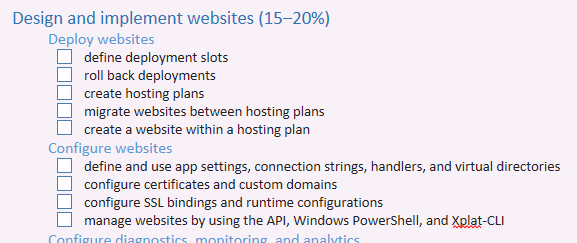
So I start by asking myself if I know what a _deployment slot _is. I don’t. I Bing it and find something like this Staged Deployment on Microsoft Azure Websites article that does an excellent job of defining the term and goes on to discuss the next point roll back deployments as well. So I read up, try it myself, grok the concept, then check the boxes. Simple as that. Notice I said that my study process is simple. The concept aren’t always, but then that’s one of the reasons I like software… it’s complicated!
So attached you’ll find a OneNote notebook that’s yours to keep. Just open it up, start studying, and start checking. And give me a shout on Twitter when you pass the exam! Best of luck!