
Saving Your Code Settings and Snippets
I finally realized why I wasn’t investing a lot of thought or time on my Visual Studio Code snippet library. It’s transient.
I looked up where the user settings are being saved - C:\users\<me>\AppData\Roaming\Code\User.
Well, that’s a bit of a crock. It’s 2016. I want everything saved to my OneDrive folder so I can do a reload without considering the various settings files I’ll have to back up and restore. What, am I a caveman?
I searched VS Code and my registry and didn’t see an obvious (I only have about 2.5 minutes to spend on tasks like this) way to customize the path, so I did what any developer in this modern era would do. I posted a question on StackOverflow.
And in true SO form, I got an answer back very quickly. Well, it wasn’t exactly an answer, but close. DAXaholic responded that there is an extension for VS Code that may fit the bill.
It’s called Visual Studio Code Settings Sync by Shan Khan. You can install it in Visual Studio Code by going to your command palette (CTRL+P) and typing ext install code-settings-sync.
Now, I had to spend a few synapses on this strategy for saving settings. The way Shan set this up it saves your settings, snippets, launch, and keybindings to your GitHub account as gists. Creative, Shan. It’s not exactly the same as having my settings and snippets saved to my OneDrive, but I kinda like it. I do have to manually upload everything, and by manual I only mean that I have to execute the Sync: Update/Upload Settings command in Code. And then when I reload or slide over to a new work machine I have to Sync: Download Settings.
I sort of like, however, storing bits of code in my GitHub Gists repository.
One advantage is that I could easily share my settings with the world. By default, the extension creates the gist as secret. I don’t like secrets though, so I can just edit that gist on gist.github.com and hit the Make Public button.
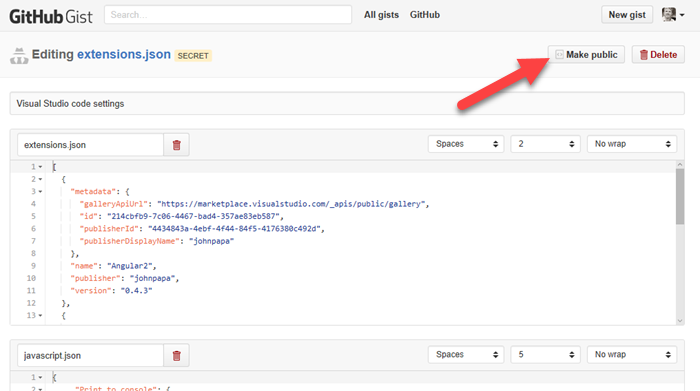
And now I can share the link with you. Very cool. And that’s a live link too so that every time I add an awesome new snippet, you can see it. Now, I just have to remember not to put any secret keys in my settings or snippets :)
Anyway. I thought this was very cool. Kudos to Shan Khan on the cool extension.
Happy coding.
The Most Basic Way to Access GPIO on a Raspberry Pi
I’ve been hacking on the Raspberry Pi of late and wanted to share out some of the more interesting learnings.
I think people that love technology love understanding how things work. When I was a kid I took apart the family phone because I was compelled to see what was inside that made it tick. My brother didn’t care. If it made phone calls, he was fine with it. I had to understand.
Likewise, I knew that I could use a Node library and change the GPIO pin levels on my Raspberry Pi, but I wanted to understand how that worked.
In case you’re not familiar, GPIO stands for General Purpose Input/Output and is the feature of modern IoT boards that allows us to controls things like lights and read data from sensors. It’s a bank of pins that you can raise high (usually to something like 3.3V) or low (0V) to cause some electronic behavior to occur.
On an Intel Edison (another awesome IoT board), the platform developers decided to provide a C library with mappings to Node and Python. On the default Edison image, they provided a global node module that a developer could include in his project to access pins. The module, by the way, is called libmraa.
On a Raspberry Pi, it works differently. Instead of a code library, a Pi running Raspbian uses the Linux file system.
When you’re sitting at the terminal of your pi (either hooked up to a monitor and keyboard or ssh’ed in), try…
cd /sys/class/gpio |
You’ll be taken to the base of the file system that they chose to give us for accessing GPIO.
The first thing to note is that this area is restricted to the root user. Bummer? Not quite. There’s a way around it.
The system has a function called exporting and unexporting. Yes, I know that unexport is not a real word, but alas I’m not the one that made this stuff up, and besides, who said Linux commands had to make sense?
To access a pin, you have to first export that pin. To later disallow access to that pin, you unexport it.
I had a hard time finding good documentation on this, but then I stumbled upon this znix.com page that describes it quite well. By the way, this page references “the kernel documentation,” but when I hit that link here’s what I get…

Oh well.
Now keep in mind that to follow these instructions you have to be root. You cannot simply sudo these commands. There is an alternative called gpio-admin that I’ll talk about in a second. If you want to just become root to do it this way, you do…
su root |
If you get an error when you do that, you may need to first set a password for root using sudo passwd.
To export then, you do this…
echo <pin number> > /sys/class/gpio/export |
And the pin number is the pin name - not the header number. So pin GPIO4 is on pin 7 on an RP2, and to export this you use the number 4.
When you do that, a virtual directory is created inside of /sys/class/gpio called gpio4, and that directory contains virtual files such as direction, value, edge, and active_low. These files don’t act like normal files, by the way. When you change the text inside one of these files, it actually does something - like perhaps the voltage level on a GPIO pin changes. Likewise, if a hardware sensor causes the voltage level on a pin to change, the content of one of these virtual files is going to change. So this becomes the means by which we communicate in both directions with our GPIO pins.
The easiest way, then, to read the value of the /sys/class/gpio/gpio4/value file is…
cat /sys/class/gpio/gpio4/value |
Easy.
To write to the same file, you have to first make sure that it’s an out pin. That is, you have to make sure the pin is configured as an output pin. To do that, you change the virtual direction file. Like this…
echo out > /sys/class/gpio/gpio17/direction |
That’s a fancy (and quick) way to edit the contents of the file to have a new value of “out”. You could just use vi or nano to edit the file, but using echo and the direction operator (>) is quicker.
Once you have configured your pin as an output, you can change the value using…
echo 0 > /sys/class/gpio/gpio4/value //set the pin low (0V) |
Now that I’ve described the setting of the direction and the value, you should know that there’s a shortcut for doing both of those in one motion…
echo high > /sys/class/gpio/gpio4/direction |
There’s more you can do including edge control and logic inversion, but I’m going to keep this post simple and let you read about that on the znix.com page.
Now, although it’s fun and satisfying to understand how this is implemented, and it might be fun to manipulate the pins using this method, you’ll most likely want to use a language library to control your pins in your app. Just know that the Python and Node libraries that change value are actually just wrappers around these file system calls.
For instance, let’s take a look at the pi-gpio.js file in the pi-gpio module…
write: function(pinNumber, value, callback) { |
When you call the write() method in this library, it’s just calling the file system.
So there you have it. I hope you feel a little smarter.
Easy and Offline Connection to your Raspberry Pi
Getting a Raspberry Pi online is really easy if you have an HDMI monitor, keyboard, and mouse.
Subsequently getting an SSH connection to your pi is easy if you have a home router with internet access that you’re both (your PC and your pi) connected to.
But let’s say you’re on an airplane and you pull your Raspberry Pi out of its box and you want to get set up. We call that provisioning. How would you do that?
I’ll propose my method.
First, you need to plug your pi into your PC using an ethernet cable. If you’re a technologist of old like I am, you may be rummaging through your stash for a crossover cable at this point. It turns out that’s not necessary though. I was pretty interested to discover that modern networking hardware has auto-detection that is able to determine that you have a network adapter plugged directly into another network adapter and crosses it over for you. This means I only have to carry one ethernet cable in my go bag. Nice.
If you put a new OS image on your pi and boot it up, it already detects and supports the ethernet NIC, so it should get connected and get an IP automatically.
Here comes the seemingly difficult part. How do you determine what the IP address of your pi is if you don’t have a screen?
The great thing is that the pi will tell you if you know how to listen.
The means by which you listen is called mDNS. mDNS (Multicast DNS) resolves host names to IP addresses within small networks that do not have a local name server. You may also hear mDNS called zero configuration and Apple implemented it and felt compelled (as they tend to) to rename it - they call it Bonjour.
This service is included by default on the Raspberry Pi’s base build of Raspbian, and what it means is that out of the box, the pi is broadcasting its IP address.
To access it, however, you also need mDNS installed on your system. The easiest way I am aware of to do this is to download and install Apple’s Bonjour Print Services for Windows. I’m not certain, but I believe if you have a Mac this service is already there.
Once you have mDNS capability, you simply…
ping raspberrypi.local -4 |
The name raspberrypi is there because that’s the default hostname of a Raspberry Pi. I like to change the hostname of my devices so I can distinguish one from another, but out of the box, your pi will be called raspberrypi. The .local is there because that’s the way mDNS works. And finally, the -4 is an argument that specifically requests the IPv4 address.
If everything works as expected you’ll see something like…
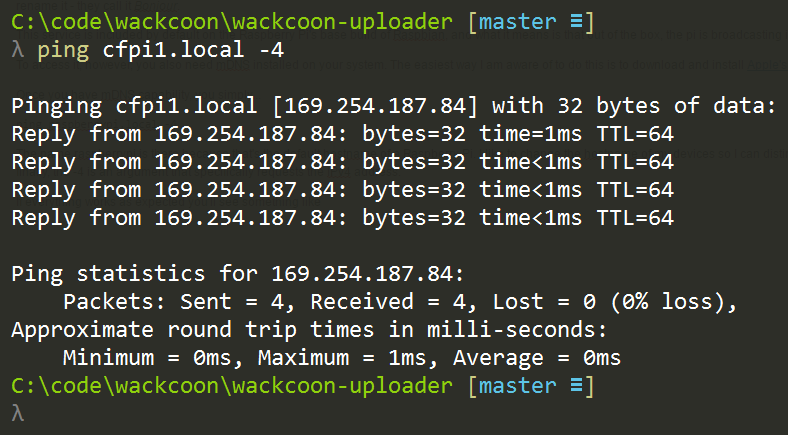
Again, my pi has been renamed to cfpi1, but yours should be called raspberrypi if it’s new.
My system uses 192.168.1.X addresses for my wireless adapter and 169.254.X.X for my ethernet adapter.
So that’s the information I needed. I can now SSH to the device using…
ssh pi@169.254.187.84 |
I could just use ssh pi@raspberrypi.local to remote to it, but I’ve found that continuing to force this local name resolution comes with a little time cost, so it’s sometimes significantly faster to hit the IP address directly. I only use the mDNS to discover the IP and then I use the IP after that.
Provisioning a Raspberry Pi usually includes a number of system configuration steps too. You need to connect it to wireless, set the locale and keyboard language, and maybe turn on services like the camera. If you’re used to doing this through the Raspbian Configuration in XWindows, fear not. You can also do this from the command line using…
sudo raspi-configuration |
Most everything you need is in there.
You may also be wanting to tell your pi about your wifi router so it’s able to connect to via wireless the next time you boot up. For that, check out my post at codefoster.com/pi-wifi. Actually, if you’re playing a lot with the Raspberry Pi, you might want to visit codefoster.com/pi and see all of the posts I’ve written on the device.
Happy hacking!
Accidental Old Version of Node on the Raspberry Pi
I beat my head against a wall for a long time wondering why I wasn’t able to do basic GPIO on a Raspberry Pi using Node. Even after a fresh image and install, I was getting cryptic node error messages when I ran my basic blinky app.
Lucky for me (and perhaps you) I got to the bottom of it and am going to document it here for posterity. Let’s go.
The head beating happened at a hackathon I recently attended with some colleagues.
The task was simple - turn on an LED. It’s so simple that it’s become the “hello world” app of the IoT world. There’s zero reason in the world why this task should take more than 10 minutes. And yet I was stumped.
After a fresh image of Raspbian, an install of NVM, and then a subsequent installation of Node.js 6.2.2, I wrote a blink app using a variety of modules. I used pi-gpio, rpi-gpio, onoff, and finally johnny-five and the raspi-io driver.
None of these strategies were successful. Ugh. Node worked fine, but any of the libraries that accessed the GPIO were failing.
I was getting an obscure error about an undefined symbol: node_module_register. No amount of searching was bringing me any help until I found this GitHub issue where nodesocket (thanks, nodesocket!) mentioned that he had the same issue and it was caused by an NVM install of Node and an accidental, residual version of node still living in /usr/local/bin. In fact, that was exactly what was happening for me. It was a subtle issue. Running node -v returned my v6.2.2. Running which node returned my NVM version. But somewhere in the build process of the GPIO modules, the old version (v0.10) of node from the /usr/local/bin folder was being used.
There are two resolutions to this problem. You can kill the old version of node by deleting the linked file using sudo rm /usr/local/bin/node and then create a new one pointing to your NVM node. I decided, however, to deactive NVM…
nvm deactivate |
…and then follow these instructions (from here) to install a single version node…
wget http://nodejs.org/dist/v6.2.2/node-v6.2.2-linux-armv7l.tar.xz`` # Copied link |
I like using NVM on my dev machine, but it’s logical and simpler to use a single, static version of Node on the pi itself.
EDIT (2016-12-14): Since writing this, I discovered the awesomeness of nvs. Check it out for yourself.
And that did it. I had blinky working in under 3 minutes and considering I get quite obsessive about unresolved issues like this, I had a massive weight lifted.
BTW, through this process I also learned about how the GPIO works at the lowest level on the pi, and I blogged about that at codefoster.com/pi-basicgpio.
Wifi on the Command Line on a Raspberry Pi
I hate hooking a monitor up to my Raspberry Pi. It feels wrong. It feels like I should be able to do everything from the command line, and the fact is I can.
If you’re pulling your Raspberry Pi out of the box and are interested in bootstrapping without a monitor, check out my other post on Easy and Offline Connection to your Raspberry Pi.
Afterward, you may want to set up your wifi access - that is, you want to tell your pi about the wireless access points at your home, your coffee shop, or whatever.
Doing that from the command line is pretty easy, so this will be short.
You’re going to be using a utility on Raspbian called wpa_cli. This handles wireless configuration and writes its configuration into /etc/wpa_supplicant/wpa_supplicant.conf. You could even just edit that file directly, but now we’re talking crazy talk. Actually, I do that sometimes, but whatever.
First, run…
wpa_cli status |
…to see what the current status is. If you get Failed to connect to non-global ctrl_ifname: (null) error: No such file or directory, that’s just a ridiculously cryptic error message that means you don’t have a wifi dongle. Why they couldn’t just say “you don’t have a wifi dongle” I don’t know, but whatever.
If you do have a wifi dongle, you’ll instead see something like…
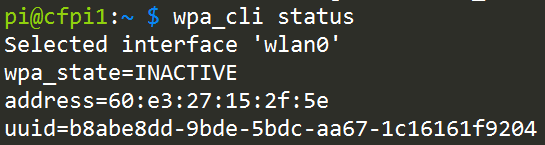
Yay! You have a wireless adapter, which means you likely have a wifi dongle plugged into a USB port. It says here that the current state is INACTIVE. That’s because you’re not connected to any access points.
To do so, you need to run scan, but at this point, you may want to enter the wpa_cli interactive mode. That means that you don’t have to keep prefixing your commands with wpa_cli, but can instead just type the commands. To enter interactive mode, just do…
wpa_cli |
To get out at any time just type quit <enter>.
Now do a scan using…
scan |
It’s funny, because it appears that nothing happened, but it did. Use…
scan_results |
…to see what it found.
This scanning step is not necessary, by the way, there’s a good chance you already know the name (SSID) of your access point, and in that case you don’t need to do this.
Next you create a new network using…
add_network |
You’ll get an integer in return. If it’s your first network, you’ll get a 0. That’s the ID of the new network you just created, and you’ll use it on these subsequent commands.
To configure your network do this…
set_network 0 ssid "mynetwork" |
Something I read online said that as soon as you enter this, it would start connecting, but I had to also do this to get it to connect…
select_network 0 |
Now there’s one more thing. If you’re like me, you don’t just connect to a single AP. I connect from home, my mifi, my local coffee shop, from work, etc. I want my pi to be able to connect from any and all of those networks.
Adding more networks is as easy as following the instructions above multiple times, but you want to set one more network property - the priority. The priority property takes an integer value and higher numbers are higher priority. That means that if I have network1 (priority 1) and network2 (priority 2), and when my pi boots it sees both of those networks, it’s going to choose to connect to network2 first because it has the higher priority.
Okay, that does it.
If you want to see everything I’ve written about the Raspberry Pi, check out codefoster.com/pi
Index of my Raspberry Pi Posts
I’ve been doing a lot of hacking on the Raspberry Pi, and I’ve written a few articles on the topic. I’ve assembled all of my posts here for easy access.
- Accidental Old Version of Node on the Raspberry Pi - I beat my head against a wall for a long time wondering why I wasn’t able to do basic GPIO on a Raspberry Pi using Node. Even after a fresh image and install, I was getting cryptic node error messages when I ran my basic blinky app.Lucky for me (and perhaps you) I got to the bottom of it and am going to document it here for posterity.
- The Most Basic Way to Access GPIO on a Raspberry Pi - I’m always looking for the lowest level understanding, because I hate not knowing how things work. On a Raspberry Pi, I’m able to write a Node app that changes GPIO, but how does that work? Turns out it’s pretty interesting. I’ll show you.
- Easy and Offline Connection to your Raspberry Pi - Getting a Raspberry Pi online is really easy if you have an HDMI monitor, keyboard, and mouse, but what about if you want to get connected to your Pi while you’re, say, flying on a plane?
- Wifi on the Command Line on a Raspberry Pi - How to configure wireless connections on your Raspberry Pi from the command line.
Deploying TypeScript Projects to Azure from GitHub Using Continuous Deployment
I’m working on a fun project called Waterbug. You can peek or play at github.com/codefoster/waterbug.
Waterbug is an app that collects data as you row on a WaterRower and visualizes it in an Angular 2.0 app.
It’s a fun app because it uses a lot of modern stuff. Modern stuff is usually the fun stuff, and that’s why it’s always nice to be working on a greenfield project.
So, like I mentioned, one of the components of this app uses Angular 2.0. Angular is itself written in TypeScript, and you’re strongly encouraged to write your Angular 2.0 apps using TypeScript. You don’t have to, but at least in my opinion, you’d be crazy not to.
TypeScript is awesome.
TypeScript makes everything more terse, more elegant, and easier to read, and it allows your tooling (Visual Studio Code is my editor of choice) to reason about your code and thus help you out immensely.
The important thing to remember about TypeScript and the reason I think for it’s rapid uptake is that it’s not a different language that compiles to JavaScript. It’s a superset of JavaScript. That means you don’t throw any of your existing work away. You just start sprinkling in TypeScript where it benefits you. If you’re like me though, it won’t be long before you’re addicted to using it everywhere.
When you’re working on a TypeScript project, you write in .ts files and those get transpiled from .ts files to .js files.
Herein lies our first question.
Should we check those .js files (and also the .js.map files that are created by default) into our code repository (GitHub in my case)?
The answer is no.
The .js code is derivative and does not belong in source control. Source control is for source files. The .ts files are our source files in this case.
If you start checking your .js files into source control, you’re inevitably going to end up with .ts files and their associated .js files out of sync. Hair pulling will surely ensue.
I’ve gone one step further and determined that I don’t even want to look at my .js files in my editor.
In Visual Studio Code, I can go to File | Preferences | Workspace Settings, which opens (or creates if necessary) my projects .vscode\settings.json file. Then I can sprinkle in a little magic dust and tell Code that I’m not so concerned with .js and .js.map files and I’d just rather they not show up in my File Explorer pane or in my global search results.
Here’s the magic dust…
{ |
If, however, you don’t check your .js files into GitHub, then when you configure Azure to do continuous deployment from GitHub, it’s not going to pull in any .js files and that’s what your users’ browsers really need to make the site run.
So this is where some people say “Oh, blasted! I’ll just check my .js files in and call it done”.
True that works, but it also incurs technical debt. Don’t do it. It’s not worth it. Stick to your philosophical guns and don’t make choices like this. It may cost a little more up front to figure out the right way, but you’ll be glad later.
So, where and when should the .ts files get transpiled?
The answer is that they should get transpiled in Azure and it should happen each time there’s a deployment.
Now, let’s dig in and figure out how to do this.
If you do a little research, you’ll find that when you wire Azure up to look at GitHub, it does a pull of the code every time you push to the configured branch. Then it runs a default deployment script if you haven’t specified otherwise.
To run some code for each deployment, you simply customize this deployment script. You do that by adding two files to the root of your project: .deployment and deploy.cmd. You could just create these files manually, of course, but it’s better to generate them. That way you have the latest recommended default script and it specifically made for the type of application you’re running.
To generate the default deployment script, you first need to have the Azure Xplat CLI tool installed, which is a breeze. Just do npm install -g azure-cli. If you already have it and haven’t updated it for a while, then run npm up -g azure-cli.
After you have the azure-cli tool, you need to login to your Azure subscription. This is a lot easier than it used to be.
Simply type azure login. That will generate a little code for you and then ask you to go to a website, login, and enter your code. From that point forward, you’re able to access your Azure goodies from your command line. CLI FTW!
Once you get that, just go to the root of your website project (at the command line) and then run…
azure site deploymentscript --node |
This will create the .deployment and deploy.cmd files.
Okay, now we just have to customize the deploy.cmd file a bit.
If your deployment script looks like mine, then there’s a part that looks like this…
:: 3\. Install npm packages |
That script runs npm install to install your npm dependencies. It adds the --production flag to indicate that developer dependencies should be skipped since this is not a dev box - it’s the real deal!
Just after an npm install, you’re ready for the meat of the matter. It’s time to turn all of your .ts files into .js files.
To accomplish this, I added this just after step 3…
:: 4\. Compile TypeScript |
The first line is obviously a comment.
The echo shows what’s going on in the console so you can find it in the log files and such.
The last line calls :ExecuteCmd (which is a function that comes with the default deployment script) and asks it to run TypeScript’s commandline compiler (tsc) using node and pointing it to the deployment target. The deployment target is the /site/wwwroot directory that contains your site. The command explicitly uses the tsc command that’s in the deployment target’s node_modules\typescript\bin folder. That should be there because we have typescript defined as one of the projects dependencies in the package.json. Therefore the npm install from a few lines up should have installed typescript. Another strategy would be to install typescript globally, but I opted for this method.
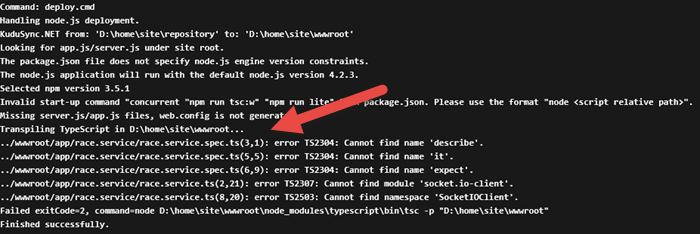
And that’s really all there is to it. I like to jump over to my SCM site (
If you look in the list of deployments in your Azure portal, you can actually double-click on the latest deployment and then click on View Log to see the console output that was captured when this deployment script ran…
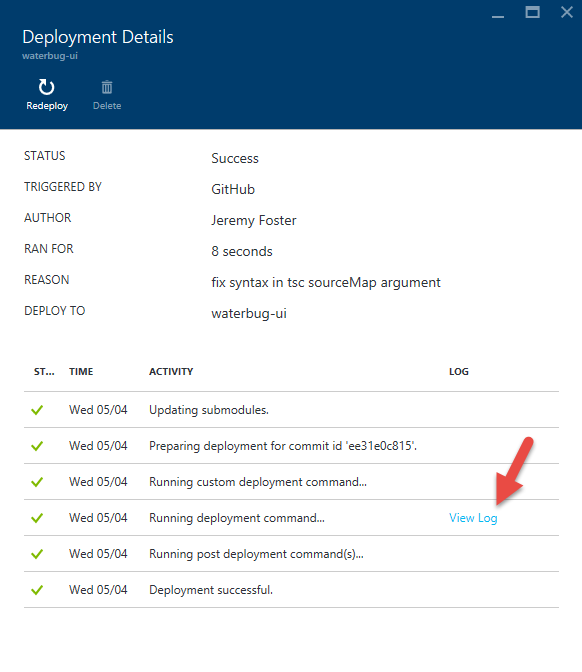
In the log, you can see our echo and that the transpilation process has occurred. Don’t worry about the errors that are thrown. Those are expected and didn’t stop the process from completing.
On the New Mongo Capabilities in DocumentDB
On March 31, 2016 it was announced at //build and also by Stephen Baron via the DocumentDB blog that DocumentDB could now be used as the cloud data store for apps that already target MongoDB.
There’s a good video all about DocumentDB that came out of the recent //build event, and if you jump to 16:20 you’ll hear John Macintyre describe this new offering in good detail.
In this post, I’d like to break down what this means and why I think this is cool beans.
First of all, if you’re itching to get started, just check out how to join the preview program in the aforementioned blog post.
What does this mean in my own words? Keep in mind that my words tend not to contain a lot of technical speak. I have to keep things well organized in my mind if I’m to avoid insanity - an aspect of my personality that I’m hoping works to your when I record my thoughts in video or in this case in HTML.
I’ll start with what this is not. This is not a driver or an adapter. It’s not a package that you install that translates everything you do against Mongo into underlying calls to DocumentDB’s API.
That would be pretty cool, and I’m not certain that it didn’t already exist, but this is not that. The team decided on an approach that was lower level, more performant, and more compatible. They decided to essentially build MongoDB wire-level protocol compatibility into DocumentDB.
This is more performant because it doesn’t rely on any sort of adapter. It’s more compatible because it doesn’t care what tools, libraries, or techniques you use to talk to MongoDB today. Whatever strategy you use will inevitably result in MongoDB protocol compatible messages on the wire, and that’s going to work with DocumentDB.
I’d also like to attempt to position this against the open-source MongoDB code base that currently exists.
Is this Microsoft’s attempt to compete with Mongo? No way.
If anything, this is a recognition of the power and popularity of MongoDB.
DocumentDB’s support of this protocol doesn’t, in fact, do away with the need for MongoDB. DocumentDB is only a cloud service. You can’t install DocumentDB in a mobile app and run it offline. You can do that with MongoDB.
On the contrary, you use DocumentDB and this protocol when you already know MongoDB, but you want the many benefits of hosting your database in the cloud as a managed service - the primary advantages being scale and elasticity.
Take a look at this great article about the similarities and differences between MongoDB and DocumentDB.
This announcement appears to me to capture the strengths of these platforms without being forced to accept the shortcomings of either.
Make Git Wait for Code
There’s a decent chance that you, like me, ended up with Visual Studio Code incorrectly configured as Git’s core editor. I’m talking about Windows here.
Take a look at your .gitconfig file and see what you have configured. You will likely find that in c:\users&lt;username>.
Under the [core] section, look for the editor key. What do you have for a value?
If your Visual Studio Code path ends with code.cmd, then it’s not correct. It should end with code.exe. And it should have a -w flag. The -w flag tells the launching context to block until the process is terminated. That means that if you run a Git command from the command line that launches Code as a text editor, the command line should be blocked until you’re done editing that file and shut down Code.
Let’s say, for instance, that you have committed some files and then realize that you forgot one. You could commit it as a new commit, but it makes more sense to tack the change on to the last commit (assuming you haven’t pushed your commit up to a shared repo yet!).
To do this, you simply run git commit --amend at the command line. This amends your staged files to the last commit. It also launches your default text editor so you can determine if you want to keep the same commit message you elected previously or overwrite it.
This should open your text editor, wait for you to make and save your changes and then shut down your editor before releasing control of the command line and continuing on.
You can simply edit your .gitconfig file to add this configuration, but it’s easier to run this…
git config --global core.editor "'C:\Program Files (x86)\Microsoft VS Code\code.exe' -w"
…from your command line.
Hope this helps you like it did me. Credit goes to F Boucheros on this Stackoverflow post.
Developer Reactions to Build 2016
Microsoft takes opportunity every year at //build - its annual conference for developers - to make as many shock and awe announcements as it can, and this year in 2016, there was plenty of shock and plenty of awe.
Maybe you’ve watched all the keynotes already. Maybe you’ve even watched all of the sessions already. We’re going to assume, however, that even if you have seen or otherwise caught wind of the announcements that you would like to get an answer to the question “What does that mean for me?”
In this post, I’m going to invite a number of colleagues - all Microsoft Technical Evangelists - to share in detail via blog posts and videos about their favorite announcements, and what they mean for you - the developer.
This is an active blog post that will be updated as new content lands, so check back often.
We’ll start with a Channel 9 introduction to a few of the team. In this video you’ll meet…
- Jeremy Foster (myself) @codefoster
- Jerry Nixon @jerrynixon
- Nick Landry @activenick
- Jennifer Marsman @jennifermarsman
- Sam Stokes @socalsam
- Brian Sherwin @bsherwin
Now, as promised, here’s the line-up of content from the evangelists you saw in the video and a few more. Topics will be filled in as we go and links will light up when they’re active.
James Sturtevant @aspenwilder
APRIL 11: My reaction to the news that Bash is on windows, the .NET Foundation gaining new members and what Service Fabric going GA means to developers.
Adam Tuliper @adamtuliper
APRIL 13: Excited to get started developing for the HoloLens – even if you don’t own one yet? Join Adam for a tour of what the HoloLens can do, how to get started with the Unity bits for the HoloLens, and explore some of the powerful APIs to work with the HoloLens!
Shahed Chowdhuri @shahedc
APRIL 15: Do you dream about publishing your own games on a major game console? Get caught up with the latest Xbox news from Build 2016 and hear about the different ways you can publish your very own game on Windows 10 and Xbox One. Use your own Xbox One console for development or apply for a dev kit via ID@Xbox. Harness the power of DirectX 12 and use a variety of tools to build your own games!
Tim Reilly @timmyreilly
APRIL 18: Interested in what a Partner Evangelist pays attention to during build? Sertac Ozercan works with partners to bring their apps to Windows and shares his notes about changes to the store, chase-able tiles, and more.
Sam Stokes @socalsam
APRIL 20: //Build brought new, awesome, stuff for Power BI. Power BI is powerful as is, so just what are the designers changing? In this video I will cover the super cool things that have changed in Power BI to make it an even more powerful tool then it already is. Is BI really open source? How about a no-code app for Apple devices or Android? What if you need everyone who is using your Power BI dashboards? Embedded Power BI, isn’t what you think it is. Watch this video and catch the excitement of Power BI!
Jennifer Marsman @jennifermarsman
APRIL 22: Jennifer Marsman fills you in on the machine learning announcements from Build 2016. We announced the Microsoft Bot Framework and showcased the Microsoft Cognitive Services (formerly Project Oxford) for adding intelligence to your applications. We’ll discuss the fun Project Murphy bot and the inspiring Seeing AI story.
Brian Sherwin @bsherwin
APRIL 25: Coverage of IoT and Office 365 announcements and resources to follow up on.
Nick Landry @activenick
APRIL 26: We are moving from a world of data and apps, to a new exciting world of conversations with personal digital assistants and bots using speech and natural language. Nick Landry provides an introduction to the latest advances in Cortana integration on Windows 10, as well as the brand new Bot Framework, opening up a new realm of possibilities in human-computer interactions.
Jerry Nixon @jerrynixon
APRIL 27: Build 2016 was like Christmas for UWP developers creating Windows apps. As existing features were enriched, several new innovations were unveiled to make developers more productive and apps more valuable with signature Windows experiences and capabilities. In this article, we’ll walk through the Windows announcements – every single one of them – from mapping to proximity, XAML enhancements, the Action center, and implications for cross-platform development.
Sam Stokes @socalsam
APRIL 29: Skype will blow your mind if you just think Skype is only for instant messaging or voice mail. Medical telepresence may save the Affordable Care Act by making medicine more efficient. You as a developer can actually save lives by getting access to HIPAA compliance directly! What about Project Management. If you are developing Project Management tools, this is for you! In this video we will take a look at the excitement of Skype, Skype Bots and how you can generate wealth for you and society. Of everything at //Build 2016, Skype may be the quiet way to success for you!