
Posts tagged with "node"
Deploying TypeScript Projects to Azure from GitHub Using Continuous Deployment
I’m working on a fun project called Waterbug. You can peek or play at github.com/codefoster/waterbug.
Waterbug is an app that collects data as you row on a WaterRower and visualizes it in an Angular 2.0 app.
It’s a fun app because it uses a lot of modern stuff. Modern stuff is usually the fun stuff, and that’s why it’s always nice to be working on a greenfield project.
So, like I mentioned, one of the components of this app uses Angular 2.0. Angular is itself written in TypeScript, and you’re strongly encouraged to write your Angular 2.0 apps using TypeScript. You don’t have to, but at least in my opinion, you’d be crazy not to.
TypeScript is awesome.
TypeScript makes everything more terse, more elegant, and easier to read, and it allows your tooling (Visual Studio Code is my editor of choice) to reason about your code and thus help you out immensely.
The important thing to remember about TypeScript and the reason I think for it’s rapid uptake is that it’s not a different language that compiles to JavaScript. It’s a superset of JavaScript. That means you don’t throw any of your existing work away. You just start sprinkling in TypeScript where it benefits you. If you’re like me though, it won’t be long before you’re addicted to using it everywhere.
When you’re working on a TypeScript project, you write in .ts files and those get transpiled from .ts files to .js files.
Herein lies our first question.
Should we check those .js files (and also the .js.map files that are created by default) into our code repository (GitHub in my case)?
The answer is no.
The .js code is derivative and does not belong in source control. Source control is for source files. The .ts files are our source files in this case.
If you start checking your .js files into source control, you’re inevitably going to end up with .ts files and their associated .js files out of sync. Hair pulling will surely ensue.
I’ve gone one step further and determined that I don’t even want to look at my .js files in my editor.
In Visual Studio Code, I can go to File | Preferences | Workspace Settings, which opens (or creates if necessary) my projects .vscode\settings.json file. Then I can sprinkle in a little magic dust and tell Code that I’m not so concerned with .js and .js.map files and I’d just rather they not show up in my File Explorer pane or in my global search results.
Here’s the magic dust…
{ |
If, however, you don’t check your .js files into GitHub, then when you configure Azure to do continuous deployment from GitHub, it’s not going to pull in any .js files and that’s what your users’ browsers really need to make the site run.
So this is where some people say “Oh, blasted! I’ll just check my .js files in and call it done”.
True that works, but it also incurs technical debt. Don’t do it. It’s not worth it. Stick to your philosophical guns and don’t make choices like this. It may cost a little more up front to figure out the right way, but you’ll be glad later.
So, where and when should the .ts files get transpiled?
The answer is that they should get transpiled in Azure and it should happen each time there’s a deployment.
Now, let’s dig in and figure out how to do this.
If you do a little research, you’ll find that when you wire Azure up to look at GitHub, it does a pull of the code every time you push to the configured branch. Then it runs a default deployment script if you haven’t specified otherwise.
To run some code for each deployment, you simply customize this deployment script. You do that by adding two files to the root of your project: .deployment and deploy.cmd. You could just create these files manually, of course, but it’s better to generate them. That way you have the latest recommended default script and it specifically made for the type of application you’re running.
To generate the default deployment script, you first need to have the Azure Xplat CLI tool installed, which is a breeze. Just do npm install -g azure-cli. If you already have it and haven’t updated it for a while, then run npm up -g azure-cli.
After you have the azure-cli tool, you need to login to your Azure subscription. This is a lot easier than it used to be.
Simply type azure login. That will generate a little code for you and then ask you to go to a website, login, and enter your code. From that point forward, you’re able to access your Azure goodies from your command line. CLI FTW!
Once you get that, just go to the root of your website project (at the command line) and then run…
azure site deploymentscript --node |
This will create the .deployment and deploy.cmd files.
Okay, now we just have to customize the deploy.cmd file a bit.
If your deployment script looks like mine, then there’s a part that looks like this…
:: 3\. Install npm packages |
That script runs npm install to install your npm dependencies. It adds the --production flag to indicate that developer dependencies should be skipped since this is not a dev box - it’s the real deal!
Just after an npm install, you’re ready for the meat of the matter. It’s time to turn all of your .ts files into .js files.
To accomplish this, I added this just after step 3…
:: 4\. Compile TypeScript |
The first line is obviously a comment.
The echo shows what’s going on in the console so you can find it in the log files and such.
The last line calls :ExecuteCmd (which is a function that comes with the default deployment script) and asks it to run TypeScript’s commandline compiler (tsc) using node and pointing it to the deployment target. The deployment target is the /site/wwwroot directory that contains your site. The command explicitly uses the tsc command that’s in the deployment target’s node_modules\typescript\bin folder. That should be there because we have typescript defined as one of the projects dependencies in the package.json. Therefore the npm install from a few lines up should have installed typescript. Another strategy would be to install typescript globally, but I opted for this method.
And that’s really all there is to it. I like to jump over to my SCM site (
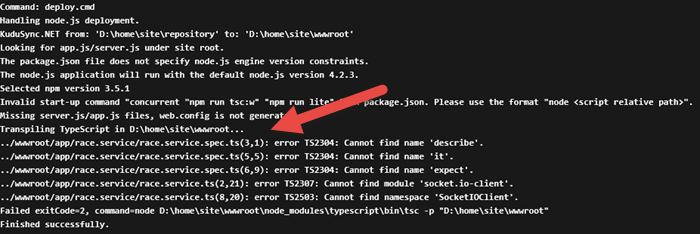
If you look in the list of deployments in your Azure portal, you can actually double-click on the latest deployment and then click on View Log to see the console output that was captured when this deployment script ran…
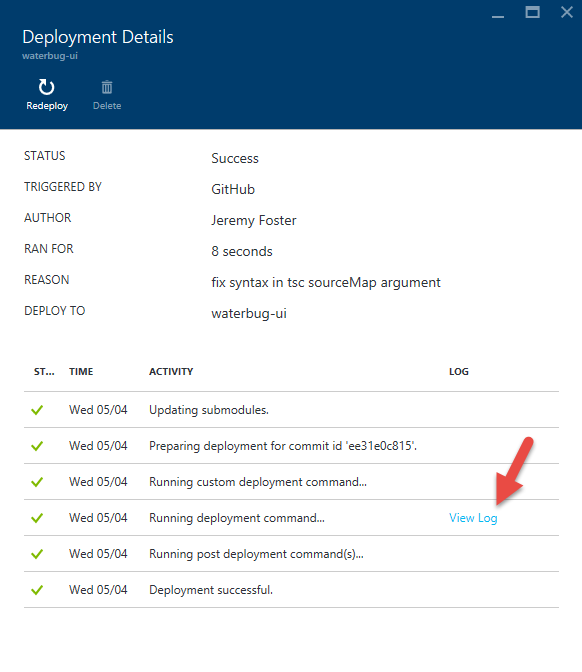
In the log, you can see our echo and that the transpilation process has occurred. Don’t worry about the errors that are thrown. Those are expected and didn’t stop the process from completing.
VS Code Goes Open
Visual Studio Code is now open source.
Me: What do you think of Visual Studio Code?
Some Dude: It’s awesome. I just wish it were open source.
Me: You need to fork it? Tweak it?
Some Dude: No.
Me: Okay.
I get it. I like open source stuff too.
Realistically, there are few products I have time to fork and fewer still that I have need to fork.
But even when I have no need to fork a project and no intention to submit a pull request any time soon, still I want it to be open source. Why? Because… freedom.
I like closed source products too, actually. Closed source products can be sold. Selling products earns a company money. Companies with money can create big research and development departments that can tinker with stuff and make new, cool stuff. And ultimately, I like new cool stuff.
The best scenario for me, a consumer, though, is when a big company with a big research and development department can afford to make something cool and free and open, because they make money on other products.
Some products (think Adobe Photoshop) are obviously a massive mess of proprietary code that feel right to belong to their parent company. They need the first-party control.
Others, like Code feel more like they belong to the community. That’s how I feel anyway.
**And now I can. Visual Studio Code is officially OSS! **
In case you missed it, Microsoft announced at Connect() 2015 that Code was graduating from preview to beta status and that it would be open sourced.
To see Code’s code comfortably settled into its new home, just head over to github.com/microsoft/vscode. From there, you can clone it, fork it, submit an issue, submit a PR… or look at what the team is working on and who else is involved. You know… you can do all of the GitHub stuff with it.
So there it is. It’s not only free as in “free beer” now, but also as in “free speech”.
The actual announcement is buried in the keynote, so the best way to get the skinny on this announcement, the details, and the implications is to watch the Visual Studio Code session hosted on Connect() Day 2 by @chrisrisner. The panel shows off Code in serious depth. It’s a must-see session if you’re into this stuff.
One of the more exciting things they showed off is actually the second gigantic announcement regarding Code… the addition of extensions to the product, but that’s a big topic for another day and another blog post.
What exactly does the open sourcing of Code mean for you? As I mentioned, you may or may not be interested in ever even viewing the source code for Code. The real gold in this announcement is the fact that Code now belongs to the community. It’s ours. It’s something that we’re all working on together. That’s no trivial matter. Microsoft may have kicked it off and may be a huge contributor to it here forward, but so are you and I.
So whether you’re going to modify the code base, study the code base, or just take advantage of the warm feeling that open source software gives us, you know now that the best light-weight code editor for Windows, Linux, and Mac, is ready for you.
Let’s have a quick look at the code for Code using Code. The official repo is at http://github.com/Microsoft/vscode. So start by cloning that into your local projects folder. My local projects folder is c:\code, so I do this…

Then, you launch that project in Code using…

You’ve got it now. So I just added “codefoster” to a readme.md file to simulate a change and then hit CTRL + SHIFT + G to switch to the Git source control section of VS Code, and here’s what I see…
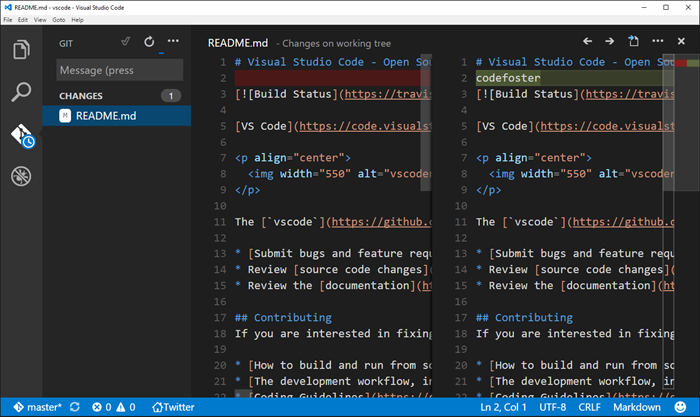
Notice that the changed file is listed on the left and when highlighted the lines that were changed are compared in split panes on the right. Checking this change in would simply involve typing the commit message (above the file list) and then hitting the checkmark.
This interface abstracts away some of the git concepts that tend to intimidate newcomers - things like pushing, pulling, and fetching - with a simpler concept of synchronizing which is accomplished via the circle arrow icon.
It’s important to note that I wouldn’t be able to check this change in here because I don’t have direct access to the VS Code repo. Neither do you most likely. The git workflow for submitting changes to a repo that you don’t have direct access to is called a pull request. I’ll leave the expansion of this topic to other articles online, but in short it’s done by forking the repo, cloning your fork, changing your files, committing and pushing to your fork, and then using github.com to submit a pull request. This is you saying to the original repo owner, “Hey, I made some changes that I think benefit this project. They are in my online repository which I forked from yours. I hereby request you _pull _these changes into the main repository.
It’s quite an easy process for the repo owner and I don’t think a repo owner on earth is opposed to people doing work for them by submitting PR’s. :)
Again, getting involved simply means interacting and collaborating on GitHub. Here’s how…
- Check out the list of issues (there are already over 200 of them as I type this) on microsoft/vscode repo.
- Chime in on the issues by submitting comments.
- Create your own issue. See how.
- Clone the code base using your favorite git tooling or using
git clone https://github.com/microsoft/vscode.giton your command line. That will allow you togit pullanytime you need to get the latest. Having the code means you can browse it whenever you’re wondering how something works. See how. - Fork the code using GitHub if you want to create a copy of the code base in your own GitHub repo. Then you can modify that code base and submit it via a pull request whenever you’re certain you’ve added some value to the project. See how.
And you can chatter about Code as well on Twitter using @Code. As to how they got such an awesome handle on Twitter I have no idea.
Also check out my mini-series I’m calling Tidbits of Code and Node on the Raw Tech blog on Channel 9 where I’ve been talking a lot about Code (and Node) and plan to do even more now that the dial for its awesome factor was turned up a couple of notches.
Happy coding in Code!
The Simplest Node Website
I’ll start with the code…
require('express')().get('/',function(req,res){ |
There it is. The simplest Node.js webserver/website. Three lines of code.
I know I’ve got it a bit mungled together. I’m not recommending this code. Just having fun.
Notice that I’m hanging a () directly off of the require('express'). The require statement returns a function. This is one of the most popular of the Node module patterns. Since it returns a function, hanging parenthesis off of it executes the function.
The execution of the function returns an express app, and the app supports chaining like jQuery or LINQ, so you do a .get() and then a .listen() and those are both methods of an express app.
The .get() creates the root route ('/') and then allows you to provide a function to handle that route. The function does a simple hello world.
The .listen() starts up the engine.
After creating a JavaScript file called app.js with this content in it, just type node app, and you should get zero feedback. But then hit http://localhost:3000 in your browser of choice and you’ll get the reassuring “hello world”.
By the way, if you’re using ES2015, that gets even shorter…
require('express')().get('/',(req,res)=>res.send('hi')).listen(3000);
Command Monkey
Alright, this is going to be fun. The process is going to be fun, and the end game is going to be even more so.
Let me paint a picture of the final product. I have a monkey toy on the table before me. I then hold my Microsoft Band up to my mouth and talk into it like Maxwell Smart. I say two simple words - “Monkey, dance!”
And in no time flat, the monkey toy obeys my command and is set into motion.
The whole thing reminds you of Tweet Monkey and it should. This is Tweet Monkey’s older and slightly more involved brother.
Where Tweet Monkey was a device to cloud scenario, Command Monkey is a Cortana to phone app to cloud to device scenario. Where Tweet Monkey relied on the Twitter Streaming API (which is very cool), Command Monkey involves our very own streaming API using web sockets.
I know it sounds like it’s going to be a lot of code, but it’s really not. You’ll see. Let me just say too that if for some reason you don’t have any interest in going through this step by step, then don’t. Just go grab the code on GitHub, because that’s how we roll.
I’m going to be using the free community version of Visual Studio and the Node.js Tools for Visual Studio. You could obviously use anything beyond an abacus to generate ASCII, so let’s not get opinionated here. Use what you love. It should go without saying that you’ll need Node.js installed to make this work. That can be found at nodejs.org.
I’m going to host my Node.js project in Azure and in fact, I’m going to get it there in a rather cool way. I’m going to use the cross platform CLI for Azure to create the site and then I’ll use git deployment to publish the app.
The architecture diagram is going to look something like this…
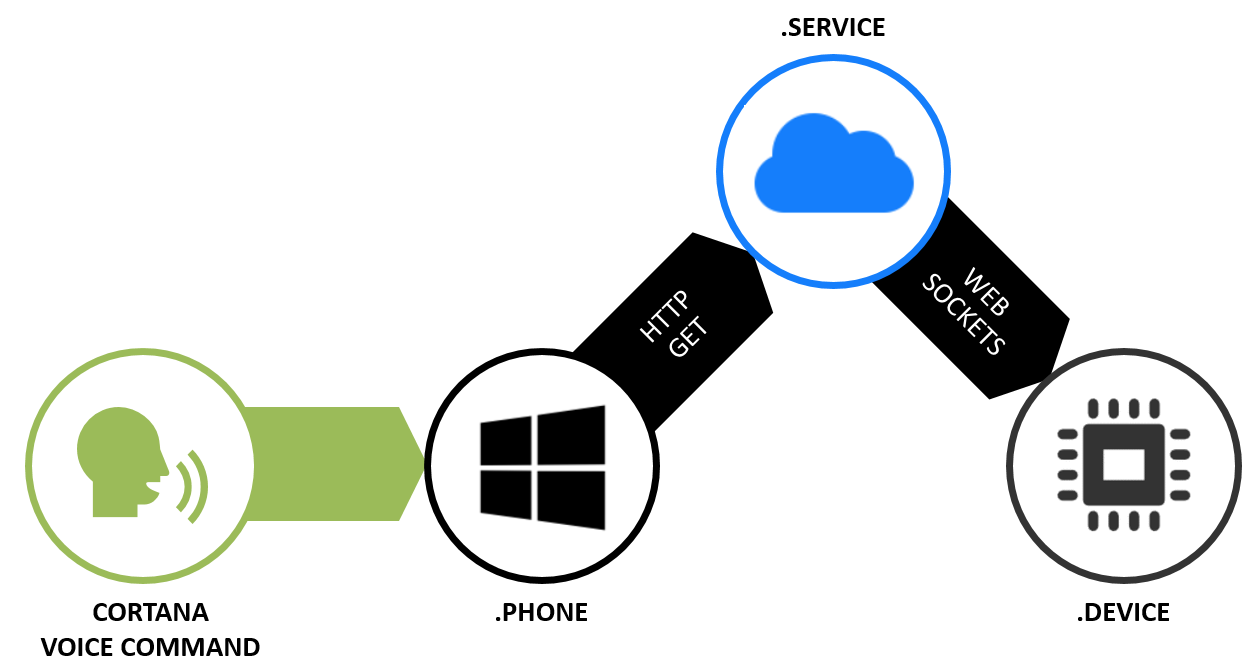
The part about speaking the command into a Microsoft Band just looks like special sauce, but you get that for free with a Band. The Band already knows how to talk to Cortana on your phone.
You will need to teach Cortana to talk to you app, so let’s do that first. Let’s build a Windows Phone app.
Building the Phone App
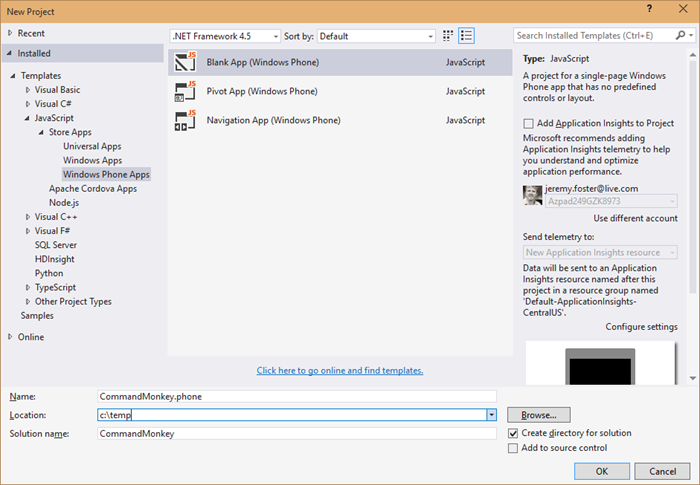
In Visual Studio, hit File | New | Project and create a blank Windows Phone App using JavaScript called CommandMonkey.phone. Call the solution just CommandMonkey. Like this…
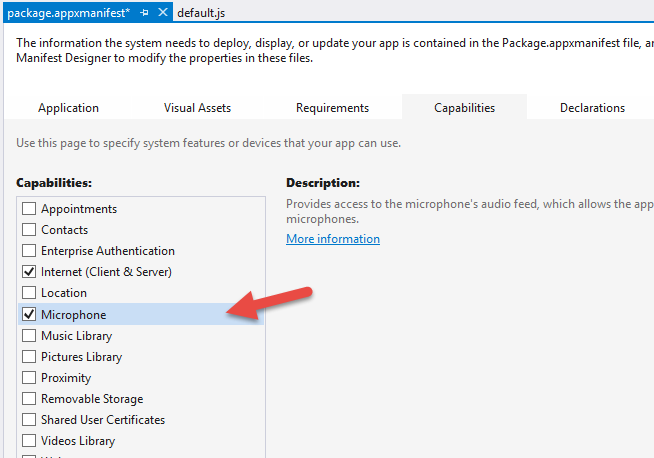
In order to customize Cortana, we need to define a voice command and that requires the Microphone capability. To add that, double click on your package.appxmanifest, go to the Capabilities tab, and check Microphone…
Now we need to create a Voice Command Definition (VCD) file. This file defines to Cortana how to handle the launching of our app when the user talks to her. Here’s what you should use…
|
The interesting bits are lines 6 and 9-14. The combination of the prefix with the command name means that we’ll be able to say “Monkey dance” and Cortana will understand that she should invoke the Command Monkey app and use “dance” for the command.
You’ll notice that I have a second command in the phrase list for the command - chatter. I don’t currently have a mechanical monkey capable of both dancing and chattering, but you can imagine a device capable of doing more than one action and so the capability is already stubbed out.
Next we need to register this VCD file in our phone app. When we do this and then install the app on a phone, Cortana will then have awareness of the voice capabilities of this app. She’ll even show it to the user when they ask Cortana “What can I say?” To do that, open the js/default.js file and add this to the beginning of the onactivated function…
var sf = Windows.Storage.StorageFile; |
And there’s one more step to completing the Cortana integration. We need to actually do something when our application is invoked using this voice command.
Still in the default.js, add this after the if statement that is looking for the activation.ActivationKind.launch
else if (args.detail.kind === activation.ActivationKind.voiceCommand) { |
Now let’s talk about what that does.
The if statement we hung that else if off of is checking to see just how the app was launched. If the user clicked the tile on the start screen, then the value will be activation.ActivationKind.launch. But if they activated it using Cortana then the value will be activation.ActivationKind.voiceCommand, so this is simply how we handle that case.
The way we handle it is to access the parsed semantic using the event argument and then to send whatever command the user spoke to the CommandMonkey.azurewebsites.net website.
How did that website get created you might ask? I’m glad you did, because we’ll look at that next. As for the phone project, that’s it. We’re done. It’s not fancy, and in fact if you run it, you’ll see the default “Content goes here” on a black screen, but remember, we’re keeping this simple.
Building the Node.js Web Service
Visual Studio is able to hold multiple projects in a single solution. So far we have a single solution (called CommandMonkey) with a Windows Phone project (called CommandMonkey.phone).
Now we’re adding the web service.
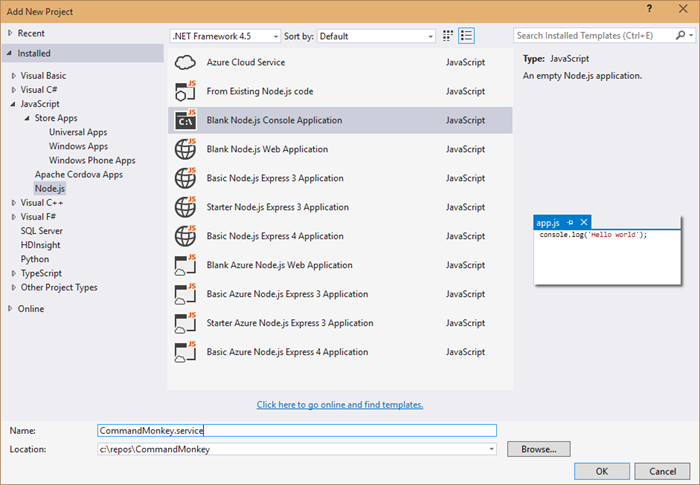
Find the solution node in Visual Studio’s Solution Explorer and right click on it and choose Add | New Project…
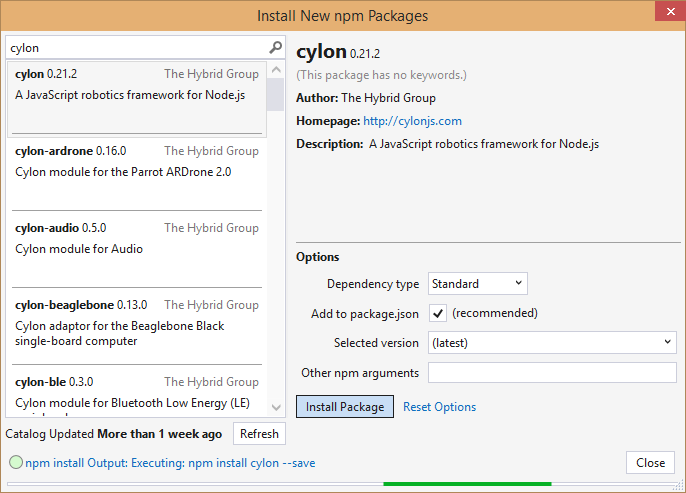
Now install the express and socket.io Node modules. You can either do it the graphical way or the command line way.
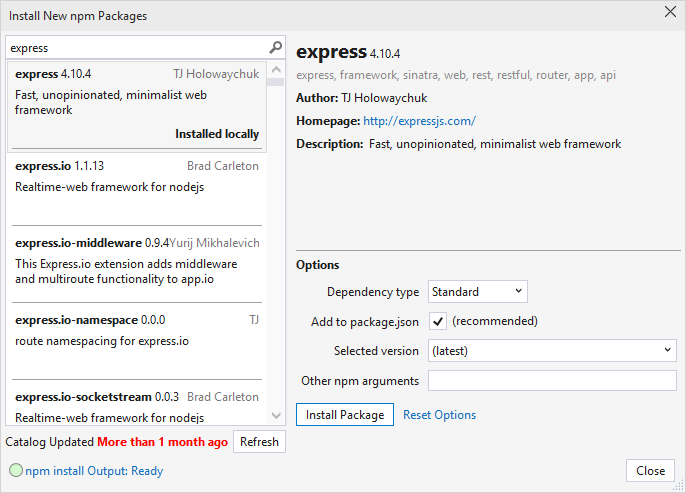
The graphical way is to right click on npm in the .service project and choose Install New npm Packages… Then search for and install express and socket.io. For each leave the Add to package.json checked so they’ll be a part of your project’s package.json.
Now the command line way. Navigate to the root of this project at a command line or in PowerShell and enter npm install express socket.io --save
Now open up the app.js and paste this in…
var http = require('http'); |
This is not a lot of code for what it’s doing. This is…
- creating a web server
- setting up web sockets using socket.io
- setting up a handler for when clients call the ‘setTarget’ event
- defining a route to /api/command which calls the “target” client with the specified command
That’s what I love about JavaScript and Node.js. The code is short enough to really be able to see the essence of what’s going on.
Okay, the service is done, but it’s still local. We need to get this published.
We’re going to use Azure Websites feature called git deployment.
There’s something interesting about our project though. The git repository would exist at the solution level and include all of our code, but the folder that contains the Node.js project that we actually want published to Azure is in a subdirectory called CommandMonkey.service. So we need to create a “deployment file”. To do that just create a file at the root of the project called .deployment and use this as the contents…
[config] |
And in typical fashion, we’re going to have a few files that we have no interest in checking in to source control, so make yourself a .gitignore file (again at the root of the CommandMonkey solution) and use this as the content…
node_modules |
Now git commit the project using…
git init |
Now you need to create an Azure website. Note, you need to already have your account configured via the Azure xplat-cli in order to do this. I’ll consider that task outside the scope of this article and trust you can find out how to do that with a little internet searching.
azure site create CommandMonkey --git |
And of course, you can’t use CommandMonkey, because I’ve already used that one, but you can come up with your own name.
The --git parameter, by the way, tells the create command to also set up git deployment on the remote website and will also create a git remote in the local repository so that you’ll be able to execute the next line.
To publish the website to azure, just use…
git push azure master |
…and that will push all of your code to a repository in Azure and will then fire off a process to deploy the site for you out of the CommandMonkey.service directory which you specified earlier.
There’s one thing you need to do in the Azure portal to make this work. If anyone knows how to do this from the xplat-cli, be sure to drop me a comment below. I’d love to know. You need to turn on web sockets. Just go to your website in the portal, go to the configuration tab, and find the option to turn on web sockets. Easy.
Whew, done with that. Not so hard. Now it’s time to write the Node.js app that’s going to represent the device.
Building the Device Code
As is often the case, the device project is the simplest project in the solution. It does, after all, only have one job - listen for socket messages and then turn the relay pin high for a couple seconds. Let’s go.
In Visual Studio, right click on the solution and Add | New Project… and add another blank Node.js app. This time call it CommandMonkey.device…

Using the technique above for installing npm packages, install the socket.io-client npm package.
var cylon = require('cylon'); |
You can see that this code is connecting to our web service in Azure - CommandMonkey.azurewebsites.net.
It also requires and initializes the Cylon library so it can talk to the hardware in an easy, expressive, and modern way.
The Cylon work method is like Cylon’s ready method, and so that’s where we’ll invoke the setTarget event. This socket event request for the server to save this socket as the “target” socket. That just means that when anyone triggers messages on the server, this is the device that’s going to pick them up. You may want to create this as an array and thus allow for multiple devices to be targets, but I’m keeping it simple here.
Finally, it handles the ‘command’ event that the server is going to pass it and simply raises the digital pin for 2 seconds.
To make this work, you need to deploy this project to your device. I use an Intel Edison, but this will work on any SoC (System on a Chip) that will run Linux. I am not going to repeat how to setup the Edison or deploy to it. You can find that in my series of Intel Edison posts indexed at codefoster.com/edison.
Once you get the code deployed to the device, you then run the CommandMonkey.phone project on your phone emulator or on your device. I run mine directly on my device so I can talk to my Microsoft Band.
And that should pretty much do it. If I haven’t made any gross errors in relaying this and you haven’t made any errors typing or pasting it in, then you’re scenario should work like mine. That is… you hold the action button on your Microsoft Band and say…
“Monkey, dance!”
…and a very short time later you get a message with the command on the screen.
I hope you’re mind is awhir like mine is with all the ideas for things you could do with this. We have real time device to device communication going on, and users really get excited when they utter a command and a half a second later something is happening in front of them.
Go. Make.
I recorded a CodeChat episode with my colleague Jason Short (@infinitecodex) about Command Monkey. Here you go…
Using Visual Studio to Write Node for Devices
In previous blog posts, I explained how to setup your Intel Edison and how to start writing code for it. And in case you got here directly, I created a full index of my Edison posts to help you find what you need.
In this post, we’ll take a look at writing code for it using Visual Studio. Visual Studio, once you add the free Node.js Tools for Visual Studio plugin, happens to be pretty great at working with Node.js projects. It runs node behind the scenes, so it offer the following…
- Editing
- Intellisense
- Profiling
- npm
- TypeScript
- Debugging (local, remote, and Azure!)
That’s an impressive list, and we’ll take a look at a few of these features in this post.
Closer to the end of this post, I’ll tell you about my edref project. “edref” stands for Edison Reference project and is intended to get you started quickly with an Intel Edison project in Visual Studio. If you want to skip all the rhetoric and just download the reference project, I’ll understand.
Visual Studio
In case you missed the announcement in November, Visual Studio Community edition is now free. That’s huge. The Community edition is essentially the existing Professional edition, and facilitates a huge array of development scenarios. VS is intuitive, intelligent, and has a lot of Microsoft and community support behind it.
Installing Visual Studio Community 2013
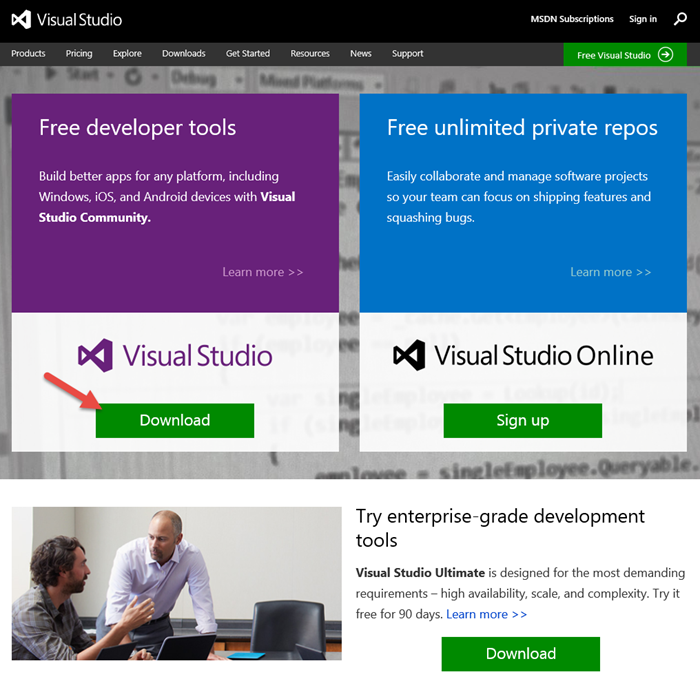
To download Visual Studio, start at visualstudio.com, but know that visualstudio.com sort of has two meanings right now. Visual Studio is the IDE, but it’s also the ALM tools for taking any size projects from conception to completion with any size group of developers. So click the download button under Visual Studio the IDE and (at least at the time of this writing) you’ll get a direct link to the Visual Studio Community 2013 package.
Installation is pretty straight-forward, and I won’t include a screenshot series, but one decision you will have to make is which features of the product to install. Do you want to play with Lightswitch? Windows Phone? Just check the boxes.
The next version of Visual Studio is Visual Studio 2015 and there’s pretty good support for it already (including a working version of the Node.js Tools), so if you want to be a trailblazer at work, go for it.
The Node.js Tools for Visual Studio
Installing the Tools
The Node.js Tools are found at nodejstools.codeplex.com. Go there and click the gigantic, unmistakable DOWNLOAD button. Again, the download is assumedly self-explanatory.
Creating a New Project
Creating a project using Node.js in Visual Studio begins like any other project type - with the File | New Project dialog…
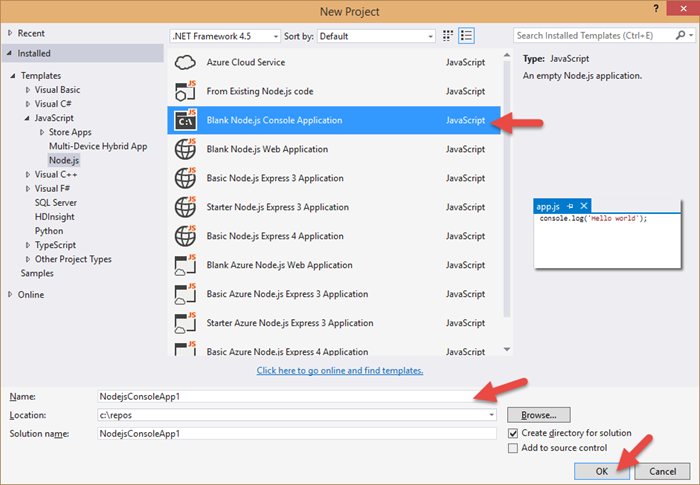
There are a number of projects to choose from. For what we’re dealing with - writing Node.js for devices - the Blank Node.js Console Application will suffice. The rest are web applications for creating node apps on the server.
As per usual, give your project a name and location and OK away.
Now, when Visual Studio finished with our bidding, let’s take a look at what we’ve got…
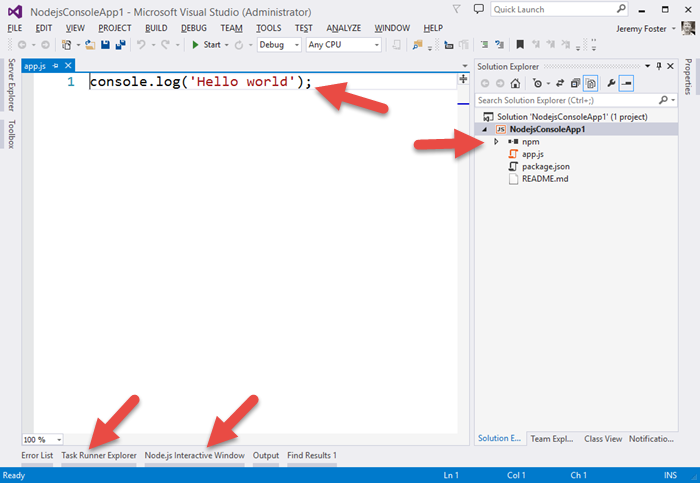
Let me point out a few things.
First of all, perhaps the simplest Hello World app in the world :) Next, notice the npm folder in the project. This is going to give you a graphic way of managing your npm packages. Some people like to do things the graphic way. I personally never use this, but for some people it’s just your kind of thing. It actually works pretty slick too showing you all of your global modules, all of the modules that are installed, and visually differentiating the packages that have been added to your package.json file.
If you begin typing a dependency directly into the package.json, it gives you some Intellisense with an under-the-covers search of the npm repository, and it even helps you with the version…
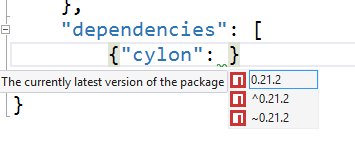
I like that. I never type my dependencies in directly, but if I did, I’d certainly come to rely on it.
You can also use the npm dialog to install packages.
Again, nice, but I still keep a CLI open and execute npm install mypackage --save on my own. And of course, in that case, all of the installed packages are recognized by the tools, so I do enjoy having the visual indication that my package has been installed.
By the way, if you want to create a new Visual Studio Node.js project from an existing Node.js project that you have in your file system (perhaps recently cloned with git?) then check out my post Open an Existing Node.js Project in Visual Studio.
Using gulp for Deployment
We saw in the last post in this series how to wirelessly deploy your code to your device. You can keep doing it that way if you want, but there’s an easier way. Deploying your code is essentially a build task, and that’s what grunt and gulp are for.
NTVS also gives you a little bit of help with grunt and gulp. It’s hilarious that most people still refer to “grunt and gulp” whenever they talk about JavaScript task running frameworks. They do the exact same thing and I don’t imagine to many folks actually use grunt _and _gulp. Rather, most likely use grunt if they have to and gulp if they can. gulp is better hands down. grunt uses JSON files for configuration of tasks and gulp uses JavaScript. So, instead of composing gigantic JSON files to attempt to define what sort of tasks you need to run, you can stay in code and do whatever the heck you want or need. And gulp is supposedly way faster too, although I haven’t done any of my own tests.
Adding some gulp tasks to your app is easy. You just add a gulpfile.js to the project and add the gulp npm module both globally and at the project level.
The edref project has a little bit of gulp built in to deploy your code to your Edison device. Here’s that gulpfile.js content so we can talk about what gulp tasks look like…
/// <vs BeforeBuild='jshint' AfterBuild='deploy' /> |
Notice the actual gulp tasks (where I put the <———— indicators). Those define what tasks are configured to run.
Now this next part I love. Visual Studio looks at the gulpfile.js at these tasks and adds them to a new pane called the Task Runner Explorer…
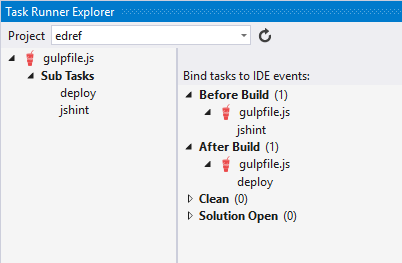
So jshint and deploy under Sub Tasks exist because they are defined in the gulpfile.js code.
Any time you need (or just want), you can right click one of those bad boys and hit Run and just run your tasks ad hoc individually. But also notice that under Before Build I have determined that the gulpfile.js/jshint task should run, and After Build the gulpfile.js/deploy task should run. That means that I can change a line of code, hit CTRL+SHIFT+B to build my project, and know that the targeted Edison (whether it’s on my desk or installed in a wall or gadget absolutely anywhere!) is going to contain the latest version of my project. That’s pretty awesome.
I’m working on another task as we speak that will fire off the node process for that app so your device will not only get its code, but start cranking on it as well.
Remote Debugging
Another scenario unlocked for us using the NTVS tools is debugging - even remote debugging. I’m thrilled about this one.
Note that you can also check out the official documentation for the remote debugging feature of the NTVS tools.
I did a little research online and found that most people working with devices are resorting to the classic console.log method of debugging. When you’re writing Wiring code for an Arduino, for example, you use a serial debug library that allows you to send messages back to the console in your Arduino IDE. You can then add something like…
Serial.println("Made it here!");
This reminds me of JavaScript development circa 1999 and by no means turns my crank.
What does turn my crank is running my project, perhaps watching a couple thing happen on my gadget, then hitting a breakpoint in my code in Visual Studio and being able to hover over any variables to see what their value is and hit F5 to continue. That’s an awesome dev scenario!
Here’s how to do it.
Write or open a Node.js project targeting your device.
You can clone http://github.com/codefoster/tweetmonkey if you’re looking for inspiration. You can see more about my good friend TweetMonkey at codefoster.com/tweetmonkey, but in short, he taps into Twitter’s streaming API and waits for tweets with the hashtag #tweetmonkey. When he see’s one, he comes to life, nods his head, squeaks, and clangs his symbols. My 3 year old loves it :)
Make sure you have a RemoteDebug.js deployed to your device
I like to include the RemoteDebug.js file in my project and check it into source so it’s ready to go for anyone that clones the project.
If you have the NTVS tools installed, you have this file. To see where it is, go to Tools | Node.js Tools | Remote Debugging Proxy | Open Containing Folder. Copy that file to your project or deploy it directly to your device. By the way, the gulp task that I include with the edref project (see later) copies all .js files, so if you put the RemoteDebug.js file in your project, it will get deployed automatically.
Execute your node app
You normally execute your app by remoting to your device (using something like ssh root@mydevice.local), changing to your project folder, and then executing the line…
node app.js
For remote debugging, you do it like this…
node RemoteDebug.js app.js
…and you should get some feedback like…
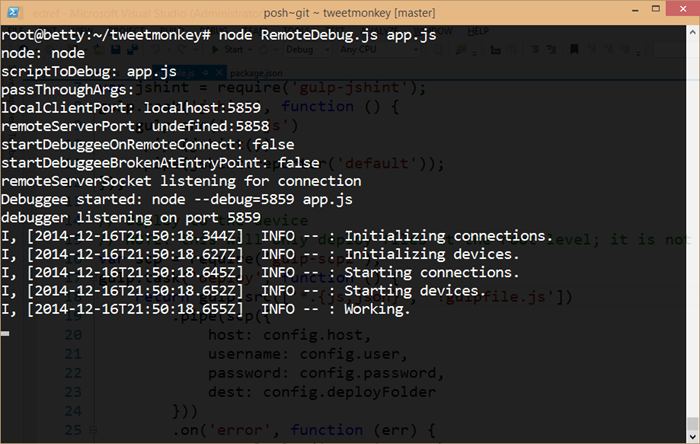
So you can see that the RemoteDebug.js file is launching a proxy for us using port 5858. And it introduces a term that was new to me - debuggee. I think I like it.
With that going, we’re ready for the next step.
Attach to Process from Visual Studio
In Visual Studio, go to the Debug menu and Attach to Process… and change the Transport to Node.js remote debugging.
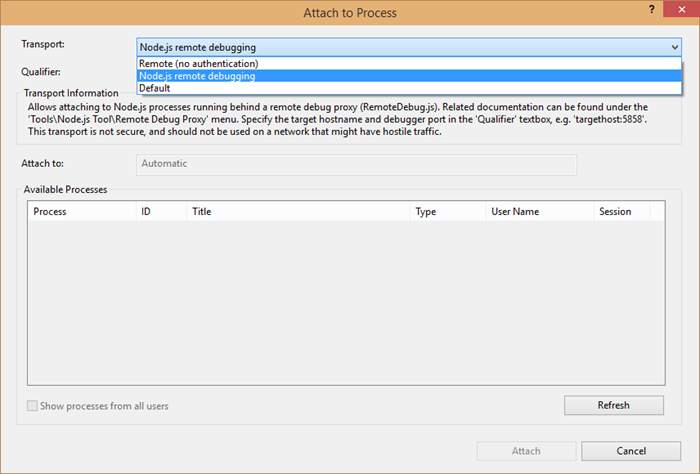
Now, in the Qualifier field, enter tcp://devicename.local:5858 and check the Show processes from all users box. You should see your node process appear in the Available Processes.
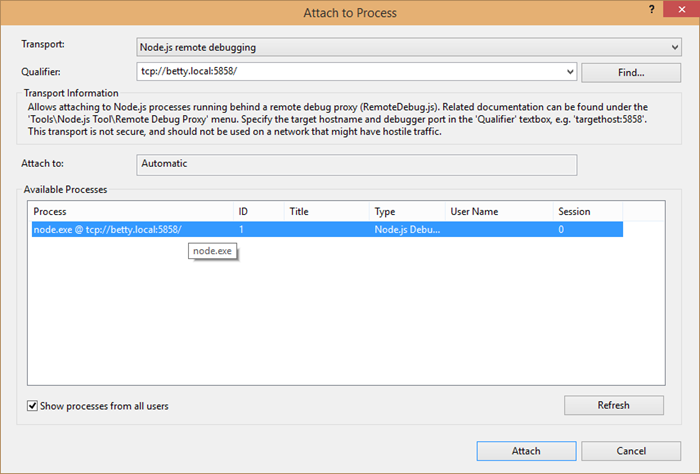
Attach.
Now set a breakpoint.
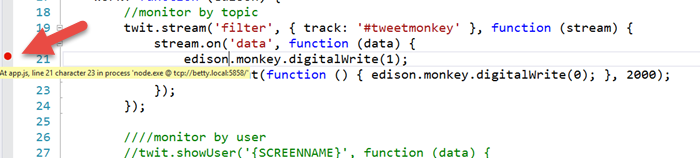
And in the case of the app we’re working with here (tweetmonkey), send a tweet to hashtag #tweetmonkey and you should break at your breakpoint. As the French say, “Formidable!”
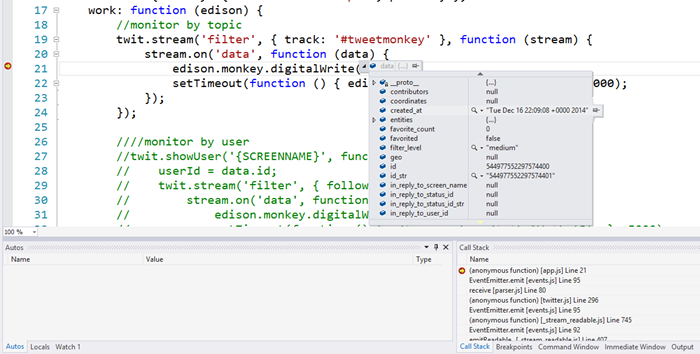
And, of course, in typical VS fashion, while broken, you can hover over JavaScript objects and check out all of their property values.
And you can open QuickWatch and enter any dynamic expressions you want and browse the results.
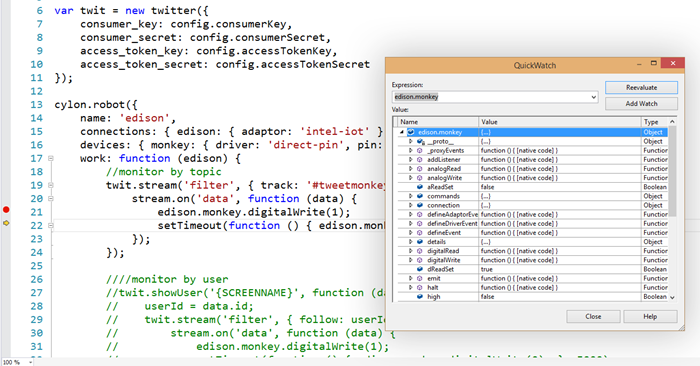
So, now you’re cruising!
The edref Project
There’s one last thing that I said I’d talk about, and that’s my edref project. There are a few things to do to set up a good, working Node.js environment in Visual Studio that will get you the kind of rich development environment I’ve lined out. It’s not a lot, but there’s not sense in doing it from scratch every time, so I’ve created a project called edref on GitHub that you can clone and get started right away. Feel free to fork and issue pull requests if you have ideas for how to improve it. I personally use this project for starting new hardware hacks, so when I find more efficient ways to do something, I’ll update the GitHub project.
The one thing I’d like to point out about the project is that the gulpfile.js is all set up to deploy your project to a remote device. You just have to fill out the config.js file with your particulars.
Conclusion
You should have what you need to not only write code for your Intel Edison, but write it in Visual Studio style! If you have any questions about this, please let me know in the comments. Consider this a living blog post still in that I’ll add edits here as I learn more about this fun device.
Happy hardware hacking!